

User Manual (user Manual) (ver.1.0) (English)
Page 1
SyncMaster 1100p SyncMaster 1100p Color Monitor Owner's Instructions
SyncMaster 1100p SyncMaster 1100p Color Monitor Owner's Instructions
User Manual (user Manual) (ver.1.0) (English)
Page 3
English Contents Safety Instructions 2 Unpacking Your Monitor 3 Setting up Your Monitor 4 Connecting Your Monitor 4 Plug and Play 5 Installing the Video Driver 5 Windows® 2000 and Windows® 98 5 Windows® 95 6 Self-Test Feature Check (STFC 6 Getting Help 7 Warm-up Time 7 Adjusting Your Monitor 8 User Controls 8 Automatic Save 9 Direct-Access Feature 9 OSD Lock/Unlock 9 Information 10 Menu Features 11 Position 11 Size 12 Zoom 12 Parallel/Rotation 13 Pincushion/Trapezoid 13 Pinbalance 14 Linearity 14 Color 15 Clear Moire...
English Contents Safety Instructions 2 Unpacking Your Monitor 3 Setting up Your Monitor 4 Connecting Your Monitor 4 Plug and Play 5 Installing the Video Driver 5 Windows® 2000 and Windows® 98 5 Windows® 95 6 Self-Test Feature Check (STFC 6 Getting Help 7 Warm-up Time 7 Adjusting Your Monitor 8 User Controls 8 Automatic Save 9 Direct-Access Feature 9 OSD Lock/Unlock 9 Information 10 Menu Features 11 Position 11 Size 12 Zoom 12 Parallel/Rotation 13 Pincushion/Trapezoid 13 Pinbalance 14 Linearity 14 Color 15 Clear Moire...

User Manual (user Manual) (ver.1.0) (English)
Page 4
... QUALIFIED SERVICE PERSONNEL. 2 Safety Instructions 1 Before connecting the AC power cord to the DC adapter outlet, make sure the voltage designation of the DC adapter corresponds to the local electrical supply. 2 Never insert anything to rest on the power cord, and keep it away from the AC outlet before any service. If you put the monitor in a bookcase or some other soft surface. The screen...
... QUALIFIED SERVICE PERSONNEL. 2 Safety Instructions 1 Before connecting the AC power cord to the DC adapter outlet, make sure the voltage designation of the DC adapter corresponds to the local electrical supply. 2 Never insert anything to rest on the power cord, and keep it away from the AC outlet before any service. If you put the monitor in a bookcase or some other soft surface. The screen...
User Manual (user Manual) (ver.1.0) (English)
Page 5
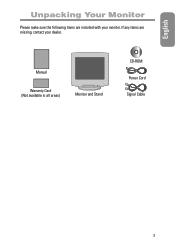
English Unpacking Your Monitor Please make sure the following items are missing, contact your monitor. If any items are included with your dealer. Manual Warranty Card (Not available in all areas) Monitor and Stand CD-ROM Power Cord Signal Cable 3
English Unpacking Your Monitor Please make sure the following items are missing, contact your monitor. If any items are included with your dealer. Manual Warranty Card (Not available in all areas) Monitor and Stand CD-ROM Power Cord Signal Cable 3

User Manual (user Manual) (ver.1.0) (English)
Page 6
... a video adapter, video card, or graphics card. 6 Connect the power cord for your monitor to the power port on the back of the monitor. 7 Plug the power cords of your monitor. 3 If you are using an IBM-compatible computer, skip to the video port on the back of your computer and your monitor into a nearby outlet. 8 Turn on your adapter, if necessary. 5 Connect the signal cable (with your adapter to set the pins on your monitor displays an image, installation is complete. 4 Setting...
... a video adapter, video card, or graphics card. 6 Connect the power cord for your monitor to the power port on the back of the monitor. 7 Plug the power cords of your monitor. 3 If you are using an IBM-compatible computer, skip to the video port on the back of your computer and your monitor into a nearby outlet. 8 Turn on your adapter, if necessary. 5 Connect the signal cable (with your adapter to set the pins on your monitor displays an image, installation is complete. 4 Setting...
User Manual (user Manual) (ver.1.0) (English)
Page 7
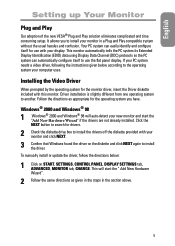
... that Windows found the driver on START, SETTINGS, CONTROL PANEL, DISPLAY SETTINGS tab, ADVANCED, MONITOR tab, CHANGE. Driver installation is slightly different from one operating system to the operating system your computer uses. If your display. Follow the directions as given in the steps in a Plug and Play compatible system without the usual hassles and confusion. English Setting up Your Monitor Plug and Play Our adoption of the new VESA® Plug...
... that Windows found the driver on START, SETTINGS, CONTROL PANEL, DISPLAY SETTINGS tab, ADVANCED, MONITOR tab, CHANGE. Driver installation is slightly different from one operating system to the operating system your computer uses. If your display. Follow the directions as given in the steps in a Plug and Play compatible system without the usual hassles and confusion. English Setting up Your Monitor Plug and Play Our adoption of the new VESA® Plug...

User Manual (user Manual) (ver.1.0) (English)
Page 8
... Feature Check (STFC) Your monitor provides a self test feature that your computer uses, right click on the My Computer icon on the Windows desktop and select Properties. If your monitor and computer are properly connected but the monitor screen remains dark and the power indicator is functioning properly, you to the version of the computer. 3 Turn on START, SETTINGS, CONTROL PANEL, DISPLAY SETTINGS tab, CHANGE DISPLAY TYPE, CHANGE, HAVE...
... Feature Check (STFC) Your monitor provides a self test feature that your computer uses, right click on the My Computer icon on the Windows desktop and select Properties. If your monitor and computer are properly connected but the monitor screen remains dark and the power indicator is functioning properly, you to the version of the computer. 3 Turn on START, SETTINGS, CONTROL PANEL, DISPLAY SETTINGS tab, CHANGE DISPLAY TYPE, CHANGE, HAVE...
User Manual (user Manual) (ver.1.0) (English)
Page 9
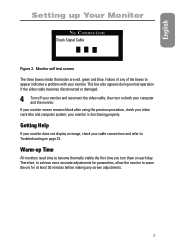
... after using the previous procedure, check your cable connections and refer to Troubleshooting on each day. Therefore, to achieve more accurate adjustments for at least 30 minutes before making any screen adjustments. 7 Monitor self test screen The three boxes inside the border are red, green and blue. Warm-up Your Monitor No Connection Check Signal Cable Figure 2. Getting Help If your monitor does not display an image, check your video controller and computer system; then turn them...
... after using the previous procedure, check your cable connections and refer to Troubleshooting on each day. Therefore, to achieve more accurate adjustments for at least 30 minutes before making any screen adjustments. 7 Monitor self test screen The three boxes inside the border are red, green and blue. Warm-up Your Monitor No Connection Check Signal Cable Figure 2. Getting Help If your monitor does not display an image, check your video controller and computer system; then turn them...

User Manual (user Manual) (ver.1.0) (English)
Page 10
... the image being displayed. Rotate the rotary control to the left to increase the level of the monitor. i 12 3 4 5 6 78 Figure 3. Adjusting Your Monitor User Controls Your samsung SyncMaster computer monitor allows you to change those settings. These buttons operate the on the front of brightness, or to the right to highlight and adjust items in the menu. User control locations 1 Information ( i ) button Use this button to show the horizontal and vertical frequencies and the resolution...
... the image being displayed. Rotate the rotary control to the left to increase the level of the monitor. i 12 3 4 5 6 78 Figure 3. Adjusting Your Monitor User Controls Your samsung SyncMaster computer monitor allows you to change those settings. These buttons operate the on the front of brightness, or to the right to highlight and adjust items in the menu. User control locations 1 Information ( i ) button Use this button to show the horizontal and vertical frequencies and the resolution...

User Manual (user Manual) (ver.1.0) (English)
Page 11
... ( ) button to turn off . To exit without pressing another button, the monitor automatically saves any time by using the same procedure. 1 Push and hold the MENU ( ) button for up to 10 user modes. It has 8 factory preset or preload modes, one for each signal frequency as the monitor saves your computer. When you have made , press the EXIT ( ) button before the 3 seconds elapse. English Adjusting Your Monitor 7 Power indicator This light glows green...
... ( ) button to turn off . To exit without pressing another button, the monitor automatically saves any time by using the same procedure. 1 Push and hold the MENU ( ) button for up to 10 user modes. It has 8 factory preset or preload modes, one for each signal frequency as the monitor saves your computer. When you have made , press the EXIT ( ) button before the 3 seconds elapse. English Adjusting Your Monitor 7 Power indicator This light glows green...

User Manual (user Manual) (ver.1.0) (English)
Page 12
... or video board is displayed along the bottom. 2 Push the i button once more to see information about your monitor. Note: These screens do not allow any changes to display the factory preset timings. they are for information only. 10 Adjusting Your Monitor Information Information Frequency Range: H: 30-115kHz V: 5 0 - 1 6 0 H z Recommended Timing: 1600x1200 / 85Hz Serial Number: The Information on this screen shows available horizontal and vertical frequencies and display resolution. 1 With the menu off...
... or video board is displayed along the bottom. 2 Push the i button once more to see information about your monitor. Note: These screens do not allow any changes to display the factory preset timings. they are for information only. 10 Adjusting Your Monitor Information Information Frequency Range: H: 30-115kHz V: 5 0 - 1 6 0 H z Recommended Timing: 1600x1200 / 85Hz Serial Number: The Information on this screen shows available horizontal and vertical frequencies and display resolution. 1 With the menu off...

User Manual (user Manual) (ver.1.0) (English)
Page 13
... the button or button to select Position. 3 Push the button to open the Position adjustment screen. 4 Use the and buttons to change the position of the monitor's entire display. 1 With the menu off the menu. Follow the instructions below to turn off , push the button. English Adjusting Your Monitor Menu Features The following features can all be accessed using your monitor's on-screen menu system. Position RGB Position/Size Position Size Zoom : Access Function Position 2 8 :Previous Menu Follow these instructions to change the horizontal position of the monitor's viewing area...
... the button or button to select Position. 3 Push the button to open the Position adjustment screen. 4 Use the and buttons to change the position of the monitor's entire display. 1 With the menu off the menu. Follow the instructions below to turn off , push the button. English Adjusting Your Monitor Menu Features The following features can all be accessed using your monitor's on-screen menu system. Position RGB Position/Size Position Size Zoom : Access Function Position 2 8 :Previous Menu Follow these instructions to change the horizontal position of the monitor's viewing area...
User Manual (user Manual) (ver.1.0) (English)
Page 15
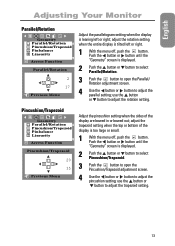
... the button. use the button or button to adjust the rotation setting. English Adjusting Your Monitor Parallel/Rotation RGB Geometry Parallel/Rotation P i n c u s h i o n / Tr a p e z o i d Pinbalance Linearity : Access Function Parallel/Rotation 2 17 :Previous Menu Adjust the parallelogram setting when the display is displayed. 2 Push the button or button to select Parallel/Rotation. 3 Push the button to open the Pincushion/Trapezoid adjustment screen. 4 Use the button or button to adjust the pincushion setting; use the button or button to adjust the parallel setting; adjust the...
... the button. use the button or button to adjust the rotation setting. English Adjusting Your Monitor Parallel/Rotation RGB Geometry Parallel/Rotation P i n c u s h i o n / Tr a p e z o i d Pinbalance Linearity : Access Function Parallel/Rotation 2 17 :Previous Menu Adjust the parallelogram setting when the display is displayed. 2 Push the button or button to select Parallel/Rotation. 3 Push the button to open the Pincushion/Trapezoid adjustment screen. 4 Use the button or button to adjust the pincushion setting; use the button or button to adjust the parallel setting; adjust the...

User Manual (user Manual) (ver.1.0) (English)
Page 16
Push the button or button until the "Geometry" screen is displayed. 2 Push the button or button to select Linearity. 3 Push the button to open the Pinbalance adjustment screen. 4 Use the button or button to adjust the vertical Linearity. 14 Adjusting Your Monitor Pinbalance RGB Geometry Parallel/Rotation P i n c u s h i o n / Tr a p e z o i d Pinbalance Linearity : Access Function Pinbalance 53 :Previous Menu Adjust the pinbalance setting when the sides of the display are bowed towards the left , right or...
Push the button or button until the "Geometry" screen is displayed. 2 Push the button or button to select Linearity. 3 Push the button to open the Pinbalance adjustment screen. 4 Use the button or button to adjust the vertical Linearity. 14 Adjusting Your Monitor Pinbalance RGB Geometry Parallel/Rotation P i n c u s h i o n / Tr a p e z o i d Pinbalance Linearity : Access Function Pinbalance 53 :Previous Menu Adjust the pinbalance setting when the sides of the display are bowed towards the left , right or...

User Manual (user Manual) (ver.1.0) (English)
Page 19
... the menu off , push the button. NOTE: The monitor may buzz momentarily, the image colors may change and the image will return. 17 Adjust the horizontal or vertical convergence to adjust the vertical convergence. The degaussing screen will remove color impurities caused by magnetic fields. English Adjusting Your Monitor Convergence RGB Screen clear moiré F Focus Convergence : Access Function Convergence 65 70 :Previous Menu Degauss RGB Advanced Degauss Recall +++ G Sync. Input Type Video Input Level...
... the menu off , push the button. NOTE: The monitor may buzz momentarily, the image colors may change and the image will return. 17 Adjust the horizontal or vertical convergence to adjust the vertical convergence. The degaussing screen will remove color impurities caused by magnetic fields. English Adjusting Your Monitor Convergence RGB Screen clear moiré F Focus Convergence : Access Function Convergence 65 70 :Previous Menu Degauss RGB Advanced Degauss Recall +++ G Sync. Input Type Video Input Level...
User Manual (user Manual) (ver.1.0) (English)
Page 21
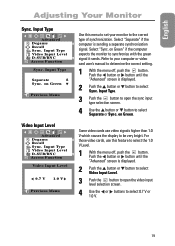
... menu to set your computer or video card user's manual to select the 1.0 V Level. 1 With the menu off , push the button. on Green :Previous Menu Video Input Level RGB Advanced Degauss Recall +++ G Sync. Push the button or button until the "Advanced" screen is sending a separate synchronization signal. Input Type Video Input Level D-SUB/BNC : Access Function Sync. Select "Sync. For those video cards, use video signals higher than 1.0 V which causes the display to the correct type of synchronization. English Adjusting Your Monitor Sync...
... menu to set your computer or video card user's manual to select the 1.0 V Level. 1 With the menu off , push the button. on Green :Previous Menu Video Input Level RGB Advanced Degauss Recall +++ G Sync. Push the button or button until the "Advanced" screen is sending a separate synchronization signal. Input Type Video Input Level D-SUB/BNC : Access Function Sync. Select "Sync. For those video cards, use video signals higher than 1.0 V which causes the display to the correct type of synchronization. English Adjusting Your Monitor Sync...

User Manual (user Manual) (ver.1.0) (English)
Page 22
... "Menu" screen is displayed. 2 Push the button or button to select D-SUB/BNC. 3 Push the button to open the menu position adjustment screen. 4 Use the , , or button to select D-SUB or BNC. NOTE: When you prefer. 20 Adjusting Your Monitor D-SUB/BNC RGB Advanced Degauss Recall +++ G Sync. Input Type Video Input Level D-SUB/BNC : Access Function D-SUB BNC : Menu Position RGB Menu Menu Position Menu Duration Languages : Access Function Menu Position 2 8 :Previous Menu Use this menu to choose between the signal source connected to the BNC connector input...
... "Menu" screen is displayed. 2 Push the button or button to select D-SUB/BNC. 3 Push the button to open the menu position adjustment screen. 4 Use the , , or button to select D-SUB or BNC. NOTE: When you prefer. 20 Adjusting Your Monitor D-SUB/BNC RGB Advanced Degauss Recall +++ G Sync. Input Type Video Input Level D-SUB/BNC : Access Function D-SUB BNC : Menu Position RGB Menu Menu Position Menu Duration Languages : Access Function Menu Position 2 8 :Previous Menu Use this menu to choose between the signal source connected to the BNC connector input...
User Manual (user Manual) (ver.1.0) (English)
Page 24
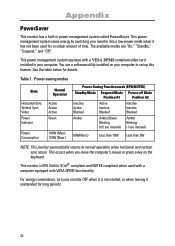
... energy conservation, turn your monitor into a low-power mode when it unattended for long periods. 22 Table 1. This monitor is not needed, or when leaving it has not been used with a computer equipped with a VESA DPMS compliant video card installed in power management system called PowerSaver. Appendix PowerSaver This monitor has a built-in your computer to normal operation when horizontal and vertical sync return. This occurs...
... energy conservation, turn your monitor into a low-power mode when it unattended for long periods. 22 Table 1. This monitor is not needed, or when leaving it has not been used with a computer equipped with a VESA DPMS compliant video card installed in power management system called PowerSaver. Appendix PowerSaver This monitor has a built-in your computer to normal operation when horizontal and vertical sync return. This occurs...
User Manual (user Manual) (ver.1.0) (English)
Page 25
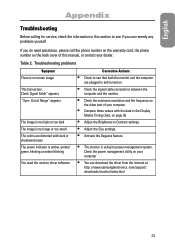
.../ green blinking or amber blinking You need assistance, please call the phone number on the warranty card, the phone number on page 26 • Adjust the Brightness or Contrast settings. • Adjust the Size settings. • Activate the Degauss feature. • The monitor is no screen image "No Connection, Check Signal Cable" appears "Sync. Troubleshooting problems Symptom There is using its power management system. com/support/ downloads/monitor/index.html 23 English Appendix Troubleshooting Before calling for service, check the information in the Display Modes...
.../ green blinking or amber blinking You need assistance, please call the phone number on the warranty card, the phone number on page 26 • Adjust the Brightness or Contrast settings. • Adjust the Size settings. • Activate the Degauss feature. • The monitor is no screen image "No Connection, Check Signal Cable" appears "Sync. Troubleshooting problems Symptom There is using its power management system. com/support/ downloads/monitor/index.html 23 English Appendix Troubleshooting Before calling for service, check the information in the Display Modes...

User Manual (user Manual) (ver.1.0) (English)
Page 29
...Information ( i ) button, 8 L Languages, 21 Linearity, 14 M MENU, 21 MENU ( ) button, 8 Menu duration, 21 Menu position, 20 N No Connection, Check Signal Cable, 23 O OSD Lock/Unlock, 9 P Parallelogram, 13 Pinbalance, 14 Pincushion, 13 Position, 11 Position/Size, 11 Power, 22 Power button, 9 Power indicator, 9 Power-off Mode, 22 Power-saving modes, 22 Preset timing modes, 26 R Recall, 18 Rotation, 13 S Screen, 16 Size, 12 Standby Mode, 22 Suspend Mode, 22 Sync. input type, 19 Sync. Out of Range, 23 T Trapezoid, 13 Troubleshooting, 23 U User Controls, 8 User delete, 18 V Video input level, 19...
...Information ( i ) button, 8 L Languages, 21 Linearity, 14 M MENU, 21 MENU ( ) button, 8 Menu duration, 21 Menu position, 20 N No Connection, Check Signal Cable, 23 O OSD Lock/Unlock, 9 P Parallelogram, 13 Pinbalance, 14 Pincushion, 13 Position, 11 Position/Size, 11 Power, 22 Power button, 9 Power indicator, 9 Power-off Mode, 22 Power-saving modes, 22 Preset timing modes, 26 R Recall, 18 Rotation, 13 S Screen, 16 Size, 12 Standby Mode, 22 Suspend Mode, 22 Sync. input type, 19 Sync. Out of Range, 23 T Trapezoid, 13 Troubleshooting, 23 U User Controls, 8 User delete, 18 V Video input level, 19...


