
Warranty (English)
Page 1
... your Rocketfish product during the Warranty Period of a defect covered by an authorized Rocketfish repair center or store personnel, Rocketfish will (at no charge with new or rebuilt parts; This warranty does not cover: • Customer instruction • Installation • Set up ...use www.rocketfishproducts.com 1 The Warranty Period lasts for one year (365 days), beginning on the receipt you received with this warranty statement. One-Year Limited Warranty Rocketfish Products ("Rocketfish") warrants to you, the original purchaser of this new product, that the product shall be free...
... your Rocketfish product during the Warranty Period of a defect covered by an authorized Rocketfish repair center or store personnel, Rocketfish will (at no charge with new or rebuilt parts; This warranty does not cover: • Customer instruction • Installation • Set up ...use www.rocketfishproducts.com 1 The Warranty Period lasts for one year (365 days), beginning on the receipt you received with this warranty statement. One-Year Limited Warranty Rocketfish Products ("Rocketfish") warrants to you, the original purchaser of this new product, that the product shall be free...
Warranty (English)
Page 2
...by Rocketfish to an incorrect voltage supply • Attempted repair by anyone other products and brand names are trademarks of Best Buy Enterprise Services, Inc. THIS WARRANTY GIVES YOU SPECIFIC LEGAL...cover: • Damage due to incorrect operation or maintenance • Connection to service the product • Products sold as is a trademark of their respective owners. 2 www.rocketfishproducts.com ROCKETFISH is or with all faults • Consumables, such as fuses or batteries • Products where the factory applied serial number has been altered or removed REPAIR REPLACEMENT...
...by Rocketfish to an incorrect voltage supply • Attempted repair by anyone other products and brand names are trademarks of Best Buy Enterprise Services, Inc. THIS WARRANTY GIVES YOU SPECIFIC LEGAL...cover: • Damage due to incorrect operation or maintenance • Connection to service the product • Products sold as is a trademark of their respective owners. 2 www.rocketfishproducts.com ROCKETFISH is or with all faults • Consumables, such as fuses or batteries • Products where the factory applied serial number has been altered or removed REPAIR REPLACEMENT...

User Manual (English)
Page 3
... the risk of explosion if battery is incorrectly replaced. Caution: Danger of fire or electric shock, do not expose this device to rain, moisture, dripping, or splashing, and no objects filled with the same or equivalent type. Using the combo driver 13 Installing the combo driver 14 Configuring the mouse 14 Uninstalling the combo driver 19 Maintaining 20 Troubleshooting 20 Specifications 20 Legal notices 22 One...
... the risk of explosion if battery is incorrectly replaced. Caution: Danger of fire or electric shock, do not expose this device to rain, moisture, dripping, or splashing, and no objects filled with the same or equivalent type. Using the combo driver 13 Installing the combo driver 14 Configuring the mouse 14 Uninstalling the combo driver 19 Maintaining 20 Troubleshooting 20 Specifications 20 Legal notices 22 One...
User Manual (English)
Page 4
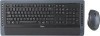
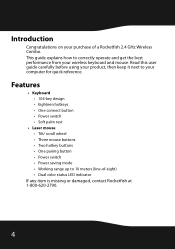
Read this user guide carefully before using your product, then keep it next to your wireless keyboard and mouse. Features • Keyboard • 104-key design • Eighteen hotkeys • One connect button • Power switch • Soft palm rest • Laser mouse • Tilt/ scroll wheel • Three mouse buttons • Two hotkey buttons • One pairing button • Power switch • Power saving mode • Working range up to correctly operate and get the best performance from...
Read this user guide carefully before using your product, then keep it next to your wireless keyboard and mouse. Features • Keyboard • 104-key design • Eighteen hotkeys • One connect button • Power switch • Soft palm rest • Laser mouse • Tilt/ scroll wheel • Three mouse buttons • Two hotkey buttons • One pairing button • Power switch • Power saving mode • Working range up to correctly operate and get the best performance from...
User Manual (English)
Page 5
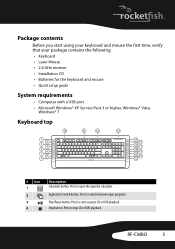
... Scroll Screen Lock Pause Break Insert Home Page Up Delete End Page Down Num Lock / 7 8 Home 4 5 *_ 9 PgUp + 6 1 2 End 0 Ins 3 PgDn . Press to start using your keyboard and mouse the first time, verify that your package contains the following: • Keyboard • Laser Mouse • 2.4 GHz receiver • Installation CD • Batteries for the keyboard and mouse • Quick setup guide System requirements • Computer with a USB port • Microsoft Windows...
... Scroll Screen Lock Pause Break Insert Home Page Up Delete End Page Down Num Lock / 7 8 Home 4 5 *_ 9 PgUp + 6 1 2 End 0 Ins 3 PgDn . Press to start using your keyboard and mouse the first time, verify that your package contains the following: • Keyboard • Laser Mouse • 2.4 GHz receiver • Installation CD • Batteries for the keyboard and mouse • Quick setup guide System requirements • Computer with a USB port • Microsoft Windows...
User Manual (English)
Page 6
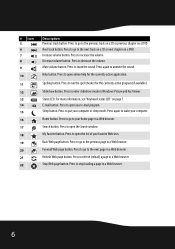
Increase volume button. Press to open the list of your favorite Web sites. Press to mute the sound. Sleep button. Press to open online help for the currently active program (if available). Press to open your computer. Press to go to stop loading a page in a Web browser. 6 Forward Web page button. Press to the previous page in a Web browser. Press to...
Increase volume button. Press to open the list of your favorite Web sites. Press to mute the sound. Sleep button. Press to open online help for the currently active program (if available). Press to open your computer. Press to go to stop loading a page in a Web browser. 6 Forward Web page button. Press to the previous page in a Web browser. Press to...
User Manual (English)
Page 7
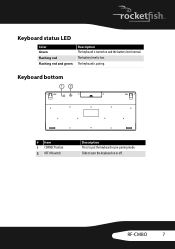
Slide to put the keyboard in pre-pairing mode. The keyboard is low. RF-CMBO 7 The battery level is pairing. Keyboard bottom CONN EC T OF F ON # Item 1 CONNECT button 2 OFF ON switch Description Press to turn the keyboard on and the battery level normal. Keyboard status LED Color Green Flashing red Flashing red and green Description The keyboard is turned on or off.
Slide to put the keyboard in pre-pairing mode. The keyboard is low. RF-CMBO 7 The battery level is pairing. Keyboard bottom CONN EC T OF F ON # Item 1 CONNECT button 2 OFF ON switch Description Press to turn the keyboard on and the battery level normal. Keyboard status LED Color Green Flashing red Flashing red and green Description The keyboard is turned on or off.

User Manual (English)
Page 8
... battery level normal. The mouse is low. Press to go to move the screen left or right. Status LED. Mouse status LED Color Green Flashing red Flashing green Description The mouse is turned on page 8. Mouse top # Item 1 Left button 2 Forward button 3 Back button 4 Right button Tilt/scroll wheel 5 6 LED indicator Description Press to perform left-button actions like selecting items or opening programs. Press to go to perform standard...
... battery level normal. The mouse is low. Press to go to move the screen left or right. Status LED. Mouse status LED Color Green Flashing red Flashing green Description The mouse is turned on page 8. Mouse top # Item 1 Left button 2 Forward button 3 Back button 4 Right button Tilt/scroll wheel 5 6 LED indicator Description Press to perform left-button actions like selecting items or opening programs. Press to go to perform standard...
User Manual (English)
Page 9
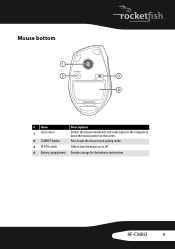
RF-CMBO 9 Mouse bottom CONNECT OFF ON # Item 1 Laser sensor Description Detects the mouse movements and sends signals to the computer to move the mouse pointer on the screen. 2 CONNECT button Press to put the mouse in pre-pairing mode. 3 OFF ON switch Slide to turn the mouse on or off. 4 Battery compartment Provides storage for the batteries and receiver.
RF-CMBO 9 Mouse bottom CONNECT OFF ON # Item 1 Laser sensor Description Detects the mouse movements and sends signals to the computer to move the mouse pointer on the screen. 2 CONNECT button Press to put the mouse in pre-pairing mode. 3 OFF ON switch Slide to turn the mouse on or off. 4 Battery compartment Provides storage for the batteries and receiver.
User Manual (English)
Page 13
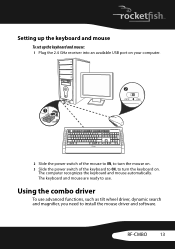
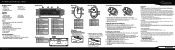
RF-CMBO 13 The keyboard and mouse are ready to turn the keyboard on. Setting up the keyboard and mouse To set up the keyboard and mouse: 1 Plug the 2.4 GHz receiver into an available USB port on your computer. 2 OFF ON 1 2 Slide the power switch of the mouse to ON, to turn the mouse on. 3 Slide the power switch of the keyboard to ON, to use advanced functions, such as tilt wheel driver, dynamic search and magnifier, you need to install the mouse driver and software. Using the combo driver To use . The computer recognizes the keyboard and mouse automatically.
RF-CMBO 13 The keyboard and mouse are ready to turn the keyboard on. Setting up the keyboard and mouse To set up the keyboard and mouse: 1 Plug the 2.4 GHz receiver into an available USB port on your computer. 2 OFF ON 1 2 Slide the power switch of the mouse to ON, to turn the mouse on. 3 Slide the power switch of the keyboard to ON, to use advanced functions, such as tilt wheel driver, dynamic search and magnifier, you need to install the mouse driver and software. Using the combo driver To use . The computer recognizes the keyboard and mouse automatically.
User Manual (English)
Page 14
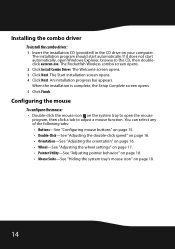
The Rocketfish Wireless combo screen opens. 2 Click Install Combo Driver. You can select any of the following tabs: • Buttons-See "Configuring mouse buttons" on page 15. • Double-Click-See "Adjusting the double-click speed" on page 16. • Orientation-See "Adjusting the orientation" on page 16. • Wheel-See "Adjusting the wheel settings" on page 17. • Pointer Utility-See "Adjusting...
The Rocketfish Wireless combo screen opens. 2 Click Install Combo Driver. You can select any of the following tabs: • Buttons-See "Configuring mouse buttons" on page 15. • Double-Click-See "Adjusting the double-click speed" on page 16. • Orientation-See "Adjusting the orientation" on page 16. • Wheel-See "Adjusting the wheel settings" on page 17. • Pointer Utility-See "Adjusting...
User Manual (English)
Page 15
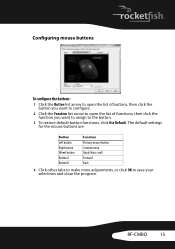
RF-CMBO 15 Configuring mouse buttons To configure the buttons: 1 Click the Button list arrow to open the list of buttons, then click the button you want to configure. 2 Click the Function list arrow to open the list of functions, then click the function you want to assign to save your selections and close the program. The default settings for the mouse buttons are: Button Left button Right button Wheel button Button A Button B Function Primary mouse button Context...
RF-CMBO 15 Configuring mouse buttons To configure the buttons: 1 Click the Button list arrow to open the list of buttons, then click the button you want to configure. 2 Click the Function list arrow to open the list of functions, then click the function you want to assign to save your selections and close the program. The default settings for the mouse buttons are: Button Left button Right button Wheel button Button A Button B Function Primary mouse button Context...

User Manual (English)
Page 16
Adjusting the orientation Use this tab to adjust the angle at which you use the on-screen pointer to follow the dog as it moves around. 16 Adjusting the double-click speed To adjust the double-click speed: 1 To adjust double-click speed, drag the slider. 2 To test the click speed, double-click the Test Area icon. 3 To restore to default settings, click Reset to Default Value. 4 Click other tabs to make more adjustments, or click OK to activate orientation setup, then use the mouse. To adjust the orientation: 1 Click Set Orientation to save your selections and close the program.
Adjusting the orientation Use this tab to adjust the angle at which you use the on-screen pointer to follow the dog as it moves around. 16 Adjusting the double-click speed To adjust the double-click speed: 1 To adjust double-click speed, drag the slider. 2 To test the click speed, double-click the Test Area icon. 3 To restore to default settings, click Reset to Default Value. 4 Click other tabs to make more adjustments, or click OK to activate orientation setup, then use the mouse. To adjust the orientation: 1 Click Set Orientation to save your selections and close the program.
User Manual (English)
Page 17
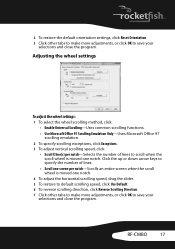
RF-CMBO 17 2 To restore the default orientation settings, click Reset Orientation. 3 Click other tabs to make more adjustments, or click OK to save your selections and close the program. Adjusting the wheel settings To adjust the wheel settings: 1 To select the wheel scrolling method, click: • Enable Universal Scrolling-Uses common scrolling functions. • Use Microsoft Office 97 Scrolling Emulation Only-Uses Microsoft Office 97...
RF-CMBO 17 2 To restore the default orientation settings, click Reset Orientation. 3 Click other tabs to make more adjustments, or click OK to save your selections and close the program. Adjusting the wheel settings To adjust the wheel settings: 1 To select the wheel scrolling method, click: • Enable Universal Scrolling-Uses common scrolling functions. • Use Microsoft Office 97 Scrolling Emulation Only-Uses Microsoft Office 97...
User Manual (English)
Page 20
... are set to use less battery power. symbols on the batteries align with any problems with water. Maintaining To clean your Bluetooth keyboard and mouse, wipe them with a soft, lint-free cloth slightly moistened with your 2.4 GHz keyboard or mouse, check the following: • Make sure that your computer. • Only use the mouse on a clean, flat surface in the keyboard and mouse are installed correctly. Troubleshooting If...
... are set to use less battery power. symbols on the batteries align with any problems with water. Maintaining To clean your Bluetooth keyboard and mouse, wipe them with a soft, lint-free cloth slightly moistened with your 2.4 GHz keyboard or mouse, check the following: • Make sure that your computer. • Only use the mouse on a clean, flat surface in the keyboard and mouse are installed correctly. Troubleshooting If...
User Manual (English)
Page 21
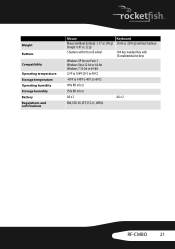
Weight Buttons Compatibility Operating temperature Storage temperature Operating humidity Storage humidity Battery Regulations and certifications Mouse Mouse (without battery): 3.17 oz. (90 g) Dongle: 0.07 oz. (2 g) 5 buttons with tilt scroll wheel Windows XP Service Pack 3 Windows Vista 32-bit or 64-bit Windows 7 32-bit or 64-bit 32ºF to 104ºF (0ºC to 40ºC) Keyboard 30.69 oz. (870 g) (without battery) 104-key standard key with 18-multimedia hot keys -40ºF to 140...
Weight Buttons Compatibility Operating temperature Storage temperature Operating humidity Storage humidity Battery Regulations and certifications Mouse Mouse (without battery): 3.17 oz. (90 g) Dongle: 0.07 oz. (2 g) 5 buttons with tilt scroll wheel Windows XP Service Pack 3 Windows Vista 32-bit or 64-bit Windows 7 32-bit or 64-bit 32ºF to 104ºF (0ºC to 40ºC) Keyboard 30.69 oz. (870 g) (without battery) 104-key standard key with 18-multimedia hot keys -40ºF to 140...

User Manual (English)
Page 22
... not installed and used in accordance with Part 15 of this product is subject to the following measures: • Reorient or relocate the receiving antenna. • Increase the separation between the equipment and receiver. • Connect the equipment into an outlet on , the user is connected. • Consult the dealer or an experienced radio/TV technician for help. FCC warning Changes...
... not installed and used in accordance with Part 15 of this product is subject to the following measures: • Reorient or relocate the receiving antenna. • Increase the separation between the equipment and receiver. • Connect the equipment into an outlet on , the user is connected. • Consult the dealer or an experienced radio/TV technician for help. FCC warning Changes...

User Manual (English)
Page 25
... United States, Canada, and Mexico. How to you. This warranty does not cover: • Customer instruction • Installation • Set up adjustments • Cosmetic damage RF-CMBO 25 One-year limited warranty Rocketfish Products ("Rocketfish") warrants to you, the original purchaser of this new RF-CMBO ("Product"), that the Product shall be free of defects in the original manufacture of the material or workmanship for...
... United States, Canada, and Mexico. How to you. This warranty does not cover: • Customer instruction • Installation • Set up adjustments • Cosmetic damage RF-CMBO 25 One-year limited warranty Rocketfish Products ("Rocketfish") warrants to you, the original purchaser of this new RF-CMBO ("Product"), that the Product shall be free of defects in the original manufacture of the material or workmanship for...

User Manual (English)
Page 26
... use • Modification of any part of the Product, including the antenna This warranty also does not cover: • Damage due to incorrect operation or maintenance • Connection to service the Product • Products sold as fuses or batteries • Products where the factory applied serial number has been altered or removed REPAIR REPLACEMENT AS PROVIDED UNDER THIS WARRANTY IS YOUR EXCLUSIVE REMEDY. ROCKETFISH...
... use • Modification of any part of the Product, including the antenna This warranty also does not cover: • Damage due to incorrect operation or maintenance • Connection to service the Product • Products sold as fuses or batteries • Products where the factory applied serial number has been altered or removed REPAIR REPLACEMENT AS PROVIDED UNDER THIS WARRANTY IS YOUR EXCLUSIVE REMEDY. ROCKETFISH...
Quick Setup Guide (English)
Page 1
... Wireless Combo Package contents • Keyboard • 2.4G Receiver • Installation CD including User Guide • Laser mouse • AA batteries (4) • Quick Setup Guide Features Keyboard • 104-key design • Connect button • LED showing pairing and battery status • 18 hot-keys • Power switch • Soft palm rest Mouse • Three mouse buttons (left, right, and middle) • Tilt/scroll wheel • Two hot-key buttons • Power saving mode • Excellent performance • Working range...
... Wireless Combo Package contents • Keyboard • 2.4G Receiver • Installation CD including User Guide • Laser mouse • AA batteries (4) • Quick Setup Guide Features Keyboard • 104-key design • Connect button • LED showing pairing and battery status • 18 hot-keys • Power switch • Soft palm rest Mouse • Three mouse buttons (left, right, and middle) • Tilt/scroll wheel • Two hot-key buttons • Power saving mode • Excellent performance • Working range...


