

Warranty (English)
Page 1
... your Rocketfish product during the Warranty Period of the product in its original packaging or packaging that requires service, terms of this warranty apply. Products and parts replaced under this warranty that provides the same amount of the product ("Warranty Period"). This warranty is printed on the date you . This warranty does not cover: • Customer instruction • Installation • Set up...
... your Rocketfish product during the Warranty Period of the product in its original packaging or packaging that requires service, terms of this warranty apply. Products and parts replaced under this warranty that provides the same amount of the product ("Warranty Period"). This warranty is printed on the date you . This warranty does not cover: • Customer instruction • Installation • Set up...
User Manual (English)
Page 2
This guide explains how to your computer for quick reference. 2 Read this user guide carefully before using your product, then keep it next to correctly operate and get the best performance from your purchase of a Rocketfish Bluetooth keyboard and mouse. Rocketfish RF-BTCMBO Bluetooth Keyboard and Mouse Combo Contents Introduction 2 Features 3 Identifying components 4 Using the keyboard and mouse 9 Troubleshooting 23 Legal notices 24 Warranty 27 Français 29 Español 57 Introduction Congratulations on your wireless keyboard and mouse.
This guide explains how to your computer for quick reference. 2 Read this user guide carefully before using your product, then keep it next to correctly operate and get the best performance from your purchase of a Rocketfish Bluetooth keyboard and mouse. Rocketfish RF-BTCMBO Bluetooth Keyboard and Mouse Combo Contents Introduction 2 Features 3 Identifying components 4 Using the keyboard and mouse 9 Troubleshooting 23 Legal notices 24 Warranty 27 Français 29 Español 57 Introduction Congratulations on your wireless keyboard and mouse.
User Manual (English)
Page 3
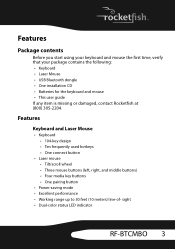
... middle buttons) • Four media key buttons • One pairing button • Power-saving mode • Excellent performance • Working range up to 30 feet (10 meters) line-of- Features Package contents Before you start using your keyboard and mouse the first time, verify that your package contains the following: • Keyboard • Laser Mouse • USB Bluetooth dongle • One installation CD • Batteries for the keyboard and mouse • This user guide If...
... middle buttons) • Four media key buttons • One pairing button • Power-saving mode • Excellent performance • Working range up to 30 feet (10 meters) line-of- Features Package contents Before you start using your keyboard and mouse the first time, verify that your package contains the following: • Keyboard • Laser Mouse • USB Bluetooth dongle • One installation CD • Batteries for the keyboard and mouse • This user guide If...
User Manual (English)
Page 4
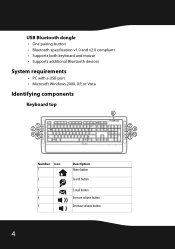
USB Bluetooth dongle • One pairing button • Bluetooth specification v1.0 and v2.0 compliant • Supports both keyboard and mouse • Supports additional Bluetooth devices System requirements • PC with a USB port • Microsoft Windows 2000, XP, or Vista Identifying components Keyboard top 6 1 7 2 8 43 9 10 5 11 Number Icon 1 2 3 4 5 Description Home button Search button E-mail button Increase volume button Decrease volume button 4
USB Bluetooth dongle • One pairing button • Bluetooth specification v1.0 and v2.0 compliant • Supports both keyboard and mouse • Supports additional Bluetooth devices System requirements • PC with a USB port • Microsoft Windows 2000, XP, or Vista Identifying components Keyboard top 6 1 7 2 8 43 9 10 5 11 Number Icon 1 2 3 4 5 Description Home button Search button E-mail button Increase volume button Decrease volume button 4
User Manual (English)
Page 5
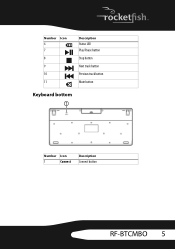
Number Icon 6 7 8 9 10 11 Description Status LED Play/Pause button Stop button Next track button Previous track button Mute button Keyboard bottom 1 Number Icon 1 Connect Description Connect button RF-BTCMBO 5
Number Icon 6 7 8 9 10 11 Description Status LED Play/Pause button Stop button Next track button Previous track button Mute button Keyboard bottom 1 Number Icon 1 Connect Description Connect button RF-BTCMBO 5
User Manual (English)
Page 7
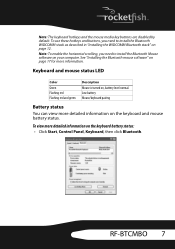
... mouse status LED Color Green Flashing red Flashing red and green Description Mouse is turned on the keyboard and mouse battery status. Note: To enable the horizontal scrolling, you need to install the Bluetooth WIDCOMM stack as described in "Installing the WIDCOMM Bluetooth stack" on the keyboard battery status: • Click Start, Control Panel, Keyboard, then click Bluetooth. To view more information. To use these hotkeys and buttons, you need to install the Bluetooth Mouse software on your computer. RF-BTCMBO 7 See "Installing the Bluetooth mouse software...
... mouse status LED Color Green Flashing red Flashing red and green Description Mouse is turned on the keyboard and mouse battery status. Note: To enable the horizontal scrolling, you need to install the Bluetooth WIDCOMM stack as described in "Installing the WIDCOMM Bluetooth stack" on the keyboard battery status: • Click Start, Control Panel, Keyboard, then click Bluetooth. To view more information. To use these hotkeys and buttons, you need to install the Bluetooth Mouse software on your computer. RF-BTCMBO 7 See "Installing the Bluetooth mouse software...

User Manual (English)
Page 9
Complete the following steps to install the batteries. Keyboard To install the keyboard batteries: 1 Remove the battery cover as shown. Using the keyboard and mouse Installing the batteries The keyboard and mouse both need two AA alkaline batteries. RF-BTCMBO 9
Complete the following steps to install the batteries. Keyboard To install the keyboard batteries: 1 Remove the battery cover as shown. Using the keyboard and mouse Installing the batteries The keyboard and mouse both need two AA alkaline batteries. RF-BTCMBO 9
User Manual (English)
Page 12
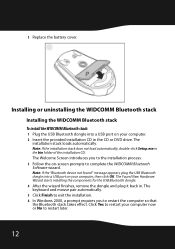
... the USB Bluetooth dongle into a USB port on your computer now or No to restart the computer so that the Bluetooth stack takes effect. The keyboard and mouse pair automatically. 5 Click Finish to exit the installation. 6 In Windows 2000, a prompt requires you to complete the WIDCOMM Bluetooth Software wizard. Note: If the installation stack does not load automatically, double-click Setup.exe in . 3 Replace the battery cover...
... the USB Bluetooth dongle into a USB port on your computer now or No to restart the computer so that the Bluetooth stack takes effect. The keyboard and mouse pair automatically. 5 Click Finish to exit the installation. 6 In Windows 2000, a prompt requires you to complete the WIDCOMM Bluetooth Software wizard. Note: If the installation stack does not load automatically, double-click Setup.exe in . 3 Replace the battery cover...
User Manual (English)
Page 13
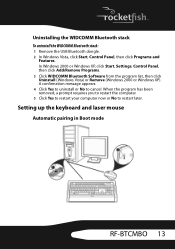
In Windows 2000 or Windows XP, click Start, Settings, Control Panel, then click Add/Remove Programs. 3 Click WIDCOMM Bluetooth Software from the program list, then click Uninstall (Windows Vista) or Remove (Windows 2000 or Windows XP). When the program has been removed, a prompt requires... to restart later. Setting up the keyboard and laser mouse Automatic pairing in Boot mode RF-BTCMBO 13 Uninstalling the WIDCOMM Bluetooth stack To uninstall the WIDCOMM Bluetooth stack: 1 Remove the USB Bluetooth dongle. 2 In Windows Vista, click Start, Control Panel, then click Programs and Features.
In Windows 2000 or Windows XP, click Start, Settings, Control Panel, then click Add/Remove Programs. 3 Click WIDCOMM Bluetooth Software from the program list, then click Uninstall (Windows Vista) or Remove (Windows 2000 or Windows XP). When the program has been removed, a prompt requires... to restart later. Setting up the keyboard and laser mouse Automatic pairing in Boot mode RF-BTCMBO 13 Uninstalling the WIDCOMM Bluetooth stack To uninstall the WIDCOMM Bluetooth stack: 1 Remove the USB Bluetooth dongle. 2 In Windows Vista, click Start, Control Panel, then click Programs and Features.

User Manual (English)
Page 14
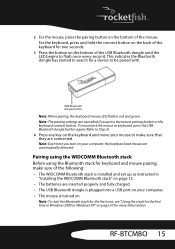
...-pairing mode: 1 Plug the USB Bluetooth dongle into an available USB port. 2 Slide the power switch of the mouse to turn the mouse on. 3 Press the button on the computer and use the Bluetooth mouse to navigate through the menu items and enable the USB keyboard and mouse function. (In some BIOS settings, you connect the keyboard or mouse to your computer. The first time you can use the keyboard to enter the BIOS setup. 5 Use...
...-pairing mode: 1 Plug the USB Bluetooth dongle into an available USB port. 2 Slide the power switch of the mouse to turn the mouse on. 3 Press the button on the computer and use the Bluetooth mouse to navigate through the menu items and enable the USB keyboard and mouse function. (In some BIOS settings, you connect the keyboard or mouse to your computer. The first time you can use the keyboard to enter the BIOS setup. 5 Use...
User Manual (English)
Page 15
... Bluetooth dongle has started to flash once every second. Note: Each time you press the mouse pairing button or the keyboard connect button. Note: The pairing settings are inserted properly and fully charged. • The USB Bluetooth dongle is plugged into a USB port on your computer, the keyboard and mouse are connected. RF-BTCMBO 15 Note: To start the Bluetooth stack for the first time, see "Using the stack for the first time in "Installing...
... Bluetooth dongle has started to flash once every second. Note: Each time you press the mouse pairing button or the keyboard connect button. Note: The pairing settings are inserted properly and fully charged. • The USB Bluetooth dongle is plugged into a USB port on your computer, the keyboard and mouse are connected. RF-BTCMBO 15 Note: To start the Bluetooth stack for the first time, see "Using the stack for the first time in "Installing...

User Manual (English)
Page 16
Your computer starts to start pairing. 2 Press the USB Bluetooth dongle button until the Human Interface Device (HID) screen appears. To pair using the Bluetooth stack: 1 Press the Connect button on the mouse and keyboard to search for all Bluetooth devices. When the connection to the mouse is established, this message appears: 3 Click to confirm that the mouse is connected. 16
Your computer starts to start pairing. 2 Press the USB Bluetooth dongle button until the Human Interface Device (HID) screen appears. To pair using the Bluetooth stack: 1 Press the Connect button on the mouse and keyboard to search for all Bluetooth devices. When the connection to the mouse is established, this message appears: 3 Click to confirm that the mouse is connected. 16
User Manual (English)
Page 17
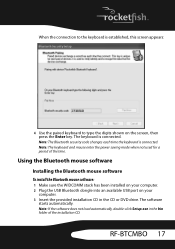
... keyboard is connected. RF-BTCMBO 17 The software starts automatically. Note: The keyboard and mouse enter the power saving mode when not used for a period of the installation CD. Note: If the software does not load automatically, double-click Setup.exe in the CD or DVD drive. Note: The Bluetooth security code changes each time the keyboard is connected. When the connection to the keyboard is established, this screen appears: 4 Use the paired keyboard to type...
... keyboard is connected. RF-BTCMBO 17 The software starts automatically. Note: The keyboard and mouse enter the power saving mode when not used for a period of the installation CD. Note: If the software does not load automatically, double-click Setup.exe in the CD or DVD drive. Note: The Bluetooth security code changes each time the keyboard is connected. When the connection to the keyboard is established, this screen appears: 4 Use the paired keyboard to type...

User Manual (English)
Page 18
... vertical scrolling. 18 A confirmation message appears. 4 Click Yes to uninstall or No to install the Bluetooth mouse software. 5 Restart your computer before using the Bluetooth mouse software. In Windows 2000 or Windows XP, click Start, Settings, Control Panel, then click Add/Remove Programs. 3 Select Bluetooth Mouse from the program list, then click Uninstall (Windows Vista) or Remove (Windows 2000 or Windows XP). Uninstalling the Bluetooth mouse software To uninstall the Bluetooth mouse software: 1 Remove the USB Bluetooth dongle. 2 In Windows Vista, click Start...
... vertical scrolling. 18 A confirmation message appears. 4 Click Yes to uninstall or No to install the Bluetooth mouse software. 5 Restart your computer before using the Bluetooth mouse software. In Windows 2000 or Windows XP, click Start, Settings, Control Panel, then click Add/Remove Programs. 3 Select Bluetooth Mouse from the program list, then click Uninstall (Windows Vista) or Remove (Windows 2000 or Windows XP). Uninstalling the Bluetooth mouse software To uninstall the Bluetooth mouse software: 1 Remove the USB Bluetooth dongle. 2 In Windows Vista, click Start...
User Manual (English)
Page 21
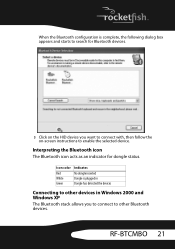
When the Bluetooth configuration is plugged in Green Dongle has detected the devices Connecting to other devices in Windows 2000 and Windows XP The Bluetooth stack allows you want to connect with, then follow the on-screen instructions to other Bluetooth devices. Icon color Indicates Red No dongle inserted White Dongle is complete, the following dialog box appears and starts to search for dongle status. RF-BTCMBO 21 Interpreting the Bluetooth icon The Bluetooth icon acts...
When the Bluetooth configuration is plugged in Green Dongle has detected the devices Connecting to other devices in Windows 2000 and Windows XP The Bluetooth stack allows you want to connect with, then follow the on-screen instructions to other Bluetooth devices. Icon color Indicates Red No dongle inserted White Dongle is complete, the following dialog box appears and starts to search for dongle status. RF-BTCMBO 21 Interpreting the Bluetooth icon The Bluetooth icon acts...
User Manual (English)
Page 23
... Windows Vista To use the Bluetooth stack: 1 Double-click the Bluetooth icon in the keyboard and mouse are installed correctly. Setup is compatible with new batteries immediately. • After the Bluetooth stack (see "Installing the WIDCOMM Bluetooth stack" on the Devices tab, then click Add. Replace with this product's system requirements. • Make sure that the batteries in the system tray. The Bluetooth settings screen opens. 2 Click on page 12) has been installed...
... Windows Vista To use the Bluetooth stack: 1 Double-click the Bluetooth icon in the keyboard and mouse are installed correctly. Setup is compatible with new batteries immediately. • After the Bluetooth stack (see "Installing the WIDCOMM Bluetooth stack" on the Devices tab, then click Add. Replace with this product's system requirements. • Make sure that the batteries in the system tray. The Bluetooth settings screen opens. 2 Click on page 12) has been installed...
User Manual (English)
Page 24
... PC's manual for technical support. If this product is encouraged to try to correct the interference by turning the equipment off and on page 14. • If your PC system's BIOS setup has options for a class B digital device, pursuant to Part 15 of...and, if not installed and used in a particular installation. If you use a mouse pad, choose a light-colored one, not a dark one or more information. • Only use of the FCC Rules. • If the keyboard and mouse fail to work, check the USB keyboard and mouse functions in a residential installation. This equipment has ...
... PC's manual for technical support. If this product is encouraged to try to correct the interference by turning the equipment off and on page 14. • If your PC system's BIOS setup has options for a class B digital device, pursuant to Part 15 of...and, if not installed and used in a particular installation. If you use a mouse pad, choose a light-colored one, not a dark one or more information. • Only use of the FCC Rules. • If the keyboard and mouse fail to work, check the USB keyboard and mouse functions in a residential installation. This equipment has ...

User Manual (English)
Page 25
... warning Changes or modifications not expressly approved by the party responsible for help. DHHS and FDA safety certification This product is not more than that permitted for successful communication. Specifications and features are trademarks of the U.S. For service and support call (800) 305-2204. RSS 310 statement To reduce potential radio interference to other users, the antenna type...
... warning Changes or modifications not expressly approved by the party responsible for help. DHHS and FDA safety certification This product is not more than that permitted for successful communication. Specifications and features are trademarks of the U.S. For service and support call (800) 305-2204. RSS 310 statement To reduce potential radio interference to other users, the antenna type...
User Manual (English)
Page 27
...? Products and parts replaced under this warranty become the property of Rocketfish and are required after the Warranty Period expires, you purchased it from. If you notify Rocketfish during the Warranty Period. This warranty does not cover: • Customer instruction RF-BTCMBO 27 Warranty 1-year limited warranty Rocketfish Products ("Rocketfish") warrants to you, the original purchaser of this new RF-BTCMBO ("Product"), that the Product shall be free...
...? Products and parts replaced under this warranty become the property of Rocketfish and are required after the Warranty Period expires, you purchased it from. If you notify Rocketfish during the Warranty Period. This warranty does not cover: • Customer instruction RF-BTCMBO 27 Warranty 1-year limited warranty Rocketfish Products ("Rocketfish") warrants to you, the original purchaser of this new RF-BTCMBO ("Product"), that the Product shall be free...
User Manual (English)
Page 28
... by Rocketfish to acts of God, such as lightning strikes • Accident • Misuse • Abuse • Negligence • Commercial use • Modification of any part of Best Buy Enterprise Services, Inc. ROCKETFISH SHALL ...Buy Purchasing, LLC. • Installation • Set up adjustments • Cosmetic damage • Damage due to service the Product • Products sold as fuses or batteries • Products where the factory applied serial number has been altered or removed REPAIR REPLACEMENT AS PROVIDED UNDER THIS WARRANTY IS YOUR EXCLUSIVE REMEDY. Rocketfish...
... by Rocketfish to acts of God, such as lightning strikes • Accident • Misuse • Abuse • Negligence • Commercial use • Modification of any part of Best Buy Enterprise Services, Inc. ROCKETFISH SHALL ...Buy Purchasing, LLC. • Installation • Set up adjustments • Cosmetic damage • Damage due to service the Product • Products sold as fuses or batteries • Products where the factory applied serial number has been altered or removed REPAIR REPLACEMENT AS PROVIDED UNDER THIS WARRANTY IS YOUR EXCLUSIVE REMEDY. Rocketfish...


