User Guide
Page 1
For safe and correct use, be sure to read Safety Information before using the machine. User Guide Selected Version Getting Started Print Web Image Monitor Adding Paper and Toner Troubleshooting Specifications for the Machine Legal and Contact Information For information not found in this manual, see the online manuals available on our web site (https://www.ricoh.com/).
For safe and correct use, be sure to read Safety Information before using the machine. User Guide Selected Version Getting Started Print Web Image Monitor Adding Paper and Toner Troubleshooting Specifications for the Machine Legal and Contact Information For information not found in this manual, see the online manuals available on our web site (https://www.ricoh.com/).
User Guide
Page 5
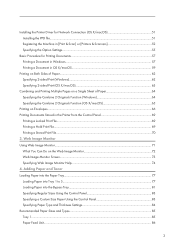
Adding Paper and Toner Loading Paper into the Paper Tray...77 Loading Paper into Tray 1 to 5...77 Loading Paper into the Bypass Tray...81 Specifying Regular Sizes Using the ...
Adding Paper and Toner Loading Paper into the Paper Tray...77 Loading Paper into Tray 1 to 5...77 Loading Paper into the Bypass Tray...81 Specifying Regular Sizes Using the ...

User Guide
Page 6
...Two-sided Paper 94 Printing onto Letterhead Paper Using the Printer Driver 94 Replacing the Toner...96 How to Replace the Toner...96 Precautions When Storing Toner...99 Precautions When Replacing the Toner 100 Disposing Exhausted Toners...101 Replacing the Waste Toner Bottle...102 How to (Y4)...129 4 Bypass Tray...87 Notes on Error Logs... (A1)...124 Paper Misfeed Message (A2)...125 Paper Misfeed Message (B)...126 Paper Misfeed Message (C)...127 Paper Misfeed Message (Y1) to Replace the Waste Toner Bottle 102 Precautions When Replacing the Waste Toner Bottle 104 Disposing the Used Waste...
...Two-sided Paper 94 Printing onto Letterhead Paper Using the Printer Driver 94 Replacing the Toner...96 How to Replace the Toner...96 Precautions When Storing Toner...99 Precautions When Replacing the Toner 100 Disposing Exhausted Toners...101 Replacing the Waste Toner Bottle...102 How to (Y4)...129 4 Bypass Tray...87 Notes on Error Logs... (A1)...124 Paper Misfeed Message (A2)...125 Paper Misfeed Message (B)...126 Paper Misfeed Message (C)...127 Paper Misfeed Message (Y1) to Replace the Waste Toner Bottle 102 Precautions When Replacing the Waste Toner Bottle 104 Disposing the Used Waste...

User Guide
Page 12
...-Specific Information" Exterior: Front and Left View 1 3 2 EBS241 1. Getting Started Guide to the region of Components • Do not obstruct the machine's vents. Waste toner bottle Waste toner is full. 3. Doing so can result in fire as the internal components are overheated. (mainly Europe and Asia), (mainly Europe), or (mainly Asia) (mainly...
...-Specific Information" Exterior: Front and Left View 1 3 2 EBS241 1. Getting Started Guide to the region of Components • Do not obstruct the machine's vents. Waste toner bottle Waste toner is full. 3. Doing so can result in fire as the internal components are overheated. (mainly Europe and Asia), (mainly Europe), or (mainly Asia) (mainly...

User Guide
Page 15
Guide to be inserted. Print cartridge Messages appear on the screen when the print cartridge needs to be replaced, or a new cartridge needs to Names and Functions of Components 6. Insert an optional wireless LAN interface board, IEEE 1284 interface board, or Device server. page 96 "Replacing the Toner" 13 Interior: Front View 1 EBS244 1. Optional interface board slot Optional interface boards can be prepared.
Guide to be inserted. Print cartridge Messages appear on the screen when the print cartridge needs to be replaced, or a new cartridge needs to Names and Functions of Components 6. Insert an optional wireless LAN interface board, IEEE 1284 interface board, or Device server. page 96 "Replacing the Toner" 13 Interior: Front View 1 EBS244 1. Optional interface board slot Optional interface boards can be prepared.
User Guide
Page 33
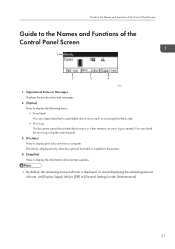
... If a document cannot be printed due to display the information about printer supplies. • By default, the remaining amount of toner is created. To avoid displaying the remaining amount of toner, set [Display Supply Info] to the Names and Functions of the Control Panel Screen CYN901 1. Guide to the Names and Functions...
... If a document cannot be printed due to display the information about printer supplies. • By default, the remaining amount of toner is created. To avoid displaying the remaining amount of toner, set [Display Supply Info] to the Names and Functions of the Control Panel Screen CYN901 1. Guide to the Names and Functions...

User Guide
Page 79
Adding Paper and Toner Loading Paper into the bypass tray. • When loading paper on a tray which has a few sheets of paper, multiple sheets of [Paper Input] in the ...
Adding Paper and Toner Loading Paper into the bypass tray. • When loading paper on a tray which has a few sheets of paper, multiple sheets of [Paper Input] in the ...

User Guide
Page 80
4. Pull the tray carefully until it stops, lift the front side of the tray, and then pull it out of the machine. 78 EAT057 In the following example procedure, Tray 1 is used. 1. Adding Paper and Toner EAT333 • Tray 2-5 EAT334 Load paper into every tray in the same way.
4. Pull the tray carefully until it stops, lift the front side of the tray, and then pull it out of the machine. 78 EAT057 In the following example procedure, Tray 1 is used. 1. Adding Paper and Toner EAT333 • Tray 2-5 EAT334 Load paper into every tray in the same way.

User Guide
Page 82
Make sure paper is not stacked higher than a few millimeters. 4. EAT073 5. Do not move paper loaded in sheets being folded or becoming jammed. 80 EAT060 Load the new paper stack print side down. Adjust the paper guides to paper edges on the openings of the tray's lifting plate, resulting in the tray more than the upper limit (upper line) marked inside the tray. Adding Paper and Toner EAT328 4. Moving the loaded paper excessively may cause damage to close any gaps.
Make sure paper is not stacked higher than a few millimeters. 4. EAT073 5. Do not move paper loaded in sheets being folded or becoming jammed. 80 EAT060 Load the new paper stack print side down. Adjust the paper guides to paper edges on the openings of the tray's lifting plate, resulting in the tray more than the upper limit (upper line) marked inside the tray. Adding Paper and Toner EAT328 4. Moving the loaded paper excessively may cause damage to close any gaps.

User Guide
Page 84
... a specific orientation. • page 94 "Loading Orientation-fixed Paper or Two-sided Paper" • You can load envelopes into the bypass tray. Adding Paper and Toner 1. EBS247 2. Load paper face up until it stops, and then adjust both sides of the paper guide to match the paper width. 2 1 2 EBS248 • When...
... a specific orientation. • page 94 "Loading Orientation-fixed Paper or Two-sided Paper" • You can load envelopes into the bypass tray. Adding Paper and Toner 1. EBS247 2. Load paper face up until it stops, and then adjust both sides of the paper guide to match the paper width. 2 1 2 EBS248 • When...

User Guide
Page 86
Adding Paper and Toner 4. Enter the vertical value, and then press the [OK] key. • If the item you change the screen. • page 85 "Recommended Paper Sizes and ...
Adding Paper and Toner 4. Enter the vertical value, and then press the [OK] key. • If the item you change the screen. • page 85 "Recommended Paper Sizes and ...

User Guide
Page 88
... Env *1 When a print job is performed on A5 or 51/2 × 81/2 paper, it is set the paper horizontally. Bond- 44 lb. Adding Paper and Toner Paper Feed Unit Paper type and weight 64-120 g/m2 (17 lb. Also, use the bypass tray when printing on the paper's thickness and condition...
... Env *1 When a print job is performed on A5 or 51/2 × 81/2 paper, it is set the paper horizontally. Bond- 44 lb. Adding Paper and Toner Paper Feed Unit Paper type and weight 64-120 g/m2 (17 lb. Also, use the bypass tray when printing on the paper's thickness and condition...

User Guide
Page 90
... 1 Plain Paper 2 Middle Thick Thick Paper 1 Thick Paper 2 Paper weight 60-63 g/m2 (16 lb. Bond) 91-105 g/m2 (24-28 lb. Adding Paper and Toner Notes on Special Paper Paper Type Setting thick paper Setting envelopes Setting letterhead paper Setting label paper (adhesive labels) Setting transparencies Note page 91 "Thick...
... 1 Plain Paper 2 Middle Thick Thick Paper 1 Thick Paper 2 Paper weight 60-63 g/m2 (16 lb. Bond) 91-105 g/m2 (24-28 lb. Adding Paper and Toner Notes on Special Paper Paper Type Setting thick paper Setting envelopes Setting letterhead paper Setting label paper (adhesive labels) Setting transparencies Note page 91 "Thick...

User Guide
Page 92
... of your copies by storing them in a binder in a dark, dry place. • When folding prints, toner in the folds will come off. • If the prints are stored in the conditions described below, toner may melt: • When a print and a half-dried print are put on top of each other •... not store paper where it will fade if exposed to direct sunlight or reach high temperatures. • Store paper in a plastic bag. Adding Paper and Toner • Paper with loading of paper because the powder for long periods of time • When prints are placed in good condition. If you use...
... of your copies by storing them in a binder in a dark, dry place. • When folding prints, toner in the folds will come off. • If the prints are stored in the conditions described below, toner may melt: • When a print and a half-dried print are put on top of each other •... not store paper where it will fade if exposed to direct sunlight or reach high temperatures. • Store paper in a plastic bag. Adding Paper and Toner • Paper with loading of paper because the powder for long periods of time • When prints are placed in good condition. If you use...

User Guide
Page 94
... about one minute until printing starts to allow the machine to remove any air from inside and flatten out all four edges. Adding Paper and Toner Envelope Orientation and Recommended Status The way to load envelopes varies depending on the shape and orientation of the envelopes. • Do not print on...
... about one minute until printing starts to allow the machine to remove any air from inside and flatten out all four edges. Adding Paper and Toner Envelope Orientation and Recommended Status The way to load envelopes varies depending on the shape and orientation of the envelopes. • Do not print on...

User Guide
Page 96
Adding Paper and Toner Loading Orientation-fixed Paper or Two-sided Paper To print onto letterhead paper or business letter paper on which logos or patterns are printed, confirm ...
Adding Paper and Toner Loading Orientation-fixed Paper or Two-sided Paper To print onto letterhead paper or business letter paper on which logos or patterns are printed, confirm ...
User Guide
Page 98
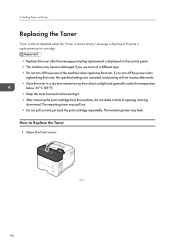
... • The machine may become damaged if you turn off the power when replenishing the toner, the specified settings are canceled, and printing will not resume afterwards. • Store the toner in a dry environment away from direct sunlight and generally under the temperature below 35°C...the power of the machine when replacing the toner. EBS027 96 Open the front cover. Adding Paper and Toner Replacing the Toner Toner is almost depleted when the "Toner is displayed. message is almost empty." The remaining toner may leak. The remaining toner may spill out. • Do not ...
... • The machine may become damaged if you turn off the power when replenishing the toner, the specified settings are canceled, and printing will not resume afterwards. • Store the toner in a dry environment away from direct sunlight and generally under the temperature below 35°C...the power of the machine when replacing the toner. EBS027 96 Open the front cover. Adding Paper and Toner Replacing the Toner Toner is almost depleted when the "Toner is displayed. message is almost empty." The remaining toner may leak. The remaining toner may spill out. • Do not ...

User Guide
Page 99
Hold the print cartridge with one hand as you release the print cartridge lever with another hand. EBS030 4. EAT124 97 Put the used print cartridge in a plastic bag and seal it . Replacing the Toner 2. EBS402 3. Squeeze the clip on the print cartridge and lift it so that the toner does not spill out.
Hold the print cartridge with one hand as you release the print cartridge lever with another hand. EBS030 4. EAT124 97 Put the used print cartridge in a plastic bag and seal it . Replacing the Toner 2. EBS402 3. Squeeze the clip on the print cartridge and lift it so that the toner does not spill out.

User Guide
Page 100
Shake the new print cartridge at least 10 times to the left and right so that the toner inside it clicks into the machine. Remove the new print cartridge from the toner kit. EAT125 6. Press the new print cartridge until it spreads uniformly. 10 EAT048 7. Insert the new print cartridge into place. 98 EBS031 Adding Paper and Toner 5. 4.
Shake the new print cartridge at least 10 times to the left and right so that the toner inside it clicks into the machine. Remove the new print cartridge from the toner kit. EAT125 6. Press the new print cartridge until it spreads uniformly. 10 EAT048 7. Insert the new print cartridge into place. 98 EBS031 Adding Paper and Toner 5. 4.

User Guide
Page 101
1 2 EBS040 8. Close the front cover. Precautions When Storing Toner • Do not store toner (new or used ) • Toner containers while toner is inside in a place where children can reach them: • Toner (new or used ) or toner containers while toner is inside • Toner-attached parts 99 Replacing the Toner EBS032 9. Lock the lever of the print cartridge. The toner can ignite and result in burns or fire. • Do not leave the following items in a place with an open flame.
1 2 EBS040 8. Close the front cover. Precautions When Storing Toner • Do not store toner (new or used ) • Toner containers while toner is inside in a place where children can reach them: • Toner (new or used ) or toner containers while toner is inside • Toner-attached parts 99 Replacing the Toner EBS032 9. Lock the lever of the print cartridge. The toner can ignite and result in burns or fire. • Do not leave the following items in a place with an open flame.


