
AirPrint Guide
Page 16
... Specify how to insert. [Finishing Options] Configure settings for inserting a cover page (banner page). 1 2 DVL905 1. 1. Cover Page Type Select the type of consumables, such as toner and paper. Reduce or enlarge printouts to fit the paper. How to insert it , check [Scale down only]. [Cover Page] Configure settings for stapling, the...
... Specify how to insert. [Finishing Options] Configure settings for inserting a cover page (banner page). 1 2 DVL905 1. 1. Cover Page Type Select the type of consumables, such as toner and paper. Reduce or enlarge printouts to fit the paper. How to insert it , check [Scale down only]. [Cover Page] Configure settings for stapling, the...
User Guide
Page 1
For safe and correct use, be sure to read Safety Information before using the machine. User Guide Selected Version Getting Started Copy Fax Print Scan Document Server Web Image Monitor Adding Paper and Toner Troubleshooting Specifications for the Machine Legal and Contact Information For information not found in this manual, see the online manuals available on our web site (https://www.ricoh.com/).
For safe and correct use, be sure to read Safety Information before using the machine. User Guide Selected Version Getting Started Copy Fax Print Scan Document Server Web Image Monitor Adding Paper and Toner Troubleshooting Specifications for the Machine Legal and Contact Information For information not found in this manual, see the online manuals available on our web site (https://www.ricoh.com/).
User Guide
Page 7
... When Scanned 157 Changing the Print Settings to Print a Document 158 Specifying a Page to 4...172 Loading Paper into Tray 2 to Print...159 7. Adding Paper and Toner Loading Paper into the Paper Tray...167 Loading Paper into Tray 1...168 Loading Paper into the Bypass Tray...174 Specifying Regular Sizes Using the Control...
... When Scanned 157 Changing the Print Settings to Print a Document 158 Specifying a Page to 4...172 Loading Paper into Tray 2 to Print...159 7. Adding Paper and Toner Loading Paper into the Paper Tray...167 Loading Paper into Tray 1...168 Loading Paper into the Bypass Tray...174 Specifying Regular Sizes Using the Control...
User Guide
Page 8
... Paper...191 Printing onto Letterhead Paper Using the Printer Driver 192 Recommended Original Size and Weight 193 Replacing the Toner...194 Precautions When Storing Toner...195 Precautions When Replacing the Toner 195 Disposing Exhausted Toners...196 9. Troubleshooting Alert Sounds...199 Checking the Indicators, Icons, and Messages on the Control Panel 201 When an Icon...
... Paper...191 Printing onto Letterhead Paper Using the Printer Driver 192 Recommended Original Size and Weight 193 Replacing the Toner...194 Precautions When Storing Toner...195 Precautions When Replacing the Toner 195 Disposing Exhausted Toners...196 9. Troubleshooting Alert Sounds...199 Checking the Indicators, Icons, and Messages on the Control Panel 201 When an Icon...

User Guide
Page 13
... active • When the service call message appears • When the ADF, machine's cover, or ADF cover are opened • When the "Add Toner" message appears • When toner is being replenished • When one of the following screens is minimized. Power consumption is displayed: • System Settings 11 Sleep Mode In...
... active • When the service call message appears • When the ADF, machine's cover, or ADF cover are opened • When the "Add Toner" message appears • When toner is being replenished • When one of the following screens is minimized. Power consumption is displayed: • System Settings 11 Sleep Mode In...
User Guide
Page 16
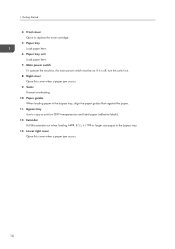
If it is off, turn the switch on OHP transparencies and label paper (adhesive labels). 12. Bypass tray Use to replace the toner cartridge. 5. Front cover Open to copy or print on . 8. Lower right cover , 81/2 × 11 or larger size paper in the bypass tray, align the ...
If it is off, turn the switch on OHP transparencies and label paper (adhesive labels). 12. Bypass tray Use to replace the toner cartridge. 5. Front cover Open to copy or print on . 8. Lower right cover , 81/2 × 11 or larger size paper in the bypass tray, align the ...
User Guide
Page 17
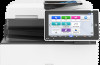
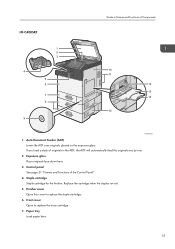
... the ADF over originals placed on the exposure glass. Staple cartridge Staple cartridge for the finisher. Finisher cover Open this cover to replace the toner cartridge. 7. Replace the cartridge when the staples run out. 5. Front cover Open to replace the staple cartridge. 6. Control panel See page... 21 "Names and Functions of Components 1 2 3 4 5 6 7 8 9 10 11 12 13 14 15 D0C9IA0901 1. IM C400SRF Guide to Names and Functions of the Control Panel". 4. If you load a stack of originals in the ADF, the ADF will automatically feed the...
... the ADF over originals placed on the exposure glass. Staple cartridge Staple cartridge for the finisher. Finisher cover Open this cover to replace the toner cartridge. 7. Replace the cartridge when the staples run out. 5. Front cover Open to replace the staple cartridge. 6. Control panel See page... 21 "Names and Functions of Components 1 2 3 4 5 6 7 8 9 10 11 12 13 14 15 D0C9IA0901 1. IM C400SRF Guide to Names and Functions of the Control Panel". 4. If you load a stack of originals in the ADF, the ADF will automatically feed the...
User Guide
Page 25
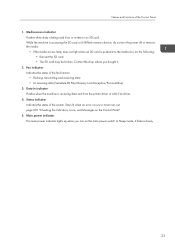
.... • Flashing: transmitting and receiving data • Lit: receiving data (Substitute RX File/Memory Lock Reception/Personal Box) 3. Stays lit when an error occurs or toner runs out. Contact the shop where you turn the power off or remove the media. • If the media access lamp does not light when...
.... • Flashing: transmitting and receiving data • Lit: receiving data (Substitute RX File/Memory Lock Reception/Personal Box) 3. Stays lit when an error occurs or toner runs out. Contact the shop where you turn the power off or remove the media. • If the media access lamp does not light when...
User Guide
Page 28
... or Widget to check the contents. 26 When you can add or delete icons and widgets, and change their order. If a message indicating that the toner has run out or an error has occurred is approx. 30N (approx. 3 kgf). (N = Newton, kgf = Kilogram force. 1 kgf = 9.8N.) • Touch the Home screen to...
... or Widget to check the contents. 26 When you can add or delete icons and widgets, and change their order. If a message indicating that the toner has run out or an error has occurred is approx. 30N (approx. 3 kgf). (N = Newton, kgf = Kilogram force. 1 kgf = 9.8N.) • Touch the Home screen to...

User Guide
Page 30
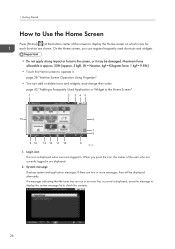
...; Machine's maintenance information See "Checking the Machine Status from the Control Panel", User Guide (Full Version). 15. Date/Time and Toner remaining The current date and time is turned on under [Function Priority]. • See "Displaying Frequently Used Functions on the screen quickly...you can change the screen displayed when the power is displayed. To display the information about Toner remaining, specify [Display Time/Remaining Toner] of [Screen Features Settings] to [Remaining Toner]. 14. [Check Status] Press to check the following operations by touching the screen with ...
...; Machine's maintenance information See "Checking the Machine Status from the Control Panel", User Guide (Full Version). 15. Date/Time and Toner remaining The current date and time is turned on under [Function Priority]. • See "Displaying Frequently Used Functions on the screen quickly...you can change the screen displayed when the power is displayed. To display the information about Toner remaining, specify [Display Time/Remaining Toner] of [Screen Features Settings] to [Remaining Toner]. 14. [Check Status] Press to check the following operations by touching the screen with ...
User Guide
Page 169
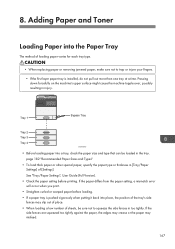
8. Adding Paper and Toner Loading Paper into the Paper Tray The method of sheets, be loaded in injury. See "Tray/Paper Settings", User Guide (Full Version). • Check the ...
8. Adding Paper and Toner Loading Paper into the Paper Tray The method of sheets, be loaded in injury. See "Tray/Paper Settings", User Guide (Full Version). • Check the ...

User Guide
Page 170
8. Adding Paper and Toner • When loading paper on the edge. If there is not flat, curls will occur on a tray which has a few sheets of paper, multiple sheets ...
8. Adding Paper and Toner • When loading paper on the edge. If there is not flat, curls will occur on a tray which has a few sheets of paper, multiple sheets ...
User Guide
Page 172
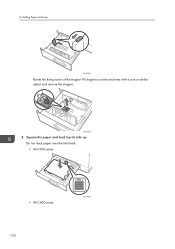
Square the paper and load it print side up. 8. Adding Paper and Toner D0C9IA0912 Rotate the fixing screw of the stopper 90 degrees counterclockwise with a coin or similar object and remove the stopper. 1 2 D0C9IA0910 5. Do not stack paper over the limit mark. • IM C300 series • IM C400 series D0C9IA5916 170
Square the paper and load it print side up. 8. Adding Paper and Toner D0C9IA0912 Rotate the fixing screw of the stopper 90 degrees counterclockwise with a coin or similar object and remove the stopper. 1 2 D0C9IA0910 5. Do not stack paper over the limit mark. • IM C300 series • IM C400 series D0C9IA5916 170
User Guide
Page 174
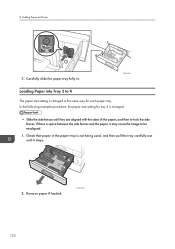
... between the side fences and the paper, it stops. 2. In the following example procedure, the paper size setting for each paper tray. Adding Paper and Toner 2 1 7. Check that paper in the paper tray is not being used, and then pull the tray carefully out until it may cause the image to...
... between the side fences and the paper, it stops. 2. In the following example procedure, the paper size setting for each paper tray. Adding Paper and Toner 2 1 7. Check that paper in the paper tray is not being used, and then pull the tray carefully out until it may cause the image to...
User Guide
Page 176
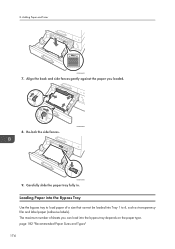
D0C9IA5924 D0C9IA5930 9. Re-lock the side fences. Loading Paper into the Bypass Tray Use the bypass tray to 4, such as transparency film and label paper (adhesive labels). The maximum number of sheets you loaded. 8. Align the back and side fences gently against the paper you can load into Tray 1 to load paper of a size that cannot be loaded into the bypass tray depends on the paper type. page 182 "Recommended Paper Sizes and Types" 174 Adding Paper and Toner D0C9IA5923 7. Carefully slide the paper tray fully in. 8.
D0C9IA5924 D0C9IA5930 9. Re-lock the side fences. Loading Paper into the Bypass Tray Use the bypass tray to 4, such as transparency film and label paper (adhesive labels). The maximum number of sheets you loaded. 8. Align the back and side fences gently against the paper you can load into Tray 1 to load paper of a size that cannot be loaded into the bypass tray depends on the paper type. page 182 "Recommended Paper Sizes and Types" 174 Adding Paper and Toner D0C9IA5923 7. Carefully slide the paper tray fully in. 8.
User Guide
Page 178
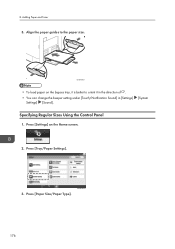
D0C9IA5927 • To load paper on the Home screen. 2. Press [Paper Size/Paper Type]. Align the paper guides to orient it is better to the paper size. Press [Settings] on the bypass tray, it in the direction of . • You can change the beeper setting under [Touch/Notification Sound] in [Settings] Settings] [Sound]. [System Specifying Regular Sizes Using the Control Panel 1. D0C9PA5323 176 8. Adding Paper and Toner 3. Press [Tray/Paper Settings]. 3.
D0C9IA5927 • To load paper on the Home screen. 2. Press [Paper Size/Paper Type]. Align the paper guides to orient it is better to the paper size. Press [Settings] on the bypass tray, it in the direction of . • You can change the beeper setting under [Touch/Notification Sound] in [Settings] Settings] [Sound]. [System Specifying Regular Sizes Using the Control Panel 1. D0C9PA5323 176 8. Adding Paper and Toner 3. Press [Tray/Paper Settings]. 3.

User Guide
Page 180
Press [Paper Size]. Press [Tray/Paper Settings]. 3. 8. Press [Settings] on the Home screen. 2. Press one tray to set. D0C9PA5253 To specify for the bypass tray, press [Paper Size: Printer]. 178 D0C9PA5323 5. Press [Paper Size/Paper Type]. 4. Adding Paper and Toner Specifying a Custom Size Paper Using the Control Panel 1.
Press [Paper Size]. Press [Tray/Paper Settings]. 3. 8. Press [Settings] on the Home screen. 2. Press one tray to set. D0C9PA5253 To specify for the bypass tray, press [Paper Size: Printer]. 178 D0C9PA5323 5. Press [Paper Size/Paper Type]. 4. Adding Paper and Toner Specifying a Custom Size Paper Using the Control Panel 1.

User Guide
Page 182
Press [Tray/Paper Settings]. 3. Press [Paper Size/Paper Type]. 4. D0C9PA5323 5. Press one tray to set. Adding Paper and Toner On the control panel 1. Press [Paper Type/Thickness]. 180 D0C9PA5255 Press [Settings] on the Home screen. 2. 8.
Press [Tray/Paper Settings]. 3. Press [Paper Size/Paper Type]. 4. D0C9PA5323 5. Press one tray to set. Adding Paper and Toner On the control panel 1. Press [Paper Type/Thickness]. 180 D0C9PA5255 Press [Settings] on the Home screen. 2. 8.

User Guide
Page 184
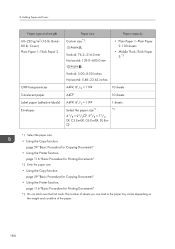
...; 81/2 Custom size: Vertical: 139.5-216.0 mm Horizontal: 210.0-297.0 mm Paper capacity • IM C300 series: 250 sheets • IM C400 series: 550 sheets • IM C300 series: 250 sheets • IM C400 series: 550 sheets Vertical: 5.50-8.50 inches Horizontal: 8.27-11.69 inches 182 Adding Paper and... Toner Recommended Paper Sizes and Types The recommended paper sizes and types for ...
...; 81/2 Custom size: Vertical: 139.5-216.0 mm Horizontal: 210.0-297.0 mm Paper capacity • IM C300 series: 250 sheets • IM C400 series: 550 sheets • IM C300 series: 250 sheets • IM C400 series: 550 sheets Vertical: 5.50-8.50 inches Horizontal: 8.27-11.69 inches 182 Adding Paper and... Toner Recommended Paper Sizes and Types The recommended paper sizes and types for ...
User Guide
Page 186
... Documents" *2 Enter the paper size. • Using the Copy function. page 116 "Basic Procedure for Copying Documents" • Using the Printer function. Adding Paper and Toner Paper type and weight 60-220 g/m2 (16 lb. 8.
... Documents" *2 Enter the paper size. • Using the Copy function. page 116 "Basic Procedure for Copying Documents" • Using the Printer function. Adding Paper and Toner Paper type and weight 60-220 g/m2 (16 lb. 8.


