Operating Instructions
Page 10
... Setting Up Your Machine Unpacking 1.2 Selecting a Location 1.4 Understanding the Component Location 1.5 Front View 1.5 Rear View 1.5 Control Panel Functions 1.6 Attaching Accessories 1.8 Document Output Support 1.8 Installing the Toner Cartridge 1.9 Loading Paper 1.11 Making Connections 1.15 Connecting to your computer 1.17 Turning the Machine On 1.18 Installing Software About Software 1.19 Printer Driver Features 1.20...
... Setting Up Your Machine Unpacking 1.2 Selecting a Location 1.4 Understanding the Component Location 1.5 Front View 1.5 Rear View 1.5 Control Panel Functions 1.6 Attaching Accessories 1.8 Document Output Support 1.8 Installing the Toner Cartridge 1.9 Loading Paper 1.11 Making Connections 1.15 Connecting to your computer 1.17 Turning the Machine On 1.18 Installing Software About Software 1.19 Printer Driver Features 1.20...
Operating Instructions
Page 14
... Cleaning the Outside 7.3 Cleaning the Inside 7.4 Cleaning the Scanning Glass 7.5 Maintaining the Toner Cartridge 7.6 Redistributing Toner 7.7 Replacing the Toner Cartridge 7.8 Setting the Notify Toner Option 7.9 Cleaning the Drum 7.9 Ignoring the Toner Empty Message 7.10 Chapter 8: TROUBLESHOOTING Clearing Document Jams 8.2 Clearing Paper Jams 8.3 In... Tray 1 8.3 In Tray 2 8.4 In the Paper Exit Area 8.5 In the Fuser Area or Around the Toner Cartridge . 8.6 In the Manual Feeder 8.6 Tips for Avoiding Paper Jams 8.7 Clearing LCD Error Messages 8.8 Solving Problems 8.11 ...
... Cleaning the Outside 7.3 Cleaning the Inside 7.4 Cleaning the Scanning Glass 7.5 Maintaining the Toner Cartridge 7.6 Redistributing Toner 7.7 Replacing the Toner Cartridge 7.8 Setting the Notify Toner Option 7.9 Cleaning the Drum 7.9 Ignoring the Toner Empty Message 7.10 Chapter 8: TROUBLESHOOTING Clearing Document Jams 8.2 Clearing Paper Jams 8.3 In... Tray 1 8.3 In Tray 2 8.4 In the Paper Exit Area 8.5 In the Fuser Area or Around the Toner Cartridge . 8.6 In the Manual Feeder 8.6 Tips for Avoiding Paper Jams 8.7 Clearing LCD Error Messages 8.8 Solving Problems 8.11 ...
Operating Instructions
Page 17
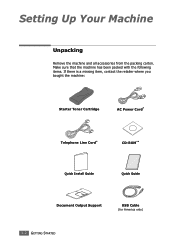
Make sure that the machine has been packed with the following items. If there is a missing item, contact the retailer where you bought the machine: Starter Toner Cartridge AC Power Cord* Telephone Line Cord* CD-ROM** Quick Install Guide Quick Guide Document Output Support USB Cable (for America only) 1.2 GETTING STARTED Setting Up Your Machine Unpacking Remove the machine and all accessories from the packing carton.
Make sure that the machine has been packed with the following items. If there is a missing item, contact the retailer where you bought the machine: Starter Toner Cartridge AC Power Cord* Telephone Line Cord* CD-ROM** Quick Install Guide Quick Guide Document Output Support USB Cable (for America only) 1.2 GETTING STARTED Setting Up Your Machine Unpacking Remove the machine and all accessories from the packing carton.
Operating Instructions
Page 20
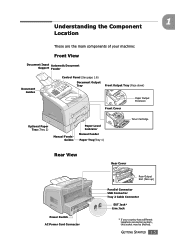
... Front Output Tray (Face down) Front Cover Paper Output Extension Optional Paper Tray (Tray 2) Manual Feeder Guides Paper Level Indicator Manual Feeder Paper Tray(Tray 1) Toner Cartridge 1 Rear View Power Switch AC Power Cord Connector Rear Cover Rear Output Slot (Face up) Parallel Connector USB Connector Tray 2 Cable Connector Line Jack EXT...
... Front Output Tray (Face down) Front Cover Paper Output Extension Optional Paper Tray (Tray 2) Manual Feeder Guides Paper Level Indicator Manual Feeder Paper Tray(Tray 1) Toner Cartridge 1 Rear View Power Switch AC Power Cord Connector Rear Cover Rear Output Slot (Face up) Parallel Connector USB Connector Tray 2 Cable Connector Line Jack EXT...
Operating Instructions
Page 24
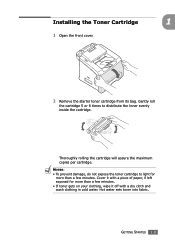
... a piece of paper, if left exposed for more than a few minutes. Installing the Toner Cartridge 1 1 Open the front cover. 2 Remove the starter toner cartridge from its bag. Gently roll the cartridge 5 or 6 times to light for more than a few minutes. • If toner gets on your clothing, wipe it with a dry cloth and wash clothing in...
... a piece of paper, if left exposed for more than a few minutes. Installing the Toner Cartridge 1 1 Open the front cover. 2 Remove the starter toner cartridge from its bag. Gently roll the cartridge 5 or 6 times to light for more than a few minutes. • If toner gets on your clothing, wipe it with a dry cloth and wash clothing in...

Operating Instructions
Page 25
3 Slide the toner cartridge into the machine until it locks into place completely. 4 Close the front cover. Make sure that the cover is securely closed. 1.10 GETTING STARTED
3 Slide the toner cartridge into the machine until it locks into place completely. 4 Close the front cover. Make sure that the cover is securely closed. 1.10 GETTING STARTED
Operating Instructions
Page 114
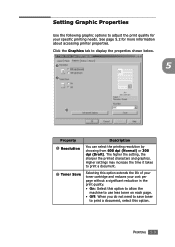
...a document, select this option. Higher settings may increase the time it takes to print a document. 2 Toner Save Selecting this option extends the life of your toner cartridge and reduces your specific printing needs. Setting Graphic Properties Use the following graphic options to adjust the print quality... reduction in the print quality. • On: Select this option to allow the machine to use less toner on each page. • Off: When you do not need to save toner to display the properties shown below. 1 5 2 3 Property Description 1 Resolution You can select the printing...
...a document, select this option. Higher settings may increase the time it takes to print a document. 2 Toner Save Selecting this option extends the life of your toner cartridge and reduces your specific printing needs. Setting Graphic Properties Use the following graphic options to adjust the print quality... reduction in the print quality. • On: Select this option to allow the machine to use less toner on each page. • Off: When you do not need to save toner to display the properties shown below. 1 5 2 3 Property Description 1 Resolution You can select the printing...
Operating Instructions
Page 134
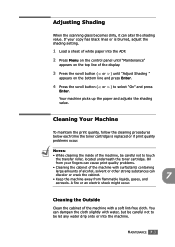
This chapter includes: • Clearing the Memory • Adjusting Shading • Cleaning Your Machine • Maintaining the Toner Cartridge 7 MAINTENANCE This chapter provides information for maintaining your machine and the toner cartridge.
This chapter includes: • Clearing the Memory • Adjusting Shading • Cleaning Your Machine • Maintaining the Toner Cartridge 7 MAINTENANCE This chapter provides information for maintaining your machine and the toner cartridge.
Operating Instructions
Page 136
Cleaning Your Machine To maintain the print quality, follow the cleaning procedures below each time the toner cartridge is blurred, adjust the shading setting. 1 Load a sheet of alcohol, solvent or other strong substances can discolor or crack the cabinet. 7 •... "Adjust Shading " appears on the bottom line and press Enter. 4 Press the scroll button ( or ) to touch the transfer roller, located underneath the toner cartridge. Your machine picks up the paper and adjusts the shading value. If your fingers can cause print quality problems. • Cleaning the cabinet of the...
Cleaning Your Machine To maintain the print quality, follow the cleaning procedures below each time the toner cartridge is blurred, adjust the shading setting. 1 Load a sheet of alcohol, solvent or other strong substances can discolor or crack the cabinet. 7 •... "Adjust Shading " appears on the bottom line and press Enter. 4 Press the scroll button ( or ) to touch the transfer roller, located underneath the toner cartridge. Your machine picks up the paper and adjusts the shading value. If your fingers can cause print quality problems. • Cleaning the cabinet of the...
Operating Instructions
Page 137
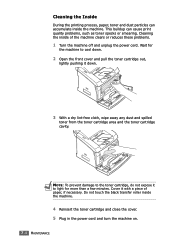
Cleaning the Inside During the printing process, paper, toner and dust particles can cause print quality problems, such as toner specks or smearing. NOTE: To prevent damage to light for more than a few minutes. Do not touch the black transfer ...the front cover and pull the toner cartridge out, lightly pushing it to the toner cartridge, do not expose it down. 3 With a dry lint-free cloth, wipe away any dust and spilled toner from the toner cartridge area and the toner cartridge cavity. This buildup can accumulate inside the machine. 4 Reinsert the toner cartridge and close the cover. 5...
Cleaning the Inside During the printing process, paper, toner and dust particles can cause print quality problems, such as toner specks or smearing. NOTE: To prevent damage to light for more than a few minutes. Do not touch the black transfer ...the front cover and pull the toner cartridge out, lightly pushing it to the toner cartridge, do not expose it down. 3 With a dry lint-free cloth, wipe away any dust and spilled toner from the toner cartridge area and the toner cartridge cavity. This buildup can accumulate inside the machine. 4 Reinsert the toner cartridge and close the cover. 5...
Operating Instructions
Page 139
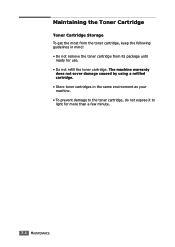
The machine warranty does not cover damage caused by using a refilled cartridge. • Store toner cartridges in mind: • Do not remove the toner cartridge from the toner cartridge, keep the following guidelines in the same environment as your machine. • To prevent damage to the toner cartridge, do not expose it to light for use. • Do not refill the toner cartridge. Maintaining the Toner Cartridge Toner Cartridge Storage To get the most from its package until ready for more than a few minute. 7.6 MAINTENANCE
The machine warranty does not cover damage caused by using a refilled cartridge. • Store toner cartridges in mind: • Do not remove the toner cartridge from the toner cartridge, keep the following guidelines in the same environment as your machine. • To prevent damage to the toner cartridge, do not expose it to light for use. • Do not refill the toner cartridge. Maintaining the Toner Cartridge Toner Cartridge Storage To get the most from its package until ready for more than a few minute. 7.6 MAINTENANCE

Operating Instructions
Page 140
... cover. The LCD displays the warning message, "[Toner Low]." MAINTENANCE 7.7 Redistributing Toner When the toner cartridge is near the end of its life, white streaks or light print occurs. You can temporarily reestablish the print quality by redistributing the remaining toner in cold water. NOTE: If the toner gets on your clothing, wipe it off with...
... cover. The LCD displays the warning message, "[Toner Low]." MAINTENANCE 7.7 Redistributing Toner When the toner cartridge is near the end of its life, white streaks or light print occurs. You can temporarily reestablish the print quality by redistributing the remaining toner in cold water. NOTE: If the toner gets on your clothing, wipe it off with...
Operating Instructions
Page 141
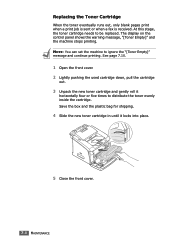
... sent or when a fax is received. See page 7.10. 1 Open the front cover. 2 Lightly pushing the used cartridge down, pull the cartridge out. 3 Unpack the new toner cartridge and gently roll it locks into place. 5 Close the front cover. 7.8 MAINTENANCE Save the box and the plastic bag for... shipping. 4 Slide the new toner cartridge in until it horizontally four or five times to be replaced. At this stage, the toner cartridge needs to distribute the toner evenly inside the cartridge. The display on the control panel shows the warning message, "[Toner Empty]" and the machine stops ...
... sent or when a fax is received. See page 7.10. 1 Open the front cover. 2 Lightly pushing the used cartridge down, pull the cartridge out. 3 Unpack the new toner cartridge and gently roll it locks into place. 5 Close the front cover. 7.8 MAINTENANCE Save the box and the plastic bag for... shipping. 4 Slide the new toner cartridge in until it horizontally four or five times to be replaced. At this stage, the toner cartridge needs to distribute the toner evenly inside the cartridge. The display on the control panel shows the warning message, "[Toner Empty]" and the machine stops ...
Operating Instructions
Page 142
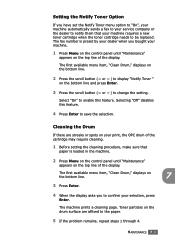
...the setting. The first available menu item, "Clean Drum," displays on the bottom line. 2 Press the scroll button ( or ) to display "Notify Toner " on the bottom line. 7 3 Press Enter. 4 When the display asks you bought your machine. 1 Press Menu on the control panel until "...enable this feature. 4 Press Enter to save the selection. Toner particles on the top line of the cartridge may require cleaning. 1 Before setting the cleaning procedure, make sure that your machine requires a new toner cartridge when the toner cartridge needs to be replaced. The fax number is loaded in the...
...the setting. The first available menu item, "Clean Drum," displays on the bottom line. 2 Press the scroll button ( or ) to display "Notify Toner " on the bottom line. 7 3 Press Enter. 4 When the display asks you bought your machine. 1 Press Menu on the control panel until "...enable this feature. 4 Press Enter to save the selection. Toner particles on the top line of the cartridge may require cleaning. 1 Before setting the cleaning procedure, make sure that your machine requires a new toner cartridge when the toner cartridge needs to be replaced. The fax number is loaded in the...
Operating Instructions
Page 143
This is empty, the machine shows a "[Toner Empty]" message and stops printing. Select "Off" to save the selection. 7.10 MAINTENANCE You can set the machine to ignore the message when it displays ... "Machine Setup" appears on the display. 2 Press the scroll button ( or ) until "Ignore Toner" appears on the bottom line and press Enter. 3 Press the Scroll button ( or ) to ignore the Toner Empty message. Ignoring the Toner Empty Message When the toner cartridge is the default setting. 4 Press Enter to stop printing when the message appears...
This is empty, the machine shows a "[Toner Empty]" message and stops printing. Select "Off" to save the selection. 7.10 MAINTENANCE You can set the machine to ignore the message when it displays ... "Machine Setup" appears on the display. 2 Press the scroll button ( or ) until "Ignore Toner" appears on the bottom line and press Enter. 3 Press the Scroll button ( or ) to ignore the Toner Empty message. Ignoring the Toner Empty Message When the toner cartridge is the default setting. 4 Press Enter to stop printing when the message appears...
Operating Instructions
Page 146
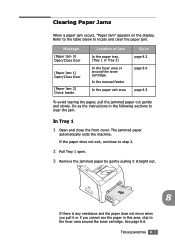
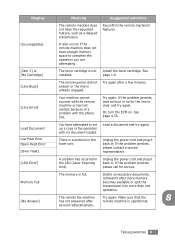
... paper does not move when you pull it or if you cannot see the paper in the following sections to the fuser area around the toner cartridge. Message [Paper Jam 0] Open/Close Door [Paper Jam 1] Open/Close Door [Paper Jam 2] Check Inside Location of Jam In the paper tray. (Tray 1 or... Tray 2) In the fuser area or around the toner cartridge. Refer to the table below to page 8.3 page 8.6 page 8.5 To avoid tearing the paper, pull the jammed paper out gently and slowly. The jammed paper...
... paper does not move when you pull it or if you cannot see the paper in the following sections to the fuser area around the toner cartridge. Message [Paper Jam 0] Open/Close Door [Paper Jam 1] Open/Close Door [Paper Jam 2] Check Inside Location of Jam In the paper tray. (Tray 1 or... Tray 2) In the fuser area or around the toner cartridge. Refer to the table below to page 8.3 page 8.6 page 8.5 To avoid tearing the paper, pull the jammed paper out gently and slowly. The jammed paper...
Operating Instructions
Page 149
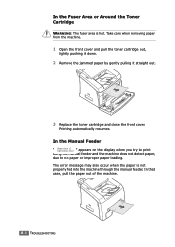
..., lightly pushing it down. 2 Remove the jammed paper by gently pulling it straight out. 3 Replace the toner cartridge and close the front cover. In the Fuser Area or Around the Toner Cartridge WARNING: The fuser area is not properly fed into the machine through the manual feeder. In the Manual Feeder " " appears on the...
..., lightly pushing it down. 2 Remove the jammed paper by gently pulling it straight out. 3 Replace the toner cartridge and close the front cover. In the Fuser Area or Around the Toner Cartridge WARNING: The fuser area is not properly fed into the machine through the manual feeder. In the Manual Feeder " " appears on the...
Operating Instructions
Page 151
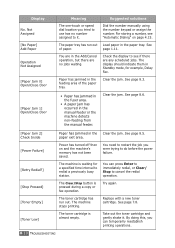
.... Just use a one-touch or speed dial number or dial a number manually using the number keypad. 8.8 TROUBLESHOOTING The machine has a problem with recognizing the new toner cartridge. Ask the sender to accept "Yes." The machine has a communication problem. Please contact a service representative or re-install the catridge. You have tried to indicate...
.... Just use a one-touch or speed dial number or dial a number manually using the number keypad. 8.8 TROUBLESHOOTING The machine has a problem with recognizing the new toner cartridge. Ask the sender to accept "Yes." The machine has a communication problem. Please contact a service representative or re-install the catridge. You have tried to indicate...
Operating Instructions
Page 152
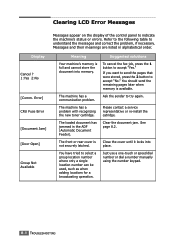
... Meaning Suggested solutions The remote machine does not have enough memory space to complete the operation you are attempting. [Jam 1] or [No Cartridge] The toner cartridge is not installed. See page 1.9. [Line Busy] The remote person did not answer or the line is a problem in . Or... Make sure that the 8 has not answered after more memory becomes available or split the transmission into more than one operation. Install the toner cartridge. Load a document and try again. Try again after a few minutes. [Line Error] Your machine cannot connect with the remote machine ...
... Meaning Suggested solutions The remote machine does not have enough memory space to complete the operation you are attempting. [Jam 1] or [No Cartridge] The toner cartridge is not installed. See page 1.9. [Line Busy] The remote person did not answer or the line is a problem in . Or... Make sure that the 8 has not answered after more memory becomes available or split the transmission into more than one operation. Install the toner cartridge. Load a document and try again. Try again after a few minutes. [Line Error] Your machine cannot connect with the remote machine ...
Operating Instructions
Page 153
...page 1.11. The display should indicate them in the Clear the jam. Clear the jam. See page 8.3. Clear the jam. Try again. [Toner Empty] The toner cartridge has run out of the paper tray. • Paper has jammed in the fuser area. • A paper jam has occurred in the ...feeding area of paper. Replace with a new toner cartridge. Take out the toner cartridge and gently shake it . For storing a number, see if there are no number assigned to redial a previously busy station. See page...
...page 1.11. The display should indicate them in the Clear the jam. Clear the jam. See page 8.3. Clear the jam. Try again. [Toner Empty] The toner cartridge has run out of the paper tray. • Paper has jammed in the fuser area. • A paper jam has occurred in the ...feeding area of paper. Replace with a new toner cartridge. Take out the toner cartridge and gently shake it . For storing a number, see if there are no number assigned to redial a previously busy station. See page...

