Operating Instructions
Page 1
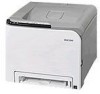
Operating Instructions Hardware Guide 1 Guide to read "Safety Information" before you use , be sure to the Printer 2 Installing the Printer and Options 3 Connecting the Printer 4 Paper and Other Media 5 Replacing Consumables 6 Cleaning the Printer 7 Troubleshooting 8 Removing Misfed Paper 9 Appendix Read this machine and keep it handy for future reference. For safe and correct use this manual carefully before using the machine.
Operating Instructions Hardware Guide 1 Guide to read "Safety Information" before you use , be sure to the Printer 2 Installing the Printer and Options 3 Connecting the Printer 4 Paper and Other Media 5 Replacing Consumables 6 Cleaning the Printer 7 Troubleshooting 8 Removing Misfed Paper 9 Appendix Read this machine and keep it handy for future reference. For safe and correct use this manual carefully before using the machine.
Operating Instructions
Page 9
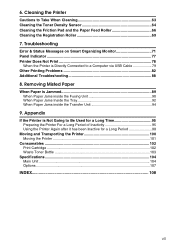
... to a Computer via USB Cable 79 Other Printing Problems 82 Additional Troubleshooting 88 8. Troubleshooting Error & Status Messages on Smart Organizing Monitor 71 Panel Indicator ...77 Printer Does Not Print 78 When the Printer is Directly Connected to Take When Cleaning 63 Cleaning the Toner Density Sensor 64 Cleaning the Friction Pad and the Paper...
... to a Computer via USB Cable 79 Other Printing Problems 82 Additional Troubleshooting 88 8. Troubleshooting Error & Status Messages on Smart Organizing Monitor 71 Panel Indicator ...77 Printer Does Not Print 78 When the Printer is Directly Connected to Take When Cleaning 63 Cleaning the Toner Density Sensor 64 Cleaning the Friction Pad and the Paper...
Operating Instructions
Page 73
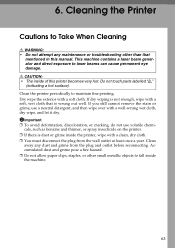
..., and let it dry. Clean away any maintenance or troubleshooting other small metallic objects to laser beams can cause permanent eye damage. 6. This machine contains a laser beam generator and direct exposure to fall inside the printer, wipe with a soft, wet cloth that mentioned in this printer becomes very hot. Do not touch parts labelled "v" (indicating...
..., and let it dry. Clean away any maintenance or troubleshooting other small metallic objects to laser beams can cause permanent eye damage. 6. This machine contains a laser beam generator and direct exposure to fall inside the printer, wipe with a soft, wet cloth that mentioned in this printer becomes very hot. Do not touch parts labelled "v" (indicating...
Operating Instructions
Page 81
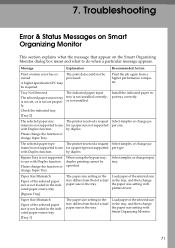
...[Bypass Tray] The paper size setting in the tray differs from that of actual paper size in the tray. with Duplex function. Troubleshooting Error & Status Messages on Smart Organizing Monitor This section explains what the message that of actual paper size in the tray differs from ...pa- (name) is not supported to use with Duplex function. A higher specification PC may be processed. The selected paper type The printer received a request Select simplex or change Input Tray. Tray Not Detected The selected paper source tray is not set properly. Please change ...
...[Bypass Tray] The paper size setting in the tray differs from that of actual paper size in the tray. with Duplex function. Troubleshooting Error & Status Messages on Smart Organizing Monitor This section explains what the message that of actual paper size in the tray differs from ...pa- (name) is not supported to use with Duplex function. A higher specification PC may be processed. The selected paper type The printer received a request Select simplex or change Input Tray. Tray Not Detected The selected paper source tray is not set properly. Please change ...
Operating Instructions
Page 82
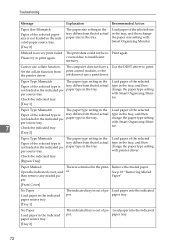
... type in the tray. covered due to print. Remove the misfed paper. paper tray. Troubleshooting Message Explanation Recommended Action Paper Size Mismatch Paper of the selected paper size is a misfeed in the printer. The print data could not be re- Check the indicated tray. [Tray 1] The... not loaded in the tray. tor. [Tray 2] Paper Type Mismatch Paper of the selected type is tray differs from the printer driver. with printer driver. Load paper into the indicated per. paper tray. 72 Set the collate function from that of actual paper size in the...
... type in the tray. covered due to print. Remove the misfed paper. paper tray. Troubleshooting Message Explanation Recommended Action Paper Size Mismatch Paper of the selected paper size is a misfeed in the printer. The print data could not be re- Check the indicated tray. [Tray 1] The... not loaded in the tray. tor. [Tray 2] Paper Type Mismatch Paper of the selected type is tray differs from the printer driver. with printer driver. Load paper into the indicated per. paper tray. 72 Set the collate function from that of actual paper size in the...
Operating Instructions
Page 84
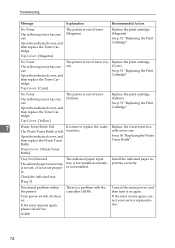
...again. If the error occurs again, contact your service representative. 74 Replace the print cartridge (Magenta). Top Cover : [Yellow] The printer is not installed correctly, or not installed. See p.51 "Replacing the Print Cartridge" 7 Waste Toner Bottle Full It is time to ...properly. See p.51 "Replacing the Print Cartridge" No Toner The following toner has run out. Replace the print cartridge (Cyan). Troubleshooting Message Explanation Recommended Action No Toner The following toner has run out. Open the indicated cover, and then replace the Toner Cartridge...
...again. If the error occurs again, contact your service representative. 74 Replace the print cartridge (Magenta). Top Cover : [Yellow] The printer is not installed correctly, or not installed. See p.51 "Replacing the Print Cartridge" 7 Waste Toner Bottle Full It is time to ...properly. See p.51 "Replacing the Print Cartridge" No Toner The following toner has run out. Replace the print cartridge (Cyan). Troubleshooting Message Explanation Recommended Action No Toner The following toner has run out. Open the indicated cover, and then replace the Toner Cartridge...
Operating Instructions
Page 86
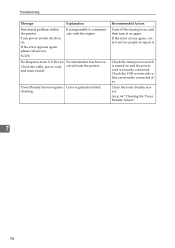
...Color registration failed. Check the main power switch is turned on and the power cord is impossible to repair it on . Clean the toner density sensor. If the error occurs again, contact service people to communicate with the engine. and main switch. Troubleshooting Message Explanation Functional problem within the printer.... No Response from I/O Device No information has been reCheck the cable, power cord, ceived from the printer. Turn power switch off the ...
...Color registration failed. Check the main power switch is turned on and the power cord is impossible to repair it on . Clean the toner density sensor. If the error occurs again, contact service people to communicate with the engine. and main switch. Troubleshooting Message Explanation Functional problem within the printer.... No Response from I/O Device No information has been reCheck the cable, power cord, ceived from the printer. Turn power switch off the ...
Operating Instructions
Page 88
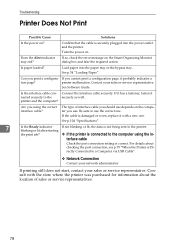
... Contact your sales or service representative. terface cable Check the port connection setting is not being sent to the securely as well. Troubleshooting Printer Does Not Print Possible Cause Solutions Is the power on the Smart Organizing Monitor dialog box and take the required action...interface cable securely. Turn the power on the computer you using the in- Can you cannot print a configuration page, it nected securely to the printer. If it has a fastener, fasten it probably indicates a tion page? Confirm that the cable is Di- Does the Alert indicator stay red?...
... Contact your sales or service representative. terface cable Check the port connection setting is not being sent to the securely as well. Troubleshooting Printer Does Not Print Possible Cause Solutions Is the power on the Smart Organizing Monitor dialog box and take the required action...interface cable securely. Turn the power on the computer you using the in- Can you cannot print a configuration page, it nected securely to the printer. If it has a fastener, fasten it probably indicates a tion page? Confirm that the cable is Di- Does the Alert indicator stay red?...
Operating Instructions
Page 90
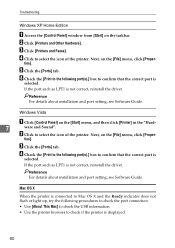
...Mac] to check the USB information. • Use the printer browser to confirm that the correct port is displayed. 80 Windows Vista A Click [Control Panel] on the [File] menu, click [Proper- E Click the [Ports] tab. Troubleshooting Windows XP Home Edition A Access the [Control Panel] window... from [Start] on the [File] menu, click [Proper- D Click to select the icon of the printer. F Check the [Print to the following port(s).] box to check ...
...Mac] to check the USB information. • Use the printer browser to confirm that the correct port is displayed. 80 Windows Vista A Click [Control Panel] on the [File] menu, click [Proper- E Click the [Ports] tab. Troubleshooting Windows XP Home Edition A Access the [Control Panel] window... from [Start] on the [File] menu, click [Proper- D Click to select the icon of the printer. F Check the [Print to the following port(s).] box to check ...
Operating Instructions
Page 92
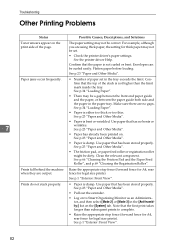
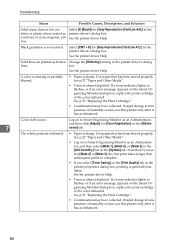
... may not be set in the tray exceeds the limit. Use paper that has been stored properly. Note that has no gaps. See the printer driver Help. Envelopes can be dirty. Confirm that the paper is not higher than subsequent prints to Smart Organizing Monitor as an Administrator, and ... Other Media". • Paper has already been printed on the [System] tab. Confirm that the top of the stack is not curled or bent. Troubleshooting Other Printing Problems Status Possible Causes, Descriptions, and Solutions Toner smears appear on the print side of paper set . • Check the...
... may not be set in the tray exceeds the limit. Use paper that has been stored properly. Note that has no gaps. See the printer driver Help. Envelopes can be dirty. Confirm that the paper is not higher than subsequent prints to Smart Organizing Monitor as an Administrator, and ... Other Media". • Paper has already been printed on the [System] tab. Confirm that the top of the stack is not curled or bent. Troubleshooting Other Printing Problems Status Possible Causes, Descriptions, and Solutions Toner smears appear on the print side of paper set . • Check the...
Operating Instructions
Page 94
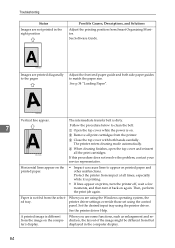
... paper guide and both hands carefully. B Remove all the print cartridges. Set the desired input tray using the control panel. See the printer driver Help. C Close the top cover with both side paper guides to appear on printed paper and other malfunctions. When you are using... the procedure below to clean the belt: A Open the top cover while the power is different from the printer. A printed image is on again. Paper is dirty. See p.34 "Loading Paper". Then, perform the print job again. Troubleshooting Status Images are not printed in the computer display. 84
... paper guide and both hands carefully. B Remove all the print cartridges. Set the desired input tray using the control panel. See the printer driver Help. C Close the top cover with both side paper guides to appear on printed paper and other malfunctions. When you are using... the procedure below to clean the belt: A Open the top cover while the power is different from the printer. A printed image is on again. Paper is dirty. See p.34 "Loading Paper". Then, perform the print job again. Troubleshooting Status Images are not printed in the computer display. 84
Operating Instructions
Page 96
...dialog box, replace the print cartridge of the color indicated. a mixture of the color indicated. Select [CMY + K] for [Gray Reproduction (Text/Line Art):] in the shiny or glossy when created as printer driver's dialog box. See the printer driver Help. Solid lines are Select [K (... p.23 "Paper and Other Media". • Toner is damp. Troubleshooting Status Possible Causes, Descriptions, and Solutions Solid areas, lines or text are printed as broken Change the [Dithering:] setting in the printer driver's dialog lines. box. If a toner indicator lights or flashes...
...dialog box, replace the print cartridge of the color indicated. a mixture of the color indicated. Select [CMY + K] for [Gray Reproduction (Text/Line Art):] in the shiny or glossy when created as printer driver's dialog box. See the printer driver Help. Solid lines are Select [K (... p.23 "Paper and Other Media". • Toner is damp. Troubleshooting Status Possible Causes, Descriptions, and Solutions Solid areas, lines or text are printed as broken Change the [Dithering:] setting in the printer driver's dialog lines. box. If a toner indicator lights or flashes...
Operating Instructions
Page 98
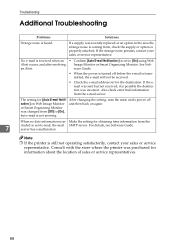
...sales or service representative. See Soft- or Smart Organizing Monitor was purchased for the destination. Consult with the store where the printer was changed from [Off] to [On] using Web Alert occurs, and after resolving Image Monitor or Smart Organizing Monitor....for obtaining time information from the e-mail server. If a supply was incorrect. Note ❒ If the printer is heard. Troubleshooting Additional Troubleshooting Problems Solutions Strange noise is still not operating satisfactorily, contact your sales or service representative. server has a malfunction. an ...
...sales or service representative. See Soft- or Smart Organizing Monitor was purchased for the destination. Consult with the store where the printer was changed from [Off] to [On] using Web Alert occurs, and after resolving Image Monitor or Smart Organizing Monitor....for obtaining time information from the e-mail server. If a supply was incorrect. Note ❒ If the printer is heard. Troubleshooting Additional Troubleshooting Problems Solutions Strange noise is still not operating satisfactorily, contact your sales or service representative. server has a malfunction. an ...

Operating Instructions
Page 118
... troubleshooting, 88 Appendix, 100 Attaching Memory Unit Type F 256MB (DDR-SDRAM Module), 16 Attaching Paper Feed Unit TK1010, 14 C Cleaning the friction pad, 66 Cleaning the paper feed roller, 66 Cleaning the printer, 63 Cleaning the registration roller, 69 Cleaning the toner density sensor, 64 Connecting the printer ... L Loading paper, 25 optional paper feed unit, 34, 46 tray 1, 34 108 M Memory Unit Type F 256MB, 16, 107 Moving and transporting the printer, 100 N Network, 19 O Options, 107 Other printing problems, 82 P Paper and other media, 23 Paper feed roller, 66 Paper Feed Unit TK1010, 14...
... troubleshooting, 88 Appendix, 100 Attaching Memory Unit Type F 256MB (DDR-SDRAM Module), 16 Attaching Paper Feed Unit TK1010, 14 C Cleaning the friction pad, 66 Cleaning the paper feed roller, 66 Cleaning the printer, 63 Cleaning the registration roller, 69 Cleaning the toner density sensor, 64 Connecting the printer ... L Loading paper, 25 optional paper feed unit, 34, 46 tray 1, 34 108 M Memory Unit Type F 256MB, 16, 107 Moving and transporting the printer, 100 N Network, 19 O Options, 107 Other printing problems, 82 P Paper and other media, 23 Paper feed roller, 66 Paper Feed Unit TK1010, 14...
Operating Instructions
Page 6
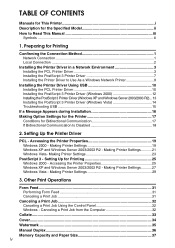
... PostScript 3 Printer Driver 7 Installing the Printer Driver to Use As a Windows Network Printer 9 Installing the Printer Driver Using USB 10 Installing the PCL Printer Driver 10 Installing the PostScript 3 Printer Driver (Windows 2000 12 Installing the PostScript 3 Printer Driver (Windows XP and Windows Server 2003/2003 R2)... 13 Installing the PostScript 3 Printer Driver (Windows Vista 14 Troubleshooting USB 15...
... PostScript 3 Printer Driver 7 Installing the Printer Driver to Use As a Windows Network Printer 9 Installing the Printer Driver Using USB 10 Installing the PCL Printer Driver 10 Installing the PostScript 3 Printer Driver (Windows 2000 12 Installing the PostScript 3 Printer Driver (Windows XP and Windows Server 2003/2003 R2)... 13 Installing the PostScript 3 Printer Driver (Windows Vista 14 Troubleshooting USB 15...
Operating Instructions
Page 23
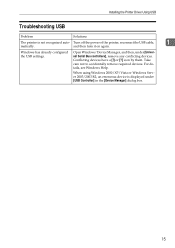
.... 15 When using Windows 2000/XP/Vista or Windows Server 2003/2003 R2, an erroneous device is not recognized auto- Installing the Printer Driver Using USB Troubleshooting USB Problem Solutions The printer is displayed under [Universal Serial Bus controllers], remove any conflicting devices. Conflicting devices have a [!] or [?] icon by them. and then turn...
.... 15 When using Windows 2000/XP/Vista or Windows Server 2003/2003 R2, an erroneous device is not recognized auto- Installing the Printer Driver Using USB Troubleshooting USB Problem Solutions The printer is displayed under [Universal Serial Bus controllers], remove any conflicting devices. Conflicting devices have a [!] or [?] icon by them. and then turn...
Operating Instructions
Page 107
..., 60, 90 TCP/IP Port Type P9100, 1, 91 Test Page, 57, 87 Top Page, 46 Tray Priority, 50 Troubleshooting PictBridge, 43 USB, 15 U UDP, 63 User Tools tab, 56, 57, 86, 87 Printer Configuration, 58, 88 W Watermark, 35 Web Image Monitor, 45 List/Test Print, 51 login information, 52 network settings, 51... paper settings, 50 printer settings, 49 Top Page, 46 user mode, 47 Web Image Monitor Help, 52 download, 52 Windows...
..., 60, 90 TCP/IP Port Type P9100, 1, 91 Test Page, 57, 87 Top Page, 46 Tray Priority, 50 Troubleshooting PictBridge, 43 USB, 15 U UDP, 63 User Tools tab, 56, 57, 86, 87 Printer Configuration, 58, 88 W Watermark, 35 Web Image Monitor, 45 List/Test Print, 51 login information, 52 network settings, 51... paper settings, 50 printer settings, 49 Top Page, 46 user mode, 47 Web Image Monitor Help, 52 download, 52 Windows...
Administration Guide
Page 7
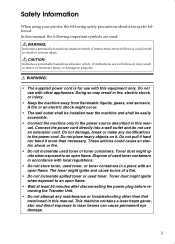
Safety Information When using your printer, the following important symbols are used: Indicates a potentially hazardous situation ...The toner might ignite when exposed to an open flame. Do not damage, break or make any maintenance or troubleshooting other appliances. Toner dust might occur. • The wall outlet shall be installed near the machine and shall...30 minutes after disconnecting the power plug before removing the Transfer Unit. • Do not attempt any modifications to laser beams can cause permanent eye damage. 3 R WARNING: • The supplied power cord is for use an ...
Safety Information When using your printer, the following important symbols are used: Indicates a potentially hazardous situation ...The toner might ignite when exposed to an open flame. Do not damage, break or make any maintenance or troubleshooting other appliances. Toner dust might occur. • The wall outlet shall be installed near the machine and shall...30 minutes after disconnecting the power plug before removing the Transfer Unit. • Do not attempt any modifications to laser beams can cause permanent eye damage. 3 R WARNING: • The supplied power cord is for use an ...

Administration Guide
Page 37
For safe and correct use this manual carefully before using the machine. Operating Instructions Hardware Guide 1 Guide to read "Safety Information" before you use , be sure to the Printer 2 Installing the Printer and Options 3 Connecting the Printer 4 Paper and Other Media 5 Replacing Consumables 6 Cleaning the Printer 7 Troubleshooting 8 Removing Misfed Paper 9 Appendix Read this machine and keep it handy for future reference.
For safe and correct use this manual carefully before using the machine. Operating Instructions Hardware Guide 1 Guide to read "Safety Information" before you use , be sure to the Printer 2 Installing the Printer and Options 3 Connecting the Printer 4 Paper and Other Media 5 Replacing Consumables 6 Cleaning the Printer 7 Troubleshooting 8 Removing Misfed Paper 9 Appendix Read this machine and keep it handy for future reference.

Administration Guide
Page 44
... to a Computer via USB Cable 79 Other Printing Problems 82 Additional Troubleshooting 88 8. Appendix If the Printer is Jammed 89 When Paper Jams inside the Fusing Unit 90 When Paper Jams Inside the Tray 92 When Paper Jams inside the Transfer ... ...102 Waste Toner Bottle 103 Specifications...104 Main Unit ...104 Options ...107 INDEX...108 vii Troubleshooting Error & Status Messages on Smart Organizing Monitor 71 Panel Indicator ...77 Printer Does Not Print 78 When the Printer is Directly Connected to Take When Cleaning 63 Cleaning the Toner Density Sensor 64 Cleaning the Friction...
... to a Computer via USB Cable 79 Other Printing Problems 82 Additional Troubleshooting 88 8. Appendix If the Printer is Jammed 89 When Paper Jams inside the Fusing Unit 90 When Paper Jams Inside the Tray 92 When Paper Jams inside the Transfer ... ...102 Waste Toner Bottle 103 Specifications...104 Main Unit ...104 Options ...107 INDEX...108 vii Troubleshooting Error & Status Messages on Smart Organizing Monitor 71 Panel Indicator ...77 Printer Does Not Print 78 When the Printer is Directly Connected to Take When Cleaning 63 Cleaning the Toner Density Sensor 64 Cleaning the Friction...

