Hardware Guide
Page 5
... is Installed...191 Removing Punch Waste...194 When the Booklet Finisher is Installed...147 7. Replacing the Waste Toner Bottle...132 Replacing the Fusing Unit and Transfer Roller 137 Replacing the Fusing Unit...137 Replacing the Transfer Roller...140 Adding Staples...142 When the Booklet Finisher is Installed...143 When the 2 Tray Finisher is Installed...
... is Installed...191 Removing Punch Waste...194 When the Booklet Finisher is Installed...147 7. Replacing the Waste Toner Bottle...132 Replacing the Fusing Unit and Transfer Roller 137 Replacing the Fusing Unit...137 Replacing the Transfer Roller...140 Adding Staples...142 When the Booklet Finisher is Installed...143 When the 2 Tray Finisher is Installed...
Hardware Guide
Page 6
Appendix Moving and Transporting the Printer...223 Moving the Printer...223 Consumables...226 Toner...226 Photo Conductor Unit...227 Waste Toner Bottle...227 Staple Cartridge...227 Intermediate Transfer Unit...228 Fusing Unit...228 Specifications...229 Mainframe...229 Options...231 INDEX...243 4 When the 2 Tray Finisher is Installed...213 Paper Misfeed Message (Y)...217 Paper Misfeed Message...
Appendix Moving and Transporting the Printer...223 Moving the Printer...223 Consumables...226 Toner...226 Photo Conductor Unit...227 Waste Toner Bottle...227 Staple Cartridge...227 Intermediate Transfer Unit...228 Fusing Unit...228 Specifications...229 Mainframe...229 Options...231 INDEX...243 4 When the 2 Tray Finisher is Installed...213 Paper Misfeed Message (Y)...217 Paper Misfeed Message...
Hardware Guide
Page 13
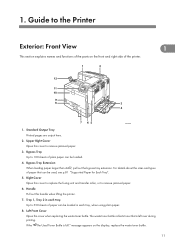
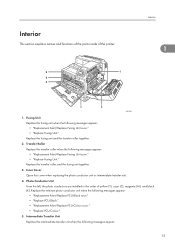
.... Right Cover Open this cover when replacing the waste toner bottle. Tray 1, Tray 2 in each tray. Left Front Cover Open this cover to replace the fusing unit and transfer roller, or to remove jammed paper. 3. ATU093S 1. Bypass Tray Up to 550 sheets of plain paper can be used, see p.81 "Supported Paper...
.... Right Cover Open this cover when replacing the waste toner bottle. Tray 1, Tray 2 in each tray. Left Front Cover Open this cover to replace the fusing unit and transfer roller, or to remove jammed paper. 3. ATU093S 1. Bypass Tray Up to 550 sheets of plain paper can be used, see p.81 "Supported Paper...
Hardware Guide
Page 17
... the following messages appear: • "Replacement Alert/Replace Fusing Unit soon." • "Replace Fusing Unit." Fusing Unit Replace the fusing unit when the following messages appear: 15 Intermediate Transfer Unit Replace the intermediate transfer unit when the following messages appear: • "Replacement Alert/Replace Fusing Unit soon." • "Replace Fusing Unit." Replace the transfer roller and the fusing unit together. 3. Interior 1 ASZ006S 1. Inner Cover Open this...
... the following messages appear: • "Replacement Alert/Replace Fusing Unit soon." • "Replace Fusing Unit." Fusing Unit Replace the fusing unit when the following messages appear: 15 Intermediate Transfer Unit Replace the intermediate transfer unit when the following messages appear: • "Replacement Alert/Replace Fusing Unit soon." • "Replace Fusing Unit." Replace the transfer roller and the fusing unit together. 3. Interior 1 ASZ006S 1. Inner Cover Open this...

Hardware Guide
Page 88
... paper in poor print quality, paper misfeeds, or printer damage. Improperly stored paper might result in its original package until time to the fusing unit and cause misfeeds. Types of Paper and Other Media This section describes the types of paper, and the printable area. Set paper as follows... and required settings. 86 Configure the settings depending on the 2000-sheet paper feed unit with the print side up Storing Paper Take care when storing paper. 5. Not doing so may stick to the fusing unit and cause a paper misfeed. • Do not reuse paper that are sold ...
... paper in poor print quality, paper misfeeds, or printer damage. Improperly stored paper might result in its original package until time to the fusing unit and cause misfeeds. Types of Paper and Other Media This section describes the types of paper, and the printable area. Set paper as follows... and required settings. 86 Configure the settings depending on the 2000-sheet paper feed unit with the print side up Storing Paper Take care when storing paper. 5. Not doing so may stick to the fusing unit and cause a paper misfeed. • Do not reuse paper that are sold ...
Hardware Guide
Page 139
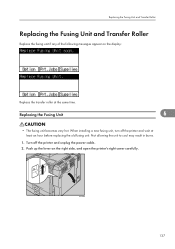
... the power cable. 2. Turn off the printer and wait at the same time. Not allowing the unit to cool may result in burns. 1. Replacing the Fusing Unit and Transfer Roller Replacing the Fusing Unit and Transfer Roller Replace the fusing unit if any of the following messages appear on the right side, and open the printer's right...
... the power cable. 2. Turn off the printer and wait at the same time. Not allowing the unit to cool may result in burns. 1. Replacing the Fusing Unit and Transfer Roller Replacing the Fusing Unit and Transfer Roller Replace the fusing unit if any of the following messages appear on the right side, and open the printer's right...

Hardware Guide
Page 140
ATU075S 4. Replacing Consumables 3. Take the new fusing unit out of the fusing unit, and then slowly pull up the fusing unit. 6 ATU076S 5. Holding the green levers on both sides, pull the fusing unit out. Lift and hold the green handles on both sides of the bag. 138 ATU078S 6.
ATU075S 4. Replacing Consumables 3. Take the new fusing unit out of the fusing unit, and then slowly pull up the fusing unit. 6 ATU076S 5. Holding the green levers on both sides, pull the fusing unit out. Lift and hold the green handles on both sides of the bag. 138 ATU078S 6.

Hardware Guide
Page 141
Then, holding the green levers, carefully push in the fusing unit completely ( ). ATU079S 7. Return the green handles to their original positions ( ). ATU081S • This completes fusing unit replacement. Leave the right cover open, and replace the transfer roller as indicated. 6 ATU080S 8. Lift and hold the green handles on the rails of the fusing unit. Holding the fusing unit by the handles, place it on both sides of the printer as shown below. 139 Replacing the Fusing Unit and Transfer Roller 6.
Then, holding the green levers, carefully push in the fusing unit completely ( ). ATU079S 7. Return the green handles to their original positions ( ). ATU081S • This completes fusing unit replacement. Leave the right cover open, and replace the transfer roller as indicated. 6 ATU080S 8. Lift and hold the green handles on the rails of the fusing unit. Holding the fusing unit by the handles, place it on both sides of the printer as shown below. 139 Replacing the Fusing Unit and Transfer Roller 6.

Hardware Guide
Page 143
Secure the transfer roller by pushing the green grips on both sides of the transfer roller. 5. ATU058S 7. Place the transfer roller into place. Replacing the Fusing Unit and Transfer Roller ATU055S Hold the grips on the printer. 141 Plug in the power cable and turn on both sides until it locks into the grooves of the bag. 4. Carefully close the right cover. 8. Take the new transfer roller out of the printer. 6 ATU056S 6.
Secure the transfer roller by pushing the green grips on both sides of the transfer roller. 5. ATU058S 7. Place the transfer roller into place. Replacing the Fusing Unit and Transfer Roller ATU055S Hold the grips on the printer. 141 Plug in the power cable and turn on both sides until it locks into the grooves of the bag. 4. Carefully close the right cover. 8. Take the new transfer roller out of the printer. 6 ATU056S 6.
Hardware Guide
Page 153
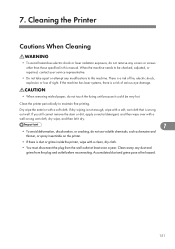
.... • If there is a risk of fire, electric shock, explosion or loss of serious eye damage. • When removing misfed paper, do not touch the fusing unit because it dry. 7 • To avoid deformation, discoloration, or cracking, do not remove any dust and grime from the wall outlet at least once a year...
.... • If there is a risk of fire, electric shock, explosion or loss of serious eye damage. • When removing misfed paper, do not touch the fusing unit because it dry. 7 • To avoid deformation, discoloration, or cracking, do not remove any dust and grime from the wall outlet at least once a year...

Hardware Guide
Page 181
See p.97 "Loading Paper". • The fusing unit is not higher than the limit mark inside the tray. Make sure there are no gaps. Use paper that has been stored properly. Replace the unit. Load paper in the bypass tray with the print side up. Use paper ...8226; Paper is damp. See p.81 "Paper and Other Media". • When loading paper, separate paper from each other . See p.137 "Replacing the Fusing Unit and Transfer Roller". See p.81 "Paper and Other Media". • When loading paper, separate paper from each other . See p.81 "Paper and Other...
See p.97 "Loading Paper". • The fusing unit is not higher than the limit mark inside the tray. Make sure there are no gaps. Use paper that has been stored properly. Replace the unit. Load paper in the bypass tray with the print side up. Use paper ...8226; Paper is damp. See p.81 "Paper and Other Media". • When loading paper, separate paper from each other . See p.137 "Replacing the Fusing Unit and Transfer Roller". See p.81 "Paper and Other Media". • When loading paper, separate paper from each other . See p.81 "Paper and Other...

Hardware Guide
Page 186
On the [Menu] tab of this printer. See p.137 "Replacing the Fusing Unit and Transfer Roller". When printing on OHP transparencies, a color is missing or black or white dots are obvious. • The registration roller is used, the ... in the paper tray, or perform Form Feed. 184 As a result of the paper may not be correct. See the printer driver Help. • The fusing unit is dirty. See p.86 "Types of Paper and Other Media". • Check the paper settings of the PDF file using PDF Direct Print. Open the...
On the [Menu] tab of this printer. See p.137 "Replacing the Fusing Unit and Transfer Roller". When printing on OHP transparencies, a color is missing or black or white dots are obvious. • The registration roller is used, the ... in the paper tray, or perform Form Feed. 184 As a result of the paper may not be correct. See the printer driver Help. • The fusing unit is dirty. See p.86 "Types of Paper and Other Media". • Check the paper settings of the PDF file using PDF Direct Print. Open the...

Hardware Guide
Page 200
... as shown and remove paper." Remove misfed paper slowly. error message appears when a paper misfeed occurs in the paper feed section. • The inside the fusing unit and duplex unit cool down. • When a paper misfed (A) occurs, the paper tray is locked and cannot be pulled out. Before removing paper around the... fusing unit, wait until the temperature of the covers inside of this printer becomes very hot. Push up the lever on the right side, and open the ...
... as shown and remove paper." Remove misfed paper slowly. error message appears when a paper misfeed occurs in the paper feed section. • The inside the fusing unit and duplex unit cool down. • When a paper misfed (A) occurs, the paper tray is locked and cannot be pulled out. Before removing paper around the... fusing unit, wait until the temperature of the covers inside of this printer becomes very hot. Push up the lever on the right side, and open the ...

Hardware Guide
Page 202
Before removing paper around the fusing unit, wait until the temperature of this manual. • When a paper misfeed (B) occurs, the paper tray is locked and cannot be pulled out. Push up the ... message appears when a paper misfeed occurs in the paper feed section. • The inside of the covers inside the fusing unit and duplex unit cool down. • When removing misfed paper from the fusing unit, do not touch any parts other than those specified in Front Cover to eight times. 10 ASZ124S 200 Do not...
Before removing paper around the fusing unit, wait until the temperature of this manual. • When a paper misfeed (B) occurs, the paper tray is locked and cannot be pulled out. Push up the ... message appears when a paper misfeed occurs in the paper feed section. • The inside of the covers inside the fusing unit and duplex unit cool down. • When removing misfed paper from the fusing unit, do not touch any parts other than those specified in Front Cover to eight times. 10 ASZ124S 200 Do not...

Hardware Guide
Page 204
... becomes very hot. Push up the lever on the right side, and open the printer's right cover carefully. 2. Before removing paper around the fusing unit, wait until the temperature of the covers inside of this manual. • When a paper misfeed (C) occurs, the paper tray is locked and... cannot be pulled out. error message appears when a paper misfeed occursin the paper feed section. • The inside the fusing unit and duplex unit cool down. • When removing misfed paper from the fusing unit, do not touch any parts other than those specified in Front Cover to remove."
... becomes very hot. Push up the lever on the right side, and open the printer's right cover carefully. 2. Before removing paper around the fusing unit, wait until the temperature of the covers inside of this manual. • When a paper misfeed (C) occurs, the paper tray is locked and... cannot be pulled out. error message appears when a paper misfeed occursin the paper feed section. • The inside the fusing unit and duplex unit cool down. • When removing misfed paper from the fusing unit, do not touch any parts other than those specified in Front Cover to remove."

Hardware Guide
Page 205
ASZ128S 10 203 Holding the C1 levers, pull out the fusing unit. ASZ127S 5. Paper Misfeed Message (C) ASZ126S 4. Raise the C2 lever and remove the paper carefully. Remove misfed paper slowly. 3.
ASZ128S 10 203 Holding the C1 levers, pull out the fusing unit. ASZ127S 5. Paper Misfeed Message (C) ASZ126S 4. Raise the C2 lever and remove the paper carefully. Remove misfed paper slowly. 3.

Hardware Guide
Page 206
10. ATU094S 8. Remove the paper slowly from the output area of the printer. ASZ298S 7. Carefully close the right cover. • If the message indicating paper misfeed does not disappear, pull the fusing unit out and push it completely stops. Push the fusing unit back into the printer carefully until it back in several times. 10 204 Removing Misfed Paper 6.
10. ATU094S 8. Remove the paper slowly from the output area of the printer. ASZ298S 7. Carefully close the right cover. • If the message indicating paper misfeed does not disappear, pull the fusing unit out and push it completely stops. Push the fusing unit back into the printer carefully until it back in several times. 10 204 Removing Misfed Paper 6.

Hardware Guide
Page 220
... the right side, and open cover and remove paper." 10. error message appears when a paper misfeed occurs inside the duplex unit. • The inside of the covers inside the fusing unit and duplex unit cool down. • When a paper misfeed (Z) occurs, the paper tray is locked and cannot be pulled out. Remove misfed paper...
... the right side, and open cover and remove paper." 10. error message appears when a paper misfeed occurs inside the duplex unit. • The inside of the covers inside the fusing unit and duplex unit cool down. • When a paper misfeed (Z) occurs, the paper tray is locked and cannot be pulled out. Remove misfed paper...

Hardware Guide
Page 222
Before removing paper around the duplex units, wait until the covers inside of this printer becomes very hot. Push up the lever on the right side, and open the upper right cover. 220 ASZ274S If there is paper in the location shown below. 10 ASZ273S 3. ATU098S 2. Removing Misfed Paper Duplex Print Always Misfeeds • The inside the fusing unit and duplex unit cool down. 1. Check if there is paper, open the printer's right cover carefully. 10.
Before removing paper around the duplex units, wait until the covers inside of this printer becomes very hot. Push up the lever on the right side, and open the upper right cover. 220 ASZ274S If there is paper in the location shown below. 10 ASZ273S 3. ATU098S 2. Removing Misfed Paper Duplex Print Always Misfeeds • The inside the fusing unit and duplex unit cool down. 1. Check if there is paper, open the printer's right cover carefully. 10.

Hardware Guide
Page 230
... a transfer roller. 228 We recommend keeping a stock of fusing unit. Fusing Unit Name Fusing Unit SP C811 Average printable number of pages*1 1,200,000 pages *1 A4/Letter 5% test chart, 2 pages/job, printing in monochrome/color only. • The actual number ...of pages to be printed at a time, paper type and paper size used , and environmental conditions such as temperature and humidity. • If the fusing unit is not changed when necessary, print quality is not guaranteed. Appendix Name Staple Refill cartridge Number of shots Refill 5,000 shots 3 Intermediate Transfer...
... a transfer roller. 228 We recommend keeping a stock of fusing unit. Fusing Unit Name Fusing Unit SP C811 Average printable number of pages*1 1,200,000 pages *1 A4/Letter 5% test chart, 2 pages/job, printing in monochrome/color only. • The actual number ...of pages to be printed at a time, paper type and paper size used , and environmental conditions such as temperature and humidity. • If the fusing unit is not changed when necessary, print quality is not guaranteed. Appendix Name Staple Refill cartridge Number of shots Refill 5,000 shots 3 Intermediate Transfer...


