Manuals
Page 2
..., special, incidental, or consequential damages as a guide only and is prohibited by local law: bank notes, revenue stamps, bonds, stock certificates, bank drafts, checks, passports, driver's licenses.
..., special, incidental, or consequential damages as a guide only and is prohibited by local law: bank notes, revenue stamps, bonds, stock certificates, bank drafts, checks, passports, driver's licenses.
Manuals
Page 12
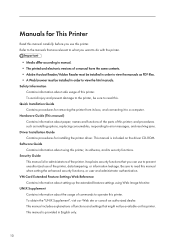
...about using Web Image Monitor. names and functions of the parts of this printer. Quick Installation Guide Contains procedures for installing the printer driver. This manual is included on this . and procedures such as PDF files. • A Web browser must be installed in ...order to error messages, and resolving jams. Driver Installation Guide Contains procedures for removing the printer from its security functions. UNIX Supplement Contains information about setting up the extended features ...
...about using Web Image Monitor. names and functions of the parts of this printer. Quick Installation Guide Contains procedures for installing the printer driver. This manual is included on this . and procedures such as PDF files. • A Web browser must be installed in ...order to error messages, and resolving jams. Driver Installation Guide Contains procedures for removing the printer from its security functions. UNIX Supplement Contains information about setting up the extended features ...
Manuals
Page 27
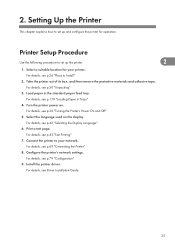
...on the display. 2. Printer Setup Procedure Use the following procedure to set up and configure the printer for your network. For details, see Driver Installation Guide. 25 Select a suitable location for operation. For details, see p.69 "Connecting the Printer" 8. Configure the printer's network ...a test page. For details, see p.26 "Place to your printer. For details, see p.42 "Selecting the Display Language" 6. Install the printer driver. Connect the printer to Install" 2. Load paper in Trays" 4. Select the language used on . Take the printer out of its box, and...
...on the display. 2. Printer Setup Procedure Use the following procedure to set up and configure the printer for your network. For details, see Driver Installation Guide. 25 Select a suitable location for operation. For details, see p.69 "Connecting the Printer" 8. Configure the printer's network ...a test page. For details, see p.26 "Place to your printer. For details, see p.42 "Selecting the Display Language" 6. Install the printer driver. Connect the printer to Install" 2. Load paper in Trays" 4. Select the language used on . Take the printer out of its box, and...
Manuals
Page 50
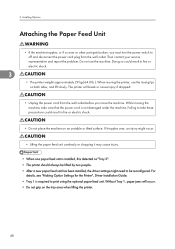
... as "Tray 2". • The printer should always be lifted by two people. • After a new paper feed unit has been installed, the driver settings might need to be reconfigured. 3. If it topples over, an injury might occur. • Lifting the paper feed unit carelessly or dropping it may...or electric shock. • Do not place the machine on an unstable or tilted surface. For details, see "Making Option Settings for the Printer", Driver Installation Guide. • Tray 1 is required to off and disconnect the power cord plug from the wall outlet. The printer will occur. •...
... as "Tray 2". • The printer should always be lifted by two people. • After a new paper feed unit has been installed, the driver settings might need to be reconfigured. 3. If it topples over, an injury might occur. • Lifting the paper feed unit carelessly or dropping it may...or electric shock. • Do not place the machine on an unstable or tilted surface. For details, see "Making Option Settings for the Printer", Driver Installation Guide. • Tray 1 is required to off and disconnect the power cord plug from the wall outlet. The printer will occur. •...
Manuals
Page 53
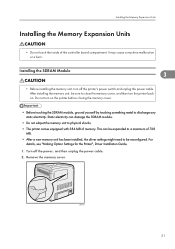
... Expansion Units Installing the Memory Expansion Units • Do not touch the inside of 768 MB. • After a new memory unit has been installed, the driver settings might need to be sure to close the memory cover, and then turn on . Static electricity can be expanded to a maximum of the controller...
... Expansion Units Installing the Memory Expansion Units • Do not touch the inside of 768 MB. • After a new memory unit has been installed, the driver settings might need to be sure to close the memory cover, and then turn on . Static electricity can be expanded to a maximum of the controller...
Manuals
Page 56
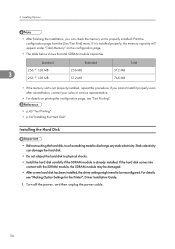
... you can damage the hard disk. • Do not subject the hard disk to be damaged. • After a new hard disk has been installed, the driver settings might need to physical shocks. • Install the hard disk carefully if the SDRAM module is installed properly, the memory capacity will appear under...
... you can damage the hard disk. • Do not subject the hard disk to be damaged. • After a new hard disk has been installed, the driver settings might need to physical shocks. • Install the hard disk carefully if the SDRAM module is installed properly, the memory capacity will appear under...

Manuals
Page 76
... such as your computer's USB interface, or a USB hub. Connect the opposite end's flat connector to the computer. For details, see "Installing the Printer Driver Using USB", Driver Installation Guide. The following describes how to connect the printer to the printer. CBK093 3. Digital Camera Connection This printer supports direct printing, which allows...
... such as your computer's USB interface, or a USB hub. Connect the opposite end's flat connector to the computer. For details, see "Installing the Printer Driver Using USB", Driver Installation Guide. The following describes how to connect the printer to the printer. CBK093 3. Digital Camera Connection This printer supports direct printing, which allows...

Manuals
Page 80
Connect the interface cable to your computer, and then secure the cable. Connect the other end of the interface cable to the IEEE 1284 interface board. CBK096 4 4. 4. Connecting the Printer 3. The printer is now connected to the computer. For details, see "Installing the Printer Driver Using Parallel Cable", Driver Installation Guide. • For details about installing the 1284 interface board, see "Installing the Interface Units". • p.57 "Installing the Interface Units" 78 Install the printer driver.
Connect the interface cable to your computer, and then secure the cable. Connect the other end of the interface cable to the IEEE 1284 interface board. CBK096 4 4. 4. Connecting the Printer 3. The printer is now connected to the computer. For details, see "Installing the Printer Driver Using Parallel Cable", Driver Installation Guide. • For details about installing the 1284 interface board, see "Installing the Interface Units". • p.57 "Installing the Interface Units" 78 Install the printer driver.
Manuals
Page 110
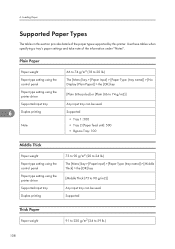
... section provide details of the information under "Notes". Plain Paper Paper weight Paper type setting using the control panel Paper type setting using the printer driver Supported input tray Duplex printing 75 to 90 g/m2 (20 to 24 lb.) The [Menu] key > [Paper Input] > [Paper Type: (tray name)] > ... 2 (Paper feed unit): 500 • Bypass Tray: 100 Middle Thick Paper weight Paper type setting using the control panel Paper type setting using the printer driver Supported input tray 6 Duplex printing Note 66 to 74 g/m2 (18 to 20 lb.) The [Menu] key > [Paper Input] > [Paper Type: (tray ...
... section provide details of the information under "Notes". Plain Paper Paper weight Paper type setting using the control panel Paper type setting using the printer driver Supported input tray Duplex printing 75 to 90 g/m2 (20 to 24 lb.) The [Menu] key > [Paper Input] > [Paper Type: (tray name)] > ... 2 (Paper feed unit): 500 • Bypass Tray: 100 Middle Thick Paper weight Paper type setting using the control panel Paper type setting using the printer driver Supported input tray 6 Duplex printing Note 66 to 74 g/m2 (18 to 20 lb.) The [Menu] key > [Paper Input] > [Paper Type: (tray ...

Manuals
Page 111
... 2]: 106 to 163 g/m2 (28 to 43 lb.) • [Thick Paper 3]: 164 to 220 g/m2 (44 to 59 lb.) Paper type setting using the printer driver • [Thick Paper 1]: [Thick 1 (91 to 105 g/m2)] • [Thick Paper 2]: [Thick 2 (106 to 163 g/m2)] • [Thick Paper 3]: [Thick 3 (164 to... tray [Thick Paper 2]: Tray 1 and Bypass tray. [Thick Paper 3]: Bypass tray. 6 Duplex printing Not supported Note Printing is slightly slower than when using the printer driver Supported input tray Duplex printing 60 to 65 g/m2 (16 to 17 lb.) The [Menu] key > [Paper Input] > [Paper Type: (tray name)] > [...
... 2]: 106 to 163 g/m2 (28 to 43 lb.) • [Thick Paper 3]: 164 to 220 g/m2 (44 to 59 lb.) Paper type setting using the printer driver • [Thick Paper 1]: [Thick 1 (91 to 105 g/m2)] • [Thick Paper 2]: [Thick 2 (106 to 163 g/m2)] • [Thick Paper 3]: [Thick 3 (164 to... tray [Thick Paper 2]: Tray 1 and Bypass tray. [Thick Paper 3]: Bypass tray. 6 Duplex printing Not supported Note Printing is slightly slower than when using the printer driver Supported input tray Duplex printing 60 to 65 g/m2 (16 to 17 lb.) The [Menu] key > [Paper Input] > [Paper Type: (tray name)] > [...
Manuals
Page 112
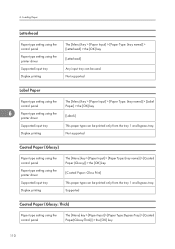
... Print] This paper type can be used. Not supported Coated Paper (Glossy) Paper type setting using the control panel Paper type setting using the printer driver Supported input tray Duplex printing The [Menu] key > [Paper Input] > [Paper Type: (tray name)] > [Label Paper] > the [OK] ...Labels] This paper type can be printed only from the tray 1 and bypass tray. 6. Supported Coated Paper (Glossy: Thick) Paper type setting using the printer driver Supported input tray Duplex printing The [Menu] key > [Paper Input] > [Paper Type: (tray name)] > [Letterhead] > the [OK] key [Letterhead...
... Print] This paper type can be used. Not supported Coated Paper (Glossy) Paper type setting using the control panel Paper type setting using the printer driver Supported input tray Duplex printing The [Menu] key > [Paper Input] > [Paper Type: (tray name)] > [Label Paper] > the [OK] ...Labels] This paper type can be printed only from the tray 1 and bypass tray. 6. Supported Coated Paper (Glossy: Thick) Paper type setting using the printer driver Supported input tray Duplex printing The [Menu] key > [Paper Input] > [Paper Type: (tray name)] > [Letterhead] > the [OK] key [Letterhead...
Manuals
Page 113
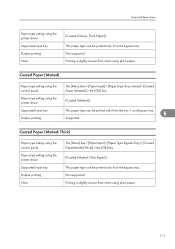
...key > [Paper Input] > [Paper Type: (tray name)] > [Coated Paper (Matted)] > the [OK] key Paper type setting using the printer driver [Coated (Matted)] Supported input tray Duplex printing This paper type can be printed only from the tray 1 and bypass tray. 6 Supported Coated Paper (Matted...: Thick) Paper type setting using the control panel Paper type setting using the printer driver Supported input tray Duplex printing Note The [Menu] key > [Paper Input] > [Paper Type: Bypass Tray] > [Coated Paper(Matted:Thick)] > the...
...key > [Paper Input] > [Paper Type: (tray name)] > [Coated Paper (Matted)] > the [OK] key Paper type setting using the printer driver [Coated (Matted)] Supported input tray Duplex printing This paper type can be printed only from the tray 1 and bypass tray. 6 Supported Coated Paper (Matted...: Thick) Paper type setting using the control panel Paper type setting using the printer driver Supported input tray Duplex printing Note The [Menu] key > [Paper Input] > [Paper Type: Bypass Tray] > [Coated Paper(Matted:Thick)] > the...
Manuals
Page 114
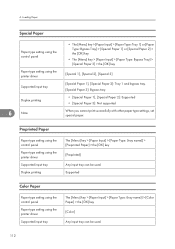
... with other paper type settings, set special paper. Loading Paper Special Paper Paper type setting using the control panel Paper type setting using the printer driver Supported input tray The [Menu] key > [Paper Input] > [Paper Type: (tray name)] > [Color Paper] > the [OK] key [Color] Any ...input tray can be used . 6. Preprinted Paper Paper type setting using the control panel Paper type setting using the printer driver Supported input tray Duplex printing The [Menu] key > [Paper Input] > [Paper Type: (tray name)] > [Preprinted Paper] > the [OK] key [...
... with other paper type settings, set special paper. Loading Paper Special Paper Paper type setting using the control panel Paper type setting using the printer driver Supported input tray The [Menu] key > [Paper Input] > [Paper Type: (tray name)] > [Color Paper] > the [OK] key [Color] Any ...input tray can be used . 6. Preprinted Paper Paper type setting using the control panel Paper type setting using the printer driver Supported input tray Duplex printing The [Menu] key > [Paper Input] > [Paper Type: (tray name)] > [Preprinted Paper] > the [OK] key [...
Manuals
Page 115
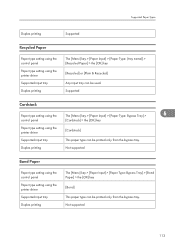
... only from the bypass tray. Duplex printing Not supported Bond Paper Paper type setting using the control panel Paper type setting using the printer driver [Cardstock] Supported input tray This paper type can be used. Supported Cardstock Paper type setting using the The [Menu] key > [Paper... Input] > [Paper Type: Bypass Tray] > 6 control panel [Cardstock] > the [OK] key Paper type setting using the printer driver Supported input tray Duplex printing The [Menu] key > [Paper Input] > [Paper Type: Bypass Tray] > [Bond Paper] > the [OK] key [Bond] This ...
... only from the bypass tray. Duplex printing Not supported Bond Paper Paper type setting using the control panel Paper type setting using the printer driver [Cardstock] Supported input tray This paper type can be used. Supported Cardstock Paper type setting using the The [Menu] key > [Paper... Input] > [Paper Type: Bypass Tray] > 6 control panel [Cardstock] > the [OK] key Paper type setting using the printer driver Supported input tray Duplex printing The [Menu] key > [Paper Input] > [Paper Type: Bypass Tray] > [Bond Paper] > the [OK] key [Bond] This ...
Manuals
Page 116
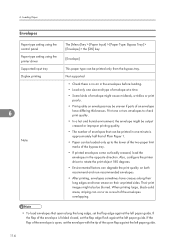
If the flap of envelope might also be printed only from the bypass tray. Also, configure the printer driver to rotate the print object 180 degrees. • Environmental factors can be printed in one size and type of envelope at a time. • Some kinds ..., set the flap edge against the left paper guide. Loading Paper Envelopes Paper type setting using the control panel Paper type setting using the printer driver Supported input tray Duplex printing 6 Note The [Menu] key > [Paper Input] > [Paper Type: Bypass Tray] > [Envelope] > the [OK] key [Envelope] This paper type can be...
If the flap of envelope might also be printed only from the bypass tray. Also, configure the printer driver to rotate the print object 180 degrees. • Environmental factors can be printed in one size and type of envelope at a time. • Some kinds ..., set the flap edge against the left paper guide. Loading Paper Envelopes Paper type setting using the control panel Paper type setting using the printer driver Supported input tray Duplex printing 6 Note The [Menu] key > [Paper Input] > [Paper Type: Bypass Tray] > [Envelope] > the [OK] key [Envelope] This paper type can be...
Manuals
Page 119
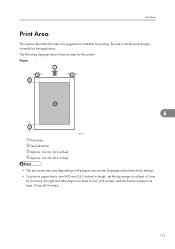
... Print area Feed direction Approx. 4.2 mm (0.2 inches) Approx. 4.2 mm (0.2 inches) • The print area may vary depending on the paper size, printer language and printer driver settings. • To print on paper that is over 900 mm (35.5 inches) in length, set the top margin to at least 4.2 mm (0.2 inches), the...
... Print area Feed direction Approx. 4.2 mm (0.2 inches) Approx. 4.2 mm (0.2 inches) • The print area may vary depending on the paper size, printer language and printer driver settings. • To print on paper that is over 900 mm (35.5 inches) in length, set the top margin to at least 4.2 mm (0.2 inches), the...
Manuals
Page 120
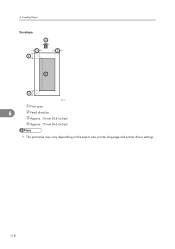
Loading Paper Envelope 2 3 3 4 1 3 CBK101 Print area 6 Feed direction Approx. 10 mm (0.4 inches) Approx. 15 mm (0.6 inches) • The print area may vary depending on the paper size, printer language and printer driver settings. 118 6.
Loading Paper Envelope 2 3 3 4 1 3 CBK101 Print area 6 Feed direction Approx. 10 mm (0.4 inches) Approx. 15 mm (0.6 inches) • The print area may vary depending on the paper size, printer language and printer driver settings. 118 6.
Manuals
Page 131
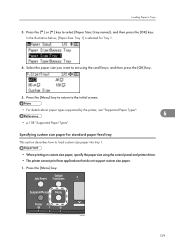
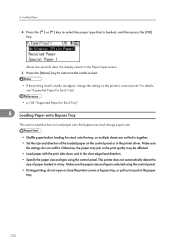
...". 6 • p.108 "Supported Paper Types" Specifying custom size paper for Tray 1. 4. Select the paper size you want to set using the control panel and printer driver. • The printer cannot print from applications that do not support custom size paper. 1.
...". 6 • p.108 "Supported Paper Types" Specifying custom size paper for Tray 1. 4. Select the paper size you want to set using the control panel and printer driver. • The printer cannot print from applications that do not support custom size paper. 1.
Manuals
Page 134
Make sure the settings do not open or close the printer covers or bypass tray, or pull out or push in the printer driver. About two seconds later, the display returns to the initial screen. • If the printing result is badly smudged, change paper size. • Shuffle paper ...
Make sure the settings do not open or close the printer covers or bypass tray, or pull out or push in the printer driver. About two seconds later, the display returns to the initial screen. • If the printing result is badly smudged, change paper size. • Shuffle paper ...
Manuals
Page 137
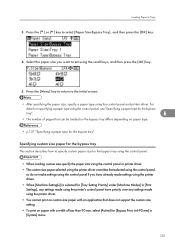
...] under [Machine Modes] in [Print Settings], any settings made using the printer's control panel have priority over any settings made using the printer driver. • You cannot print on custom size paper with an application that can be loaded on the bypass tray differs depending on paper with a..., select [Active] for [Bypass Print: 64-90 mm] in Trays 3. Press the [Menu] key to return to set using the control panel and printer driver. For details on specifying a paper type using the control panel, see "Specifying a paper type for the bypass tray". 6 • The number of pages...
...] under [Machine Modes] in [Print Settings], any settings made using the printer's control panel have priority over any settings made using the printer driver. • You cannot print on custom size paper with an application that can be loaded on the bypass tray differs depending on paper with a..., select [Active] for [Bypass Print: 64-90 mm] in Trays 3. Press the [Menu] key to return to set using the control panel and printer driver. For details on specifying a paper type using the control panel, see "Specifying a paper type for the bypass tray". 6 • The number of pages...


