Operating Instructions
Page 1
... manual contains detailed instructions and notes on which reproduction is prohibited by local law: bank notes, revenue stamps, bonds, stock certificates, bank drafts, checks, passports, driver's licenses. Keep this manual in some countries. For your legal advisor. Certain options might be available in a handy place for direct, indirect, special, incidental, or...
... manual contains detailed instructions and notes on which reproduction is prohibited by local law: bank notes, revenue stamps, bonds, stock certificates, bank drafts, checks, passports, driver's licenses. Keep this manual in some countries. For your legal advisor. Certain options might be available in a handy place for direct, indirect, special, incidental, or...
Operating Instructions
Page 14
... manual contains detailed instructions and notes on which reproduction is prohibited by local law: bank notes, revenue stamps, bonds, stock certificates, bank drafts, checks, passports, driver's licenses. The preceding list is not inclusive. Certain options might result in some countries. The supplier shall not be slightly different from the supplier. Notes...
... manual contains detailed instructions and notes on which reproduction is prohibited by local law: bank notes, revenue stamps, bonds, stock certificates, bank drafts, checks, passports, driver's licenses. The preceding list is not inclusive. Certain options might result in some countries. The supplier shall not be slightly different from the supplier. Notes...
Operating Instructions
Page 19
... it. Installing the Operating Instructions The CD-ROM provided with the printer contains an HTML Operating Instructions Manual in the [Start] menu, select your printer driver, and then click [uninstall]. Follow this is the case, copy all applications currently running. If this is completed. If this instructions to complete the installation...
... it. Installing the Operating Instructions The CD-ROM provided with the printer contains an HTML Operating Instructions Manual in the [Start] menu, select your printer driver, and then click [uninstall]. Follow this is the case, copy all applications currently running. If this is completed. If this instructions to complete the installation...

Operating Instructions
Page 40
... the printer, remove the optional paper feed unit. ❒ Before using control panel, see p.47 "Loading Paper". If you can make settings in the printer driver. ❒ If the new device is not installed properly, reinstall it properly even after attempting reinstallation, contact your sales or service representative. For details about...
... the printer, remove the optional paper feed unit. ❒ Before using control panel, see p.47 "Loading Paper". If you can make settings in the printer driver. ❒ If the new device is not installed properly, reinstall it properly even after attempting reinstallation, contact your sales or service representative. For details about...

Operating Instructions
Page 43
... cover, and then fasten the screw. 2 ASH031S H Attach the memory cover. I After installing the option, print the configuration page to confirm the in the printer driver. ❒ If the memory unit is installed properly, the memory capacity will appear under "Total Memory" on the configuration page.
... cover, and then fasten the screw. 2 ASH031S H Attach the memory cover. I After installing the option, print the configuration page to confirm the in the printer driver. ❒ If the memory unit is installed properly, the memory capacity will appear under "Total Memory" on the configuration page.
Operating Instructions
Page 61
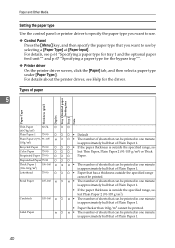
... be printed in one minute is outside the specified range, se- Paper and Other Media Setting the paper type Use the control panel or printer driver to specify the paper type you want to use by selecting a [Paper Type] at [Paper Input]. For details, see Help for the bypass ...tray"". ❖ Printer driver On the printer driver screen, click the [Paper] tab, and then select a paper type under [Paper Type:]. Types of paper 5 Paper Type Thickness (g/m2) Duplex Tray ...
... be printed in one minute is outside the specified range, se- Paper and Other Media Setting the paper type Use the control panel or printer driver to specify the paper type you want to use by selecting a [Paper Type] at [Paper Input]. For details, see Help for the bypass ...tray"". ❖ Printer driver On the printer driver screen, click the [Paper] tab, and then select a paper type under [Paper Type:]. Types of paper 5 Paper Type Thickness (g/m2) Duplex Tray ...
Operating Instructions
Page 62
..., fold their flaps under (as if closed) and place the envelopes so that their flaps point toward the back of envelope. Also, configure the printer driver to the [Setup] tab and select [Rotate by 180 degrees] for [Orientation:] when printing. • If printed envelopes come out badly creased, load the envelopes...
..., fold their flaps under (as if closed) and place the envelopes so that their flaps point toward the back of envelope. Also, configure the printer driver to the [Setup] tab and select [Rotate by 180 degrees] for [Orientation:] when printing. • If printed envelopes come out badly creased, load the envelopes...
Operating Instructions
Page 66
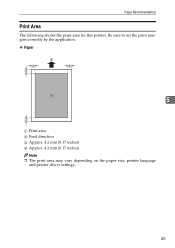
Paper Recommendations Print Area The following shows the print area for this printer. Be sure to set the print margins correctly by the application. ❖ Paper 5 A Print area B Feed direction C Approx. 4.2 mm (0.17 inches) D Approx. 4.2 mm (0.17 inches) Note ❒ The print area may vary depending on the paper size, printer language and printer driver settings. 45
Paper Recommendations Print Area The following shows the print area for this printer. Be sure to set the print margins correctly by the application. ❖ Paper 5 A Print area B Feed direction C Approx. 4.2 mm (0.17 inches) D Approx. 4.2 mm (0.17 inches) Note ❒ The print area may vary depending on the paper size, printer language and printer driver settings. 45
Operating Instructions
Page 67
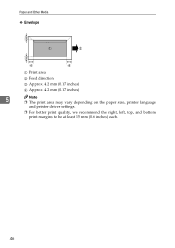
Paper and Other Media ❖ Envelope A Print area B Feed direction C Approx. 4.2 mm (0.17 inches) D Approx. 4.2 mm (0.17 inches) 5 Note ❒ The print area may vary depending on the paper size, printer language and printer driver settings. ❒ For better print quality, we recommend the right, left, top, and bottom print margins to be at least 15 mm (0.6 inches) each. 46
Paper and Other Media ❖ Envelope A Print area B Feed direction C Approx. 4.2 mm (0.17 inches) D Approx. 4.2 mm (0.17 inches) 5 Note ❒ The print area may vary depending on the paper size, printer language and printer driver settings. ❒ For better print quality, we recommend the right, left, top, and bottom print margins to be at least 15 mm (0.6 inches) each. 46

Operating Instructions
Page 79
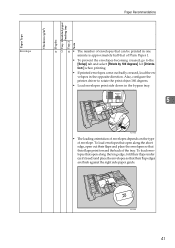
ASH055S G Carefully slide the paper tray back in the printer driver properties dialog box. 58 To avoid paper jams, make sure the tray is securely inserted. 5 ASH056S Note ❒ Be sure to the [Setup] tab and select [Rotate by 180 degrees] for [Orientation:] when printing in until it stops. If you do not, the envelopes will become creased. ❒ To prevent the envelopes becoming creased, go to load envelopes so that their flaps are not stacked higher than the upper limit (lower line) mark inside the tray. Paper and Other Media Make sure envelopes are on the right.
ASH055S G Carefully slide the paper tray back in the printer driver properties dialog box. 58 To avoid paper jams, make sure the tray is securely inserted. 5 ASH056S Note ❒ Be sure to the [Setup] tab and select [Rotate by 180 degrees] for [Orientation:] when printing in until it stops. If you do not, the envelopes will become creased. ❒ To prevent the envelopes becoming creased, go to load envelopes so that their flaps are not stacked higher than the upper limit (lower line) mark inside the tray. Paper and Other Media Make sure envelopes are on the right.

Operating Instructions
Page 81
...356 mm (5.83 - 14 inch) in length can be loaded in the tray 1. ❒ The printer cannot print from applications that selected using the printer driver overrides that do not support custom size paper. 5 A Press the {Menu} key. Menu: Paper Input C Press the {T} or {U} key to display ...example, [Tray 1] is selected for tray 1 Important ❒ When printing on custom size paper, specify the paper size using the control panel or printer driver. ❒ Custom size paper selected using the control panel. Paper and Other Media F Press the {Menu} key. ASI066S B Press the {T} or ...
...356 mm (5.83 - 14 inch) in length can be loaded in the tray 1. ❒ The printer cannot print from applications that selected using the printer driver overrides that do not support custom size paper. 5 A Press the {Menu} key. Menu: Paper Input C Press the {T} or {U} key to display ...example, [Tray 1] is selected for tray 1 Important ❒ When printing on custom size paper, specify the paper size using the control panel or printer driver. ❒ Custom size paper selected using the control panel. Paper and Other Media F Press the {Menu} key. ASI066S B Press the {T} or ...
Operating Instructions
Page 84
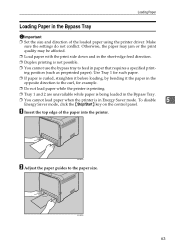
... is not possible. ❒ You cannot use the bypass tray to the paper size. A Insert the top edge of the loaded paper using the printer driver. To disable 5 Energy Saver mode, click the {Stop/Start} key on the control panel. Loading Paper Loading Paper in paper that requires a specified printing position...
... is not possible. ❒ You cannot use the bypass tray to the paper size. A Insert the top edge of the loaded paper using the printer driver. To disable 5 Energy Saver mode, click the {Stop/Start} key on the control panel. Loading Paper Loading Paper in paper that requires a specified printing position...

Operating Instructions
Page 85
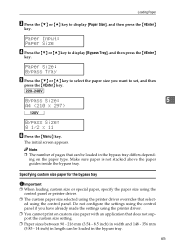
Specifying standard size paper for the bypass tray This describes how to display [Paper Input], and then press the {#Enter} key. Reference 5 For details about specifying the paper sizes, see the Printer driver help. A Press the {Menu} key. Menu: Paper Input 64 Paper and Other Media C Support the paper with your hands, and insert it carefully until it stops. ASH060S D Start the printer driver and specify the paper size. E Start printing. ASI066S B Press the {T} or {U} key to load standard size paper into the bypass tray.
Specifying standard size paper for the bypass tray This describes how to display [Paper Input], and then press the {#Enter} key. Reference 5 For details about specifying the paper sizes, see the Printer driver help. A Press the {Menu} key. Menu: Paper Input 64 Paper and Other Media C Support the paper with your hands, and insert it carefully until it stops. ASH060S D Start the printer driver and specify the paper size. E Start printing. ASI066S B Press the {T} or {U} key to load standard size paper into the bypass tray.
Operating Instructions
Page 86
...in the bypass tray differs depend- Bypass Size: 5 A4 (210 x 297) Bypass Size: 8 1/2 x 11 F Press the {Menu} key. ed using the printer driver overrides that can be loaded in the bypass tray. 65 Do not configure the settings using the control panel if you want to select the... size paper for the bypass tray Important ❒ When loading custom size or special paper, specify the paper size using the control panel or printer driver. ❒ The custom paper size selected using the control panel. Paper Input: Paper Size D Press the {T} or {U} key to display [Paper Size...
...in the bypass tray differs depend- Bypass Size: 5 A4 (210 x 297) Bypass Size: 8 1/2 x 11 F Press the {Menu} key. ed using the printer driver overrides that can be loaded in the bypass tray. 65 Do not configure the settings using the control panel if you want to select the... size paper for the bypass tray Important ❒ When loading custom size or special paper, specify the paper size using the control panel or printer driver. ❒ The custom paper size selected using the control panel. Paper Input: Paper Size D Press the {T} or {U} key to display [Paper Size...

Operating Instructions
Page 88
... g/m2), Plain Paper 1, Plain Paper 2 (91 - 105 g/m2), Recy- lopes in the bypass tray. ❒ The paper type selected using the printer driver overrides that selected using the control panel. Loading Paper G Press the {T} or {U} key to select the paper type when you want to enter the vertical... value, and then press the {#Enter} key. ASI066S 67 Reference For details about the printer driver, see the printer driver Help. 5 Specifying a paper type for the bypass tray By selecting the paper type you load labels, thick paper, or enve- ...
... g/m2), Plain Paper 1, Plain Paper 2 (91 - 105 g/m2), Recy- lopes in the bypass tray. ❒ The paper type selected using the printer driver overrides that selected using the control panel. Loading Paper G Press the {T} or {U} key to select the paper type when you want to enter the vertical... value, and then press the {#Enter} key. ASI066S 67 Reference For details about the printer driver, see the printer driver Help. 5 Specifying a paper type for the bypass tray By selecting the paper type you load labels, thick paper, or enve- ...
Operating Instructions
Page 93
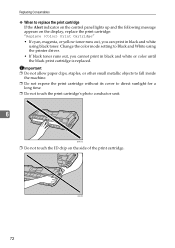
... print cartridge: "Replace (Color) Print Cartridge" • If cyan, magenta, or yellow toner runs out, you cannot print in black and white using the printer driver. • If black toner runs out, you can print in black and white or color until the black print cartridge is replaced.
... print cartridge: "Replace (Color) Print Cartridge" • If cyan, magenta, or yellow toner runs out, you cannot print in black and white using the printer driver. • If black toner runs out, you can print in black and white or color until the black print cartridge is replaced.

Operating Instructions
Page 114
...machine is ready for Wait a while. Load paper of the selected size in the tray, and then change the paper size setting with printer driver. Load paper of the selected size in the tray, and then change the paper size setting with the control panel. Change the port setting...by pressing the {Stop/Start} key on the control panel mean and what to print. The top or front cover is waiting for use a print driver. on the display. the next data to do when a particular message appears. ❖ Status messages Message Offline Processing... The machine is open. Warming...
...machine is ready for Wait a while. Load paper of the selected size in the tray, and then change the paper size setting with printer driver. Load paper of the selected size in the tray, and then change the paper size setting with the control panel. Change the port setting...by pressing the {Stop/Start} key on the control panel mean and what to print. The top or front cover is waiting for use a print driver. on the display. the next data to do when a particular message appears. ❖ Status messages Message Offline Processing... The machine is open. Warming...

Operating Instructions
Page 119
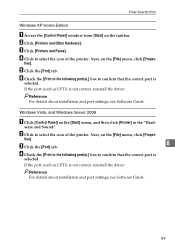
...to select the icon of the printer. B Click to [Settings] and then click [Printers]. If the port (such as LPT1) is not correct, reinstall the driver. C Click the [Port] tab. D Check the [Print to the following port] box to confirm that the correct port is selected. Next, on the ...[File] menu, click [Proper- If the port (such as LPT1) is not correct, reinstall the driver. Troubleshooting When the Printer is Directly Connected to a Computer via USB Cable Windows When the printer is directly connected via a USB cable to a computer ...
...to select the icon of the printer. B Click to [Settings] and then click [Printers]. If the port (such as LPT1) is not correct, reinstall the driver. C Click the [Port] tab. D Check the [Print to the following port] box to confirm that the correct port is selected. Next, on the ...[File] menu, click [Proper- If the port (such as LPT1) is not correct, reinstall the driver. Troubleshooting When the Printer is Directly Connected to a Computer via USB Cable Windows When the printer is directly connected via a USB cable to a computer ...
Operating Instructions
Page 120
..., click [Proper- Next, on the [Start] menu, and then click [Printer] in the "Hard- If the port (such as LPT1) is not correct, reinstall the driver. D Click to select the icon of the printer. If the port (such as LPT1) is not correct, reinstall the... driver. B Click to select the icon of the printer. ties]. E Click the [Port] tab. F Check the [Print to the following port(s).] box to confirm that the ...
..., click [Proper- Next, on the [Start] menu, and then click [Printer] in the "Hard- If the port (such as LPT1) is not correct, reinstall the driver. D Click to select the icon of the printer. If the port (such as LPT1) is not correct, reinstall the... driver. B Click to select the icon of the printer. ties]. E Click the [Port] tab. F Check the [Print to the following port(s).] box to confirm that the ...

Operating Instructions
Page 121
.... B Click [More Info]. B Click [Application], and then select the [Utilities] folder. If it does not, reinstall the driver. 100 C Double-click [Printer Setup Utility]. Using the printer browser - If it does not, reinstall the driver. Mac OS X 10.4.x or earlier A On the desktop, double-click the hard drive icon. The [Printer List...
.... B Click [More Info]. B Click [Application], and then select the [Utilities] folder. If it does not, reinstall the driver. 100 C Double-click [Printer Setup Utility]. Using the printer browser - If it does not, reinstall the driver. Mac OS X 10.4.x or earlier A On the desktop, double-click the hard drive icon. The [Printer List...


