
User Guide
Page 2
... more Please be responsible for any possible laser beam exposure to the operator. Laser Safety: This machine is attached on rear side of consumables (toner, maintenance kits and parts) other than genuine consumables from the supplier. The following label is considered class 1 laser device, safe for each emitter... as above. 2 The supplier shall not be sure to connect the power cord to prevent any damage or expense that you use genuine toner, maintenance kits and parts from the supplier with the laser beam might result from the use . Direct (or indirect reflected) eye contact...
... more Please be responsible for any possible laser beam exposure to the operator. Laser Safety: This machine is attached on rear side of consumables (toner, maintenance kits and parts) other than genuine consumables from the supplier. The following label is considered class 1 laser device, safe for each emitter... as above. 2 The supplier shall not be sure to connect the power cord to prevent any damage or expense that you use genuine toner, maintenance kits and parts from the supplier with the laser beam might result from the use . Direct (or indirect reflected) eye contact...

User Guide
Page 5
... in malfunction and risk of injury to fix it to fall inside the machine. • When moving the machine, you should take out toner and development unit to lift the machine without the assistance of your service representative if you move the machine. While moving the machine, hold ...or cords can damage your machine has been damaged. R CAUTION: • Unplug the power cord from the wall outlet. Do not attempt to prevent toner spill inside the machine. • Do not look into the machine. • You suspect that the power cord will be damaged under the machine....
... in malfunction and risk of injury to fix it to fall inside the machine. • When moving the machine, you should take out toner and development unit to lift the machine without the assistance of your service representative if you move the machine. While moving the machine, hold ...or cords can damage your machine has been damaged. R CAUTION: • Unplug the power cord from the wall outlet. Do not attempt to prevent toner spill inside the machine. • Do not look into the machine. • You suspect that the power cord will be damaged under the machine....
User Guide
Page 7
...recommend using only those specified by an incorrect type. Handling the Machine's Supplies R WARNING: • Do not incinerate used toner, or toner containers in a place with an open flame. If your skin comes into your clothing, wash with large amounts of children. •... to meet the highest standards of used toner containers in accordance with local regulations. • Do not store toner, used toner or toner container. Consult a doctor if necessary. • Avoid getting toner on your eyes, flush immediately with cold water. Toner can spill, dirtying your clothes or skin...
...recommend using only those specified by an incorrect type. Handling the Machine's Supplies R WARNING: • Do not incinerate used toner, or toner containers in a place with an open flame. If your skin comes into your clothing, wash with large amounts of children. •... to meet the highest standards of used toner containers in accordance with local regulations. • Do not store toner, used toner or toner container. Consult a doctor if necessary. • Avoid getting toner on your eyes, flush immediately with cold water. Toner can spill, dirtying your clothes or skin...
User Guide
Page 19
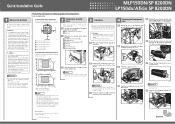
Quick Installation Guide (This manual) Black Toner Pull out tray 1, and take out the fixtures by pulling the wire with four...unit completely. Remove these protective materials after bringing the machine to a wall outlet and do not use an extension cord. Otherwise, toner might fall and injure someone. • If you use this machine for future reference. Warning • The supplied power cord ...and then take out the following specification: • 120 V, 60 Hz, 12 A or more MLP150DN/SP 8200DN LP150dn/Aficio SP 8200DN Unpacking To protect it freely.
Quick Installation Guide (This manual) Black Toner Pull out tray 1, and take out the fixtures by pulling the wire with four...unit completely. Remove these protective materials after bringing the machine to a wall outlet and do not use an extension cord. Otherwise, toner might fall and injure someone. • If you use this machine for future reference. Warning • The supplied power cord ...and then take out the following specification: • 120 V, 60 Hz, 12 A or more MLP150DN/SP 8200DN LP150dn/Aficio SP 8200DN Unpacking To protect it freely.
User Guide
Page 20
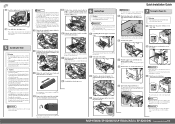
... BEK007S Do not push in toner leak. Lock the side guides. BEK017S • Make sure the power cord is available to secure it counterclockwise. • When you do not pull out the paper tray. BEK254S MLP150DN/SP 8200DN/LP150dn/Aficio SP 8200DN 1/2 Quick Installation Guide Leave the... front cover open flame. If your eyes, flush immediately with cold water. Consult a doctor if necessary. • If toner or used toner gets into the rear of the new black toner by war- BEK004S ...
... BEK007S Do not push in toner leak. Lock the side guides. BEK017S • Make sure the power cord is available to secure it counterclockwise. • When you do not pull out the paper tray. BEK254S MLP150DN/SP 8200DN/LP150dn/Aficio SP 8200DN 1/2 Quick Installation Guide Leave the... front cover open flame. If your eyes, flush immediately with cold water. Consult a doctor if necessary. • If toner or used toner gets into the rear of the new black toner by war- BEK004S ...

User Guide
Page 23
..., and then take out the fixtures by the black sheet. or "Replace Maintenance Kit B." Otherwise, toner might cause the toner to tilt or shake the unit. Maintenance Kit SP 8200 A /B REPLACEMENT GUIDE M8187217 Replacing Maintenance Kit A Warning • Do not incinerate the development unit...starts calibration. Read this sheet) Leaflet about Unpacking the Development Unit Development Unit BEK248S Unlock the right green lever. Maintenance Kit SP 8200 A Replacement Guide (this guide carefully before you finish installing the unit. Calibration takes four to protect the photo conductor ...
..., and then take out the fixtures by the black sheet. or "Replace Maintenance Kit B." Otherwise, toner might cause the toner to tilt or shake the unit. Maintenance Kit SP 8200 A /B REPLACEMENT GUIDE M8187217 Replacing Maintenance Kit A Warning • Do not incinerate the development unit...starts calibration. Read this sheet) Leaflet about Unpacking the Development Unit Development Unit BEK248S Unlock the right green lever. Maintenance Kit SP 8200 A Replacement Guide (this guide carefully before you finish installing the unit. Calibration takes four to protect the photo conductor ...

User Guide
Page 24
...both sides of the box match the following parts. Checking the Contents of the unit ( ), turn the printer on both sides. Maintenance Kit SP 8200 B Replacement Guide (this happens, contact your workspace. • If you turn the pins with a red tag toward you cannot return ... from the right cover ( ), and then take out the protective material. BEK164S BEK185S Copyright © 2007 Printed in burns. Otherwise, toner might ignite when exposed to avoid dirtying your sales or service representative. BEK183S Carefully close the right cover. Align the new transfer unit with...
...both sides of the box match the following parts. Checking the Contents of the unit ( ), turn the printer on both sides. Maintenance Kit SP 8200 B Replacement Guide (this happens, contact your workspace. • If you turn the pins with a red tag toward you cannot return ... from the right cover ( ), and then take out the protective material. BEK164S BEK185S Copyright © 2007 Printed in burns. Otherwise, toner might ignite when exposed to avoid dirtying your sales or service representative. BEK183S Carefully close the right cover. Align the new transfer unit with...
User Guide
Page 29
......140 Cleaning the Registration Roller...142 8. Adjusting the Printer Adjusting Image Density...145 Adjusting Printing Position...147 9. Removing Misfed Paper Removing Misfed Paper...175 3 Adding Toner...109 Replacing Maintenance Kit A...114 Replacing the Development Unit...114 Replacing Maintenance Kit B...121 Replacing the Transfer Unit...122 Replacing the Fusing Unit...125 Adding...
......140 Cleaning the Registration Roller...142 8. Adjusting the Printer Adjusting Image Density...145 Adjusting Printing Position...147 9. Removing Misfed Paper Removing Misfed Paper...175 3 Adding Toner...109 Replacing Maintenance Kit A...114 Replacing the Development Unit...114 Replacing Maintenance Kit B...121 Replacing the Transfer Unit...122 Replacing the Fusing Unit...125 Adding...
User Guide
Page 30
... Message (Z)...192 Paper Misfeed Message (U)...194 Duplex Print Always Misfeeds...198 11. Appendix Moving and Transporting the Printer...201 Moving the Printer...201 Consumables...204 Toner...204 Maintenance Kit...204 Staple Cartridge...205 Specifications...206 Mainframe...206 Options...208 INDEX...219 4
... Message (Z)...192 Paper Misfeed Message (U)...194 Duplex Print Always Misfeeds...198 11. Appendix Moving and Transporting the Printer...201 Moving the Printer...201 Consumables...204 Toner...204 Maintenance Kit...204 Staple Cartridge...205 Specifications...206 Mainframe...206 Options...208 INDEX...219 4
User Guide
Page 39
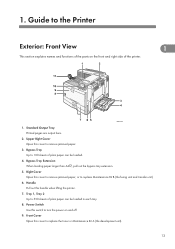
Upper Right Cover Open this cover to replace the toner or Maintenance Kit A (the development unit). 13 Front Cover Open this cover to turn the power on the front and right side of plain paper ...
Upper Right Cover Open this cover to replace the toner or Maintenance Kit A (the development unit). 13 Front Cover Open this cover to turn the power on the front and right side of plain paper ...
User Guide
Page 42
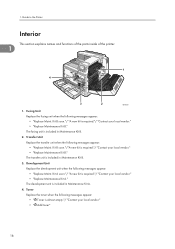
... inside of the printer. 1 BEK002S 1. The fusing unit is required."/ "Contact your local vendor." • " Add toner" 16 Kit A soon."/ "A new kit is almost empty."/ "Contact your local vendor." • "Replace Maintenance Kit B." Toner Replace the toner when the following messages appear: • "Replace Maint. Kit B soon."/ "A new kit is included in Maintenance...
... inside of the printer. 1 BEK002S 1. The fusing unit is required."/ "Contact your local vendor." • " Add toner" 16 Kit A soon."/ "A new kit is almost empty."/ "Contact your local vendor." • "Replace Maintenance Kit B." Toner Replace the toner when the following messages appear: • "Replace Maint. Kit B soon."/ "A new kit is included in Maintenance...

User Guide
Page 45
...] is displayed only when the hard disk is dark. The items are displayed. For details, see Software Guide. 4. [Supplies] Press to display the menu of toner and paper in the printer. 3. [Prt.Jobs] Press to display the status of options installed in each tray are highlighted when selected. To adjust the...
...] is displayed only when the hard disk is dark. The items are displayed. For details, see Software Guide. 4. [Supplies] Press to display the menu of toner and paper in the printer. 3. [Prt.Jobs] Press to display the status of options installed in each tray are highlighted when selected. To adjust the...

User Guide
Page 112
... with the edges wrinkled, with the print side down, and the open end of the envelope you are printed more slowly. • Load envelopes with toner marks on the back, or blurred. If envelopes are curled, straighten them before loading. • If envelopes are curled when they are sharply creased. In...
... with the edges wrinkled, with the print side down, and the open end of the envelope you are printed more slowly. • Load envelopes with toner marks on the back, or blurred. If envelopes are curled, straighten them before loading. • If envelopes are curled when they are sharply creased. In...

User Guide
Page 135
... was purchased. If your skin comes into your clothes or skin when removing a paper jam or replacing toner. 6. Replacing Consumables Adding Toner • Do not incinerate spilled toner or used toner containers in accidental ingestion. • When removing toner, be careful not to meet high standards of water. Consult a doctor if necessary. • Avoid getting...
... was purchased. If your skin comes into your clothes or skin when removing a paper jam or replacing toner. 6. Replacing Consumables Adding Toner • Do not incinerate spilled toner or used toner containers in accidental ingestion. • When removing toner, be careful not to meet high standards of water. Consult a doctor if necessary. • Avoid getting...

User Guide
Page 136
Replacing Consumables When the following message appears on the display, the toner should be replaced soon. Holding the left and right side grips, carefully open the front cover. 6 BEK003S 2. 6. Turn the green handle counterclockwise until it clicks into place. 110 BEK004S Prepare a new toner. 1.
Replacing Consumables When the following message appears on the display, the toner should be replaced soon. Holding the left and right side grips, carefully open the front cover. 6 BEK003S 2. 6. Turn the green handle counterclockwise until it clicks into place. 110 BEK004S Prepare a new toner. 1.

User Guide
Page 137
Take the new toner out of the holder carefully. 6 BEK006S Do not shake the removed toner. BEK009S 111 Adding Toner 3. Pushing the green locking lever down, pull out the toner holder carefully by the handle until it out of the box. 6. BEK005S 4. Slide the toner slightly towards the printer, raise its top, and then take it stops. Shake the new toner back and forth five or six times. Place the used toner on paper or some other material to prevent leakage. Any remaining toner may leak. Pull the toner out carefully to avoid dirtying your workspace. 5.
Take the new toner out of the holder carefully. 6 BEK006S Do not shake the removed toner. BEK009S 111 Adding Toner 3. Pushing the green locking lever down, pull out the toner holder carefully by the handle until it out of the box. 6. BEK005S 4. Slide the toner slightly towards the printer, raise its top, and then take it stops. Shake the new toner back and forth five or six times. Place the used toner on paper or some other material to prevent leakage. Any remaining toner may leak. Pull the toner out carefully to avoid dirtying your workspace. 5.

User Guide
Page 138
...handle clockwise until it clicks into place. Confirm that the holder is secured with the green locking lever. 112 Put the toner onto the toner holder in angle ( ), place it flat on the toner holder, and then slide it towards you to secure it counterclockwise. BEK007S Do not push in... toner leak. 10. Replacing Consumables Even distribution of the new toner by turning it in carefully until it clicks into place. Push the toner holder back in place ( ). 6 ...
...handle clockwise until it clicks into place. Confirm that the holder is secured with the green locking lever. 112 Put the toner onto the toner holder in angle ( ), place it flat on the toner holder, and then slide it towards you to secure it counterclockwise. BEK007S Do not push in... toner leak. 10. Replacing Consumables Even distribution of the new toner by turning it in carefully until it clicks into place. Push the toner holder back in place ( ). 6 ...

User Guide
Page 139
Wait until "Please wait." disappears from the display. 6 113 Carefully close the front cover. Adding Toner BEK266S 11.
Wait until "Please wait." disappears from the display. 6 113 Carefully close the front cover. Adding Toner BEK266S 11.
User Guide
Page 140
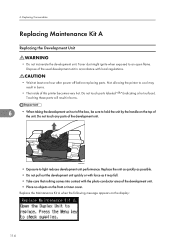
... touch any parts of this printer becomes very hot. Replacing Consumables Replacing Maintenance Kit A Replacing the Development Unit • Do not incinerate the development unit. Toner dust might ignite when exposed to light reduces development unit performance. 6. Touching these parts will result in burns. 6 • When taking the development unit out...
... touch any parts of this printer becomes very hot. Replacing Consumables Replacing Maintenance Kit A Replacing the Development Unit • Do not incinerate the development unit. Toner dust might ignite when exposed to light reduces development unit performance. 6. Touching these parts will result in burns. 6 • When taking the development unit out...

User Guide
Page 143
Holding the green handle, lift the development unit out of the new development unit, and then open the plastic bag from the center. 6 BEK035S 8. Otherwise, toner might scatter. 7. BEK040S 117 Open the box of the box, without removing its protective materials. Replacing Maintenance Kit A BEK123S Be careful not to tilt or shake the unit.
Holding the green handle, lift the development unit out of the new development unit, and then open the plastic bag from the center. 6 BEK035S 8. Otherwise, toner might scatter. 7. BEK040S 117 Open the box of the box, without removing its protective materials. Replacing Maintenance Kit A BEK123S Be careful not to tilt or shake the unit.


