User Guide
Page 21
...• Subnet Mask • Gateway Address • Consult your network administrator for example using Web Image Monitor For details, see "Troubleshooting", Hardware Guide. Press the {▼} or {▲} key to verify that is located on when the printer is working normally....• Changing the administrator's user name and password using a hub. • For details about configuring network settings. MLP150DN/SP 8200DN/LP150dn/Aficio SP 8200DN Next Sheet it does not test the connection to select [Config. BEK020S Connect the opposite end's flat connector to the desired...
...• Subnet Mask • Gateway Address • Consult your network administrator for example using Web Image Monitor For details, see "Troubleshooting", Hardware Guide. Press the {▼} or {▲} key to verify that is located on when the printer is working normally....• Changing the administrator's user name and password using a hub. • For details about configuring network settings. MLP150DN/SP 8200DN/LP150dn/Aficio SP 8200DN Next Sheet it does not test the connection to select [Config. BEK020S Connect the opposite end's flat connector to the desired...

User Guide
Page 25
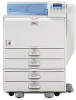
For safe and correct use, be sure to the Printer 2 Installing Options 3 Connecting the Printer Cables 4 Configuration 5 Paper and Other Media 6 Replacing Consumables 7 Cleaning the Printer 8 Adjusting the Printer 9 Troubleshooting 10 Removing Misfed Paper 11 Appendix Read this manual carefully before using the machine. Operating Instructions Hardware Guide 1 Guide to read the Safety Information before you use this machine and keep it handy for future reference.
For safe and correct use, be sure to the Printer 2 Installing Options 3 Connecting the Printer Cables 4 Configuration 5 Paper and Other Media 6 Replacing Consumables 7 Cleaning the Printer 8 Adjusting the Printer 9 Troubleshooting 10 Removing Misfed Paper 11 Appendix Read this manual carefully before using the machine. Operating Instructions Hardware Guide 1 Guide to read the Safety Information before you use this machine and keep it handy for future reference.
User Guide
Page 29
...500-sheet Paper Trays...138 2000-sheet Paper Feed Unit...139 1200-sheet Paper Feed Unit...140 Cleaning the Registration Roller...142 8. Troubleshooting Error and Status Messages Appears on the Control Panel 151 Panel Tones...155 Printer Does Not Print...156 Checking the Port Connection......157 Printing Problems...159 Additional Troubleshooting...166 Removing Jammed Staples...168 When the 1000-sheet Finisher is Installed 168 When the 2 Tray Finisher is Installed...170 Removing Punch...
...500-sheet Paper Trays...138 2000-sheet Paper Feed Unit...139 1200-sheet Paper Feed Unit...140 Cleaning the Registration Roller...142 8. Troubleshooting Error and Status Messages Appears on the Control Panel 151 Panel Tones...155 Printer Does Not Print...156 Checking the Port Connection......157 Printing Problems...159 Additional Troubleshooting...166 Removing Jammed Staples...168 When the 1000-sheet Finisher is Installed 168 When the 2 Tray Finisher is Installed...170 Removing Punch...

User Guide
Page 177
... a while. It means the printer is required. Printing Suspended Printing is changing settings. The printer is suspended. If the message is the default ready message. Troubleshooting Error and Status Messages Appears on the Control Panel This section explains the meanings of messages that appear on . Press any keys to recover to...
... a while. It means the printer is required. Printing Suspended Printing is changing settings. The printer is suspended. If the message is the default ready message. Troubleshooting Error and Status Messages Appears on the Control Panel This section explains the meanings of messages that appear on . Press any keys to recover to...

User Guide
Page 178
... server.(101/201) Cannot obtain IP address from DHCP server. Cannot print. Contact your network administrator. Check the IP address, subnet mask, and gateway address. Troubleshooting Updating Certificate... The printer is unavailable. Check the file you want to print. Check for misfeeds and ask your network administrator. 152 For details, see...
... server.(101/201) Cannot obtain IP address from DHCP server. Cannot print. Contact your network administrator. Check the IP address, subnet mask, and gateway address. Troubleshooting Updating Certificate... The printer is unavailable. Check the file you want to print. Check for misfeeds and ask your network administrator. 152 For details, see...

User Guide
Page 180
incomplete.(211) WPA authentication could not complete. Check the network settings. Contact your network administrator. • Confirm error details by printing the Error Log. WPA Auth. 9. For details, see "List/Test Print Menu", Software Guide. 9 154 Troubleshooting Values set for IPv6/Gateway addresses are invalid.(110/210) The IPv6 address or gateway address is invalid.
incomplete.(211) WPA authentication could not complete. Check the network settings. Contact your network administrator. • Confirm error details by printing the Error Log. WPA Auth. 9. For details, see "List/Test Print Menu", Software Guide. 9 154 Troubleshooting Values set for IPv6/Gateway addresses are invalid.(110/210) The IPv6 address or gateway address is invalid.

User Guide
Page 182
... red? Can you cannot print a configuration page, it securely as well. Contact your network administrator. Are you should use the correct 9 one . See p.206 "Specifications". Troubleshooting Printer Does Not Print Is the power on? Is paper loaded? If you print a configuration page? Load paper into both the power outlet and the...
... red? Can you cannot print a configuration page, it securely as well. Contact your network administrator. Are you should use the correct 9 one . See p.206 "Specifications". Troubleshooting Printer Does Not Print Is the power on? Is paper loaded? If you print a configuration page? Load paper into both the power outlet and the...

User Guide
Page 184
Click the icon of the machine. In the [Print to the following port(s)] list, confirm the correct port is selected. 9 158 Troubleshooting 3. On the [Organize] menu, click [Properties]. 4. Click the [Ports] tab. 5. 9.
Click the icon of the machine. In the [Print to the following port(s)] list, confirm the correct port is selected. 9 158 Troubleshooting 3. On the [Organize] menu, click [Properties]. 4. Click the [Ports] tab. 5. 9.
User Guide
Page 186
... mark inside the tray, or side guides of the paper tray are locked. • Paper guides are not set too tight. See p.89 "Loading Paper". Troubleshooting Multiple pages are fed at once. • Check the following : • Paper guides are not set correctly, leaving no gaps between paper guides and paper...
... mark inside the tray, or side guides of the paper tray are locked. • Paper guides are not set too tight. See p.89 "Loading Paper". Troubleshooting Multiple pages are fed at once. • Check the following : • Paper guides are not set correctly, leaving no gaps between paper guides and paper...

User Guide
Page 188
... is now warming up. appears on the initial screen seems empty, replace the toner. See the printer driver Help. See p.114 "Replacing Maintenance Kit A". 162 Troubleshooting See the printer driver Help. • The data is not loaded correctly, it . Wait for that application. Raise the resolution in the application. Images are...
... is now warming up. appears on the initial screen seems empty, replace the toner. See the printer driver Help. See p.114 "Replacing Maintenance Kit A". 162 Troubleshooting See the printer driver Help. • The data is not loaded correctly, it . Wait for that application. Raise the resolution in the application. Images are...

User Guide
Page 190
... PDF Password] menu in [PDF Menu] or Web Image Monitor. 9. See p.121 "Replacing Maintenance Kit B". PDF Direct Print is not executed (PDF file is dirty. Troubleshooting Printed pages are obvious. • The registration roller is not printed). • When printing a PDF with your finger, it smears out. • The setting of...
... PDF Password] menu in [PDF Menu] or Web Image Monitor. 9. See p.121 "Replacing Maintenance Kit B". PDF Direct Print is not executed (PDF file is dirty. Troubleshooting Printed pages are obvious. • The registration roller is not printed). • When printing a PDF with your finger, it smears out. • The setting of...

User Guide
Page 192
... [Notify when error:] to Notify For details about the settings, 9 see Web Image Monitor Help. • When the power is coming from the e-mail server. Troubleshooting Additional Troubleshooting • If the printer is still not operating satisfactorily after resolving an Alert. • Confirm [Auto Email Notify] is heard. • If a supply was...
... [Notify when error:] to Notify For details about the settings, 9 see Web Image Monitor Help. • When the power is coming from the e-mail server. Troubleshooting Additional Troubleshooting • If the printer is still not operating satisfactorily after resolving an Alert. • Confirm [Auto Email Notify] is heard. • If a supply was...

User Guide
Page 193
Refer to the Web Image Monitor's Help to the settings. 9 167 Additional Troubleshooting Alert Resolving is set for sending e-mail, but while no date information is included in sent e-mail, the mail server has a malfunction. • Configure the ...
Refer to the Web Image Monitor's Help to the settings. 9 167 Additional Troubleshooting Alert Resolving is set for sending e-mail, but while no date information is included in sent e-mail, the mail server has a malfunction. • Configure the ...

User Guide
Page 194
In this case, try turning over the paper in the tray. • After the cartridge is Installed 1. 9. BEK054S 9 BEK050S 168 Lift the staple unit. Open the finisher front cover. 2. When the 1000-sheet Finisher is replaced, the next five to seven sheets of paper will not be frequently jammed because of the staple sheet. Troubleshooting Removing Jammed Staples • Staples might be stapled until the finisher has adjusted the position of curled paper.
In this case, try turning over the paper in the tray. • After the cartridge is Installed 1. 9. BEK054S 9 BEK050S 168 Lift the staple unit. Open the finisher front cover. 2. When the 1000-sheet Finisher is replaced, the next five to seven sheets of paper will not be frequently jammed because of the staple sheet. Troubleshooting Removing Jammed Staples • Staples might be stapled until the finisher has adjusted the position of curled paper.

User Guide
Page 196
Holding the lever on the cartridge, push the cartridge down gently into the staple unit until it clicks. Open the front cover of the finisher. 9 When the 2 Tray Finisher is Installed 1. Return the staple unit to its original position. 9. BEK082S 8. Troubleshooting BEK088S 7. Close the front cover of the finisher. 170 BEK110S 9.
Holding the lever on the cartridge, push the cartridge down gently into the staple unit until it clicks. Open the front cover of the finisher. 9 When the 2 Tray Finisher is Installed 1. Return the staple unit to its original position. 9. BEK082S 8. Troubleshooting BEK088S 7. Close the front cover of the finisher. 170 BEK110S 9.

User Guide
Page 198
Troubleshooting 5. BEK087S 6. BEK088S 7. Close the front cover of the finisher. 172 Holding the cartridge's face plate up, remove the jammed staples. Return the staple unit to its original position. 9. Holding the lever on the cartridge, push the cartridge down gently into place. Make sure it clicks into the staple unit until 9 it clicks. BEK200S 8. Return the face plate to its original position. 9.
Troubleshooting 5. BEK087S 6. BEK088S 7. Close the front cover of the finisher. 172 Holding the cartridge's face plate up, remove the jammed staples. Return the staple unit to its original position. 9. Holding the lever on the cartridge, push the cartridge down gently into place. Make sure it clicks into the staple unit until 9 it clicks. BEK200S 8. Return the face plate to its original position. 9.

User Guide
Page 200
In this case, there may be some punch waste on the surface shown by the arrow. Remove the punch waste. Close the front cover of the finisher. • If you do not re-install the punch waste box in step 3, the message remains displayed. • If the message remains displayed, re-install the punch waste box. • The message might appear even when the punch waste box is not full. BEK131S 9 174 Troubleshooting 4. 9.
In this case, there may be some punch waste on the surface shown by the arrow. Remove the punch waste. Close the front cover of the finisher. • If you do not re-install the punch waste box in step 3, the message remains displayed. • If the message remains displayed, re-install the punch waste box. • The message might appear even when the punch waste box is not full. BEK131S 9 174 Troubleshooting 4. 9.
User Guide
Page 260
TABLE OF CONTENTS Manuals for Bidirectional Communication 54 If Bidirectional Communication Is Disabled 55 Installing Font Manager...56 6 USB...46 Troubleshooting USB...47 Printing with Parallel Connection...48 Messages Displayed When Installing the Printer Driver 51 Windows 2000...51 Windows XP Professional or Windows Server 2003/...
TABLE OF CONTENTS Manuals for Bidirectional Communication 54 If Bidirectional Communication Is Disabled 55 Installing Font Manager...56 6 USB...46 Troubleshooting USB...47 Printing with Parallel Connection...48 Messages Displayed When Installing the Printer Driver 51 Windows 2000...51 Windows XP Professional or Windows Server 2003/...

User Guide
Page 301
... devices. For details, see Windows Help. When using Windows 2000/XP or Windows Server 2003, an erroneous device is added to accidentally remove required devices. Troubleshooting USB Problem Solutions The printer is not recognized automatically. Turn off the power of printers connected. Take care not to the [Printers and Faxes] window...
... devices. For details, see Windows Help. When using Windows 2000/XP or Windows Server 2003, an erroneous device is added to accidentally remove required devices. Troubleshooting USB Problem Solutions The printer is not recognized automatically. Turn off the power of printers connected. Take care not to the [Printers and Faxes] window...

Hardware Guide
Page 1
For safe and correct use this machine and keep it handy for future reference. Operating Instructions Hardware Guide 1 Guide to the Printer 2 Installing Options 3 Connecting the Printer Cables 4 Configuration 5 Paper and Other Media 6 Replacing Consumables 7 Cleaning the Printer 8 Adjusting the Printer 9 Troubleshooting 10 Removing Misfed Paper 11 Appendix Read this manual carefully before you use , be sure to read the Safety Information before using the machine.
For safe and correct use this machine and keep it handy for future reference. Operating Instructions Hardware Guide 1 Guide to the Printer 2 Installing Options 3 Connecting the Printer Cables 4 Configuration 5 Paper and Other Media 6 Replacing Consumables 7 Cleaning the Printer 8 Adjusting the Printer 9 Troubleshooting 10 Removing Misfed Paper 11 Appendix Read this manual carefully before you use , be sure to read the Safety Information before using the machine.

