
Operating Instructions
Page 1
Operating Instructions Hardware Guide 1 Guide to read "Safety Information" before you use this manual carefully before using the machine. For safe and correct use, be sure to the Printer 2 Setting Up the Printer 3 Installing Options 4 Connecting the Printer 5 Configuration 6 Loading Paper 7 Maintaining the Printer 8 Adjusting the Printer 9 Troubleshooting 10 Removing Misfed Paper 11 Appendix Read this machine and keep it handy for future reference.
Operating Instructions Hardware Guide 1 Guide to read "Safety Information" before you use this manual carefully before using the machine. For safe and correct use, be sure to the Printer 2 Setting Up the Printer 3 Installing Options 4 Connecting the Printer 5 Configuration 6 Loading Paper 7 Maintaining the Printer 8 Adjusting the Printer 9 Troubleshooting 10 Removing Misfed Paper 11 Appendix Read this machine and keep it handy for future reference.

Operating Instructions
Page 3
...Positions of WARNING and CAUTION Labels 9 Power Switch Symbols...10 Manuals for This Printer...11 List of Option Installation...45 Where to Install Options...45 Caution When Re-installing the Controller Board 47 1 Setting Up the Printer Printer Setup Procedure...31 Place to Enter Characters...27 2. Guide to...Rear View...19 Interior...21 Control Panel...23 Display Panel...25 Entering Characters...26 How to Install...32 Unpacking...36 Turning the Printer's Power On and Off...39 Turning on the Computer 14 1. Installing Options Available Options...45 Order of Options...13 Operating ...
...Positions of WARNING and CAUTION Labels 9 Power Switch Symbols...10 Manuals for This Printer...11 List of Option Installation...45 Where to Install Options...45 Caution When Re-installing the Controller Board 47 1 Setting Up the Printer Printer Setup Procedure...31 Place to Enter Characters...27 2. Guide to...Rear View...19 Interior...21 Control Panel...23 Display Panel...25 Entering Characters...26 How to Install...32 Unpacking...36 Turning the Printer's Power On and Off...39 Turning on the Computer 14 1. Installing Options Available Options...45 Order of Options...13 Operating ...
Operating Instructions
Page 9
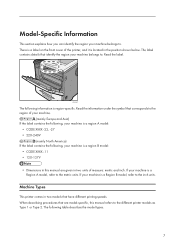
...units. CEC247 The following table describes the model types. 7 Read the information under the symbol that have different printing speeds. Machine Types This printer comes in the position shown below. The following information is a Region A model, refer to the region of measure: metric and inch.... explains how you can identify the region your machine belongs to . Read the label. The label contains details that are model-specific, this manual are given in two units of your machine. (mainly Europe and Asia) If the label contains the following, your machine is a region ...
...units. CEC247 The following table describes the model types. 7 Read the information under the symbol that have different printing speeds. Machine Types This printer comes in the position shown below. The following information is a Region A model, refer to the region of measure: metric and inch.... explains how you can identify the region your machine belongs to . Read the label. The label contains details that are model-specific, this manual are given in two units of your machine. (mainly Europe and Asia) If the label contains the following, your machine is a region ...
Operating Instructions
Page 13
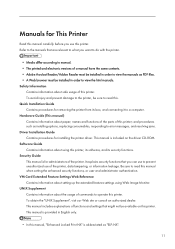
... you use of functions and settings that are relevant to what you can use to prevent unauthorized use this printer, its software, and its box, and connecting it to a computer. Refer to the manuals that might not be sure to read this printer; Manuals for removing the printer from its security functions. Hardware Guide (This...
... you use of functions and settings that are relevant to what you can use to prevent unauthorized use this printer, its software, and its box, and connecting it to a computer. Refer to the manuals that might not be sure to read this printer; Manuals for removing the printer from its security functions. Hardware Guide (This...

Operating Instructions
Page 14
• Manuals provided are specific to printer types. 12
• Manuals provided are specific to printer types. 12
Operating Instructions
Page 15
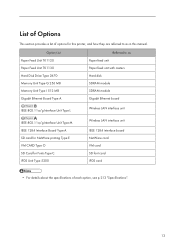
... Unit Type M IEEE 1284 Interface Board Type A SD card for NetWare printing Type E VM CARD Type O SD Card for this printer, and how they are referred to as in this manual. List of Options This section provides a list of options for Fonts Type C IPDS Unit Type 5200 Wireless LAN interface unit IEEE...
... Unit Type M IEEE 1284 Interface Board Type A SD card for NetWare printing Type E VM CARD Type O SD Card for this printer, and how they are referred to as in this manual. List of Options This section provides a list of options for Fonts Type C IPDS Unit Type 5200 Wireless LAN interface unit IEEE...
Operating Instructions
Page 25
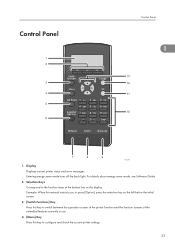
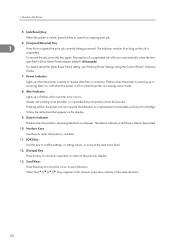
... and error messages. Example: When this manual instructs you to configure and check the current printer settings. 23 For details about energy saver mode, see Software Guide. 2. Selection Keys Correspond to the function items at the bottom line on the left ...below the initial screen. 3. [Switch Functions] Key Press this key to switch between the operation screen of the printer function and the function screens of the extended features currently in use. 4. [Menu] Key Press this key to press [Option], press the selection key on...
... and error messages. Example: When this manual instructs you to configure and check the current printer settings. 23 For details about energy saver mode, see Software Guide. 2. Selection Keys Correspond to the function items at the bottom line on the left ...below the initial screen. 3. [Switch Functions] Key Press this key to switch between the operation screen of the printer function and the function screens of the extended features currently in use. 4. [Menu] Key Press this key to press [Option], press the selection key on...
Operating Instructions
Page 26
Resumption of the same direction. 24 Flashing yellow: the printer will occur automatically when the time specified in [Auto Reset Timer] elapses (default: 60 seconds). To resume the job, press this manual, press the scroll key of a suspended job will soon require maintenance or a replacement ...consumable such as the job is ready to receive data from a computer. Power Indicator Lights up when the printer is suspended. It is unlit when the...
Resumption of the same direction. 24 Flashing yellow: the printer will occur automatically when the time specified in [Auto Reset Timer] elapses (default: 60 seconds). To resume the job, press this manual, press the scroll key of a suspended job will soon require maintenance or a replacement ...consumable such as the job is ready to receive data from a computer. Power Indicator Lights up when the printer is suspended. It is unlit when the...

Operating Instructions
Page 28
... be displayed at the cursor position, the entered character will be displayed before that. Press the right selection key to move the cursor in this manual instructs you to its previous state. 4. [OK] Key Confirms the entered text and numbers, and displays the next menu. 5. Scroll Keys Press to ...display a list of the display. Selection Keys Correspond to the function items on the left selection key to the Printer Entering Characters When you can enter. 2. Number Keys To enter text using the number keys, select text input mode by the cursor. 1.
... be displayed at the cursor position, the entered character will be displayed before that. Press the right selection key to move the cursor in this manual instructs you to its previous state. 4. [OK] Key Confirms the entered text and numbers, and displays the next menu. 5. Scroll Keys Press to ...display a list of the display. Selection Keys Correspond to the function items on the left selection key to the Printer Entering Characters When you can enter. 2. Number Keys To enter text using the number keys, select text input mode by the cursor. 1.
Operating Instructions
Page 103
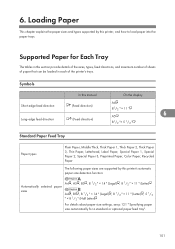
6. Supported Paper for a standard or optional paper feed tray". 101 Loading Paper This chapter explains the paper sizes and types supported by this printer's automatic paper size detection function: Automatically selected paper sizes A4 , A5 , B5 , 8 1/2 " × 14 " (Legal) , 8 1/2 " × 11 " (Letter) A4 , B5 , 8 1/2 " ×...size settings, see p.121 " Specifying paper size automatically for Each Tray The tables in this printer, and how to load paper into the paper trays. Symbols In this manual On the display A4 Short-edge feed direction (Feed direction) 81/2 " × 11 ...
6. Supported Paper for a standard or optional paper feed tray". 101 Loading Paper This chapter explains the paper sizes and types supported by this printer's automatic paper size detection function: Automatically selected paper sizes A4 , A5 , B5 , 8 1/2 " × 14 " (Legal) , 8 1/2 " × 11 " (Letter) A4 , B5 , 8 1/2 " ×...size settings, see p.121 " Specifying paper size automatically for Each Tray The tables in this printer, and how to load paper into the paper trays. Symbols In this manual On the display A4 Short-edge feed direction (Feed direction) 81/2 " × 11 ...

Operating Instructions
Page 105
... the limit mark inside the tray. 103 B6 JIS , 8 1/2 " × 13 " (Foolscap) , 8 1/4 " × 13 " (Folio) , 8 " × Paper sizes requiring manual 13 " (F/GL) , 7 1/4 " × 10 1/2 " (Executive) , 5 1/2 " × 8 1/2 " (Half settings Letter) , 4 1/8 " × 9 1/2 " (... 1/2 " (Com10) , 3 7/8 " × 7 1/2 " (Monarch) , C5 Env. , C6 Env. , DL Env. , 16K , Custom Size The following custom sizes are supported by this printer's automatic paper size detection function: Automatically selected paper sizes A4 , A5 , B5 , 8 1/2 " × 14 " (Legal) , 8 1/2 " × 11 " (Letter) A4 , B5 ,...
... the limit mark inside the tray. 103 B6 JIS , 8 1/2 " × 13 " (Foolscap) , 8 1/4 " × 13 " (Folio) , 8 " × Paper sizes requiring manual 13 " (F/GL) , 7 1/4 " × 10 1/2 " (Executive) , 5 1/2 " × 8 1/2 " (Half settings Letter) , 4 1/8 " × 9 1/2 " (... 1/2 " (Com10) , 3 7/8 " × 7 1/2 " (Monarch) , C5 Env. , C6 Env. , DL Env. , 16K , Custom Size The following custom sizes are supported by this printer's automatic paper size detection function: Automatically selected paper sizes A4 , A5 , B5 , 8 1/2 " × 14 " (Legal) , 8 1/2 " × 11 " (Letter) A4 , B5 ,...
Operating Instructions
Page 157
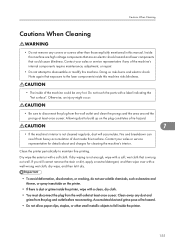
...wipe with a clean, dry cloth. • You must disconnect the plug from heavy accumulation of dust inside the printer. 155 Contact your sales or service representative for details about and charges for cleaning the machine's interior. Otherwise, ... or repair. • Do not attempt to disassemble or modify this machine risks blindness. • The inside the printer, wipe with a soft, wet cloth that could be very hot. Cautions When Cleaning Cautions When Cleaning • Do... around the prongs at least once a year. Inside this manual. Do not touch the parts with a soft cloth.
...wipe with a clean, dry cloth. • You must disconnect the plug from heavy accumulation of dust inside the printer. 155 Contact your sales or service representative for details about and charges for cleaning the machine's interior. Otherwise, ... or repair. • Do not attempt to disassemble or modify this machine risks blindness. • The inside the printer, wipe with a soft, wet cloth that could be very hot. Cautions When Cleaning Cautions When Cleaning • Do... around the prongs at least once a year. Inside this manual. Do not touch the parts with a soft cloth.
Operating Instructions
Page 176
..., see p.59 "Installing the Interface Units". The output trays are problems with Remote Communication Gate. Parallel I/F Error The printer's self diagnostic test failed due to the Remote Server Gate. The toner has run out, or the photo conductor unit has...off the power of its service life. IPv6 Address already exists Manual Config. Contact your network administrator. Troubleshooting Failed to connect to FormFeed. Consult your network administrator. Option RAM Error The printer cannot detect an optional SDRAM module. Consult your network administrator....
..., see p.59 "Installing the Interface Units". The output trays are problems with Remote Communication Gate. Parallel I/F Error The printer's self diagnostic test failed due to the Remote Server Gate. The toner has run out, or the photo conductor unit has...off the power of its service life. IPv6 Address already exists Manual Config. Contact your network administrator. Troubleshooting Failed to connect to FormFeed. Consult your network administrator. Option RAM Error The printer cannot detect an optional SDRAM module. Consult your network administrator....
Operating Instructions
Page 177
... detect a hard disk. The printer cannot detect a Wireless LAN board. It may be installed correctly. For details about installing the unit, see the procedure for removing the Fusing unit in p.197 "Paper Misfeed Message (B)(C)" or the unit replacement procedure manual provided with Hard Disk Please call ... Contact your sales or service representative. Authentication from the SD card failed. The fusing unit may not be incorrectly installed. Turn the printer off , and then back on the Control Panel Problem with the Fusing unit. 175 If the message is installed properly or contact ...
... detect a hard disk. The printer cannot detect a Wireless LAN board. It may be installed correctly. For details about installing the unit, see the procedure for removing the Fusing unit in p.197 "Paper Misfeed Message (B)(C)" or the unit replacement procedure manual provided with Hard Disk Please call ... Contact your sales or service representative. Authentication from the SD card failed. The fusing unit may not be incorrectly installed. Turn the printer off , and then back on the Control Panel Problem with the Fusing unit. 175 If the message is installed properly or contact ...
Operating Instructions
Page 189
appears on the display, the printer is being processed. You must manually specify the tray as those set in the printer driver are the same as the source paper tray before printing. When doing aggregate prints or bound prints. • Check that you must configure attached ...
appears on the display, the printer is being processed. You must manually specify the tray as those set in the printer driver are the same as the source paper tray before printing. When doing aggregate prints or bound prints. • Check that you must configure attached ...
Operating Instructions
Page 212
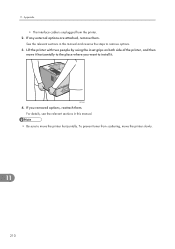
...them . To prevent toner from the printer. 2. If you want to move the printer horizontally. Lift the printer with two people by using the inset grips on both side of the printer, and then move the printer slowly. 11 210 See the relevant sections in this manual and reverse the steps to remove options.... 3. For details, see the relevant sections in this manual. • Be sure to install it. Appendix •...
...them . To prevent toner from the printer. 2. If you want to move the printer horizontally. Lift the printer with two people by using the inset grips on both side of the printer, and then move the printer slowly. 11 210 See the relevant sections in this manual and reverse the steps to remove options.... 3. For details, see the relevant sections in this manual. • Be sure to install it. Appendix •...
Operating Instructions
Page 225
... speed 81 Exterior 17, 19 F Friction pad 156 G Gigabit Ethernet board 59 H Hard disk drive 52 How to enter character 27 HTML manuals 14 I IEEE 1284 interface board 63, 74 IEEE 802.1X 94 Image density 163 Installing options 45 Installing the memory expansion units 52 Interface...of options 13 Loading envelopes 133 Loading paper 117 M Machine types 7 Maintenance kit 154, 212 Manuals 11, 14 Menu key 23 Middle thick 106 Model-specific information 7 Moving and transporting 209 Moving the printer a short distance 209 N NetWare 80 Network 75, 84 Network setting 80 No DHCP 76 ...
... speed 81 Exterior 17, 19 F Friction pad 156 G Gigabit Ethernet board 59 H Hard disk drive 52 How to enter character 27 HTML manuals 14 I IEEE 1284 interface board 63, 74 IEEE 802.1X 94 Image density 163 Installing options 45 Installing the memory expansion units 52 Interface...of options 13 Loading envelopes 133 Loading paper 117 M Machine types 7 Maintenance kit 154, 212 Manuals 11, 14 Menu key 23 Middle thick 106 Model-specific information 7 Moving and transporting 209 Moving the printer a short distance 209 N NetWare 80 Network 75, 84 Network setting 80 No DHCP 76 ...


