Operating Instructions
Page 1
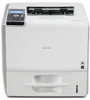
Operating Instructions Hardware Guide 1 Guide to read "Safety Information" before you use this machine and keep it handy for future reference. For safe and correct use, be sure to the Printer 2 Setting Up the Printer 3 Installing Options 4 Connecting the Printer 5 Configuration 6 Loading Paper 7 Maintaining the Printer 8 Adjusting the Printer 9 Troubleshooting 10 Removing Misfed Paper 11 Appendix Read this manual carefully before using the machine.
Operating Instructions Hardware Guide 1 Guide to read "Safety Information" before you use this machine and keep it handy for future reference. For safe and correct use, be sure to the Printer 2 Setting Up the Printer 3 Installing Options 4 Connecting the Printer 5 Configuration 6 Loading Paper 7 Maintaining the Printer 8 Adjusting the Printer 9 Troubleshooting 10 Removing Misfed Paper 11 Appendix Read this manual carefully before using the machine.

Operating Instructions
Page 3
... and CAUTION Labels 9 Power Switch Symbols...10 Manuals for This Printer...11 List of Option Installation...45 Where to Install Options...45 Caution When Re-installing the Controller Board 47 1 Guide to the Printer Exterior: Front View...17 Exterior: Rear View...19 Interior...21 Control...Panel...23 Display Panel...25 Entering Characters...26 How to Install...32 Unpacking...36 Turning the Printer's Power On and Off...39 Turning on the Computer 14 1. Setting Up the Printer Printer Setup Procedure...31 Place to Enter Characters...27 2. Installing Options Available Options...45 Order ...
... and CAUTION Labels 9 Power Switch Symbols...10 Manuals for This Printer...11 List of Option Installation...45 Where to Install Options...45 Caution When Re-installing the Controller Board 47 1 Guide to the Printer Exterior: Front View...17 Exterior: Rear View...19 Interior...21 Control...Panel...23 Display Panel...25 Entering Characters...26 How to Install...32 Unpacking...36 Turning the Printer's Power On and Off...39 Turning on the Computer 14 1. Setting Up the Printer Printer Setup Procedure...31 Place to Enter Characters...27 2. Installing Options Available Options...45 Order ...
Operating Instructions
Page 4
... Board...59 Installing the Wireless LAN Interface Board 61 Installing the IEEE 1284 Interface Board 63 Installing the SD Memory Card Options...66 4. Connecting the Printer Ethernet Cable Connection...69 Reading the LED Lamps...71 USB Cable Connection...72 Parallel Cable Connection...74 5. Configuration Ethernet Configuration...75 Specifying an IP Address...
... Board...59 Installing the Wireless LAN Interface Board 61 Installing the IEEE 1284 Interface Board 63 Installing the SD Memory Card Options...66 4. Connecting the Printer Ethernet Cable Connection...69 Reading the LED Lamps...71 USB Cable Connection...72 Parallel Cable Connection...74 5. Configuration Ethernet Configuration...75 Specifying an IP Address...
Operating Instructions
Page 6
...You Cannot Print Properly...181 Paper Misfeeds Occur Frequently...183 The printed image is different from the image on the computer 185 When Printer is Jammed...191 Paper Misfeed Message (A)...193 Paper Misfeed Message (B)(C)...197 Paper Misfeed Message (Y1)(Y2)(Y3)(Y4 202 Paper Misfeed ...Message (Z1)(Z2)...205 11. Removing Misfed Paper When Paper is Not Functioning Properly 186 Additional Troubleshooting...188 10. Maintaining the Printer Replacing the Print Cartridge...149 Replacing the Maintenance Kit...154 Cautions When Cleaning...155 Cleaning the Friction Pad and the Paper Feed Roller...
...You Cannot Print Properly...181 Paper Misfeeds Occur Frequently...183 The printed image is different from the image on the computer 185 When Printer is Jammed...191 Paper Misfeed Message (A)...193 Paper Misfeed Message (B)(C)...197 Paper Misfeed Message (Y1)(Y2)(Y3)(Y4 202 Paper Misfeed ...Message (Z1)(Z2)...205 11. Removing Misfed Paper When Paper is Not Functioning Properly 186 Additional Troubleshooting...188 10. Maintaining the Printer Replacing the Print Cartridge...149 Replacing the Maintenance Kit...154 Cautions When Cleaning...155 Cleaning the Friction Pad and the Paper Feed Roller...
Operating Instructions
Page 9
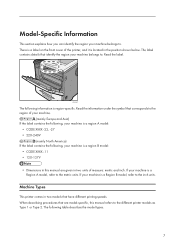
...information under the symbol that have different printing speeds. The following information is region-specific. There is a label on the front cover of the printer, and it is located in two units of your machine. (mainly Europe and Asia) If the label contains the following, your machine is... 120-127V • Dimensions in this manual are model-specific, this manual refers to the different printer models as Type 1 or Type 2. If your machine belongs to. Machine Types This printer comes in two models that corresponds to the region of measure: metric and inch. Model-Specific Information...
...information under the symbol that have different printing speeds. The following information is region-specific. There is a label on the front cover of the printer, and it is located in two units of your machine. (mainly Europe and Asia) If the label contains the following, your machine is... 120-127V • Dimensions in this manual are model-specific, this manual refers to the different printer models as Type 1 or Type 2. If your machine belongs to. Machine Types This printer comes in two models that corresponds to the region of measure: metric and inch. Model-Specific Information...

Operating Instructions
Page 11
Disposal should take place at the positions shown below. The inside the printer. If you dispose of the used toner. Toner dust is flammable and might ignite when exposed to local regulations. CEC230 CEC202 Do not incinerate spilled ...toner or used toner containers yourself, dispose of them according to an open flame. Do not touch parts with this printer becomes very hot. For safety, please follow the instructions and handle the machine as indicated. CEC203 Do not put your hands inside of children. Keep...
Disposal should take place at the positions shown below. The inside the printer. If you dispose of the used toner. Toner dust is flammable and might ignite when exposed to local regulations. CEC230 CEC202 Do not incinerate spilled ...toner or used toner containers yourself, dispose of them according to an open flame. Do not touch parts with this printer becomes very hot. For safety, please follow the instructions and handle the machine as indicated. CEC203 Do not put your hands inside of children. Keep...

Operating Instructions
Page 12
CEC204 The inside of the symbols for the switches on both sides, and lift slowly in pairs. Power Switch Symbols The meanings of this printer becomes very hot. Do not touch parts with this machine are as follows: • : POWER ON • : POWER OFF 10 When moving the printer, use the inset grips on this label (indicating a hot surface). CEC248 The printer weighs approximately 23 kg (51 lb.).
CEC204 The inside of the symbols for the switches on both sides, and lift slowly in pairs. Power Switch Symbols The meanings of this printer becomes very hot. Do not touch parts with this machine are as follows: • : POWER ON • : POWER OFF 10 When moving the printer, use the inset grips on this label (indicating a hot surface). CEC248 The printer weighs approximately 23 kg (51 lb.).
Operating Instructions
Page 13
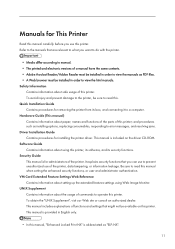
... use to error messages, and resolving jams. Driver Installation Guide Contains procedures for installing the printer driver. Refer to the manuals that are relevant to what you want to do with the printer. • Media differ according to manual. • The printed and electronic versions of .... • A Web browser must be available on the driver CD-ROM. Security Guide This manual is included on this printer. This manual includes explanations of the printer, data tampering, or information leakage. This manual is provided in order to view the html manuals. To obtain the "UNIX...
... use to error messages, and resolving jams. Driver Installation Guide Contains procedures for installing the printer driver. Refer to the manuals that are relevant to what you want to do with the printer. • Media differ according to manual. • The printed and electronic versions of .... • A Web browser must be available on the driver CD-ROM. Security Guide This manual is included on this printer. This manual includes explanations of the printer, data tampering, or information leakage. This manual is provided in order to view the html manuals. To obtain the "UNIX...

Operating Instructions
Page 14
• Manuals provided are specific to printer types. 12
• Manuals provided are specific to printer types. 12
Operating Instructions
Page 15
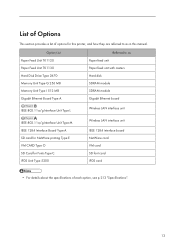
... unit IEEE 802.11a/g Interface Unit Type M IEEE 1284 Interface Board Type A SD card for NetWare printing Type E VM CARD Type O SD Card for this printer, and how they are referred to as in this manual.
... unit IEEE 802.11a/g Interface Unit Type M IEEE 1284 Interface Board Type A SD card for NetWare printing Type E VM CARD Type O SD Card for this printer, and how they are referred to as in this manual.

Operating Instructions
Page 19
...8 1/2" × 11" (Letter) on the Bypass Tray. Tray Extension Raise this out when loading a sheet that shows the printer status. 17 See p.101 "Supported Paper for printer control and a display that is longer than A4 3. Up to 550 sheets of plain paper can be loaded. Bypass Tray Extension... Pull this barrier to the Printer This chapter explains the names and functions of the printer's components. Control Panel Contains keys for Each Tray" and p.101 "Loading Paper". 4. Guide to prevent paper...
...8 1/2" × 11" (Letter) on the Bypass Tray. Tray Extension Raise this out when loading a sheet that shows the printer status. 17 See p.101 "Supported Paper for printer control and a display that is longer than A4 3. Up to 550 sheets of plain paper can be loaded. Bypass Tray Extension... Pull this barrier to the Printer This chapter explains the names and functions of the printer's components. Control Panel Contains keys for Each Tray" and p.101 "Loading Paper". 4. Guide to prevent paper...

Operating Instructions
Page 20
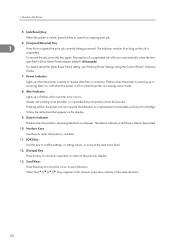
Front Cover Release Button Press this to turn the printer's power on and off. 10. Friction Pad This ensures only one sheet of paper is released through these vents are delivered here printed side facing down. 7. If multi-sheet feeds occur, clean the friction pad carefully. 18 Power Switch Press this to the Printer 6. Guide to open the front cover. 9. 1. Vents 1 To prevent overheating, heat from internal components is fed in at a time. Malfunctions and failure can result if these vents. Standard Tray Prints are blocked or obstructed. 8.
Front Cover Release Button Press this to turn the printer's power on and off. 10. Friction Pad This ensures only one sheet of paper is released through these vents are delivered here printed side facing down. 7. If multi-sheet feeds occur, clean the friction pad carefully. 18 Power Switch Press this to the Printer 6. Guide to open the front cover. 9. 1. Vents 1 To prevent overheating, heat from internal components is fed in at a time. Malfunctions and failure can result if these vents. Standard Tray Prints are blocked or obstructed. 8.

Operating Instructions
Page 21
...the other end of the cable into their connectors. 4. Plug cables such as the SDRAM module or printer hard disk. USB Port B Use a USB cable to connect the printer to replace the fusing unit. 2. Vents To prevent overheating, heat from internal components is released through ...result if these vents. Exterior: Rear View Exterior: Rear View 1 CEC208 1. Ethernet Port Use a network interface cable to connect the printer to the printer here. Power Connector Connect the power cord to the network. 8. Optional Interface Board Slot Insert an optional Wireless LAN interface unit, Gigabit...
...the other end of the cable into their connectors. 4. Plug cables such as the SDRAM module or printer hard disk. USB Port B Use a USB cable to connect the printer to replace the fusing unit. 2. Vents To prevent overheating, heat from internal components is released through ...result if these vents. Exterior: Rear View Exterior: Rear View 1 CEC208 1. Ethernet Port Use a network interface cable to connect the printer to the printer here. Power Connector Connect the power cord to the network. 8. Optional Interface Board Slot Insert an optional Wireless LAN interface unit, Gigabit...

Operating Instructions
Page 22
1. USB Port A Use a USB cable to the Printer 9. Guide to connect the optional USB devices such as the authentication card reader. 1 20
1. USB Port A Use a USB cable to the Printer 9. Guide to connect the optional USB devices such as the authentication card reader. 1 20
Operating Instructions
Page 23
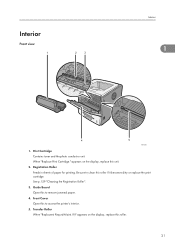
... print cartridge. When "Replace Print Cartridge." Front Cover Open this to clean this unit. 2. Transfer Roller When "Replacmnt Requrd:Maint. Be sure to access the printer's interior. 5. Print Cartridge Contains toner and the photo conductor unit. Guide Board Open this roller. 21 Interior Front view Interior 1 CEC209 1. appears on the display...
... print cartridge. When "Replace Print Cartridge." Front Cover Open this to clean this unit. 2. Transfer Roller When "Replacmnt Requrd:Maint. Be sure to access the printer's interior. 5. Print Cartridge Contains toner and the photo conductor unit. Guide Board Open this roller. 21 Interior Front view Interior 1 CEC209 1. appears on the display...

Operating Instructions
Page 24
Envelope lever Use this unit. 3. When "Replacmnt Requrd:Maint. Guide to replace the fusing unit. 22 Kit" appears on can improve print quality. 2. Raising or lowering the envelope lever according to the thickness of the paper you are printing on the display, replace this lever if envelopes become wrinkled during printing. Fusing Unit Fuses print images onto paper. Fusing Unit Lock Levers Lift these levers to the Printer Rear view 1 CEC231 1. 1.
Envelope lever Use this unit. 3. When "Replacmnt Requrd:Maint. Guide to replace the fusing unit. 22 Kit" appears on can improve print quality. 2. Raising or lowering the envelope lever according to the thickness of the paper you are printing on the display, replace this lever if envelopes become wrinkled during printing. Fusing Unit Fuses print images onto paper. Fusing Unit Lock Levers Lift these levers to the Printer Rear view 1 CEC231 1. 1.
Operating Instructions
Page 25
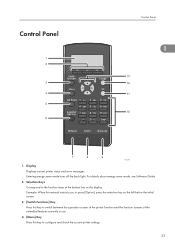
...], press the selection key on the left below the initial screen. 3. [Switch Functions] Key Press this key to switch between the operation screen of the printer function and the function screens of the extended features currently in use. 4. [Menu] Key Press this key to the function items at the bottom line... the display. Entering energy saver mode turns off the back light. Control Panel Control Panel 1 CEC210 1. Selection Keys Correspond to configure and check the current printer settings. 23
...], press the selection key on the left below the initial screen. 3. [Switch Functions] Key Press this key to switch between the operation screen of the printer function and the function screens of the extended features currently in use. 4. [Menu] Key Press this key to the function items at the bottom line... the display. Entering energy saver mode turns off the back light. Control Panel Control Panel 1 CEC210 1. Selection Keys Correspond to configure and check the current printer settings. 23
Operating Instructions
Page 26
...cancel an operation or return to receive data from a computer. Follow the instructions that appear on the display. 9. Data In Indicator Flashes when the printer is ready to the previous display. 13. Number Keys Use these keys to move to the next menu level. 12. [Escape] Key Press ...this to the Printer 5. [Job Reset] Key When the printer is warming up or flashes when a printer error occurs. Guide to suspend the print job currently being processed. The indicator remains lit as long as print ...
...cancel an operation or return to receive data from a computer. Follow the instructions that appear on the display. 9. Data In Indicator Flashes when the printer is ready to the previous display. 13. Number Keys Use these keys to move to the next menu level. 12. [Escape] Key Press ...this to the Printer 5. [Job Reset] Key When the printer is warming up or flashes when a printer error occurs. Guide to suspend the print job currently being processed. The indicator remains lit as long as print ...

Operating Instructions
Page 27
... or the messages. 2. [Option] Press to display the following screen appears when you turn on the printer. Display Panel 1 CEC235 1. Select [General Settings], then [Display Supply Info], and then select [Off]. • Adjust the brightness if the screen is displayed. To ...] Press to display print jobs sent from a computer. 4. [Supplies] Press to display the information of supplies for the printer. • [Prt.Jobs] is displayed only when the hard disk is installed in the printer. • By default, the remaining amount of toner, press the [Menu] key, and then select [Maintenance] on...
... or the messages. 2. [Option] Press to display the following screen appears when you turn on the printer. Display Panel 1 CEC235 1. Select [General Settings], then [Display Supply Info], and then select [Off]. • Adjust the brightness if the screen is displayed. To ...] Press to display print jobs sent from a computer. 4. [Supplies] Press to display the information of supplies for the printer. • [Prt.Jobs] is displayed only when the hard disk is installed in the printer. • By default, the remaining amount of toner, press the [Menu] key, and then select [Maintenance] on...

Operating Instructions
Page 28
Guide to the Printer Entering Characters When you enter a character, it will be displayed at the cursor position, the entered character will be displayed before that you to press [...
Guide to the Printer Entering Characters When you enter a character, it will be displayed at the cursor position, the entered character will be displayed before that you to press [...


