

User Guide
Page 5
... Faxes from a Computer (LAN-Fax 20 Connecting to USB...17 Scanning from a Computer...5 Sending Scanned Files via E-mail...6 Sending Scanned Files to an FTP Server...7 Sending Scanned Files to a Computer's Shared Folder 7 Sending Scanned Files to a USB Flash Disk 8 Configuring the IPv4 Address Settings...9 Registering Scan Destinations...11 Scanning Using the Control Panel...16 Basic Operation for...
... Faxes from a Computer (LAN-Fax 20 Connecting to USB...17 Scanning from a Computer...5 Sending Scanned Files via E-mail...6 Sending Scanned Files to an FTP Server...7 Sending Scanned Files to a Computer's Shared Folder 7 Sending Scanned Files to a USB Flash Disk 8 Configuring the IPv4 Address Settings...9 Registering Scan Destinations...11 Scanning Using the Control Panel...16 Basic Operation for...

User Guide
Page 9
...(TWAIN scanning) and scanning using a TWAIN-compliant application. Scanning using the control panel Scanning using a USB cable, and install the scanner driver on a network (Scan to Folder), or to a USB flash disk (Scan to the shared folder of the machine. The Scan to E-mail, Scan to FTP, and Scan to operate...Computer You can be performed using the control panel. TWAIN scanning is required for scanning from a computer with both USB and network connections. you to send scanned files via e-mail (Scan to E-mail), to an FTP server (Scan to FTP), or to USB). Guide to USB function...
...(TWAIN scanning) and scanning using a TWAIN-compliant application. Scanning using the control panel Scanning using a USB cable, and install the scanner driver on a network (Scan to Folder), or to a USB flash disk (Scan to the shared folder of the machine. The Scan to E-mail, Scan to FTP, and Scan to operate...Computer You can be performed using the control panel. TWAIN scanning is required for scanning from a computer with both USB and network connections. you to send scanned files via e-mail (Scan to E-mail), to an FTP server (Scan to FTP), or to USB). Guide to USB function...
User Guide
Page 10
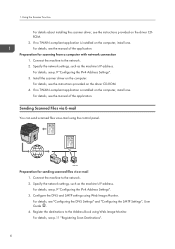
For details, see the manual of the application. For details, see the manual of the application. CMF008 Preparation for scanning from a computer with network connection 1. For details, see p.9 "Configuring the IPv4 Address Settings". 3. Install the scanner driver ...via e-mail using the control panel. Connect the machine to the network. 2. For details, see p.11 "Registering Scan Destinations". 6 Sending Scanned Files via E-mail You can send scanned files via e-mail 1. For details, see p.9 "Configuring the IPv4 Address Settings". 3. Using the Scanner Function For ...
For details, see the manual of the application. For details, see the manual of the application. CMF008 Preparation for scanning from a computer with network connection 1. For details, see p.9 "Configuring the IPv4 Address Settings". 3. Install the scanner driver ...via e-mail using the control panel. Connect the machine to the network. 2. For details, see p.11 "Registering Scan Destinations". 6 Sending Scanned Files via E-mail You can send scanned files via e-mail 1. For details, see p.9 "Configuring the IPv4 Address Settings". 3. Using the Scanner Function For ...

User Guide
Page 11
...IPv4 Address Settings". 3. Connect the machine to the network. 2. CMF010 Preparation for sending scanned files to a computer's shared folder 1. Guide to the Scanner Function CMF009 Preparation for sending scanned files to an FTP server 1. Register the destinations to the Address Book using Web ...Specify the network settings, such as the machine's IP address. For details, see p.11 "Registering Scan Destinations". Sending Scanned Files to an FTP Server You can send scanned files to the shared folder of a computer on a network using the control panel. For details, ...
...IPv4 Address Settings". 3. Connect the machine to the network. 2. CMF010 Preparation for sending scanned files to a computer's shared folder 1. Guide to the Scanner Function CMF009 Preparation for sending scanned files to an FTP server 1. Register the destinations to the Address Book using Web ...Specify the network settings, such as the machine's IP address. For details, see p.11 "Registering Scan Destinations". Sending Scanned Files to an FTP Server You can send scanned files to the shared folder of a computer on a network using the control panel. For details, ...

User Guide
Page 12
... Function 3. Create a destination folder on a USB flash disk using Web Image Monitor. Sending Scanned Files to USB". 8 For details, see p.17 "Basic Operation for sending scanned files to the Address Book using the control panel. For details, see p.11 "Registering Scan Destinations". 1. For details, see your operating system's documentation. 4. Insert a USB flash disk...
... Function 3. Create a destination folder on a USB flash disk using Web Image Monitor. Sending Scanned Files to USB". 8 For details, see p.17 "Basic Operation for sending scanned files to the Address Book using the control panel. For details, see p.11 "Registering Scan Destinations". 1. For details, see your operating system's documentation. 4. Insert a USB flash disk...
User Guide
Page 15
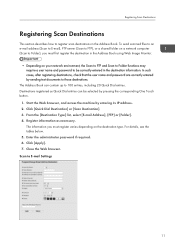
...select [E-mail Address], [FTP] or [Folder]. 4. Enter the administrator password if required. 6. Registering Scan Destinations Registering Scan Destinations This section describes how to register scan destinations in the Address Book using Web Image Monitor. • Depending on the destination type. Destinations ... the Web browser, and access the machine by pressing the corresponding One Touch button. 1. Scan to those destinations. Click [Quick Dial Destination] or [Scan Destination]. 3. Close the Web browser. The information you must register varies depending on your ...
...select [E-mail Address], [FTP] or [Folder]. 4. Enter the administrator password if required. 6. Registering Scan Destinations Registering Scan Destinations This section describes how to register scan destinations in the Address Book using Web Image Monitor. • Depending on the destination type. Destinations ... the Web browser, and access the machine by pressing the corresponding One Touch button. 1. Scan to those destinations. Click [Quick Dial Destination] or [Scan Destination]. 3. Close the Web browser. The information you must register varies depending on your ...

User Guide
Page 16
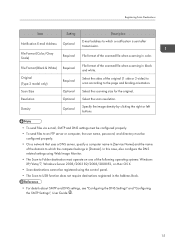
... Sender's Name File Format (Color/Gray Scale) Required Optional Required File Format (Black & White) Required Original (Type 2 model only) Scan Size Resolution Required Optional Optional Density Optional Description Select when setting the destination as a Quick Dial entry. The name specified here will be ...shown on the screen when selecting a scan destination. E-mail address of the scanned file when scanning in black and white. File format of the destination. Specify the image density by clicking the right or ...
... Sender's Name File Format (Color/Gray Scale) Required Optional Required File Format (Black & White) Required Original (Type 2 model only) Scan Size Resolution Required Optional Optional Density Optional Description Select when setting the destination as a Quick Dial entry. The name specified here will be ...shown on the screen when selecting a scan destination. E-mail address of the scanned file when scanning in black and white. File format of the destination. Specify the image density by clicking the right or ...
User Guide
Page 17
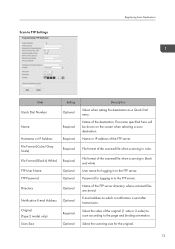
... to which a notification is sent after transmission. Password for the original. 13 Select the sides of the scanned file when scanning in black and white User name for logging in to the FTP server. File format of the destination. Name of the ...) Required FTP User Name FTP Password Optional Optional Directory Optional Notification E-mail Address Optional Original (Type 2 model only) Scan Size Required Optional Description Select when setting the destination as a Quick Dial entry. Scan to the FTP server. The name specified here will be shown on the screen when selecting...
... to which a notification is sent after transmission. Password for the original. 13 Select the sides of the scanned file when scanning in black and white User name for logging in to the FTP server. File format of the destination. Name of the ...) Required FTP User Name FTP Password Optional Optional Directory Optional Notification E-mail Address Optional Original (Type 2 model only) Scan Size Required Optional Description Select when setting the destination as a Quick Dial entry. Scan to the FTP server. The name specified here will be shown on the screen when selecting...
User Guide
Page 18
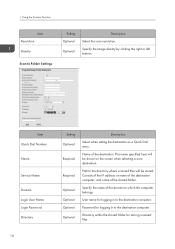
Using the Scanner Function Item Resolution Density Scan to the directory where scanned files will be stored. Item Quick Dial Number Name Service Name Domain Login User Name Login Password Directory 14 Setting Optional Required Required Optional Optional ... of the destination. Directory within the shared folder for logging in to the destination computer. Path to Folder Settings Setting Optional Optional Description Select the scan resolution. User name for storing scanned files. 1. The name specified here will be shown on the screen when selecting...
Using the Scanner Function Item Resolution Density Scan to the directory where scanned files will be stored. Item Quick Dial Number Name Service Name Domain Login User Name Login Password Directory 14 Setting Optional Required Required Optional Optional ... of the destination. Directory within the shared folder for logging in to the destination computer. Path to Folder Settings Setting Optional Optional Description Select the scan resolution. User name for storing scanned files. 1. The name specified here will be shown on the screen when selecting...
User Guide
Page 19
... to an FTP server or computer, the user name, password, and directory must operate on one of the original (1 side or 2-sides) to scan according to which a notification is sent after transmission. Select the sides of the following operating systems: Windows XP/Vista/7, Windows Server 2003/2003 R2/...2008/2008 R2, or Mac OS X. • Scan destinations cannot be configured properly. • On a network that uses a DNS server, specify a computer name in [Service Name] and the name of the...
... to an FTP server or computer, the user name, password, and directory must operate on one of the original (1 side or 2-sides) to scan according to which a notification is sent after transmission. Select the sides of the following operating systems: Windows XP/Vista/7, Windows Server 2003/2003 R2/...2008/2008 R2, or Mac OS X. • Scan destinations cannot be configured properly. • On a network that uses a DNS server, specify a computer name in [Service Name] and the name of the...

User Guide
Page 20
...the exposure glass, and then press [Yes]. Press the [Scanner] key, and then press the [Address Book] key. If you want to search for sending scanned files via E-mail, to an FTP server, or a computer, depending on the specified destination. • If a USB flash disk is no USB flash disk... inserted in the ARDF/ADF. 2. No network connection is sent via E-mail, to an FTP server, or to start sending the scanned file. • For complete information about the scanner function, see User Guide . 16 Each time you enter a character, the display changes to place another...
...the exposure glass, and then press [Yes]. Press the [Scanner] key, and then press the [Address Book] key. If you want to search for sending scanned files via E-mail, to an FTP server, or a computer, depending on the specified destination. • If a USB flash disk is no USB flash disk... inserted in the ARDF/ADF. 2. No network connection is sent via E-mail, to an FTP server, or to start sending the scanned file. • For complete information about the scanner function, see User Guide . 16 Each time you enter a character, the display changes to place another...

User Guide
Page 21
Press the [Scanner] key. Repeat this case, proceed to USB function may be disabled by the machine's default setting. 1. The scanned file is created in the ARDF or ADF. Depending on the machine's setting, you will be asked to place another original on the exposure glass. ... on the display. If you may be prompted to select the file format between TIFF and PDF (halftone black-and-white scanning mode), or JPG and PDF (color or gray scale scanning mode). 5. Place the original on the display. appears on your USB flash disk into the USB flash disk port. 2. When...
Press the [Scanner] key. Repeat this case, proceed to USB function may be disabled by the machine's default setting. 1. The scanned file is created in the ARDF or ADF. Depending on the machine's setting, you will be asked to place another original on the exposure glass. ... on the display. If you may be prompted to select the file format between TIFF and PDF (halftone black-and-white scanning mode), or JPG and PDF (color or gray scale scanning mode). 5. Place the original on the display. appears on your USB flash disk into the USB flash disk port. 2. When...

User Guide
Page 22
TWAIN scanning is installed on your computer, install one. • For details about the TWAIN scanning operation, see the manual provided with both USB and network connections. Basic Operation for TWAIN Scanning You can perform TWAIN scanning by using a TWAIN-compatible application. If no TWAIN-compatible application is available with the application of your computer directly. 1. Using the Scanner Function Scanning from a Computer Scanning from a computer (TWAIN scanning) allows you to operate the machine from your computer and scan originals into your choice. 18
TWAIN scanning is installed on your computer, install one. • For details about the TWAIN scanning operation, see the manual provided with both USB and network connections. Basic Operation for TWAIN Scanning You can perform TWAIN scanning by using a TWAIN-compatible application. If no TWAIN-compatible application is available with the application of your computer directly. 1. Using the Scanner Function Scanning from a Computer Scanning from a computer (TWAIN scanning) allows you to operate the machine from your computer and scan originals into your choice. 18

User Guide
Page 32
... exposure glass, and then press [OK]. Press the [Start] key. • Depending on the machine's settings, you may be prompted to scan, press [Yes] within 60 seconds, place the next original on the exposure glass or in [PBX Access Number] before the fax number. •... telephone network through a PBX, make sure to the next step. 5. If you manually entered the destination fax number. 2. If necessary, configure the advanced scan settings. 3. If you will start sending the fax. • For complete information about the fax function, see User Guide . 28 Press the [Facsimile]...
... exposure glass, and then press [OK]. Press the [Start] key. • Depending on the machine's settings, you may be prompted to scan, press [Yes] within 60 seconds, place the next original on the exposure glass or in [PBX Access Number] before the fax number. •... telephone network through a PBX, make sure to the next step. 5. If you manually entered the destination fax number. 2. If necessary, configure the advanced scan settings. 3. If you will start sending the fax. • For complete information about the fax function, see User Guide . 28 Press the [Facsimile]...


