User Guide
Page 4
... Cable 42 Reading the LED lamps 44 Connecting to a Telephone Line 44 Configuring the Machine 46 Configuring the IP Address Settings 46 Setting the machine to receive an IP address automatically 46 Assigning the machine's IP address manually 47 Configuring Telephone Network Settings 50 Selecting the telephone line type 50 Selecting the telephone network connection type...
... Cable 42 Reading the LED lamps 44 Connecting to a Telephone Line 44 Configuring the Machine 46 Configuring the IP Address Settings 46 Setting the machine to receive an IP address automatically 46 Assigning the machine's IP address manually 47 Configuring Telephone Network Settings 50 Selecting the telephone line type 50 Selecting the telephone network connection type...
User Guide
Page 20
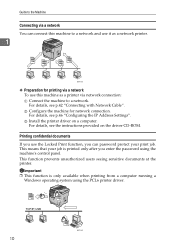
For details, see p.46 "Configuring the IP Address Settings". C Install the printer driver on the driver CD-ROM. For details, see p.42 "Connecting with Network Cable". Important ❒ This function is printed only ...
For details, see p.46 "Configuring the IP Address Settings". C Install the printer driver on the driver CD-ROM. For details, see p.42 "Connecting with Network Cable". Important ❒ This function is printed only ...
User Guide
Page 25
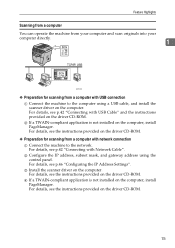
... details, see the instructions provided on the driver CD-ROM. 15 D If a TWAIN-compliant application is not installed on the computer. B Configure the IP address, subnet mask, and gateway address using a USB cable, and install the scanner driver on the computer, install PageManager. For details, see p.42 "Connecting with Network Cable". For details...
... details, see the instructions provided on the driver CD-ROM. 15 D If a TWAIN-compliant application is not installed on the computer. B Configure the IP address, subnet mask, and gateway address using a USB cable, and install the scanner driver on the computer, install PageManager. For details, see p.42 "Connecting with Network Cable". For details...

User Guide
Page 26
B Configure the IP address, subnet mask, and gateway address using Web Image Monitor. D Register the destinations to the Address Book using the control panel. C Configure the DNS and SMTP settings using the control panel. 16 BSP011S For details, see p.258 "... sending scanned files via e-mail You can send scanned files to an FTP server using Web Image Monitor. For details, see p.46 "Configuring the IP Address Settings". For details, see p.134 "Registering Scan Destinations". For details, see p.42 "Connecting with Network Cable". Guide to the Machine Sending scanned ...
B Configure the IP address, subnet mask, and gateway address using Web Image Monitor. D Register the destinations to the Address Book using the control panel. C Configure the DNS and SMTP settings using the control panel. 16 BSP011S For details, see p.258 "... sending scanned files via e-mail You can send scanned files to an FTP server using Web Image Monitor. For details, see p.46 "Configuring the IP Address Settings". For details, see p.134 "Registering Scan Destinations". For details, see p.42 "Connecting with Network Cable". Guide to the Machine Sending scanned ...

User Guide
Page 27
...10066; If you must specify the server name and domain name in the DNS settings. B Configure the IP address, subnet mask, and gateway address using the Scan to the Address Book using the control panel. BSP012S ❖ Preparation for sending scanned files to an FTP server A... Connect the machine to the network. B Configure the IP address, subnet mask, and gateway address using Web Image Monitor. For details, see your operating system's documentation. C Register the destinations to Folder function on a ...
...10066; If you must specify the server name and domain name in the DNS settings. B Configure the IP address, subnet mask, and gateway address using the Scan to the Address Book using the control panel. BSP012S ❖ Preparation for sending scanned files to an FTP server A... Connect the machine to the network. B Configure the IP address, subnet mask, and gateway address using Web Image Monitor. For details, see your operating system's documentation. C Register the destinations to Folder function on a ...
User Guide
Page 30
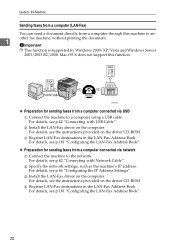
... the LAN-Fax driver on the driver CD-ROM. C Register LAN-Fax destinations in the LAN-Fax Address Book. B Specify the network settings, such as the machine's IP address. For details, see the instructions provided on the computer. D Register LAN-Fax destinations in the LAN-...Fax Address Book. For details, see p.181 "Configuring the LAN-Fax Address Book". ❖ Preparation for sending faxes from a ...
... the LAN-Fax driver on the driver CD-ROM. C Register LAN-Fax destinations in the LAN-Fax Address Book. B Specify the network settings, such as the machine's IP address. For details, see the instructions provided on the computer. D Register LAN-Fax destinations in the LAN-...Fax Address Book. For details, see p.181 "Configuring the LAN-Fax Address Book". ❖ Preparation for sending faxes from a ...
User Guide
Page 53
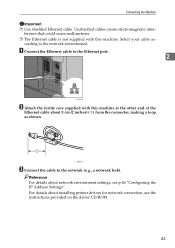
cording to the network (e.g., a network hub). For details about installing printer drivers for network connection, see p.46 "Configuring the IP Address Settings". Select your cable ac- ference that could cause malfunctions. ❒ The Ethernet cable is not supplied with this machine. A Connect the Ethernet cable to ...
cording to the network (e.g., a network hub). For details about installing printer drivers for network connection, see p.46 "Configuring the IP Address Settings". Select your cable ac- ference that could cause malfunctions. ❒ The Ethernet cable is not supplied with this machine. A Connect the Ethernet cable to ...

User Guide
Page 56
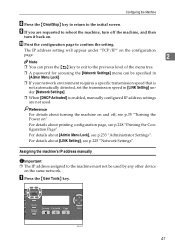
... [Network Settings], and then press the {OK} key. Configuring the IP Address Settings 2 The procedure for the machine to receive an IP address automatically. D Press the {U}{T} keys to use the machine on whether IP address information is displayed with an "p" symbol, indicating that the setting has ...Getting Started Configuring the Machine This section describes configuring the settings required to select [IP Configuration], and then press the {OK} key. Setting the machine to receive an IP address automatically Important ❒ A DHCP server is required on the network for configuring ...
... [Network Settings], and then press the {OK} key. Configuring the IP Address Settings 2 The procedure for the machine to receive an IP address automatically. D Press the {U}{T} keys to use the machine on whether IP address information is displayed with an "p" symbol, indicating that the setting has ...Getting Started Configuring the Machine This section describes configuring the settings required to select [IP Configuration], and then press the {OK} key. Setting the machine to receive an IP address automatically Important ❒ A DHCP server is required on the network for configuring ...
User Guide
Page 57
... 2 Note ❒ You can press the { } key to exit to the initial screen. Assigning the machine's IP address manually Important ❒ The IP address assigned to the machine must not be specified in [Admin Menu Lock]. ❒ If your network environment requires a specific... [LINK Setting] under [Network Settings]. ❒ When [DHCP Activated] is enabled, manually configured IP address settings are requested to confirm the setting. The IP address setting will appear under "TCP/IP" on . BSP051S 47 A Press the {User Tools} key. Configuring the Machine H Press the...
... 2 Note ❒ You can press the { } key to exit to the initial screen. Assigning the machine's IP address manually Important ❒ The IP address assigned to the machine must not be specified in [Admin Menu Lock]. ❒ If your network environment requires a specific... [LINK Setting] under [Network Settings]. ❒ When [DHCP Activated] is enabled, manually configured IP address settings are requested to confirm the setting. The IP address setting will appear under "TCP/IP" on . BSP051S 47 A Press the {User Tools} key. Configuring the Machine H Press the...
User Guide
Page 58
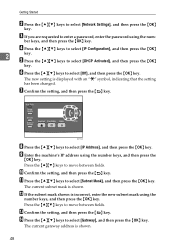
E Press the {U}{T} keys to select [Gateway], and then press the {OK} key. I Enter the machine's IP address using the num- The current subnet mask is shown. 48 M Confirm the setting, and then press the { } key. N Press the {U}{T} keys to select [DHCP ...OK} key. BSP052S H Press the {U}{T} keys to select [Off], and then press the {OK} key. F Press the {U}{T} keys to select [IP Address], and then press the {OK} key. The current gateway address is shown. L If the subnet mask shown is displayed with an "p" symbol, indicating that the setting has been changed. C If you...
E Press the {U}{T} keys to select [Gateway], and then press the {OK} key. I Enter the machine's IP address using the num- The current subnet mask is shown. 48 M Confirm the setting, and then press the { } key. N Press the {U}{T} keys to select [DHCP ...OK} key. BSP052S H Press the {U}{T} keys to select [Off], and then press the {OK} key. F Press the {U}{T} keys to select [IP Address], and then press the {OK} key. The current gateway address is shown. L If the subnet mask shown is displayed with an "p" symbol, indicating that the setting has been changed. C If you...
User Guide
Page 59
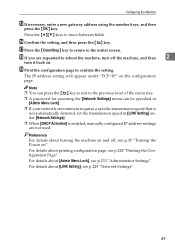
... will appear under [Network Settings]. ❒ When [DHCP Activated] is enabled, manually configured IP address settings are requested to reboot the machine, turn it back on the configuration page. Reference For details about printing configuration page, see p.35 ... Menu Lock]. ❒ If your network environment requires a specific transmission speed that is not automatically detected, set the transmission speed in [LINK Setting] under "TCP/IP" on . P Confirm the setting, and then press the { } key. R If you are not used. For details about [LINK Setting], see p.233 "Administrator ...
... will appear under [Network Settings]. ❒ When [DHCP Activated] is enabled, manually configured IP address settings are requested to reboot the machine, turn it back on the configuration page. Reference For details about printing configuration page, see p.35 ... Menu Lock]. ❒ If your network environment requires a specific transmission speed that is not automatically detected, set the transmission speed in [LINK Setting] under "TCP/IP" on . P Confirm the setting, and then press the { } key. R If you are not used. For details about [LINK Setting], see p.233 "Administrator ...
User Guide
Page 101
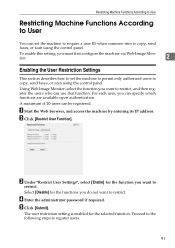
... Settings", select [Enable] for the selected function. Proceed to the following steps to restrict. A Start the Web browser, and access the machine by entering its IP address. Restricting Machine Functions According to User Restricting Machine Functions According to User You can be registered. Using Web Image Monitor, select the function you want...
... Settings", select [Enable] for the selected function. Proceed to the following steps to restrict. A Start the Web browser, and access the machine by entering its IP address. Restricting Machine Functions According to User Restricting Machine Functions According to User You can be registered. Using Web Image Monitor, select the function you want...
User Guide
Page 103
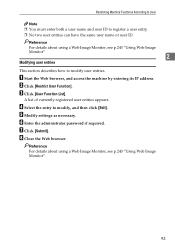
... For details about using a Web Image Monitor, see p.243 "Using Web Image Monitor". 93 A Start the Web browser, and access the machine by entering its IP address.
... For details about using a Web Image Monitor, see p.243 "Using Web Image Monitor". 93 A Start the Web browser, and access the machine by entering its IP address.
User Guide
Page 104
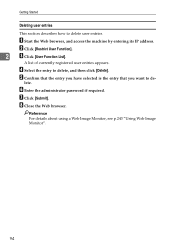
A Start the Web browser, and access the machine by entering its IP address. E Confirm that the entry you have selected is the entry that you want to delete, and then click [Delete]. lete. G Click [Submit]. D Select the entry ...
A Start the Web browser, and access the machine by entering its IP address. E Confirm that the entry you have selected is the entry that you want to delete, and then click [Delete]. lete. G Click [Submit]. D Select the entry ...
User Guide
Page 144
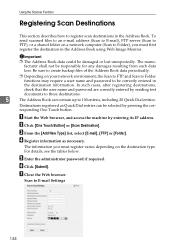
...F Click [Submit]. Using the Scanner Function Registering Scan Destinations This section describes how to E-mail Settings 134 Important ❒ The Address Book data could be correctly entered in the destination information. Destinations registered as necessary. The information you must register varies depending on a..., after registering destinations, check that the user name and password are correctly entered by entering its IP address. To send scanned files to an e-mail address (Scan to E-mail), FTP server (Scan to FTP), or a shared folder on the destination type.
...F Click [Submit]. Using the Scanner Function Registering Scan Destinations This section describes how to E-mail Settings 134 Important ❒ The Address Book data could be correctly entered in the destination information. Destinations registered as necessary. The information you must register varies depending on a..., after registering destinations, check that the user name and password are correctly entered by entering its IP address. To send scanned files to an e-mail address (Scan to E-mail), FTP server (Scan to FTP), or a shared folder on the destination type.

User Guide
Page 146
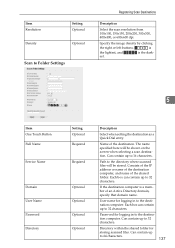
... Directory Sender Document size Optional Optional Optional Optional Optional 136 Description Select when setting the destination as a Quick Dial entry. Name or IP address of the scanned file when scanning in color. Can contain up to 64 characters. Can contain up to which a notification is sent... after transmission. User name for logging in to FTP Settings Item One Touch Button 5 Full Name Setting Optional Required Host name or IP Address Required File Format for Color/Gray Required File Format for the original from A5, B5, A4, Executive, STMT, Letter, Legal, or ...
... Directory Sender Document size Optional Optional Optional Optional Optional 136 Description Select when setting the destination as a Quick Dial entry. Name or IP address of the scanned file when scanning in color. Can contain up to 64 characters. Can contain up to which a notification is sent... after transmission. User name for logging in to FTP Settings Item One Touch Button 5 Full Name Setting Optional Required Host name or IP Address Required File Format for Color/Gray Required File Format for the original from A5, B5, A4, Executive, STMT, Letter, Legal, or ...
User Guide
Page 147
The name specified here will be shown on the screen when selecting a scan destination. Consists of the IP address or name of the destination computer, and name of the destination. Each box can contain up to 16 characters. Name of the shared folder. Can ...
The name specified here will be shown on the screen when selecting a scan destination. Consists of the IP address or name of the destination computer, and name of the destination. Each box can contain up to 16 characters. Name of the shared folder. Can ...
User Guide
Page 149
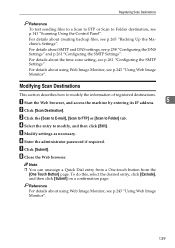
...'s Settings". C Click the [Scan to E-mail], [Scan to FTP] or [Scan to Folder] tab. A Start the Web browser, and access the machine by entering its IP address. 5 B Click [Scan Destination].
...'s Settings". C Click the [Scan to E-mail], [Scan to FTP] or [Scan to Folder] tab. A Start the Web browser, and access the machine by entering its IP address. 5 B Click [Scan Destination].
User Guide
Page 150
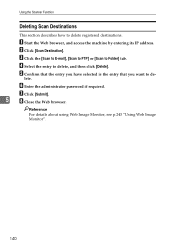
... Destinations This section describes how to delete, and then click [Delete]. B Click [Scan Destination]. A Start the Web browser, and access the machine by entering its IP address.
... Destinations This section describes how to delete, and then click [Delete]. B Click [Scan Destination]. A Start the Web browser, and access the machine by entering its IP address.
User Guide
Page 174
...; You can press the { } key to exit to register destinations using Web Image Monitor. A Start the Web browser and access the machine by entering its IP address. E Register [Name] and [Fax Number] as necessary. F Enter the administrator password if required. Reference For details about [Admin Menu Lock], see p.233 "Administrator Settings". B Click...
...; You can press the { } key to exit to register destinations using Web Image Monitor. A Start the Web browser and access the machine by entering its IP address. E Register [Name] and [Fax Number] as necessary. F Enter the administrator password if required. Reference For details about [Admin Menu Lock], see p.233 "Administrator Settings". B Click...


