
Quick Installation Guide
Page 1
Keep this 'Quick Setup Guide' for quick and easy reference at all times. How to use the printer, you must set up the hardware and install the driver. STEP 1 Setting Up the Machine STEP 2 Installing the Printer Driver Setup is Complete! Quick Setup Guide Laser Printer SP 1210N Before you can use the printer, see the User's Guide on the CD-ROM. Please read this 'Quick Setup Guide' and the supplied CD-ROM in a convenient place for proper set up and installation instructions.
Keep this 'Quick Setup Guide' for quick and easy reference at all times. How to use the printer, you must set up the hardware and install the driver. STEP 1 Setting Up the Machine STEP 2 Installing the Printer Driver Setup is Complete! Quick Setup Guide Laser Printer SP 1210N Before you can use the printer, see the User's Guide on the CD-ROM. Please read this 'Quick Setup Guide' and the supplied CD-ROM in a convenient place for proper set up and installation instructions.
Quick Installation Guide
Page 2
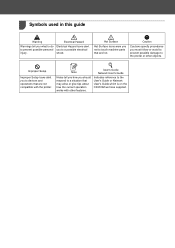
Electrical Hazard Electrical Hazard icons alert you to the printer or other features. Caution Cautions specify procedures you must follow or avoid to prevent possible damage to a possible electrical shock. Improper Setup Improper Setup icons ... this guide 1 Warning Warnings tell you what to do to a situation that may arise or give tips about how the current operation works with the printer. Hot Surface Hot Surface icons warn you not to touch machine parts that are not compatible with other objects.
Electrical Hazard Electrical Hazard icons alert you to the printer or other features. Caution Cautions specify procedures you must follow or avoid to prevent possible damage to a possible electrical shock. Improper Setup Improper Setup icons ... this guide 1 Warning Warnings tell you what to do to a situation that may arise or give tips about how the current operation works with the printer. Hot Surface Hot Surface icons warn you not to touch machine parts that are not compatible with other objects.
Quick Installation Guide
Page 3
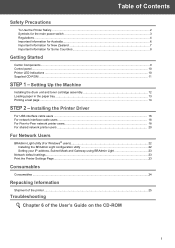
... For USB interface cable users ...16 For network interface cable users ...18 For Peer-to-Peer network printer users...18 For shared network printer users ...20 For Network Users BRAdmin Light utility (For Windows® users 22 Installing the BRAdmin Light ... and Gateway using BRAdmin Light 23 Network default settings...23 Print the Printer Settings Page...23 Consumables Consumables ...24 Repacking Information Shipment of the printer...25 Troubleshooting Chapter 6 of Contents Safety Precautions To Use the Printer Safely ...2 Symbols for the main power switch ...3 Regulations ...4 Important ...
... For USB interface cable users ...16 For network interface cable users ...18 For Peer-to-Peer network printer users...18 For shared network printer users ...20 For Network Users BRAdmin Light utility (For Windows® users 22 Installing the BRAdmin Light ... and Gateway using BRAdmin Light 23 Network default settings...23 Print the Printer Settings Page...23 Consumables Consumables ...24 Repacking Information Shipment of the printer...25 Troubleshooting Chapter 6 of Contents Safety Precautions To Use the Printer Safely ...2 Symbols for the main power switch ...3 Regulations ...4 Important ...
Quick Installation Guide
Page 4
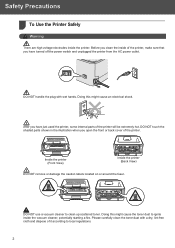
... regulations. 2 DO NOT use a vacuum cleaner to ignite inside of the printer will be extremely hot. Doing this might cause an electrical shock. Before you have just used the printer, some internal parts of the printer, make sure that you clean the inside the vacuum cleaner, potentially starting a...the shaded parts shown in the illustration when you have turned off the power switch and unplugged the printer from the AC power outlet. Inside the printer (Front View) Inside the printer (Back View) DO NOT remove or damage the caution labels located on or around the fuser. ...
... regulations. 2 DO NOT use a vacuum cleaner to ignite inside of the printer will be extremely hot. Doing this might cause an electrical shock. Before you have just used the printer, some internal parts of the printer, make sure that you clean the inside the vacuum cleaner, potentially starting a...the shaded parts shown in the illustration when you have turned off the power switch and unplugged the printer from the AC power outlet. Inside the printer (Front View) Inside the printer (Back View) DO NOT remove or damage the caution labels located on or around the fuser. ...
Quick Installation Guide
Page 6
Safety Precautions Regulations Federal Communications Commission (FCC) Declaration of Conformity (For USA) Responsible Party: Ricoh Americas Corporation Address: 5 Dedrick Place, West Caldwell,NJ 07006 USA Telephone number: 973-882-2000 declares, that the products Product Name: Laser Printer Model Number: SP 1210N comply with Part 15 of user operation. Important A shielded interface cable should be...
Safety Precautions Regulations Federal Communications Commission (FCC) Declaration of Conformity (For USA) Responsible Party: Ricoh Americas Corporation Address: 5 Dedrick Place, West Caldwell,NJ 07006 USA Telephone number: 973-882-2000 declares, that the products Product Name: Laser Printer Model Number: SP 1210N comply with Part 15 of user operation. Important A shielded interface cable should be...
Quick Installation Guide
Page 7
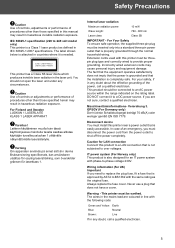
... You should be inserted only into a standard three-pin power outlet that the installation is easily accessible. Maschinenlärminformations- This printer must install this product to a LAN connection that is approved by ASTA to BS1362 with the following code: Green and Yellow: ... product should not open the laser unit under any doubt about the effective grounding of procedures other than those specified in this printer must be connected to provide proper grounding. Always replace the fuse cover. For Your Safety To ensure safe operation, the supplied...
... You should be inserted only into a standard three-pin power outlet that the installation is easily accessible. Maschinenlärminformations- This printer must install this product to a LAN connection that is approved by ASTA to BS1362 with the following code: Green and Yellow: ... product should not open the laser unit under any doubt about the effective grounding of procedures other than those specified in this printer must be connected to provide proper grounding. Always replace the fuse cover. For Your Safety To ensure safe operation, the supplied...
Quick Installation Guide
Page 11
... tray support flap 1 (Support flap 1) 2. however, maximum data transfer rate will be connected to a computer that is not a standard accessory. The printer can also be 12 Mbits/s. Control panel 3. When you use a USB cable, make sure you use . „ USB cable • Please make... sure you are going to use a USB 2.0 interface cable that is no longer than 6 feet (2 meters). • Your printer has a USB interface that has a USB 1.1 interface. • DO NOT connect the interface cable at this time. Front cover 8. Buy the appropriate cable...
... tray support flap 1 (Support flap 1) 2. however, maximum data transfer rate will be connected to a computer that is not a standard accessory. The printer can also be 12 Mbits/s. Control panel 3. When you use a USB cable, make sure you use . „ USB cable • Please make... sure you are going to use a USB 2.0 interface cable that is no longer than 6 feet (2 meters). • Your printer has a USB interface that has a USB 1.1 interface. • DO NOT connect the interface cable at this time. Front cover 8. Buy the appropriate cable...
Quick Installation Guide
Page 12
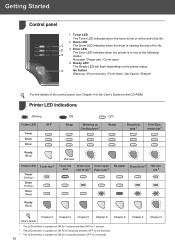
... life. 2 Drum LED 1 The Drum LED indicates when the drum is nearing the end of its life. 2 3 Error LED The Error LED indicates when the printer is in one of the following 3 states: No paper / Paper jam / Cover open end of life 3 Paper jam 2 No paper Drum Error 2 Service call 2 ... OFF for 1 second. 2 The LED will blink in a pattern of ON for 0.5 seconds and then OFF for 0.5 seconds. 3 The LED will flash depending on the printer status. 4 Go button Wake-up / Error recovery / Form feed / Job Cancel / Reprint For the details of the control panel, see Chapter 4 of ON for 2 seconds...
... life. 2 Drum LED 1 The Drum LED indicates when the drum is nearing the end of its life. 2 3 Error LED The Error LED indicates when the printer is in one of the following 3 states: No paper / Paper jam / Cover open end of life 3 Paper jam 2 No paper Drum Error 2 Service call 2 ... OFF for 1 second. 2 The LED will blink in a pattern of ON for 0.5 seconds and then OFF for 0.5 seconds. 3 The LED will flash depending on the printer status. 4 Go button Wake-up / Error recovery / Form feed / Job Cancel / Reprint For the details of the control panel, see Chapter 4 of ON for 2 seconds...
Quick Installation Guide
Page 13
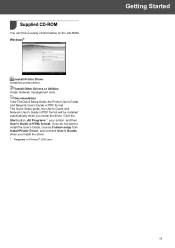
...'s Guide and Network User's Guide in HTML format. Click the Start button, All Programs 1, your printer, and then User's Guide in PDF format. The Quick Setup guide, the User's Guide and Network User's Guide in PDF format will be installed automatically ... 4 You can find a variety of information on the CD-ROM. If you do not want to install the User's Guide, choose Custom setup from Install Printer Driver, and uncheck User's Guides when you install the driver. Install Other Drivers or Utilities Install Network management tools. Windows® Install...
...'s Guide and Network User's Guide in HTML format. Click the Start button, All Programs 1, your printer, and then User's Guide in PDF format. The Quick Setup guide, the User's Guide and Network User's Guide in PDF format will be installed automatically ... 4 You can find a variety of information on the CD-ROM. If you do not want to install the User's Guide, choose Custom setup from Install Printer Driver, and uncheck User's Guides when you install the driver. Install Other Drivers or Utilities Install Network management tools. Windows® Install...
Quick Installation Guide
Page 14
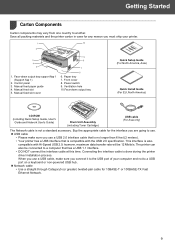
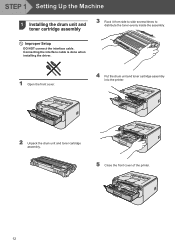
Connecting the interface cable is done when installing the driver. 1 Open the front cover. 4 Put the drum unit and toner cartridge assembly into the printer. 2 Unpack the drum unit and toner cartridge assembly. 5 Close the front cover of the printer. 12 STEP 1 Setting Up the Machine 1 1 Installing the drum unit and toner cartridge assembly 3 Rock it from side to side several times to distribute the toner evenly inside the assembly. Improper Setup DO NOT connect the interface cable.
Connecting the interface cable is done when installing the driver. 1 Open the front cover. 4 Put the drum unit and toner cartridge assembly into the printer. 2 Unpack the drum unit and toner cartridge assembly. 5 Close the front cover of the printer. 12 STEP 1 Setting Up the Machine 1 1 Installing the drum unit and toner cartridge assembly 3 Rock it from side to side several times to distribute the toner evenly inside the assembly. Improper Setup DO NOT connect the interface cable.
Quick Installation Guide
Page 15
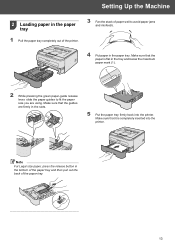
... that the guides are using. Note For Legal size paper, press the release button in the slots. 5 Put the paper tray firmly back into the printer. Make sure that it is flat in the tray and below the maximum paper mark (1). 1 2 While pressing the green paper-guide release lever, slide the... misfeeds. 4 Put paper in the paper tray. Setting Up the Machine 2 Loading paper in the paper tray 1 Pull the paper tray completely out of the printer. 3 Fan the stack of paper well to fit the paper size you are firmly in the bottom of the paper tray and then pull out...
... that the guides are using. Note For Legal size paper, press the release button in the slots. 5 Put the paper tray firmly back into the printer. Make sure that it is flat in the tray and below the maximum paper mark (1). 1 2 While pressing the green paper-guide release lever, slide the... misfeeds. 4 Put paper in the paper tray. Setting Up the Machine 2 Loading paper in the paper tray 1 Pull the paper tray completely out of the printer. 3 Fan the stack of paper well to fit the paper size you are firmly in the bottom of the paper tray and then pull out...

Quick Installation Guide
Page 16
... switch. 3 Unfold support flap 1. Connect the AC power cord to the printer. 1 5 Press the Go button. Note This function will not be available after the first print job you send from your computer. 14 STEP 1 Setting Up ...the Machine 3 Printing a test page Improper Setup DO NOT connect the interface cable yet. 4 After the printer has finished warming up, the Ready LED / Go button (1) stops blinking and stays blue. 1 Make sure that the test page has printed correctly. 2 Plug the...
... switch. 3 Unfold support flap 1. Connect the AC power cord to the printer. 1 5 Press the Go button. Note This function will not be available after the first print job you send from your computer. 14 STEP 1 Setting Up ...the Machine 3 Printing a test page Improper Setup DO NOT connect the interface cable yet. 4 After the printer has finished warming up, the Ready LED / Go button (1) stops blinking and stays blue. 1 Make sure that the test page has printed correctly. 2 Plug the...
Quick Installation Guide
Page 17
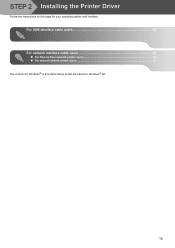
STEP 2 Installing the Printer Driver Follow the instructions on Windows® XP. 15 For USB interface cable users 16 For network interface cable users 18 „ For Peer-to-Peer network printer users 18 „ For shared network printer users ...20 The screens for Windows® in this Quick Setup Guide are based on this page for your operating system and interface.
STEP 2 Installing the Printer Driver Follow the instructions on Windows® XP. 15 For USB interface cable users 16 For network interface cable users 18 „ For Peer-to-Peer network printer users 18 „ For shared network printer users ...20 The screens for Windows® in this Quick Setup Guide are based on this page for your operating system and interface.
Quick Installation Guide
Page 18
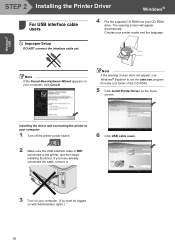
...appear automatically. If you have already connected the cable, remove it. 3 Turn on your computer. (You must be logged on your computer 1 Turn off the printer power switch. 6 Click USB cable users. 2 Make sure the USB interface cable is NOT connected to run the start.exe program from the root folder... of the CD-ROM. 5 Click Install Printer Driver on the menu screen. Note If the Found New Hardware Wizard appears on with Administrator rights.) 16 The opening screen does not appear, use...
...appear automatically. If you have already connected the cable, remove it. 3 Turn on your computer. (You must be logged on your computer 1 Turn off the printer power switch. 6 Click USB cable users. 2 Make sure the USB interface cable is NOT connected to run the start.exe program from the root folder... of the CD-ROM. 5 Click Install Printer Driver on the menu screen. Note If the Found New Hardware Wizard appears on with Administrator rights.) 16 The opening screen does not appear, use...
Quick Installation Guide
Page 19
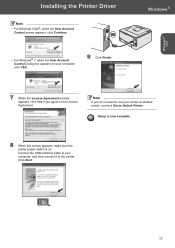
Installing the Printer Driver Note • For Windows Vista®, when the User Account Control screen appears, click Continue. • For Windows® 7, when the User Account Control ... to set your computer, click YES. 9 Click Finish. Setup is now complete. 8 When this screen appears, make sure the printer power switch is on your printer as Default printer, uncheck Set as Default Printer. Note If you agree to the License Agreement. Windows® Windows® USB 7 When the License Agreement window appears, click...
Installing the Printer Driver Note • For Windows Vista®, when the User Account Control screen appears, click Continue. • For Windows® 7, when the User Account Control ... to set your computer, click YES. 9 Click Finish. Setup is now complete. 8 When this screen appears, make sure the printer power switch is on your printer as Default printer, uncheck Set as Default Printer. Note If you agree to the License Agreement. Windows® Windows® USB 7 When the License Agreement window appears, click...
Quick Installation Guide
Page 20
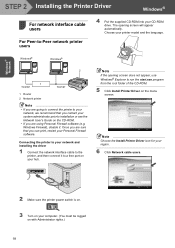
...For network interface cable 2 users For Peer-to run the start.exe program from the root folder of the CD-ROM. 5 Click Install Printer Driver on the menu screen. Note If the opening screen will appear automatically. Windows Firewall), disable it to installation or see the Network User...the supplied CD-ROM into your network and installing the driver 1 Connect the network interface cable to the printer, and then connect it . Windows R Windows R 2 1 TCP/IP TCP/IP 1 Router 2 Network printer Note • If you are sure that you can print, restart your hub. Once you are going...
...For network interface cable 2 users For Peer-to run the start.exe program from the root folder of the CD-ROM. 5 Click Install Printer Driver on the menu screen. Note If the opening screen will appear automatically. Windows Firewall), disable it to installation or see the Network User...the supplied CD-ROM into your network and installing the driver 1 Connect the network interface cable to the printer, and then connect it . Windows R Windows R 2 1 TCP/IP TCP/IP 1 Router 2 Network printer Note • If you are sure that you can print, restart your hub. Once you are going...
Quick Installation Guide
Page 21
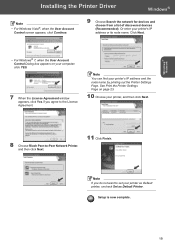
Note If you agree to the License Agreement. Or enter your printer, and then click Next. 8 Choose Ricoh Peer-to set your printer's IP address and the node name by printing out the Printer Settings Page. Click Next. Windows® Network • For Windows® 7, when the User Account Control... Dialog box appears on page 23. 10 Choose your printer's IP address or its...
Note If you agree to the License Agreement. Or enter your printer, and then click Next. 8 Choose Ricoh Peer-to set your printer's IP address and the node name by printing out the Printer Settings Page. Click Next. Windows® Network • For Windows® 7, when the User Account Control... Dialog box appears on page 23. 10 Choose your printer's IP address or its...
Quick Installation Guide
Page 22
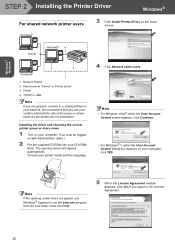
... Shared 2 Also known as "Server" or "Printer server" 3 Printer 4 TCP/IP or USB Note If you agree to a shared printer on your computer, click YES. Windows® Network STEP 2 Installing the Printer Driver Windows® For shared network printer users 3 Click Install Printer Driver on with Administrator rights.) 2 Put the ...going to connect to the License Agreement. 20 Installing the driver and choosing the correct printer queue or share name 1 Turn on your printer model and the language. 4 Click Network cable users. Note If the opening screen will appear automatically....
... Shared 2 Also known as "Server" or "Printer server" 3 Printer 4 TCP/IP or USB Note If you agree to a shared printer on your computer, click YES. Windows® Network STEP 2 Installing the Printer Driver Windows® For shared network printer users 3 Click Install Printer Driver on with Administrator rights.) 2 Put the ...going to connect to the License Agreement. 20 Installing the driver and choosing the correct printer queue or share name 1 Turn on your printer model and the language. 4 Click Network cable users. Note If the opening screen will appear automatically....
Quick Installation Guide
Page 23
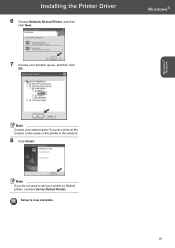
Note If you do not want to set your printer's queue, and then click OK. Setup is now complete. 21 Windows® Network Note Contact your administrator if you do not know the location or the name of the printer in the network. 8 Click Finish. Windows® 7 Choose your printer as Default printer, uncheck Set as Default Printer. Installing the Printer Driver 6 Choose Network Shared Printer, and then click Next.
Note If you do not want to set your printer's queue, and then click OK. Setup is now complete. 21 Windows® Network Note Contact your administrator if you do not know the location or the name of the printer in the network. 8 Click Finish. Windows® 7 Choose your printer as Default printer, uncheck Set as Default Printer. Installing the Printer Driver 6 Choose Network Shared Printer, and then click Next.
Quick Installation Guide
Page 25
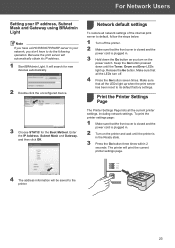
...default, follow the steps below. 1 Turn off . 4 Press the Go button seven times. Network default settings 2 To restore all the LEDs turn on the printer and wait until the Toner, Drum and Error LEDs light up when the print server has been reset to do the following operation. Enter the..., Subnet Mask and Gateway, and then click OK. Make sure that all network settings of the internal print server to the printer. 23 Print the Printer Settings 3 Page The Printer Settings Page lists all the LEDs light up . Keep the Go button pressed down the Go button as you don't have ...
...default, follow the steps below. 1 Turn off . 4 Press the Go button seven times. Network default settings 2 To restore all the LEDs turn on the printer and wait until the Toner, Drum and Error LEDs light up when the print server has been reset to do the following operation. Enter the..., Subnet Mask and Gateway, and then click OK. Make sure that all network settings of the internal print server to the printer. 23 Print the Printer Settings 3 Page The Printer Settings Page lists all the LEDs light up . Keep the Go button pressed down the Go button as you don't have ...


