
Quick Installation Guide
Page 1
How to use the printer, you must set up the hardware and install the driver. STEP 1 Setting Up the Machine STEP 2 Installing the Printer Driver Setup is Complete! Keep this 'Quick Setup Guide' for quick and easy reference at all times. Quick Setup Guide Laser Printer SP 1210N Before you can use the printer, see the User's Guide on the CD-ROM. Please read this 'Quick Setup Guide' and the supplied CD-ROM in a convenient place for proper set up and installation instructions.
How to use the printer, you must set up the hardware and install the driver. STEP 1 Setting Up the Machine STEP 2 Installing the Printer Driver Setup is Complete! Keep this 'Quick Setup Guide' for quick and easy reference at all times. Quick Setup Guide Laser Printer SP 1210N Before you can use the printer, see the User's Guide on the CD-ROM. Please read this 'Quick Setup Guide' and the supplied CD-ROM in a convenient place for proper set up and installation instructions.
Quick Installation Guide
Page 3
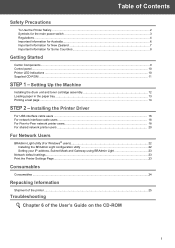
... 12 Loading paper in the paper tray ...13 Printing a test page ...14 STEP 2 - Table of the User's Guide on the CD-ROM 1 Installing the Printer Driver For USB interface cable users ...16 For network interface cable users ...18 For Peer-to-Peer network printer users...18 For shared network printer users...
... 12 Loading paper in the paper tray ...13 Printing a test page ...14 STEP 2 - Table of the User's Guide on the CD-ROM 1 Installing the Printer Driver For USB interface cable users ...16 For network interface cable users ...18 For Peer-to-Peer network printer users...18 For shared network printer users...
Quick Installation Guide
Page 11
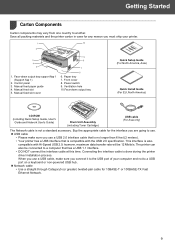
... cable • Use a straight-through Category5 (or greater) twisted-pair cable for any reason you connect it to a computer that is done during the printer driver installation process. Manual feed slot 5. Front cover 8. Getting Started 1 Carton Components 1 Carton components may vary from one country to use a USB 2.0 interface cable that is...
... cable • Use a straight-through Category5 (or greater) twisted-pair cable for any reason you connect it to a computer that is done during the printer driver installation process. Manual feed slot 5. Front cover 8. Getting Started 1 Carton Components 1 Carton components may vary from one country to use a USB 2.0 interface cable that is...
Quick Installation Guide
Page 13
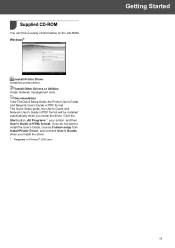
...HTML format. The Quick Setup guide, the User's Guide and Network User's Guide in PDF format will be installed automatically when you install the driver. 1 Programs for Windows® 2000 users Getting Started 11 Click the Start button, All Programs 1, your printer, and then User's Guide ...format. If you do not want to install the User's Guide, choose Custom setup from Install Printer Driver, and uncheck User's Guides when you install the driver. Windows® Install Printer Driver Install the printer driver. Supplied CD-ROM 4 You can find a variety of information on the CD-ROM.
...HTML format. The Quick Setup guide, the User's Guide and Network User's Guide in PDF format will be installed automatically when you install the driver. 1 Programs for Windows® 2000 users Getting Started 11 Click the Start button, All Programs 1, your printer, and then User's Guide ...format. If you do not want to install the User's Guide, choose Custom setup from Install Printer Driver, and uncheck User's Guides when you install the driver. Windows® Install Printer Driver Install the printer driver. Supplied CD-ROM 4 You can find a variety of information on the CD-ROM.
Quick Installation Guide
Page 14
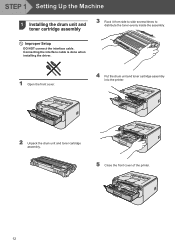
Improper Setup DO NOT connect the interface cable. Connecting the interface cable is done when installing the driver. 1 Open the front cover. 4 Put the drum unit and toner cartridge assembly into the printer. 2 Unpack the drum unit and toner cartridge assembly. 5 Close the front cover of the printer. 12 STEP 1 Setting Up the Machine 1 1 Installing the drum unit and toner cartridge assembly 3 Rock it from side to side several times to distribute the toner evenly inside the assembly.
Improper Setup DO NOT connect the interface cable. Connecting the interface cable is done when installing the driver. 1 Open the front cover. 4 Put the drum unit and toner cartridge assembly into the printer. 2 Unpack the drum unit and toner cartridge assembly. 5 Close the front cover of the printer. 12 STEP 1 Setting Up the Machine 1 1 Installing the drum unit and toner cartridge assembly 3 Rock it from side to side several times to distribute the toner evenly inside the assembly.
Quick Installation Guide
Page 17
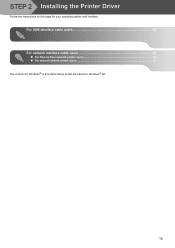
STEP 2 Installing the Printer Driver Follow the instructions on this page for Windows® in this Quick Setup Guide are based on Windows® XP. 15 For USB interface cable users 16 For network interface cable users 18 „ For Peer-to-Peer network printer users 18 „ For shared network printer users ...20 The screens for your operating system and interface.
STEP 2 Installing the Printer Driver Follow the instructions on this page for Windows® in this Quick Setup Guide are based on Windows® XP. 15 For USB interface cable users 16 For network interface cable users 18 „ For Peer-to-Peer network printer users 18 „ For shared network printer users ...20 The screens for your operating system and interface.
Quick Installation Guide
Page 18
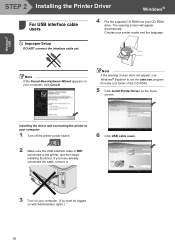
...interface cable yet. If you have already connected the cable, remove it. 3 Turn on the menu screen. Windows® USB STEP 2 Installing the Printer Driver Windows® 1 For USB interface cable 1 users 4 Put the supplied CD-ROM into your CD-ROM drive. Note If the opening screen will appear ...screen does not appear, use Windows® Explorer to run the start.exe program from the root folder of the CD-ROM. 5 Click Install Printer Driver on your computer 1 Turn off the printer power switch. 6 Click USB cable users. 2 Make sure the USB interface cable is NOT connected to ...
...interface cable yet. If you have already connected the cable, remove it. 3 Turn on the menu screen. Windows® USB STEP 2 Installing the Printer Driver Windows® 1 For USB interface cable 1 users 4 Put the supplied CD-ROM into your CD-ROM drive. Note If the opening screen will appear ...screen does not appear, use Windows® Explorer to run the start.exe program from the root folder of the CD-ROM. 5 Click Install Printer Driver on your computer 1 Turn off the printer power switch. 6 Click USB cable users. 2 Make sure the USB interface cable is NOT connected to ...
Quick Installation Guide
Page 19
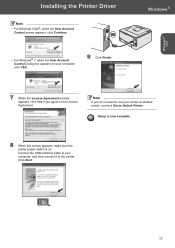
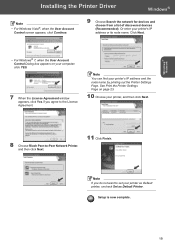
Note If you agree to your printer as Default printer, uncheck Set as Default Printer. Installing the Printer Driver Note • For Windows Vista®, when the User Account Control screen appears, click Continue. • For Windows® 7, when the User Account Control Dialog ...
Note If you agree to your printer as Default printer, uncheck Set as Default Printer. Installing the Printer Driver Note • For Windows Vista®, when the User Account Control screen appears, click Continue. • For Windows® 7, when the User Account Control Dialog ...
Quick Installation Guide
Page 20
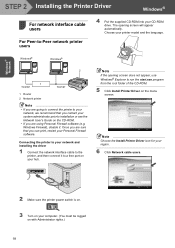
...we recommend that you are using Personal Firewall software (e.g. Note If the opening screen will appear automatically. Windows® Network STEP 2 Installing the Printer Driver Windows® For network interface cable 2 users For Peer-to run the start.exe program from the root folder of the CD-ROM. 5 Click... Install Printer Driver on the menu screen. The opening screen does not appear, use Windows® Explorer to -Peer network printer users 4 Put the supplied CD-...
...we recommend that you are using Personal Firewall software (e.g. Note If the opening screen will appear automatically. Windows® Network STEP 2 Installing the Printer Driver Windows® For network interface cable 2 users For Peer-to run the start.exe program from the root folder of the CD-ROM. 5 Click... Install Printer Driver on the menu screen. The opening screen does not appear, use Windows® Explorer to -Peer network printer users 4 Put the supplied CD-...
Quick Installation Guide
Page 21
... is now complete. 19 Click Next. Note If you agree to the License Agreement. Or enter your printer, and then click Next. 8 Choose Ricoh Peer-to set your printer's IP address and the node name by printing out the Printer Settings Page. See Print the Printer Settings Page on ...® 7, when the User Account Control Dialog box appears on page 23. 10 Choose your printer's IP address or its node name. Installing the Printer Driver Windows® Note • For Windows Vista®, when the User Account Control screen appears, click Continue. 9 Choose Search the network for devices and...
... is now complete. 19 Click Next. Note If you agree to the License Agreement. Or enter your printer, and then click Next. 8 Choose Ricoh Peer-to set your printer's IP address and the node name by printing out the Printer Settings Page. See Print the Printer Settings Page on ...® 7, when the User Account Control Dialog box appears on page 23. 10 Choose your printer's IP address or its node name. Installing the Printer Driver Windows® Note • For Windows Vista®, when the User Account Control screen appears, click Continue. 9 Choose Search the network for devices and...
Quick Installation Guide
Page 22
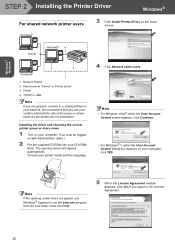
... Agreement window appears, click Yes if you ask your system administrator about the queue or share name for the printer prior to installation. Installing the driver and choosing the correct printer queue or share name 1 Turn on your computer. (You must be logged on your network, we recommend that you agree... server" 3 Printer 4 TCP/IP or USB Note If you are going to connect to the License Agreement. 20 Windows® Network STEP 2 Installing the Printer Driver Windows® For shared network printer users 3 Click Install Printer...
... Agreement window appears, click Yes if you ask your system administrator about the queue or share name for the printer prior to installation. Installing the driver and choosing the correct printer queue or share name 1 Turn on your computer. (You must be logged on your network, we recommend that you agree... server" 3 Printer 4 TCP/IP or USB Note If you are going to connect to the License Agreement. 20 Windows® Network STEP 2 Installing the Printer Driver Windows® For shared network printer users 3 Click Install Printer...
Quick Installation Guide
Page 23
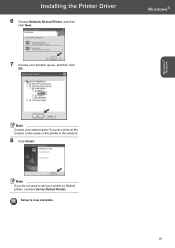
Note If you do not want to set your printer as Default printer, uncheck Set as Default Printer. Setup is now complete. 21 Installing the Printer Driver 6 Choose Network Shared Printer, and then click Next. Windows® Network Note Contact your printer's queue, and then click OK. Windows® 7 Choose your administrator if you do not know the location or the name of the printer in the network. 8 Click Finish.
Note If you do not want to set your printer as Default printer, uncheck Set as Default Printer. Setup is now complete. 21 Installing the Printer Driver 6 Choose Network Shared Printer, and then click Next. Windows® Network Note Contact your printer's queue, and then click OK. Windows® 7 Choose your administrator if you do not know the location or the name of the printer in the network. 8 Click Finish.
Quick Installation Guide
Page 24
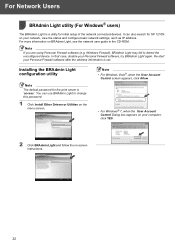
...utility (For Windows® users) 1 The BRAdmin Light is set. Note If you are using Personal Firewall software (e.g. You can also search for SP 1210N on your computer, click YES. 2 Click BRAdmin Light and follow the on your network, view the status and configure basic network settings, such as... IP address. Windows Firewall), BRAdmin Light may fail to change this password. 1 Click Install Other Drivers or Utilities on BRAdmin Light, see the network user guide in the CD-ROM. Note • For Windows Vista®, when the User ...
...utility (For Windows® users) 1 The BRAdmin Light is set. Note If you are using Personal Firewall software (e.g. You can also search for SP 1210N on your computer, click YES. 2 Click BRAdmin Light and follow the on your network, view the status and configure basic network settings, such as... IP address. Windows Firewall), BRAdmin Light may fail to change this password. 1 Click Install Other Drivers or Utilities on BRAdmin Light, see the network user guide in the CD-ROM. Note • For Windows Vista®, when the User ...
User's Guide
Page 7
... on both sides of the paper 21 Printing on both sides of the paper (manual duplex printing 21 3 Driver and Software 25 Printer driver ...25 Features in the printer driver ...27 Uninstalling the printer driver ...37 Printer driver for Windows® 2000/XP/7, Windows Vista® and Windows Server® 2003 37 Software ...38 Software...
... on both sides of the paper 21 Printing on both sides of the paper (manual duplex printing 21 3 Driver and Software 25 Printer driver ...25 Features in the printer driver ...27 Uninstalling the printer driver ...37 Printer driver for Windows® 2000/XP/7, Windows Vista® and Windows Server® 2003 37 Software ...38 Software...
User's Guide
Page 10
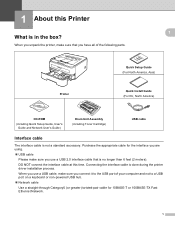
...? When you use a USB cable, make sure you use a USB 2.0 interface cable that you unpack the printer, make sure that is done during the printer driver installation process. When you have all of your computer and not to a USB port on a keyboard or non-powered USB hub. „ Network cable Use...
...? When you use a USB cable, make sure you use a USB 2.0 interface cable that you unpack the printer, make sure that is done during the printer driver installation process. When you have all of your computer and not to a USB port on a keyboard or non-powered USB hub. „ Network cable Use...

User's Guide
Page 14
... by clicking p in the table. Thin Env. Thick 5 2 Printing Methods 2 About paper Type and size of paper The printer loads paper from the printer driver Plain Paper Recycled Paper Bond Paper Thin Paper Thick Paper or Thicker Paper Transparencies Thicker Paper Envelopes Env. The names for the paper trays in... the printer driver and this guide are as follows: 2 2 2 Paper tray Manual feed slot Tray 1 Manual When looking at this page on the CD-ROM, you ...
... by clicking p in the table. Thin Env. Thick 5 2 Printing Methods 2 About paper Type and size of paper The printer loads paper from the printer driver Plain Paper Recycled Paper Bond Paper Thin Paper Thick Paper or Thicker Paper Transparencies Thicker Paper Envelopes Env. The names for the paper trays in... the printer driver and this guide are as follows: 2 2 2 Paper tray Manual feed slot Tray 1 Manual When looking at this page on the CD-ROM, you ...

User's Guide
Page 20
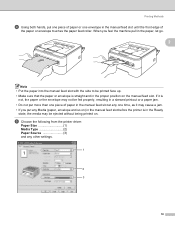
Printing Methods e Lift up the support flap 1 (1) to prevent paper from sliding off the face-down output tray. 1 2 f Choose the following from the printer driver: Paper Size 1) Media Type 2) Paper Source 3) and any other settings. 1 2 3 11
Printing Methods e Lift up the support flap 1 (1) to prevent paper from sliding off the face-down output tray. 1 2 f Choose the following from the printer driver: Paper Size 1) Media Type 2) Paper Source 3) and any other settings. 1 2 3 11

User's Guide
Page 24
e Choose the following from the printer driver: Paper Size 1) Media Type 2) Paper Source 3) and any other settings. 1 2 3 Printing Methods 2 15
e Choose the following from the printer driver: Paper Size 1) Media Type 2) Paper Source 3) and any other settings. 1 2 3 Printing Methods 2 15
User's Guide
Page 27
... and so on) in the manual feed slot before the printer is straight and in the proper position on . e Choose the following from the printer driver: Paper Size 1) Media Type 2) Paper Source 3) and any other settings. 1 2 3 18 When you put more than one piece of paper in the manual feed slot...
... and so on) in the manual feed slot before the printer is straight and in the proper position on . e Choose the following from the printer driver: Paper Size 1) Media Type 2) Paper Source 3) and any other settings. 1 2 3 18 When you put more than one piece of paper in the manual feed slot...
User's Guide
Page 28
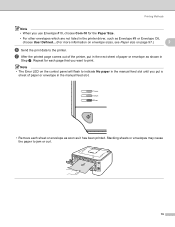
... the paper to jam or curl. 19 Note • The Error LED on the control panel will flash to indicate No paper in the printer driver, such as it has been printed. Printing Methods Note • When you use Envelope #10, choose Com-10 for each sheet or envelope as soon...
... the paper to jam or curl. 19 Note • The Error LED on the control panel will flash to indicate No paper in the printer driver, such as it has been printed. Printing Methods Note • When you use Envelope #10, choose Com-10 for each sheet or envelope as soon...


