Quick Start Guide
Page 4
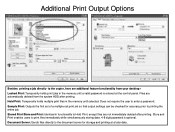
... in functionality to Hold Print, except files are additional feature functionality from the system HDD after printing. Sample Print: Outputs the first set of a multiple-set print job so that output settings can be checked for storage and printing at the control panel. Does not require the user to enter a password. Store and...
... in functionality to Hold Print, except files are additional feature functionality from the system HDD after printing. Sample Print: Outputs the first set of a multiple-set print job so that output settings can be checked for storage and printing at the control panel. Does not require the user to enter a password. Store and...
Quick Start Guide
Page 5
Sample Print: Outputs the first set of a multiple-set print job so that output settings can be checked for accuracy prior to the document server for storage and printing at the control panel. Document Server: Sends files directly to printing ...
Sample Print: Outputs the first set of a multiple-set print job so that output settings can be checked for accuracy prior to the document server for storage and printing at the control panel. Document Server: Sends files directly to printing ...
Quick Start Guide
Page 9
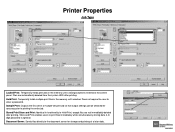
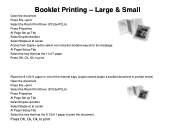
Large & Small Open the document Press File >print Select the Ricoh Print Driver (PCL5e/PCL6) Press Properties At Page Set up Tab Select Duplex>booklet Select Staple>2 at center Across from Duplex option select non reduction booklet>say ok to the message At Paper Setup ... one of the internal trays (copier cannot staple a booklet document in portrait mode) Open the document Press File >print Select the Ricoh Print Driver (PCL5e/PCL6) Press Properties At Page Set up Tab Select Duplex>booklet Select Staple>2 at center At Paper Setup Tab Select the tray that has the 8 1/2x11 paper...
Large & Small Open the document Press File >print Select the Ricoh Print Driver (PCL5e/PCL6) Press Properties At Page Set up Tab Select Duplex>booklet Select Staple>2 at center Across from Duplex option select non reduction booklet>say ok to the message At Paper Setup ... one of the internal trays (copier cannot staple a booklet document in portrait mode) Open the document Press File >print Select the Ricoh Print Driver (PCL5e/PCL6) Press Properties At Page Set up Tab Select Duplex>booklet Select Staple>2 at center At Paper Setup Tab Select the tray that has the 8 1/2x11 paper...
Quick Start Guide
Page 11
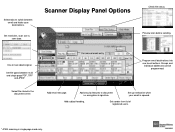
...to switch between multi and single page PDF, TIFF and JPEG* Select file stored in single page mode only. Set up notification when your email is opened. Set resolution, scan size & scan type. Scanner Display Panel Options Check file status. Add email message. Add subject ...heading. One or two sided original. Set file types between email and folder scan destinations. Set sender from list of registered users. * JPEG scanning in the document server. For manual email entry Program email ...
...to switch between multi and single page PDF, TIFF and JPEG* Select file stored in single page mode only. Set up notification when your email is opened. Set resolution, scan size & scan type. Scanner Display Panel Options Check file status. Add email message. Add subject ...heading. One or two sided original. Set file types between email and folder scan destinations. Set sender from list of registered users. * JPEG scanning in the document server. For manual email entry Program email ...
Quick Start Guide
Page 16
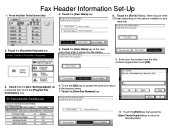
Settings/Adjust] tab is selected then touch the [Program Fax Information] key 6. Touch the [OK] key to accept the name and return to Standby Mode Enter ...] key 10. Touch the [Own Name] key at the next menu then enter a name from the blue numeric keypad then touch [OK] 3. Fax Header Information Set-Up 1. Press the [User Tools/Counter] key 4.
Settings/Adjust] tab is selected then touch the [Program Fax Information] key 6. Touch the [OK] key to accept the name and return to Standby Mode Enter ...] key 10. Touch the [Own Name] key at the next menu then enter a name from the blue numeric keypad then touch [OK] 3. Fax Header Information Set-Up 1. Press the [User Tools/Counter] key 4.

Quick Start Guide
Page 19
Press [OK] or [Print]. 5. 1. Press [Set as if you were manually dialing the number at a Fax Machine or select from [Address Book], if the number is already pre-programmed in address ...
Press [OK] or [Print]. 5. 1. Press [Set as if you were manually dialing the number at a Fax Machine or select from [Address Book], if the number is already pre-programmed in address ...
Troubleshooting Guide
Page 12
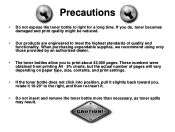
... authorized dealer. • The toner bottles allow you to meet the highest standards of pages will vary depending on paper type, size, contents, and print settings. • If the toner bottle does not click into position, pull it slightly back toward you do, toner becomes damaged and print quality might be...
... authorized dealer. • The toner bottles allow you to meet the highest standards of pages will vary depending on paper type, size, contents, and print settings. • If the toner bottle does not click into position, pull it slightly back toward you do, toner becomes damaged and print quality might be...
User Guide
Page 2
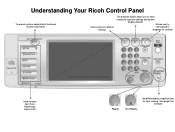
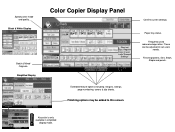
Understanding Your Ricoh Control Panel To access system administrator tools and counter information Clears screen to default settings The program button allows you to store frequently used job settings and screen display defaults Allows user to interrupt job in progress for new job Hard function keys have Red/Yellow status LEDs 8.5" Full Color W-VGA Screen Ready Not Ready Simplified display magnifies fonts for example See page 2 for easy viewing.
Understanding Your Ricoh Control Panel To access system administrator tools and counter information Clears screen to default settings The program button allows you to store frequently used job settings and screen display defaults Allows user to interrupt job in progress for new job Hard function keys have Red/Yellow status LEDs 8.5" Full Color W-VGA Screen Ready Not Ready Simplified display magnifies fonts for example See page 2 for easy viewing.
User Guide
Page 3
Register keys in simplified display mode. These can be added to suit users needs. Specify color mode and quality. Key color is only available in user tools "General Settings" Paper tray status. Finishing options may be adjusted to this screen. Finishing options. Extended feature options including; margins, stamps, page numbering, covers & slip sheets. Simplified Display Color Copier Display Panel Confirm current settings. Frequently used reduce/enlarge ratios. Black & White Display Batch & Mixed Originals. Short cut keys. Sort, Stack, Staple and punch.
Register keys in simplified display mode. These can be added to suit users needs. Specify color mode and quality. Key color is only available in user tools "General Settings" Paper tray status. Finishing options may be adjusted to this screen. Finishing options. Extended feature options including; margins, stamps, page numbering, covers & slip sheets. Simplified Display Color Copier Display Panel Confirm current settings. Frequently used reduce/enlarge ratios. Black & White Display Batch & Mixed Originals. Short cut keys. Sort, Stack, Staple and punch.
User Guide
Page 4
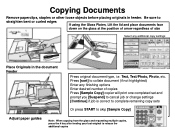
... Enter desired number of copies Press [Sample Copy] copier will print one completed set and prompt you [Suspend] to cancel job or change settings [Continue] if job is correct to complete remaining copy sets Or press START to skip [Sample Copy] Adjust paper guides Note: When copying... from the glass and requesting multiple copies, press the # key after feeding your last original to collate document (if not highlighted) Enter any additional copy settings Place Originals in feeder...
... Enter desired number of copies Press [Sample Copy] copier will print one completed set and prompt you [Suspend] to cancel job or change settings [Continue] if job is correct to complete remaining copy sets Or press START to skip [Sample Copy] Adjust paper guides Note: When copying... from the glass and requesting multiple copies, press the # key after feeding your last original to collate document (if not highlighted) Enter any additional copy settings Place Originals in feeder...
User Guide
Page 5
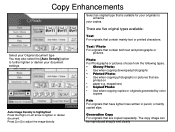
... lines written in pencil, or faintly copied slips. Select your Original document type You may also select the [Auto Density] option to enhance your document settings. magazines) • Copied Photo: • Use when copying copies or originals generated by color copiers Auto Image Density is highlighted Press the Right or Left...
... lines written in pencil, or faintly copied slips. Select your Original document type You may also select the [Auto Density] option to enhance your document settings. magazines) • Copied Photo: • Use when copying copies or originals generated by color copiers Auto Image Density is highlighted Press the Right or Left...
User Guide
Page 6
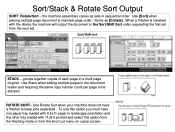
... the short cut menu on copier screen. Use [Sort] when placing multiple page document to keep jobs separated . Use Stack when setting multiple pages in sequential order. STACK - the machine assembles copies as [Collate]. Use Rotate Sort when your machine does not have one... the machine will output the document in a multi-page original. groups together copies of each page in the Sort/Shift Sort order, separating the first set . When a finisher is installed with 11x8.5 portrait and select this option you must have a finisher to maintain page order - ROTATE SORT- Sort/...
... the short cut menu on copier screen. Use [Sort] when placing multiple page document to keep jobs separated . Use Stack when setting multiple pages in sequential order. STACK - the machine assembles copies as [Collate]. Use Rotate Sort when your machine does not have one... the machine will output the document in a multi-page original. groups together copies of each page in the Sort/Shift Sort order, separating the first set . When a finisher is installed with 11x8.5 portrait and select this option you must have a finisher to maintain page order - ROTATE SORT- Sort/...
User Guide
Page 15
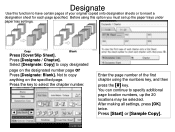
Select [Designate: Copy] to specify additional page location numbers, up the paper trays under paper tray settings. Enter the page number of your original copied onto designation sheets or to insert a designation sheet for each page specified. You can continue ... Copy]. Copy Blank Press [Cover/Slip Sheet]. Not to select the chapter number. Press [Designate / Chapter]. After making all settings, press [OK] twice. Designate Use this option you must set up the 20 locations may be selected. Before using this function to have certain pages of the first chapter using the...
Select [Designate: Copy] to specify additional page location numbers, up the paper trays under paper tray settings. Enter the page number of your original copied onto designation sheets or to insert a designation sheet for each page specified. You can continue ... Copy]. Copy Blank Press [Cover/Slip Sheet]. Not to select the chapter number. Press [Designate / Chapter]. After making all settings, press [OK] twice. Designate Use this option you must set up the 20 locations may be selected. Before using this function to have certain pages of the first chapter using the...

User Guide
Page 26
... output. Use to have the job stapled and folded. Users can choose to copy 2 face forwarding pages of a book as a duplex output. Series - Default Screen Settings Book -
... output. Use to have the job stapled and folded. Users can choose to copy 2 face forwarding pages of a book as a duplex output. Series - Default Screen Settings Book -
User Guide
Page 29
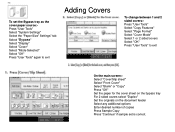
... Bypass tray as the cover paper source:Press "User Tools" Select "System Settings" Select the "Paper Size" Settings" tab Select "Bypass" Select "Display" Select "Cover" Select "Mode Selected" Select "OK" Press "User Tools" again to exit To change between 1 and 2 sided covers:Press "... On the main screen:Select "Cover/Slip sheet" Select "Front Cover" Select "Blank" or "Copy" Press "OK" Set the paper for the cover sheet on the bypass tray For 2 sided covers select "Duplex" Set the originals on the document feeder Select any additional options Enter desired number of copies Press Sample Copy...
... Bypass tray as the cover paper source:Press "User Tools" Select "System Settings" Select the "Paper Size" Settings" tab Select "Bypass" Select "Display" Select "Cover" Select "Mode Selected" Select "OK" Press "User Tools" again to exit To change between 1 and 2 sided covers:Press "... On the main screen:Select "Cover/Slip sheet" Select "Front Cover" Select "Blank" or "Copy" Press "OK" Set the paper for the cover sheet on the bypass tray For 2 sided covers select "Duplex" Set the originals on the document feeder Select any additional options Enter desired number of copies Press Sample Copy...

User Guide
Page 30
Book Copying Place open Book on Glass Platen Press [Dup./Combine/Series ]button Select [SERIES] button Press [Book - 1 sided] for single pages Outputs 2 single pages for the right and left and right pages and place front and back to a single page - Press [OK] Press Page size Paper tray Enter desired sets Press [Start] • Book 1-Sided Book 2-Sided Odd sized books may require some manual adjustments Copies the left pages Press [OK] OR Press the [BOOK ]button • Select [BOOK TO 2 SIDED] -
Book Copying Place open Book on Glass Platen Press [Dup./Combine/Series ]button Select [SERIES] button Press [Book - 1 sided] for single pages Outputs 2 single pages for the right and left and right pages and place front and back to a single page - Press [OK] Press Page size Paper tray Enter desired sets Press [Start] • Book 1-Sided Book 2-Sided Odd sized books may require some manual adjustments Copies the left pages Press [OK] OR Press the [BOOK ]button • Select [BOOK TO 2 SIDED] -

User Guide
Page 31
Select [Dup./Combine/Series] 3. Sided for 5 or more page originals 12 34 1 56 7 8 Enter desired number of sets 11. Select [Book] 4. Magazine 2 - Select [Centering] 8. Press [Start] Optional Press [Sample Copy] to preview job before running multiple sets 3 4 Use [*Magazine] Mode for Duplexed originals 5. Select [Magazine] * 4. 1 - Touch [OK] twice 6. Select [OK] Use [*Booklet] mode...
Select [Dup./Combine/Series] 3. Sided for 5 or more page originals 12 34 1 56 7 8 Enter desired number of sets 11. Select [Book] 4. Magazine 2 - Select [Centering] 8. Press [Start] Optional Press [Sample Copy] to preview job before running multiple sets 3 4 Use [*Magazine] Mode for Duplexed originals 5. Select [Magazine] * 4. 1 - Touch [OK] twice 6. Select [OK] Use [*Booklet] mode...
User Guide
Page 33
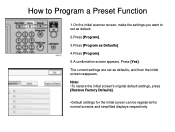
How to Program a Preset Function 1.On the initial scanner screen, make the settings you want to set as Defaults]. 4.Press [Program]. 5.A confirmation screen appears. The current settings are set as default. 2.Press [Program]. 3.Press [Program as defaults, and then the initial screen reappears. Note: •To restore the initial screen's original default settings, press [Restore Factory Defaults]. •Default settings for the initial screen can be registered for normal screens and simplified displays respectively. Press [Yes].
How to Program a Preset Function 1.On the initial scanner screen, make the settings you want to set as Defaults]. 4.Press [Program]. 5.A confirmation screen appears. The current settings are set as default. 2.Press [Program]. 3.Press [Program as defaults, and then the initial screen reappears. Note: •To restore the initial screen's original default settings, press [Restore Factory Defaults]. •Default settings for the initial screen can be registered for normal screens and simplified displays respectively. Press [Yes].

User Guide
Page 34
TAB Copying Set tab stock so that the tab sheet holder will be fed from the side without the tab edges first. Adjust the back fence position so that it will fit the tab stock. To Copy Tabs Place the Tab Copy Originals in the Document Feeder Select the Paper Tray containing the Tab Paper (tray 2 or tray 3) Press START
TAB Copying Set tab stock so that the tab sheet holder will be fed from the side without the tab edges first. Adjust the back fence position so that it will fit the tab stock. To Copy Tabs Place the Tab Copy Originals in the Document Feeder Select the Paper Tray containing the Tab Paper (tray 2 or tray 3) Press START

User Guide
Page 36
... You can press [Sample Copy] again or press [Start] to output the job Note: This feature can only be able to check the copy settings before making a long copy run. Place originals Select any other necessary functions for copy job Enter number of desire copies Instead of [START] press... [Sample Copy] key -One set is not available from the [Simplified screen]. This feature is delivered as necessary. -Depending on the combination of copies requested minus the proof copy....
... You can press [Sample Copy] again or press [Start] to output the job Note: This feature can only be able to check the copy settings before making a long copy run. Place originals Select any other necessary functions for copy job Enter number of desire copies Instead of [START] press... [Sample Copy] key -One set is not available from the [Simplified screen]. This feature is delivered as necessary. -Depending on the combination of copies requested minus the proof copy....


