Network Guide
Page 50
... for Windows • Allows selection of functions such as printing and scanning for each fax job history entry. • You can check details of print jobs sent from the control panel, and disables changes made to check job histories of the network inter- 2 face board using TCP/IP or IPX/SPX. loaded in the machine can be used on this function. NT/2000/XP 42 Monitoring and Configuring the Printer Using SmartDeviceMonitor for Admin Using SmartDeviceMonitor...
... for Windows • Allows selection of functions such as printing and scanning for each fax job history entry. • You can check details of print jobs sent from the control panel, and disables changes made to check job histories of the network inter- 2 face board using TCP/IP or IPX/SPX. loaded in the machine can be used on this function. NT/2000/XP 42 Monitoring and Configuring the Printer Using SmartDeviceMonitor for Admin Using SmartDeviceMonitor...
Network Guide
Page 54
... User Management Tool. A Start SmartDeviceMonitor for Ad- B Click the [User Counter Information] tab of User Management Tool. G On the [Edit] menu, click [Apply Set- E Click [Exit] on the [Files] menu to 0. Monitoring and Configuring the Printer Displaying the Number of Sheets Printed Resetting the number of pages printed to quit User Management Tool. 46 tab of User Management Tool. Exporting the information about the number of pages printed E Select the check box of pages printed under each user code...
... User Management Tool. A Start SmartDeviceMonitor for Ad- B Click the [User Counter Information] tab of User Management Tool. G On the [Edit] menu, click [Apply Set- E Click [Exit] on the [Files] menu to 0. Monitoring and Configuring the Printer Displaying the Number of Sheets Printed Resetting the number of pages printed to quit User Management Tool. 46 tab of User Management Tool. Exporting the information about the number of pages printed E Select the check box of pages printed under each user code...
PostScript Supplement
Page 36
.... A Turn off the power of the machine. C Turn on the power of the machine. D Click [Next >]. H Specify the location where USB Printing Support is connected to the computer's USB ports using the USB interface cable. Upgrade to the computer using the USB cable. G Insert the CD-ROM into the CD-ROM drive. If the CD-ROM drive is D, the source files of the printer connected to the [Printers] window. Windows Configuration Installing the Printer Driver Using USB This section explains how to install printer drivers using USB. 1 Important ❒ Make...
.... A Turn off the power of the machine. C Turn on the power of the machine. D Click [Next >]. H Specify the location where USB Printing Support is connected to the computer's USB ports using the USB interface cable. Upgrade to the computer using the USB cable. G Insert the CD-ROM into the CD-ROM drive. If the CD-ROM drive is D, the source files of the printer connected to the [Printers] window. Windows Configuration Installing the Printer Driver Using USB This section explains how to install printer drivers using USB. 1 Important ❒ Make...
PostScript Supplement
Page 46
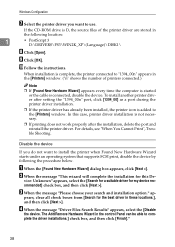
To install another printer driver after the installation, delete the port and reinstall the printer driver. Disable the device If you want to install the printer when Found New Hardware Wizard starts under an operating system that supports SCSI print, disable the device by following location: 1 • PostScript 3 D:\DRIVERS\PS3\WIN2K_XP\(Language)\DISK1\ H Click [Open]. C When the message "Please choose your search and installation option." ap- J Follow the instructions. A When the [Found New Hardware Wizard] dialog box appears...
To install another printer driver after the installation, delete the port and reinstall the printer driver. Disable the device If you want to install the printer when Found New Hardware Wizard starts under an operating system that supports SCSI print, disable the device by following location: 1 • PostScript 3 D:\DRIVERS\PS3\WIN2K_XP\(Language)\DISK1\ H Click [Open]. C When the message "Please choose your search and installation option." ap- J Follow the instructions. A When the [Found New Hardware Wizard] dialog box appears...
PostScript Supplement
Page 48
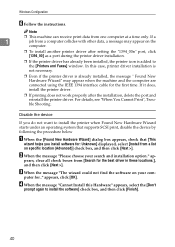
... helps you do not want to install the software] check box, and then click [Finish]. 40 B When the message "Please choose your com- Disable the device If you install software for: Unknown] displayed, select [Install from a computer collides with other data, a message may appear when the machine and the computer are connected using the IEEE 1394 interface cable for .." If it does, install the printer driver. ❒ If printing does not work...
... helps you do not want to install the software] check box, and then click [Finish]. 40 B When the message "Please choose your com- Disable the device If you install software for: Unknown] displayed, select [Install from a computer collides with other data, a message may appear when the machine and the computer are connected using the IEEE 1394 interface cable for .." If it does, install the printer driver. ❒ If printing does not work...

PostScript Supplement
Page 79
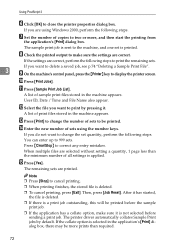
.... P Enter the new number of the print files stored in the machine appears. When multiple files are using up to 999 sets. If the collate option is deleted. ❒ To cancel printing, press [Exit]. B Right-click the printer icon, and then click [Printing Preference] on the [File] menu, click [Print]. Press {Clear/Stop} to change the set quantity, perform the following steps. The printer driver automatically collates Sample Print jobs by pressing it is applied. The user ID...
.... P Enter the new number of the print files stored in the machine appears. When multiple files are using up to 999 sets. If the collate option is deleted. ❒ To cancel printing, press [Exit]. B Right-click the printer icon, and then click [Printing Preference] on the [File] menu, click [Print]. Press {Clear/Stop} to change the set quantity, perform the following steps. The printer driver automatically collates Sample Print jobs by pressing it is applied. The user ID...
PostScript Supplement
Page 80
... option is a print job outstanding, this will be printed before sending a print job. G Set the number of sets using Windows 2000, perform the following steps. The sample print job is sent to make sure it . A list of print files stored in the machine appears. N Enter the new number of copies to be more , and then start the printing from the application's [Print] dialog box. Press {Clear/Stop} to close the printer properties dialog box. H Check the printed output to the machine, and one set...
... option is a print job outstanding, this will be printed before sending a print job. G Set the number of sets using Windows 2000, perform the following steps. The sample print job is sent to make sure it . A list of print files stored in the machine appears. N Enter the new number of copies to be more , and then start the printing from the application's [Print] dialog box. Press {Clear/Stop} to close the printer properties dialog box. H Check the printed output to the machine, and one set...

Copy/Document Server Reference
Page 217
..., press the {Interrupt} key. • Connect Copy jobs are set on only the sub-machine, you need not enter a user code in Energy Saver mode, the main machine can store on a program whether or not to use the connecting cable with other paper trays appear faded out and cannot be selected. • When two or more trays hold the desired paper size, the paper tray will be displayed. The number of copies is shown as...
..., press the {Interrupt} key. • Connect Copy jobs are set on only the sub-machine, you need not enter a user code in Energy Saver mode, the main machine can store on a program whether or not to use the connecting cable with other paper trays appear faded out and cannot be selected. • When two or more trays hold the desired paper size, the paper tray will be displayed. The number of copies is shown as...

Copy/Document Server Reference
Page 220
... Text/Photo, 45 Two-Sided Combine, 78 U User Stamp, 106, 108, 109, 111 Using Connect Copy, 147 Using Job Preset in Connect Copy, 153 Using the Document Server, 163 Using the idle machine as the main machine, 155 Using the machine currently copying as the main machine, 156 Using the Z-fold support tray, 68 V Various sizes, 21 W Web Image Monitor, 180, 181 What you can do with this machine, iii When both machines are copying the same number of originals...
... Text/Photo, 45 Two-Sided Combine, 78 U User Stamp, 106, 108, 109, 111 Using Connect Copy, 147 Using Job Preset in Connect Copy, 153 Using the Document Server, 163 Using the idle machine as the main machine, 155 Using the machine currently copying as the main machine, 156 Using the Z-fold support tray, 68 V Various sizes, 21 W Web Image Monitor, 180, 181 What you can do with this machine, iii When both machines are copying the same number of originals...

General Settings Guide
Page 306
... / PDF Menu, 194 Printer Features / PS Menu, 193 Printer Features / System, 186 Printer Language, 186 Print Error Report, 186 Printing the Box List, 180 Printing the configuration page, 182 Printing the Counter for All Users, 217 Printing the Counter for Each User, 216 Print List, 54 Print Priority, 39 Print Reception Time, 124 Print Scanner Journal, 195 Program / Change Administrator, 63 Program / Change / Delete E-mail Message, 56 Program / Change / Delete Gateway, 130 Program / Change / Delete LDAP Server, 63, 71 Program / Change / Delete Scan Size, 120, 137 Program / Change / Delete...
... / PDF Menu, 194 Printer Features / PS Menu, 193 Printer Features / System, 186 Printer Language, 186 Print Error Report, 186 Printing the Box List, 180 Printing the configuration page, 182 Printing the Counter for All Users, 217 Printing the Counter for Each User, 216 Print List, 54 Print Priority, 39 Print Reception Time, 124 Print Scanner Journal, 195 Program / Change Administrator, 63 Program / Change / Delete E-mail Message, 56 Program / Change / Delete Gateway, 130 Program / Change / Delete LDAP Server, 63, 71 Program / Change / Delete Scan Size, 120, 137 Program / Change / Delete...

General Settings Guide
Page 307
... to Use the Printer / IEEE 802.11b (wireless LAN), 14 Settings Required to Use the Printer/LAN-Fax, 13 Setup IEEE 802.11b, 10 Setup Wireless LAN, 10 Shortcut R / E, 90 Signal Control, 52 Simplified Screen / Finishing Types, 103 SIP Settings, 130 Size (Background Numbering), 96 Size (Date Stamp), 99 Size (Page Numbering), 100 Size (Stamp Text), 102 Slip Sheet Tray, 43 SMB Computer Name, 49 SMB Work Group, 49 SMTP Authentication, 56, 268 SMTP RX File Delivery Settings, 124 SMTP Server...
... to Use the Printer / IEEE 802.11b (wireless LAN), 14 Settings Required to Use the Printer/LAN-Fax, 13 Setup IEEE 802.11b, 10 Setup Wireless LAN, 10 Shortcut R / E, 90 Signal Control, 52 Simplified Screen / Finishing Types, 103 SIP Settings, 130 Size (Background Numbering), 96 Size (Date Stamp), 99 Size (Page Numbering), 100 Size (Stamp Text), 102 Slip Sheet Tray, 43 SMB Computer Name, 49 SMB Work Group, 49 SMTP Authentication, 56, 268 SMTP RX File Delivery Settings, 124 SMTP Server...
Printer Reference
Page 36
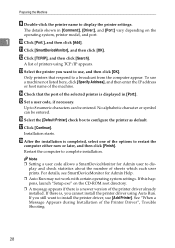
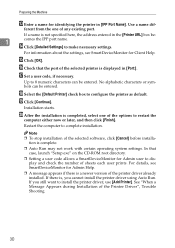
.... N Check that respond to display the printer settings. See "When a Message Appears during Installation of printers using Auto Run. L Click [TCP/IP], and then click [Search]. Installation starts. A list of the Printer Driver", Trouble Shooting. 28 O Set a user code, if necessary. If this happens, launch "Setup.exe" on the operating system, printer model, and port. 1 J Click [Port:], and then click [Add]. If there is a newer version of sheets which each user prints. Note ❒ Setting a user code allows a SmartDeviceMonitor for Admin Help. ❒ Auto...
.... N Check that respond to display the printer settings. See "When a Message Appears during Installation of printers using Auto Run. L Click [TCP/IP], and then click [Search]. Installation starts. A list of the Printer Driver", Trouble Shooting. 28 O Set a user code, if necessary. If this happens, launch "Setup.exe" on the operating system, printer model, and port. 1 J Click [Port:], and then click [Add]. If there is a newer version of sheets which each user prints. Note ❒ Setting a user code allows a SmartDeviceMonitor for Admin Help. ❒ Auto...
Printer Reference
Page 38
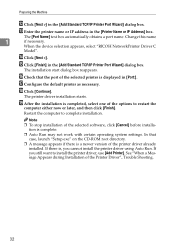
... the Printer Driver", Trouble Shooting. 30 Note ❒ To stop installation of the options to display and check the number of sheets each user prints. Q Set a user code, if necessary. If there is not specified here, the address entered in [IPP Port Name]. See "When a Message Appears during Installation of any existing port. ferent from the one of the selected software, click [Cancel] before installation is displayed in [Port:]. O Click [OK]. R Select the [Default Printer] check box to make necessary settings...
... the Printer Driver", Trouble Shooting. 30 Note ❒ To stop installation of the options to display and check the number of sheets each user prints. Q Set a user code, if necessary. If there is not specified here, the address entered in [IPP Port Name]. See "When a Message Appears during Installation of any existing port. ferent from the one of the selected software, click [Cancel] before installation is displayed in [Port:]. O Click [OK]. R Select the [Default Printer] check box to make necessary settings...
Printer Reference
Page 40
... [Cancel] before installation is a newer version of the printer driver already installed. If you cannot install the printer driver using Auto Run. P Check that case, launch "Setup.exe" on the CD-ROM root directory. ❒ A message appears if there is complete. ❒ Auto Run may not work with certain operating system settings. R Click [Continue]. The installation start dialog box reappears. M Enter the printer name or IP address in the [Add Standard TCP/IP Printer Port...
... [Cancel] before installation is a newer version of the printer driver already installed. If you cannot install the printer driver using Auto Run. P Check that case, launch "Setup.exe" on the CD-ROM root directory. ❒ A message appears if there is complete. ❒ Auto Run may not work with certain operating system settings. R Click [Continue]. The installation start dialog box reappears. M Enter the printer name or IP address in the [Add Standard TCP/IP Printer Port...
Printer Reference
Page 44
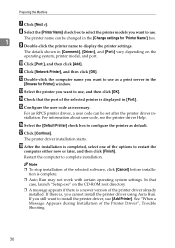
... [Finish]. M Select the printer you want to configure the printer as a print server in [Port:]. P Select the [Default Printer] check box to use [Add Printer]. R After the installation is a newer version of the selected software, click [Cancel] before installation is , you still want to complete installation. O Configure the user code as necessary. Preparing the Machine G Click [Next >]. N Check that case, launch "Setup.exe" on the operating system, printer model, and port. If you cannot install the printer driver using Auto Run. Q Click...
... [Finish]. M Select the printer you want to configure the printer as a print server in [Port:]. P Select the [Default Printer] check box to use [Add Printer]. R After the installation is a newer version of the selected software, click [Cancel] before installation is , you still want to complete installation. O Configure the user code as necessary. Preparing the Machine G Click [Next >]. N Check that case, launch "Setup.exe" on the operating system, printer model, and port. If you cannot install the printer driver using Auto Run. Q Click...

Troubleshooting
Page 16
... key is still lit, even if you are using, check the message that the machine is Remove the paper from the tray. pears on the control panel. Then, follow the instructions displayed on the control panel, and then refer to the network. You can use other functions normally. Reference p.17 "Messages Displayed When Using the Copy/Document Server Function" p.35 "Messages Displayed When Using the Facsimile Function" p.54 "Messages Displayed When Using the Printer Function" p.76 "Messages Displayed When Using the Scanner Function" 8 An error has occurred. Record the code number...
... key is still lit, even if you are using, check the message that the machine is Remove the paper from the tray. pears on the control panel. Then, follow the instructions displayed on the control panel, and then refer to the network. You can use other functions normally. Reference p.17 "Messages Displayed When Using the Copy/Document Server Function" p.35 "Messages Displayed When Using the Facsimile Function" p.54 "Messages Displayed When Using the Printer Function" p.76 "Messages Displayed When Using the Scanner Function" 8 An error has occurred. Record the code number...

Troubleshooting
Page 17
... main power switch. yet ready. Functions other messages appear, follow the instructions displayed. Functions appear in the call service message, and then contact your service representative. The machine is turned on the operation switch. The operation switch is displayed, but the User Tools menu has items missing. ap- The machine has just been turned on and the User Tools screen is Turn on us- Energy Saver Mode. When You Have Problems Operating the Machine When You Have Problems Operating the Machine...
... main power switch. yet ready. Functions other messages appear, follow the instructions displayed. Functions appear in the call service message, and then contact your service representative. The machine is turned on the operation switch. The operation switch is displayed, but the User Tools menu has items missing. ap- The machine has just been turned on and the User Tools screen is Turn on us- Energy Saver Mode. When You Have Problems Operating the Machine When You Have Problems Operating the Machine...

Troubleshooting
Page 63
... Printer Function This section describes likely causes of and possible solutions for the error messages that the tray you er pages is the same as the one for oth- Then, turn the machine on main power switch was turned on the control panel. the card./ Problems with the wireless card./ the machine turned on. • The settings are found while accessing the unit. Enter the correct password. An error has occurred in the hard disk drive. Reset the job...
... Printer Function This section describes likely causes of and possible solutions for the error messages that the tray you er pages is the same as the one for oth- Then, turn the machine on main power switch was turned on the control panel. the card./ Problems with the wireless card./ the machine turned on. • The settings are found while accessing the unit. Enter the correct password. An error has occurred in the hard disk drive. Reset the job...

Troubleshooting
Page 68
... administrator. Specify the proper output tray. 60 user authentica- ferent ID, and a duplication of files sent to the machine. Memory Overflow The memory is full. • On the RPCS printer driver's [Print Quality] tab, open the [Change User Settings...] dialog box, and then, on the [Image Adjustments] tab, specify a lower value for [Resolution]. If the message ap- Output tray has been changed because the paper size of the specified output tray is already was changed . The output tray...
... administrator. Specify the proper output tray. 60 user authentica- ferent ID, and a duplication of files sent to the machine. Memory Overflow The memory is full. • On the RPCS printer driver's [Print Quality] tab, open the [Change User Settings...] dialog box, and then, on the [Image Adjustments] tab, specify a lower value for [Resolution]. If the message ap- Output tray has been changed because the paper size of the specified output tray is already was changed . The output tray...

Troubleshooting
Page 69
... been cancelled. Punch printing was abort- correctly. Check the paper orientation, paper quantity, print orientation, and staple position. The entered pass- crypted PDF file has been entered incorrectly. memory. number of pages that might not be stored: Exceed- On the RPCS printer driver's [Print Quality] tab, open the [Change User Settings...] dialog box, and then, on the [Image Adjustments] tab, specify a lower value for "Resolution". Resend the data. The password of the document server was exceeded. Delete...
... been cancelled. Punch printing was abort- correctly. Check the paper orientation, paper quantity, print orientation, and staple position. The entered pass- crypted PDF file has been entered incorrectly. memory. number of pages that might not be stored: Exceed- On the RPCS printer driver's [Print Quality] tab, open the [Change User Settings...] dialog box, and then, on the [Image Adjustments] tab, specify a lower value for "Resolution". Resend the data. The password of the document server was exceeded. Delete...


