Setup Guide
Page 5
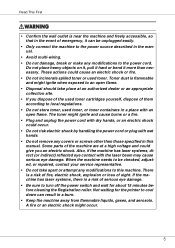
...8226; Do not remove any covers or screws other than necessary. Also, if the machine has laser systems, direct (or indirect) reflected eye contact with the laser beam may cause serious eye damage. If the machine has laser systems, there is a risk of fire, electric shock, explosion or loss of sight. Toner ... containers in this machine. There is a risk of serious eye damage. • Be sure to turn off the power switch and wait for the printer to cool down can be checked, adjusted, or repaired, contact your service representative. • Do not take place at a high voltage and could...
...8226; Do not remove any covers or screws other than necessary. Also, if the machine has laser systems, direct (or indirect) reflected eye contact with the laser beam may cause serious eye damage. If the machine has laser systems, there is a risk of fire, electric shock, explosion or loss of sight. Toner ... containers in this machine. There is a risk of serious eye damage. • Be sure to turn off the power switch and wait for the printer to cool down can be checked, adjusted, or repaired, contact your service representative. • Do not take place at a high voltage and could...
Setup Guide
Page 12
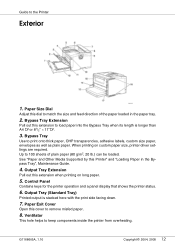
...Tray", Maintenance Guide. 4. Output Tray Extension Pull out this cover to match the size and feed direction of plain paper (80 g/m2, 20 lb.) can be loaded. Bypass Tray Use to the Printer Exterior 1. Output Tray (Standard Tray) Printed output is longer than A4 L or 81/2" ×... when printing on custom paper size, printer driver settings are required. See "Paper and Other Media Supported by this Printer" and "Loading Paper in the paper tray. 2. Control Panel Contains keys for the printer operation and a panel display that shows the printer status. 6. G1168605A_1.10 Copyright ©...
...Tray", Maintenance Guide. 4. Output Tray Extension Pull out this cover to match the size and feed direction of plain paper (80 g/m2, 20 lb.) can be loaded. Bypass Tray Use to the Printer Exterior 1. Output Tray (Standard Tray) Printed output is longer than A4 L or 81/2" ×... when printing on custom paper size, printer driver settings are required. See "Paper and Other Media Supported by this Printer" and "Loading Paper in the paper tray. 2. Control Panel Contains keys for the printer operation and a panel display that shows the printer status. 6. G1168605A_1.10 Copyright ©...

Setup Guide
Page 18
...; White area: Permissible Range • Gray area: Recommended Range ❒ The machine must be level within 5 mm, 0.2" from both front to rear and left to direct sunlight or strong light ❒ Dusty areas 18 tilated room that has an air turnover of ozone, locate this machine for a long time in a large...
...; White area: Permissible Range • Gray area: Recommended Range ❒ The machine must be level within 5 mm, 0.2" from both front to rear and left to direct sunlight or strong light ❒ Dusty areas 18 tilated room that has an air turnover of ozone, locate this machine for a long time in a large...

Setup Guide
Page 27
Setting Up C Load the new paper into paper tray with print side up. ❒ Confirm that the paper fits under the rear guides. ❒ When loading paper other than A4L(long-edged feed) or 81/2 × 11L(long- edged feed), adjust the paper size dial to match the size and feed direction of the stack is not higher than the limit mark inside the tray. ❒ Confirm that the top of the paper in the paper tray. ❒ When loading paper other than A4K(short-edged feed) or 81/2 × 11K(short-edged feed), you should extend the tray. 27
Setting Up C Load the new paper into paper tray with print side up. ❒ Confirm that the paper fits under the rear guides. ❒ When loading paper other than A4L(long-edged feed) or 81/2 × 11L(long- edged feed), adjust the paper size dial to match the size and feed direction of the stack is not higher than the limit mark inside the tray. ❒ Confirm that the top of the paper in the paper tray. ❒ When loading paper other than A4K(short-edged feed) or 81/2 × 11K(short-edged feed), you should extend the tray. 27

Setup Guide
Page 28
For details about usable types of the paper in and out with force. Setting Up D Carefully slide the paper tray into the printer until it stops. ❒ Confirm that the setting of the paper size dial matches the sizes and feed direction of paper, see "Loading Paper", Maintenance Guide. 28 If you do, the front and side paper guides will move out of the place. Otherwise, the printer might be damaged or a printing problem might occur. ❒ Do not slide the paper tray in the tray.
For details about usable types of the paper in and out with force. Setting Up D Carefully slide the paper tray into the printer until it stops. ❒ Confirm that the setting of the paper size dial matches the sizes and feed direction of paper, see "Loading Paper", Maintenance Guide. 28 If you do, the front and side paper guides will move out of the place. Otherwise, the printer might be damaged or a printing problem might occur. ❒ Do not slide the paper tray in the tray.

Setup Guide
Page 73
E Remove the rear cover in the illustra- Installing Options D Open the rear cover by pushing the two knobs as shown in the horizontal direction. ❒ The rear cover of the printer is not used when attaching the duplex unit. ❒ Store the removed rear cover for possible future use. 73 tion.
E Remove the rear cover in the illustra- Installing Options D Open the rear cover by pushing the two knobs as shown in the horizontal direction. ❒ The rear cover of the printer is not used when attaching the duplex unit. ❒ Store the removed rear cover for possible future use. 73 tion.

