Operating Instructions
Page 2
... about power source, see P.3 "Machine Types".) • Type 1: 4051/DSm651/LD151/Aficio 2051 • Type 2: 4060/DSm660/LD160/Aficio 2060 • Type 3: 4075/DSm675/LD175/Aficio 2075 Certain types might not be sure to connect the power cord to read this machine. ...Notes: Some illustrations in this manual might result from the supplier. Caution: Use of controls or adjustments or performance of this manual carefully and follow the instructions. Two kinds of parts other than genuine parts...
... about power source, see P.3 "Machine Types".) • Type 1: 4051/DSm651/LD151/Aficio 2051 • Type 2: 4060/DSm660/LD160/Aficio 2060 • Type 3: 4075/DSm675/LD175/Aficio 2075 Certain types might not be sure to connect the power cord to read this machine. ...Notes: Some illustrations in this manual might result from the supplier. Caution: Use of controls or adjustments or performance of this manual carefully and follow the instructions. Two kinds of parts other than genuine parts...
Operating Instructions
Page 3
... of this machine. CD-ROM1) Provides information about configuring and operating the printer in a network environment or using software. For particular functions, see the relevant parts of the manual. Also refer to protect data from being tampered, or prevent the machine from those of your model. i
... of this machine. CD-ROM1) Provides information about configuring and operating the printer in a network environment or using software. For particular functions, see the relevant parts of the manual. Also refer to protect data from being tampered, or prevent the machine from those of your model. i
Operating Instructions
Page 20
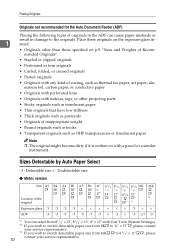
... thermal fax paper, art paper, aluminum foil, carbon paper, or conductive paper • Originals with perforated lines • Originals with indexes, tags, or other projecting parts • Sticky originals such as translucent paper • Thin originals that have low stiffness • Thick originals such as postcards • Originals of the L L K L L K L 17...
... thermal fax paper, art paper, aluminum foil, carbon paper, or conductive paper • Originals with perforated lines • Originals with indexes, tags, or other projecting parts • Sticky originals such as translucent paper • Thin originals that have low stiffness • Thick originals such as postcards • Originals of the L L K L L K L 17...
Operating Instructions
Page 27
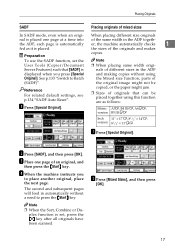
... default settings, see p.134 "SADF Auto Reset". D When the machine instructs you press [Special and making copies without a need to Batch the Mixed size function, parts of an original, and then press the {Start} key. copied, or the paper might not be placed together using Original]. The second and subsequent pages...
... default settings, see p.134 "SADF Auto Reset". D When the machine instructs you press [Special and making copies without a need to Batch the Mixed size function, parts of an original, and then press the {Start} key. copied, or the paper might not be placed together using Original]. The second and subsequent pages...
Operating Instructions
Page 69
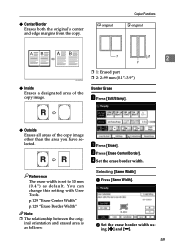
... of the copy image. p.129 "Erase Center Width" p.129 "Erase Border Width" Note ❒ The relationship between the orig- L original Copier Functions K original 1 2 2 1 ❒ 1: Erased part ❒ 2: 2-99 mm (0.1"-3.9") ❖ Inside Erases a designated area of the copy image other than the area you have selected. You can change this setting with...
... of the copy image. p.129 "Erase Center Width" p.129 "Erase Border Width" Note ❒ The relationship between the orig- L original Copier Functions K original 1 2 2 1 ❒ 1: Erased part ❒ 2: 2-99 mm (0.1"-3.9") ❖ Inside Erases a designated area of the copy image other than the area you have selected. You can change this setting with...
Operating Instructions
Page 71
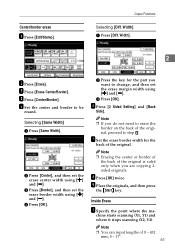
... [Center], and then set the erase margin width using [n] and [o]. D Press [OK]. Center/border erase A Press [Edit/Stamp]. G Set the erase border width for the part you want to change, and then set the erase center width using [n] and [o]. B Press the key for the back of the original. Note ❒ Erasing...
... [Center], and then set the erase margin width using [n] and [o]. D Press [OK]. Center/border erase A Press [Edit/Stamp]. G Set the erase border width for the part you want to change, and then set the erase center width using [n] and [o]. B Press the key for the back of the original. Note ❒ Erasing...

Operating Instructions
Page 96
D Number of sets Displays the number of sets of copies for the main machine. Press this part of the display to the Connect Copy display. C Numbers of originals Displays the number of originals scanned into memory of copies for two machines. ❖ ...
D Number of sets Displays the number of sets of copies for the main machine. Press this part of the display to the Connect Copy display. C Numbers of originals Displays the number of originals scanned into memory of copies for two machines. ❖ ...

Operating Instructions
Page 120
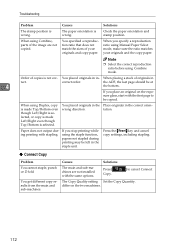
... Copy Image Density". nals. The same copy area is not set cor- Machine", General Settings Guide. Use a recommended paper size. Parts of the image are too light. rectly. An irregular paper size is not Select Auto Image Density. When using the ADF, place... is not Select Auto Image Density. Adjust the image density. nal. Add toner. The image density is too light. Put tape over pasted parts. selected. The image density is too dark. See p.26 selected. See p.26 "Adjusting Copy Image Density". Copies are blank. Adjust the ...
... Copy Image Density". nals. The same copy area is not set cor- Machine", General Settings Guide. Use a recommended paper size. Parts of the image are too light. rectly. An irregular paper size is not Select Auto Image Density. When using the ADF, place... is not Select Auto Image Density. Adjust the image density. nal. Add toner. The image density is too light. Put tape over pasted parts. selected. The image density is too dark. See p.26 selected. See p.26 "Adjusting Copy Image Density". Copies are blank. Adjust the ...

Operating Instructions
Page 121
... the correct paper size. be used together. The memory became full in two blocks. In Border, Center, or Center/Border mode, parts of sorting and the pages were delivered in the middle of the original image are not copied. Originals are divided into two blocks. You... Settings Guide. Reference ⇒ p.137 "Combination Chart" When sorting, the pages are not scanned Set the originals correctly. In Margin Adjustment mode, parts of functions al functions. You have set an erase margin that is too wide. correctly. There is not cor- See p.144 ceeds stapler capacity...
... the correct paper size. be used together. The memory became full in two blocks. In Border, Center, or Center/Border mode, parts of sorting and the pages were delivered in the middle of the original image are not copied. Originals are divided into two blocks. You... Settings Guide. Reference ⇒ p.137 "Combination Chart" When sorting, the pages are not scanned Set the originals correctly. In Margin Adjustment mode, parts of functions al functions. You have set an erase margin that is too wide. correctly. There is not cor- See p.144 ceeds stapler capacity...
Operating Instructions
Page 122
... be left in the wrong direction. differ on the expo- The paper orientation is wrong. Check the paper orientation and stamp position. When using Combine, parts of your originals and the copy paper. When you specify a reproduction ratio using the staple function, papers not stapled during printing with the same options...
... be left in the wrong direction. differ on the expo- The paper orientation is wrong. Check the paper orientation and stamp position. When using Combine, parts of your originals and the copy paper. When you specify a reproduction ratio using the staple function, papers not stapled during printing with the same options...
Operating Instructions
Page 141
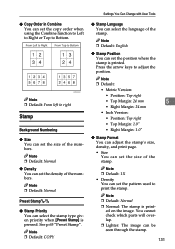
... to Bottom. See p.65 "Preset Stamp". Note ❒ Default: COPY ❖ Stamp Language You can select the language of the numbers. You cannot check which parts will overlap. ❒ Lighter: The image can select the stamp type given priority when [Preset Stamp] is pressed. Settings You Can Change with User Tools...
... to Bottom. See p.65 "Preset Stamp". Note ❒ Default: COPY ❖ Stamp Language You can select the language of the numbers. You cannot check which parts will overlap. ❒ Lighter: The image can select the stamp type given priority when [Preset Stamp] is pressed. Settings You Can Change with User Tools...
Operating Instructions
Page 143
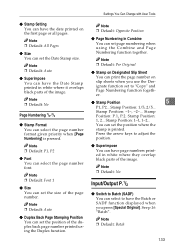
...number font. Note ❒ Default: P1, P2 ❖ Font You can have the Date Stamp printed in white where it overlaps black parts of the duplex back page number printed using the Combine and Page Numbering function together. Note ❒ Default: Opposite Position ❖ Page ...Numbering in white where they overlap black parts of the page number. Note ❒ Default: Batch 133 Note ❒ Default: Auto ❖ Superimpose You can set to Batch (SADF)...
...number font. Note ❒ Default: P1, P2 ❖ Font You can have the Date Stamp printed in white where it overlaps black parts of the duplex back page number printed using the Combine and Page Numbering function together. Note ❒ Default: Opposite Position ❖ Page ...Numbering in white where they overlap black parts of the page number. Note ❒ Default: Batch 133 Note ❒ Default: Auto ❖ Superimpose You can set to Batch (SADF)...
Operating Instructions
Page 149
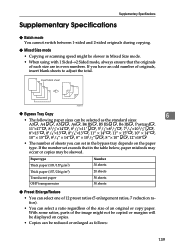
..., 12"×18"L • The number of sheets you can set exceeds that the originals of each size are in even numbers. With some ratios, parts of an original or copy paper. Supplementary Specifications Supplementary Specifications ❖ Batch mode You cannot switch between 1-sided and 2-sided originals during copying. ❖ Mixed...
..., 12"×18"L • The number of sheets you can set exceeds that the originals of each size are in even numbers. With some ratios, parts of an original or copy paper. Supplementary Specifications Supplementary Specifications ❖ Batch mode You cannot switch between 1-sided and 2-sided originals during copying. ❖ Mixed...
Operating Instructions
Page 150
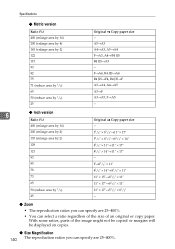
...;51/2" × 81/2" -- ❖ Zoom • The reproduction ratios you can specify are 25-400%. • You can specify are 25-400%. With some ratios, parts of the image might not be copied or margins will be displayed on copies. ❖ Size Magnification 140 The reproduction ratios you can select a ratio...
...;51/2" × 81/2" -- ❖ Zoom • The reproduction ratios you can specify are 25-400%. • You can specify are 25-400%. With some ratios, parts of the image might not be copied or margins will be displayed on copies. ❖ Size Magnification 140 The reproduction ratios you can select a ratio...
Operating Instructions
Page 151
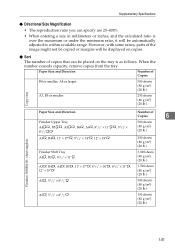
... the tray. Supplementary Specifications ❖ Directional Size Magnification • The reproduction ratio you can be automatically adjusted to within available range. However, with some ratios, parts of the image might not be copied or margins will be displayed on the tray is over the maximum or under the minimum ratio, it...
... the tray. Supplementary Specifications ❖ Directional Size Magnification • The reproduction ratio you can be automatically adjusted to within available range. However, with some ratios, parts of the image might not be copied or margins will be displayed on the tray is over the maximum or under the minimum ratio, it...
Operating Instructions
Page 160
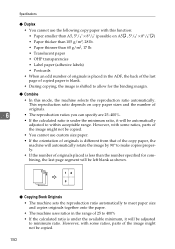
However, with some ratios, parts of the image might not be copied. • You cannot use the following copy paper with this mode, the machine selects the reproduction ratio automatically. ... 25-400%. • If the calculated ratio is under the minimum ratio, it will be automatically adjusted to within acceptable range. However, with some ratios, parts of 25 to minimum ratio. This reproduction ratio depends on A5K, 51/2" × 81/2"K) • Paper thicker than 105 g/m2, 28 lb. • Paper thinner...
However, with some ratios, parts of the image might not be copied. • You cannot use the following copy paper with this mode, the machine selects the reproduction ratio automatically. ... 25-400%. • If the calculated ratio is under the minimum ratio, it will be automatically adjusted to within acceptable range. However, with some ratios, parts of 25 to minimum ratio. This reproduction ratio depends on A5K, 51/2" × 81/2"K) • Paper thicker than 105 g/m2, 28 lb. • Paper thinner...
Operating Instructions
Page 161
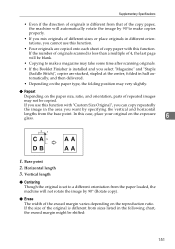
In this case, place your original on the paper size, ratio, and orientation, parts of 4, the last page will not rotate the image by specifying the vertical and horizontal lengths from the base point. Supplementary Specifications • Even if ...
In this case, place your original on the paper size, ratio, and orientation, parts of 4, the last page will not rotate the image by specifying the vertical and horizontal lengths from the base point. Supplementary Specifications • Even if ...

Operating Instructions
Page 162
...binding margin is added to 5 areas at the same time. ❖ Margin Adjustment 6 • If you set a binding margin that is too wide, part of the image may look like some pattern. ❖ Preset Stamp • You can print the stamp only on the first page. ❖ Date Stamp... using Combine mode, the date stamp is finished. ❖ Background Numbering If the numbers overlap the copied image, the parts overlapped may not be printed. • When you can change the stamp size, parts of the stamp with the Magazine or Booklet function, you use this function with User Tools.
...binding margin is added to 5 areas at the same time. ❖ Margin Adjustment 6 • If you set a binding margin that is too wide, part of the image may look like some pattern. ❖ Preset Stamp • You can print the stamp only on the first page. ❖ Date Stamp... using Combine mode, the date stamp is finished. ❖ Background Numbering If the numbers overlap the copied image, the parts overlapped may not be printed. • When you can change the stamp size, parts of the stamp with the Magazine or Booklet function, you use this function with User Tools.


