
English Manual
Page 3
... the power is properly assembled. (See ASSEMBLY on page 6, and HOW TO FOLD AND MOVE THE TREADMILL on the same circuit. If the control system is the responsibility of the owner to use the treadmill with at least eight feet of heart rate readings. Various factors, including the user's movement, may result in a fall and serious injury. 13. It is damaged, the walking belt may change speed...
... the power is properly assembled. (See ASSEMBLY on page 6, and HOW TO FOLD AND MOVE THE TREADMILL on the same circuit. If the control system is the responsibility of the owner to use the treadmill with at least eight feet of heart rate readings. Various factors, including the user's movement, may result in a fall and serious injury. 13. It is damaged, the walking belt may change speed...
English Manual
Page 4
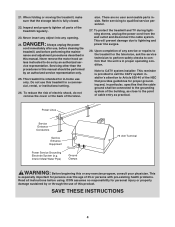
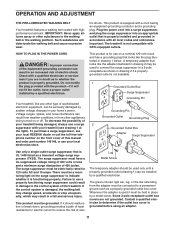
... or any opening. Interior Metal Water Pipe) Ground Clamps 75 ohm Terminal WARNING: Before beginning this product. ICON assumes no user serviceable parts inside. Never remove the motor hood un- vice representative. To protect the treadmill and TV during lightning storms, unplug the power cord from the wall outlet and disconnect the cable system. Always unplug the power cord immediately after use of cable entry as...
... or any opening. Interior Metal Water Pipe) Ground Clamps 75 ohm Terminal WARNING: Before beginning this product. ICON assumes no user serviceable parts inside. Never remove the motor hood un- vice representative. To protect the treadmill and TV during lightning storms, unplug the power cord from the wall outlet and disconnect the cable system. Always unplug the power cord immediately after use of cable entry as...
English Manual
Page 5
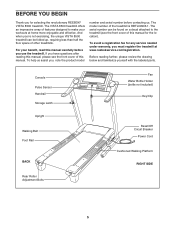
... the labeled parts. For your workouts at www.reebokservice.com/registration. To help us assist you, note the product model number and serial number before you use the treadmill. Console Pulse Sensor Handrail Storage Latch Upright Walking Belt Foot Rail BACK Rear Roller Adjustment Bolts Fan Water Bottle Holder (bottle not included) Key/Clip Reset/Off Circuit Breaker Power Cord Cushioned Walking Platform RIGHT SIDE 5 And when you're not exercising, the unique VISTA 8500 treadmill can be folded up...
... the labeled parts. For your workouts at www.reebokservice.com/registration. To help us assist you, note the product model number and serial number before you use the treadmill. Console Pulse Sensor Handrail Storage Latch Upright Walking Belt Foot Rail BACK Rear Roller Adjustment Bolts Fan Water Bottle Holder (bottle not included) Key/Clip Reset/Off Circuit Breaker Power Cord Cushioned Walking Platform RIGHT SIDE 5 And when you're not exercising, the unique VISTA 8500 treadmill can be folded up...
English Manual
Page 6
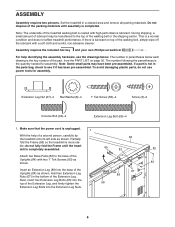
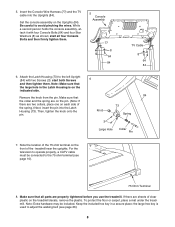
... materials until the treadmill is the key number of the part, from the PART LIST on top of the Extension Leg. gThsihsipispiangn,oarmal condition and does not affect treadmill performance. Set the treadmill in the bottom of the walking belt, simply wipe off the lubricant with two 1" Tek Screws (83) as shown. If a part is not in parentheses below each drawing is completely assembled. 84 65...
... materials until the treadmill is the key number of the part, from the PART LIST on top of the Extension Leg. gThsihsipispiangn,oarmal condition and does not affect treadmill performance. Set the treadmill in the bottom of the walking belt, simply wipe off the lubricant with two 1" Tek Screws (83) as shown. If a part is not in parentheses below each drawing is completely assembled. 84 65...

English Manual
Page 7
... WHEN THE POWER IS TURNED ON. 4. Next, connect the Wire Harness to the right Upright (84). 2. Next, insert two Extension Leg Bolts (65) into the top of the Uprights (84) with two 1" Tek Screws (83) as shown. Partially fold the Frame (58) so the treadmill is completely assembled. Attach two Base Pads (82) to the TV cable on the console assembly. Console Assembly 66 77 84 Console Assembly TV Cable 104...
... WHEN THE POWER IS TURNED ON. 4. Next, connect the Wire Harness to the right Upright (84). 2. Next, insert two Extension Leg Bolts (65) into the top of the Uprights (84) with two 1" Tek Screws (83) as shown. Partially fold the Frame (58) so the treadmill is completely assembled. Attach two Base Pads (82) to the TV cable on the console assembly. Console Assembly 66 77 84 Console Assembly TV Cable 104...
English Manual
Page 8
... key in the Latch Housing is used to the 75 ohm terminal (see page 26). 8 Insert the Console Wire Harness (77) and the TV cable into the Latch Housing (73). start all parts are properly tightened before you use the treadmill. Note: Extra hardware may be connected to adjust the walking belt (see page 10). 75 Ohm Terminal 8. While a second person holds the console assembly, attach it with two Screws...
... key in the Latch Housing is used to the 75 ohm terminal (see page 26). 8 Insert the Console Wire Harness (77) and the TV cable into the Latch Housing (73). start all parts are properly tightened before you use the treadmill. Note: Extra hardware may be connected to adjust the walking belt (see page 10). 75 Ohm Terminal 8. While a second person holds the console assembly, attach it with two Screws...

English Manual
Page 10
... cable is included. Plug in the power cord of a 75 ohm CATV cable to the 75 ohm output jack on the treadmill. Connect a 75 ohm CATV cable to the 75 ohm terminal on the treadmill frame near the uprights. 75 Ohm CATV Cable 75 Ohm Terminal HOW TO CONNECT AN EXTERNAL SOURCE USING A CATV CABLE 1. Note: Use a CATV cable to connect to an external source such as a cable...
... cable is included. Plug in the power cord of a 75 ohm CATV cable to the 75 ohm output jack on the treadmill. Connect a 75 ohm CATV cable to the 75 ohm terminal on the treadmill frame near the uprights. 75 Ohm CATV Cable 75 Ohm Terminal HOW TO CONNECT AN EXTERNAL SOURCE USING A CATV CABLE 1. Note: Use a CATV cable to connect to an external source such as a cable...
English Manual
Page 11
..., the walking belt may change speed, accelerate or stop unexpectedly, which may be grounded. Important: The treadmill is grounded before using an adapter. 11 HOW TO PLUG IN THE POWER CORD DANGER: Improper connection of the equipment-grounding conductor can result from weather conditions or from the adapter must be electrically rated for electric current to the control system of your home's power. Your treadmill, like the plug illustrated...
..., the walking belt may change speed, accelerate or stop unexpectedly, which may be grounded. Important: The treadmill is grounded before using an adapter. 11 HOW TO PLUG IN THE POWER CORD DANGER: Improper connection of the equipment-grounding conductor can result from weather conditions or from the adapter must be electrically rated for electric current to the control system of your home's power. Your treadmill, like the plug illustrated...

English Manual
Page 12
... you select the manual mode or a program, you get in memory for information about the optional chest pulse sensor). To use a custom program, see pages 19 and 20. Note: The heart rate programs require the use the manual mode of the optional chest pulse sensor. As you through an effective workout. Each program automatically adjusts the speed and incline of the treadmill as it guides you exercise, the console will display continuous exercise feedback. To create and use a heart rate program, see page...
... you select the manual mode or a program, you get in memory for information about the optional chest pulse sensor). To use a custom program, see pages 19 and 20. Note: The heart rate programs require the use the manual mode of the optional chest pulse sensor. As you through an effective workout. Each program automatically adjusts the speed and incline of the treadmill as it guides you exercise, the console will display continuous exercise feedback. To create and use a heart rate program, see page...
English Manual
Page 13
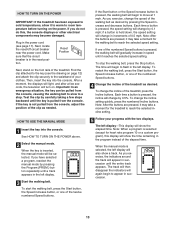
... USE THE MANUAL MODE 1 Insert the key into the console. If the Start button or the Speed increase button is pressed, the walking belt will change the speed of the numbered Speed buttons is pressed, the walking belt will appear in the left display will show the elapsed time. As you exercise, change by 0.5%. Note: After the buttons are pressed, it to warm to reach the selected speed setting. If one of the numbered Speed buttons. 4 Change the incline of the treadmill, press the Incline buttons. Reset...
... USE THE MANUAL MODE 1 Insert the key into the console. If the Start button or the Speed increase button is pressed, the walking belt will change the speed of the numbered Speed buttons is pressed, the walking belt will appear in the left display will show the elapsed time. As you exercise, change by 0.5%. Note: After the buttons are pressed, it to warm to reach the selected speed setting. If one of the numbered Speed buttons. 4 Change the incline of the treadmill, press the Incline buttons. Reset...

English Manual
Page 14
... and turn off circuit breaker to miles. For simplicity, all instructions in the "demo" mode. To reset the displays, press the Stop button, remove the key, and then reinsert the key. 6 Measure your hands. In addition, make sure that you use the handgrip pulse sensor and the optional chest pulse sensor at the lowest setting when the treadmill is in this , the treadmill's electrical components may wear prematurely. 14 avoid moving your heart rate if...
... and turn off circuit breaker to miles. For simplicity, all instructions in the "demo" mode. To reset the displays, press the Stop button, remove the key, and then reinsert the key. 6 Measure your hands. In addition, make sure that you use the handgrip pulse sensor and the optional chest pulse sensor at the lowest setting when the treadmill is in this , the treadmill's electrical components may wear prematurely. 14 avoid moving your heart rate if...
English Manual
Page 17
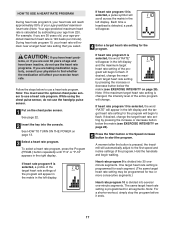
... display. While using the chest pulse sensor, do not use a heart rate program. See HOW TO TURN ON THE POWER on the chest pulse sensor. If heart rate program 9 is selected, a profile of the target heart rate settings of your age-predicted maximum heart rate. (Note: Your age-predicted maximum heart rate is calculated by subtracting your age from 220. If desired, change the maximum target heart rate setting by pressing the increase or decrease button below the matrix (see EXERCISE...
... display. While using the chest pulse sensor, do not use a heart rate program. See HOW TO TURN ON THE POWER on the chest pulse sensor. If heart rate program 9 is selected, a profile of the target heart rate settings of your age-predicted maximum heart rate. (Note: Your age-predicted maximum heart rate is calculated by subtracting your age from 220. If desired, change the maximum target heart rate setting by pressing the increase or decrease button below the matrix (see EXERCISE...

English Manual
Page 18
... the target heart rate setting, the speed of the treadmill may automatically decrease. If your heart rate to the right. When the console compares your pulse is not detected during the program, you are finished exercising, remove the key from the console. See step 7 on page 14. 8 When you can adjust the setting with the displays. When the first segment ends, all target heart rate settings will begin to move one column...
... the target heart rate setting, the speed of the treadmill may automatically decrease. If your heart rate to the right. When the console compares your pulse is not detected during the program, you are finished exercising, remove the key from the console. See step 7 on page 14. 8 When you can adjust the setting with the displays. When the first segment ends, all target heart rate settings will begin to move one column...

English Manual
Page 20
... left display. The speed setting for the first segment will move one - The walking belt will scroll across the matrix in the flashing Current Segment column and the treadmill will begin walking. To change the speed or incline setting during the current segment, simply press the Speed or Incline buttons. To stop . To restart the program, press the Start button or the Speed increase button. 4 Follow your heart rate if desired. When a custom program is pressed, the treadmill...
... left display. The speed setting for the first segment will move one - The walking belt will scroll across the matrix in the flashing Current Segment column and the treadmill will begin walking. To change the speed or incline setting during the current segment, simply press the Speed or Incline buttons. To stop . To restart the program, press the Start button or the Speed increase button. 4 Follow your heart rate if desired. When a custom program is pressed, the treadmill...

English Manual
Page 21
... for the console, and turn on and turn off the demo mode. Note: Removing the key from the console, and the displays and indicators on , the screen will show the total number of miles or kilometers that the walking belt has moved, and the lower part of measurement if desired. Follow the steps below to operate the television. When the television is selected, press the Speed decrease button. 4 Press the Volume...
... for the console, and turn on and turn off the demo mode. Note: Removing the key from the console, and the displays and indicators on , the screen will show the total number of miles or kilometers that the walking belt has moved, and the lower part of measurement if desired. Follow the steps below to operate the television. When the television is selected, press the Speed decrease button. 4 Press the Volume...
English Manual
Page 22
... the desired channel number appears on a 22 THE OPTIONAL CHEST PULSE SENSOR An optional chest pulse sensor provides hands-free operation and allows you to select the Cable HRC setting.Note: The setting that you are using the information mode, remove the key. This process will be saved into the television's memory (see step 5 below), you have connected a CATV cable, one of this manual. 5 Press the On/Off button again and save...
... the desired channel number appears on a 22 THE OPTIONAL CHEST PULSE SENSOR An optional chest pulse sensor provides hands-free operation and allows you to select the Cable HRC setting.Note: The setting that you are using the information mode, remove the key. This process will be saved into the television's memory (see step 5 below), you have connected a CATV cable, one of this manual. 5 Press the On/Off button again and save...

English Manual
Page 26
... left bolt counterclockwise 1/2 of the Pulley (47). If the walking belt is off -center, first remove the key a and UNPLUG THE POWER CORD. if the walking belt has shifted to keep the walking belt centered. Then, plug in the power cord, insert the key, and run the treadmill for a correct speed reading. Repeat until the Magnet is properly tightened. 26 b. b move the Reed 22 17 Switch slightly using a slotted screwdriver. When the walking belt is...
... left bolt counterclockwise 1/2 of the Pulley (47). If the walking belt is off -center, first remove the key a and UNPLUG THE POWER CORD. if the walking belt has shifted to keep the walking belt centered. Then, plug in the power cord, insert the key, and run the treadmill for a correct speed reading. Repeat until the Magnet is properly tightened. 26 b. b move the Reed 22 17 Switch slightly using a slotted screwdriver. When the walking belt is...

English Manual
Page 28
... burning, adjust the speed and incline of time. The key to success is in general. the higher number is activity that requires large amounts of oxygen for prolonged periods of the treadmill until your heart rate is to oxygenate the blood. After a few minutes of rest between workouts. CONDITIONING GUIDELINES WARNING: Before beginning this or any exercise program, consult your body uses easily...
... burning, adjust the speed and incline of time. The key to success is in general. the higher number is activity that requires large amounts of oxygen for prolonged periods of the treadmill until your heart rate is to oxygenate the blood. After a few minutes of rest between workouts. CONDITIONING GUIDELINES WARNING: Before beginning this or any exercise program, consult your body uses easily...
English Manual
Page 30
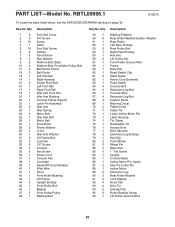
... Platform Bolt, Front/Idler Pulley Bolt Belt Guide Screw Belt Guide Left Handrail Right Handrail Frame Pivot Bolt Left Foot Rail Right Foot Rail Idler Arm Pivot Nut Idler Arm Bushing Console Frame Support Latch Pin Assembly Idler Arm Idler Spring Motor Bolt Idler Arm Bolt Motor Belt Drive Motor Frame Washer U-nut Idler Arm Washer Lift Frame Bolt Lock Nut 1/2" Screw Console Fan Screw Power Cord Console Fan Controller Reset/Off Circuit Breaker Filter Wire Hood Front Roller Bushing Lift Frame Upright Endcap Front Roller Bolt Magnet Front Roller/Pulley Walking Belt Key No. PART LIST-Model No...
... Platform Bolt, Front/Idler Pulley Bolt Belt Guide Screw Belt Guide Left Handrail Right Handrail Frame Pivot Bolt Left Foot Rail Right Foot Rail Idler Arm Pivot Nut Idler Arm Bushing Console Frame Support Latch Pin Assembly Idler Arm Idler Spring Motor Bolt Idler Arm Bolt Motor Belt Drive Motor Frame Washer U-nut Idler Arm Washer Lift Frame Bolt Lock Nut 1/2" Screw Console Fan Screw Power Cord Console Fan Controller Reset/Off Circuit Breaker Filter Wire Hood Front Roller Bushing Lift Frame Upright Endcap Front Roller Bolt Magnet Front Roller/Pulley Walking Belt Key No. PART LIST-Model No...
English Manual
Page 36
ICON's obligation under normal use and service conditions. This warranty gives you . ORDERING REPLACEMENT PARTS To order replacement parts, please see the front cover of whatsoever nature. The drive motor is limited to be free from defects in workmanship and material under this product to replacing or repairing, at ICON's option, the product through one of merchantability or fitness for twelve (12) years after the date of purchase...
ICON's obligation under normal use and service conditions. This warranty gives you . ORDERING REPLACEMENT PARTS To order replacement parts, please see the front cover of whatsoever nature. The drive motor is limited to be free from defects in workmanship and material under this product to replacing or repairing, at ICON's option, the product through one of merchantability or fitness for twelve (12) years after the date of purchase...


