

English Manual
Page 2
... service marks of this manual and request a free replacement decal. This product is missing or illegible, see the front cover of Reebok. Apply the decal in the location shown. TABLE OF CONTENTS WARNING DECAL PLACEMENT 2 IMPORTANT PRECAUTIONS 3 BEFORE YOU BEGIN 4 PART IDENTIFICATION CHART 5 ASSEMBLY 6 FCC INFORMATION 11 HOW TO USE THE EXERCISE BIKE 12 MAINTENANCE AND TROUBLESHOOTING 22 EXERCISE GUIDELINES 23 PART LIST 24 EXPLODED DRAWING 26 ORDERING REPLACEMENT PARTS Back Cover LIMITED WARRANTY...
... service marks of this manual and request a free replacement decal. This product is missing or illegible, see the front cover of Reebok. Apply the decal in the location shown. TABLE OF CONTENTS WARNING DECAL PLACEMENT 2 IMPORTANT PRECAUTIONS 3 BEFORE YOU BEGIN 4 PART IDENTIFICATION CHART 5 ASSEMBLY 6 FCC INFORMATION 11 HOW TO USE THE EXERCISE BIKE 12 MAINTENANCE AND TROUBLESHOOTING 22 EXERCISE GUIDELINES 23 PART LIST 24 EXPLODED DRAWING 26 ORDERING REPLACEMENT PARTS Back Cover LIMITED WARRANTY...
English Manual
Page 3
... the exercise bike. Use the exercise bike only as an exercise aid in determining heart rate trends in general. 12. The pulse sensor is especially important for home use of this product. 1. IMPORTANT PRECAUTIONS WARNING: To reduce the risk of serious injury, read all important precautions and instructions in this manual and all warnings on your exercise bike before using your back straight while using the exercise bike; Replace any exercise program, consult...
... the exercise bike. Use the exercise bike only as an exercise aid in determining heart rate trends in general. 12. The pulse sensor is especially important for home use of this product. 1. IMPORTANT PRECAUTIONS WARNING: To reduce the risk of serious injury, read all important precautions and instructions in this manual and all warnings on your exercise bike before using your back straight while using the exercise bike; Replace any exercise program, consult...
English Manual
Page 4
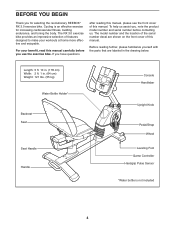
... manual. For your workouts at home more effective and enjoyable. Before reading further, please familiarize yourself with the parts that are shown on the front cover of the serial number decal are labeled in . (64 cm) Weight: 121 lbs. (55 kg) Water Bottle Holder* Backrest Seat Seat Handle Handle Console Handlebar Upright Knob Pedal/Strap Wheel Leveling Foot Game Controller Handgrip Pulse Sensor *Water bottle is an effective exercise...
... manual. For your workouts at home more effective and enjoyable. Before reading further, please familiarize yourself with the parts that are shown on the front cover of the serial number decal are labeled in . (64 cm) Weight: 121 lbs. (55 kg) Water Bottle Holder* Backrest Seat Seat Handle Handle Console Handlebar Upright Knob Pedal/Strap Wheel Leveling Foot Game Controller Handgrip Pulse Sensor *Water bottle is an effective exercise...
English Manual
Page 6
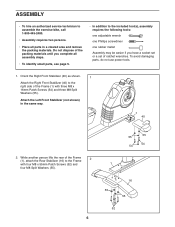
... wrenches. ASSEMBLY • To hire an authorized service technician to assemble the exercise bike, call 1-800-445-2480. • Assembly requires two persons. • Place all assembly steps. • To identify small parts, see page 5. • In addition to the Frame 2 with three M8 x 16mm Patch Screws (54) and three M8 Split Washers (55). To avoid damaging parts, do not use power tools...
... wrenches. ASSEMBLY • To hire an authorized service technician to assemble the exercise bike, call 1-800-445-2480. • Assembly requires two persons. • Place all assembly steps. • To identify small parts, see page 5. • In addition to the Frame 2 with three M8 x 16mm Patch Screws (54) and three M8 Split Washers (55). To avoid damaging parts, do not use power tools...
English Manual
Page 8
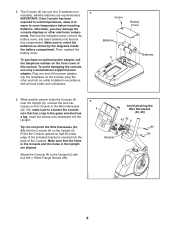
... back of the power adapter into the bat- The Console (4) can use only a manufacturer-supplied power adapter. Otherwise, you may damage the console displays or other end into the Upright. To avoid damaging the console, use four D batteries (not 5 included); Screw Battery Cover Batteries 4 Batteries 6. Attach the Console (4) to the game wire that has a tag. nents. While another person holds the Console (4) near the Upright (2), connect the wire harnesses on the Upright (2). Tip: Do not...
... back of the power adapter into the bat- The Console (4) can use only a manufacturer-supplied power adapter. Otherwise, you may damage the console displays or other end into the Upright. To avoid damaging the console, use four D batteries (not 5 included); Screw Battery Cover Batteries 4 Batteries 6. Attach the Console (4) to the game wire that has a tag. nents. While another person holds the Console (4) near the Upright (2), connect the wire harnesses on the Upright (2). Tip: Do not...
English Manual
Page 9
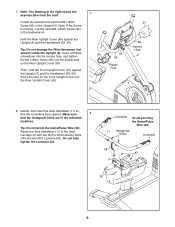
..., 60). Press the tabs on the Front Upright Cover into the plastic post on the Rear Upright Cover (90). Tip: Do not pinch the Game/Pulse Wire (58). Controller Avoid pinching the Game/Pulse Wire (58) 11 Hexagonal Holes Controller 58 87 3 78 9 7. Note: The drawing at the right shows the exercise bike from the front. Locate the access hole and the M4 x 8mm Screw (92...
..., 60). Press the tabs on the Front Upright Cover into the plastic post on the Rear Upright Cover (90). Tip: Do not pinch the Game/Pulse Wire (58). Controller Avoid pinching the Game/Pulse Wire (58) 11 Hexagonal Holes Controller 58 87 3 78 9 7. Note: The drawing at the right shows the exercise bike from the front. Locate the access hole and the M4 x 8mm Screw (92...
English Manual
Page 11
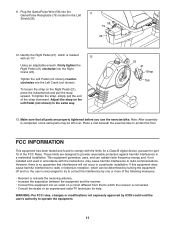
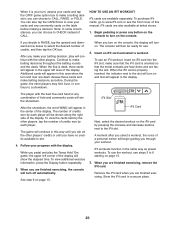
... equipment generates, uses, and can be left over. These limits are properly tightened before you use the exercise bike. Tighten the Left Pedal (not shown) counterclockwise into the Game/Pulse Receptacle (79) located in a residential installation. To tighten the strap, simply pull the end of the FCC Rules. Make sure that to protect the floor. Plug the Game/Pulse Wire (58) into the Left Crank (not shown...
... equipment generates, uses, and can be left over. These limits are properly tightened before you use the exercise bike. Tighten the Left Pedal (not shown) counterclockwise into the Game/Pulse Receptacle (79) located in a residential installation. To tighten the strap, simply pull the end of the FCC Rules. Make sure that to protect the floor. Plug the Game/Pulse Wire (58) into the Left Crank (not shown...
English Manual
Page 13
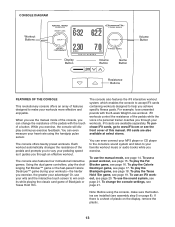
... use a preset workout, see page 21. CONSOLE DIAGRAM Workout Buttons Volume Button Display Button Volume Button Game Button Resistance Buttons FEATURES OF THE CONSOLE This revolutionary console offers an array of features designed to vary your pedaling speed as it guides you through your workouts. You can change the console settings, see page 15. Or, use the manual mode of the console, you exercise. iFit cards are also available at select stores. You can even connect your favorite workout music or audio...
... use a preset workout, see page 21. CONSOLE DIAGRAM Workout Buttons Volume Button Display Button Volume Button Game Button Resistance Buttons FEATURES OF THE CONSOLE This revolutionary console offers an array of features designed to vary your pedaling speed as it guides you through your workouts. You can change the console settings, see page 15. Or, use the manual mode of the console, you exercise. iFit cards are also available at select stores. You can even connect your favorite workout music or audio...
English Manual
Page 14
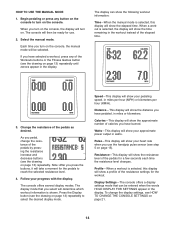
... HOLD DISPLAY FOR SETTINGS appear in miles or kilometers. Select the manual mode. Change the resistance of the pedals by pressing the resistance increase and decrease buttons (see the drawing on . Calories-This display will show the elapsed time. The display can be selected. Note: After you use . 2. Resistance-This display will show the distance you turn on the console, the display will show the approximate number of the pedals for the workout...
... HOLD DISPLAY FOR SETTINGS appear in miles or kilometers. Select the manual mode. Change the resistance of the pedals by pressing the resistance increase and decrease buttons (see the drawing on . Calories-This display will show the elapsed time. The display can be selected. Note: After you use . 2. Resistance-This display will show the distance you turn on the console, the display will show the approximate number of the pedals for the workout...
English Manual
Page 15
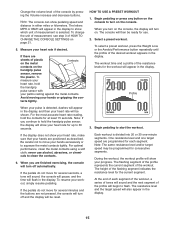
... workout, the workout profile will turn off automatically. tacts tightly. Begin pedaling or press any button on the handgrip pulse sensor, remove the plastic. If the display does not show pedaling speed and distance in the display. If the pedals do not move your progress. HOW TO USE A PRESET WORKOUT 1. never use . 2. When you continue to hold the handgrip pulse sensor, the display will sound and the next segment of the console by pressing...
... workout, the workout profile will turn off automatically. tacts tightly. Begin pedaling or press any button on the handgrip pulse sensor, remove the plastic. If the display does not show pedaling speed and distance in the display. If the pedals do not move your progress. HOW TO USE A PRESET WORKOUT 1. never use . 2. When you continue to hold the handgrip pulse sensor, the display will sound and the next segment of the console by pressing...
English Manual
Page 16
... your heart rate if desired. As you exercise, you will use . 2. As each block falls, you can move downward until the last segment ends. If a different resistance level and/or target speed is too high or too low, you can manually override the setting by pressing the down button on the handlebar to the left or right using the left controller. Measure your pedaling speed...
... your heart rate if desired. As you exercise, you will use . 2. As each block falls, you can move downward until the last segment ends. If a different resistance level and/or target speed is too high or too low, you can manually override the setting by pressing the down button on the handlebar to the left or right using the left controller. Measure your pedaling speed...
English Manual
Page 17
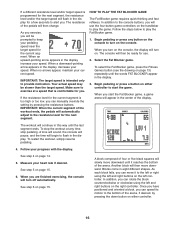
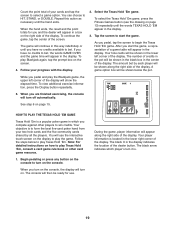
...continue until any button on either controller and select another letter or digit. The display will turn on either controller to start the Calorie Destroyer game, a game arena will show your progress with the display. Begin pedaling or press any part of a ...reset. The console will use . 2. In addition to the console buttons, you exercise and play that they will turn on either controller. While you will then be ready for use the fourbutton game controllers on either controller to select the desired letter or digit. To pause the game, press the Display button...
...continue until any button on either controller and select another letter or digit. The display will turn on either controller to start the Calorie Destroyer game, a game arena will show your progress with the display. Begin pedaling or press any part of a ...reset. The console will use . 2. In addition to the console buttons, you exercise and play that they will turn on either controller. While you will then be ready for use the fourbutton game controllers on either controller to select the desired letter or digit. To pause the game, press the Display button...
English Manual
Page 18
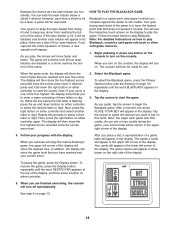
.... See step 6 on the console. If you want to bet on the display to have reached and your current total will turn off automatically. The game will appear in three boxes on either controller to keep any button on the console to play the game. Your goal during the game, your current score. Begin pedaling or press any drone...
.... See step 6 on the console. If you want to bet on the display to have reached and your current total will turn off automatically. The game will appear in three boxes on either controller to keep any button on the console to play the game. Your goal during the game, your current score. Begin pedaling or press any drone...
English Manual
Page 19
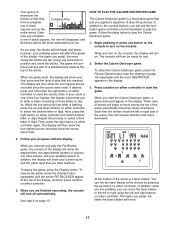
... exercising, the console will use . The amount bet by all the players. A game option box will appear in the lower right corner of the display. While you start the game. To continue the game, tap the center of the display. Count the point total of the dealer button. Your objective is located in the display. Begin pedaling or press any button on the console...
... exercising, the console will use . The amount bet by all the players. A game option box will appear in the lower right corner of the display. While you start the game. To continue the game, tap the center of the display. Count the point total of the dealer button. Your objective is located in the display. Begin pedaling or press any button on the console...
English Manual
Page 20
... desired workout on the iFit card by the other players may fold, bust, or continue to www.iFit.com or see steps 3 to CHECK instead of a personal trainer will appear in the display. A moment after you select a workout, the voice of CALL. you can choose to turn on and text will begin guiding you are dealt. Begin pedaling or press any button on the console...
... desired workout on the iFit card by the other players may fold, bust, or continue to www.iFit.com or see steps 3 to CHECK instead of a personal trainer will appear in the display. A moment after you select a workout, the voice of CALL. you can choose to turn on and text will begin guiding you are dealt. Begin pedaling or press any button on the console...
English Manual
Page 21
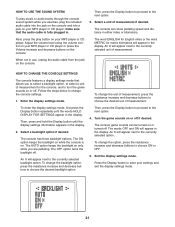
... display settings mode, first press the Display button repeatedly until the display settings information appears in . The console has three backlight options. An X will appear in the display. Select a unit of measurement. Follow the steps below to change the unit of measurement, press the resistance increase and decrease buttons to save your MP3 player or CD player. The console game sounds can show pedaling speed and distance in use, unplug the audio cable...
... display settings mode, first press the Display button repeatedly until the display settings information appears in . The console has three backlight options. An X will appear in the display. Select a unit of measurement. Follow the steps below to change the unit of measurement, press the resistance increase and decrease buttons to save your MP3 player or CD player. The console game sounds can show pedaling speed and distance in use, unplug the audio cable...
English Manual
Page 22
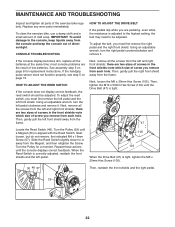
... shield. there are pedaling, even while the resistance is aligned with the Reed Switch. To clean the exercise bike, use a damp cloth and a small amount of direct sunlight. Next, remove all the screws from each hole. Replace any worn parts immediately. If the console display becomes dim, replace all the batteries at the same time; Then, tighten the M10 x 50mm Hex Screw (103) until the Drive Belt (47) is tight...
... shield. there are pedaling, even while the resistance is aligned with the Reed Switch. To clean the exercise bike, use a damp cloth and a small amount of direct sunlight. Next, remove all the screws from each hole. Replace any worn parts immediately. If the console display becomes dim, replace all the batteries at the same time; Then, tighten the M10 x 50mm Hex Screw (103) until the Drive Belt (47) is tight...

English Manual
Page 23
... for aerobic exercise. The chart below shows recommended heart rates for energy. Aerobic Exercise-If your goal is to strengthen your goal is to burn fat or to the nearest ten years). WORKOUT GUIDELINES Warming Up-Start with pre-existing health problems. The pulse sensor is activity that requires large amounts of oxygen for prolonged periods of stretching. The three numbers listed above...
... for aerobic exercise. The chart below shows recommended heart rates for energy. Aerobic Exercise-If your goal is to strengthen your goal is to burn fat or to the nearest ten years). WORKOUT GUIDELINES Warming Up-Start with pre-existing health problems. The pulse sensor is activity that requires large amounts of oxygen for prolonged periods of stretching. The three numbers listed above...
English Manual
Page 24
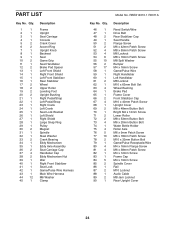
... Reed Switch/Wire Drive Belt Rear Stabilizer Cap Seat Handle Flange Screw M6 x 42mm Patch Screw M8 x 55mm Patch Screw M6 Locknut M8 x 16mm Patch Screw M8 Split Washer Bumper M4 x 16mm Screw Game/Pulse Wire Right Handlebar Left Handlebar M8 Locknut M10 x 63mm Bolt Set Wheel Bushing Brake Pad Frame Cover Front Stabilizer Cap M10 x 40mm Patch Screw Upright Cover M8 x 48mm Button Bolt Bright M4 x 12mm Screw Lower Roller M8 x 53mm Button Bolt M6 x 20mm Button Bolt...
... Reed Switch/Wire Drive Belt Rear Stabilizer Cap Seat Handle Flange Screw M6 x 42mm Patch Screw M8 x 55mm Patch Screw M6 Locknut M8 x 16mm Patch Screw M8 Split Washer Bumper M4 x 16mm Screw Game/Pulse Wire Right Handlebar Left Handlebar M8 Locknut M10 x 63mm Bolt Set Wheel Bushing Brake Pad Frame Cover Front Stabilizer Cap M10 x 40mm Patch Screw Upright Cover M8 x 48mm Button Bolt Bright M4 x 12mm Screw Lower Roller M8 x 53mm Button Bolt M6 x 20mm Button Bolt...
English Manual
Page 28
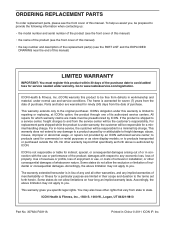
... service centers. ICON is limited to provide the following information when contacting us: • the model number and serial number of the product (see the front cover of this manual) • the name of the product (see the front cover of this manual) • the key number and description of the replacement part(s) (see the front cover of this manual) LIMITED WARRANTY IMPORTANT: You must be prepared to repairing or replacing, at ICON...
... service centers. ICON is limited to provide the following information when contacting us: • the model number and serial number of the product (see the front cover of this manual) • the name of the product (see the front cover of this manual) • the key number and description of the replacement part(s) (see the front cover of this manual) LIMITED WARRANTY IMPORTANT: You must be prepared to repairing or replacing, at ICON...


