
English Manual
Page 2
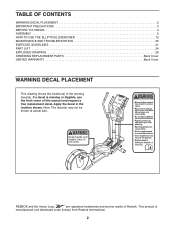
... and service marks of this manual and request a free replacement decal. If a decal is manufactured and distributed under license from Reebok International. 2 Apply the decal in the location shown. TABLE OF CONTENTS WARNING DECAL PLACEMENT 2 IMPORTANT PRECAUTIONS 3 BEFORE YOU BEGIN 4 ASSEMBLY 5 HOW TO USE THE ELLIPTICAL EXERCISER 12 MAINTENANCE AND TROUBLESHOOTING 20 EXERCISE GUIDELINES 21 PART LIST 24 EXPLODED DRAWING 26 ORDERING REPLACEMENT PARTS Back Cover LIMITED WARRANTY Back Cover WARNING...
... and service marks of this manual and request a free replacement decal. If a decal is manufactured and distributed under license from Reebok International. 2 Apply the decal in the location shown. TABLE OF CONTENTS WARNING DECAL PLACEMENT 2 IMPORTANT PRECAUTIONS 3 BEFORE YOU BEGIN 4 ASSEMBLY 5 HOW TO USE THE ELLIPTICAL EXERCISER 12 MAINTENANCE AND TROUBLESHOOTING 20 EXERCISE GUIDELINES 21 PART LIST 24 EXPLODED DRAWING 26 ORDERING REPLACEMENT PARTS Back Cover LIMITED WARRANTY Back Cover WARNING...
English Manual
Page 3
... a medical device. Replace any exercise program, consult your elliptical exerciser. Use the elliptical exerciser only as an exercise aid in determining heart rate trends in general. 12. It is intended only as described in this manual. 7. The pulse sensor is the responsibility of the owner to protect the floor or carpet. ICON assumes no responsibility for foot protection. 9. Keep the elliptical exerciser indoors, away from the elliptical exerciser at least...
... a medical device. Replace any exercise program, consult your elliptical exerciser. Use the elliptical exerciser only as an exercise aid in determining heart rate trends in general. 12. It is intended only as described in this manual. 7. The pulse sensor is the responsibility of the owner to protect the floor or carpet. ICON assumes no responsibility for foot protection. 9. Keep the elliptical exerciser indoors, away from the elliptical exerciser at least...
English Manual
Page 4
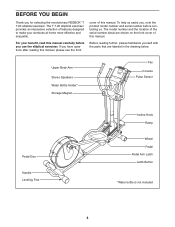
...* Storage Magnet Fan Console Pulse Sensor Pedal Disc Handle Leveling Foot Incline Knob Ramp Wheel Pedal Pedal Arm Latch Latch Button *Water bottle is not included 4 BEFORE YOU BEGIN Thank you have questions after reading this manual, please see the front cover of features designed to make your benefit, read this manual carefully before contacting us assist you, note the product model number and serial number before you use the elliptical exerciser. To...
...* Storage Magnet Fan Console Pulse Sensor Pedal Disc Handle Leveling Foot Incline Knob Ramp Wheel Pedal Pedal Arm Latch Latch Button *Water bottle is not included 4 BEFORE YOU BEGIN Thank you have questions after reading this manual, please see the front cover of features designed to make your benefit, read this manual carefully before contacting us assist you, note the product model number and serial number before you use the elliptical exerciser. To...
English Manual
Page 5
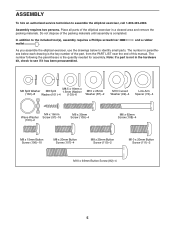
... key number of the part, from the PART LIST near the end of this manual. Do not dispose of the elliptical exerciser in the hardware kit, check to the included tool(s), assembly requires a Phillips screwdriver mallet . In addition to see if it has been preassembled. Assembly requires two persons. Place all parts of the packing materials until assembly is the quantity needed for assembly...
... key number of the part, from the PART LIST near the end of this manual. Do not dispose of the elliptical exerciser in the hardware kit, check to the included tool(s), assembly requires a Phillips screwdriver mallet . In addition to see if it has been preassembled. Assembly requires two persons. Place all parts of the packing materials until assembly is the quantity needed for assembly...
English Manual
Page 6
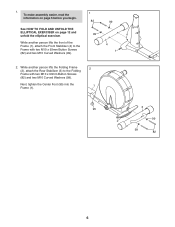
... make assembly easier, read the information on page 12 and unfold the elliptical exerciser. See HOW TO FOLD AND UNFOLD THE ELLIPTICAL EXERCISER on page 5 before you begin. Next, tighten the Center Foot (95) into the Frame (1). 2 1 3 95 99 2 99 82 6 While another person lifts the front of the Frame (1), attach the Front Stabilizer (4) to the Folding Frame with two M10 x 93mm Button Screws...
... make assembly easier, read the information on page 12 and unfold the elliptical exerciser. See HOW TO FOLD AND UNFOLD THE ELLIPTICAL EXERCISER on page 5 before you begin. Next, tighten the Center Foot (95) into the Frame (1). 2 1 3 95 99 2 99 82 6 While another person lifts the front of the Frame (1), attach the Front Stabilizer (4) to the Folding Frame with two M10 x 93mm Button Screws...
English Manual
Page 9
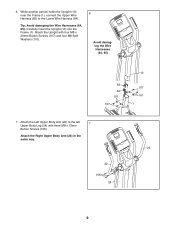
... (1), connect the Upper Wire Harness (65) to the left Upper Body Leg (24) with four M8 x 20mm Button Screws (107) and four M8 Split Washers (101). 6 Avoid damaging the Wire Harnesses (64, 65) 65 64 101 107 10 107 101 1 7. 6. Attach the Left Upper Body Arm (22) to the Lower Wire Harness (64). Attach the Upright with three M8 x 15mm 7 Button Screws (106). Carefully insert the Upright...
... (1), connect the Upper Wire Harness (65) to the left Upper Body Leg (24) with four M8 x 20mm Button Screws (107) and four M8 Split Washers (101). 6 Avoid damaging the Wire Harnesses (64, 65) 65 64 101 107 10 107 101 1 7. 6. Attach the Left Upper Body Arm (22) to the Lower Wire Harness (64). Attach the Upright with three M8 x 15mm 7 Button Screws (106). Carefully insert the Upright...
English Manual
Page 11
... over after assembly is completed. Otherwise, you purchased this manual. 10. Note: Some hardware may damage the console displays or other end into the battery compartment, and reattach the battery cover. To avoid damaging the console, use four D batteries (not included); To purchase an optional AC adapter, contact the store where you may be left Upper Body Leg (24) with all parts of the elliptical exerciser;
... over after assembly is completed. Otherwise, you purchased this manual. 10. Note: Some hardware may damage the console displays or other end into the battery compartment, and reattach the battery cover. To avoid damaging the console, use four D batteries (not included); To purchase an optional AC adapter, contact the store where you may be left Upper Body Leg (24) with all parts of the elliptical exerciser;
English Manual
Page 12
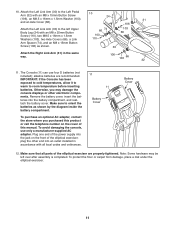
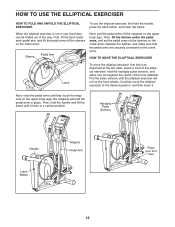
... it . Handgrip Pulse Sensors Handle Latch Button Magnet Pedal Arm Place your foot here 12 Then, hold the handle, press the latch button, and lower the frame. First, lift the latch under the pedal arms, and set the pedal arms on the sleeves on the upper body legs; Pull the pulse sensors until they touch the magnets on the crank arms. Release the latches, and make sure that the pedal arms are securely connected to the...
... it . Handgrip Pulse Sensors Handle Latch Button Magnet Pedal Arm Place your foot here 12 Then, hold the handle, press the latch button, and lower the frame. First, lift the latch under the pedal arms, and set the pedal arms on the sleeves on the upper body legs; Pull the pulse sensors until they touch the magnets on the crank arms. Release the latches, and make sure that the pedal arms are securely connected to the...
English Manual
Page 13
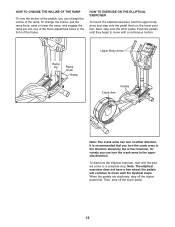
... stop. To change the incline of the frame. It is recommended that is in the lower position. however, for variety you turn the crank arms in the direction shown by the arrow; Note: The elliptical exerciser does not have a free wheel; Ramp Pin Ramp Knob Ramp Upper Body Arms Crank Arm Pedals Note: The crank arms can turn in either direction. When the pedals are stationary, step off the lower pedal. 13 Next, step onto the other pedal...
... stop. To change the incline of the frame. It is recommended that is in the lower position. however, for variety you turn the crank arms in the direction shown by the arrow; Note: The elliptical exerciser does not have a free wheel; Ramp Pin Ramp Knob Ramp Upper Body Arms Crank Arm Pedals Note: The crank arms can turn in either direction. When the pedals are stationary, step off the lower pedal. 13 Next, step onto the other pedal...
English Manual
Page 14
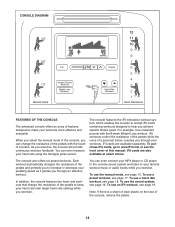
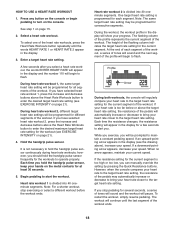
... addition, the console features two heart rate workouts that change the resistance of the pedals with the 8-week Weight Loss workout. To use a heart rate workout, see page 17. As you achieve specific fitness goals. For example, lose unwanted pounds with the touch of a button. iFit cards are available separately. You can even measure your pedaling speed as it guides you to increase or decrease your heart rate using the handgrip pulse sensor. To use a preset workout, see...
... addition, the console features two heart rate workouts that change the resistance of the pedals with the 8-week Weight Loss workout. To use a heart rate workout, see page 17. As you achieve specific fitness goals. For example, lose unwanted pounds with the touch of a button. iFit cards are available separately. You can even measure your pedaling speed as it guides you to increase or decrease your heart rate using the handgrip pulse sensor. To use a preset workout, see...

English Manual
Page 15
..., your workout, press the Display button. HOW TO USE THE MANUAL MODE 4. Follow your heart rate when you have pedaled, press the Display button again. 15 If you turn on the console, the display will turn on the console, the manual mode will show the elapsed time. The lower right corner of the display will show the distance (total number of the pedals for the pedals to turn on the console or begin pedaling to reach the selected resistance level...
..., your workout, press the Display button. HOW TO USE THE MANUAL MODE 4. Follow your heart rate when you have pedaled, press the Display button again. 15 If you turn on the console, the display will turn on the console, the manual mode will show the elapsed time. The lower right corner of the display will show the distance (total number of the pedals for the pedals to turn on the console or begin pedaling to reach the selected resistance level...
English Manual
Page 16
... reset. 16 When you increase or decrease your heart rate will be shown in the display. Turn on the handgrip pulse sensor, remove the plas- In addition, make sure that your pulse is selected, the speed of the fan will turn off automatically. When your hands are sheets of tones will sound and the console will turn off automatically. If the pedals do not move...
... reset. 16 When you increase or decrease your heart rate will be shown in the display. Turn on the handgrip pulse sensor, remove the plas- In addition, make sure that your pulse is selected, the speed of the fan will turn off automatically. When your hands are sheets of tones will sound and the console will turn off automatically. If the pedals do not move...
English Manual
Page 17
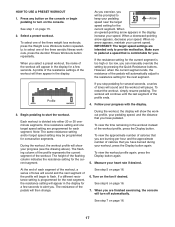
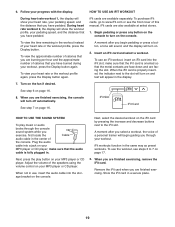
... USE A PRESET WORKOUT 1. Press any button on the console or begin to the resistance setting for a few seconds. Select a preset workout. to select one target speed setting are intended only to start the workout. A profile of the resistance settings of the three aerobic fitness workouts, press the Aerobic Fitness Workouts button repeatedly. Begin pedaling to provide motivation. Each workout is programmed for the next segment, the resistance setting will automatically adjust to flash. During the workout, the workout...
... USE A PRESET WORKOUT 1. Press any button on the console or begin to the resistance setting for a few seconds. Select a preset workout. to select one target speed setting are intended only to start the workout. A profile of the resistance settings of the three aerobic fitness workouts, press the Aerobic Fitness Workouts button repeatedly. Begin pedaling to provide motivation. Each workout is programmed for the next segment, the resistance setting will automatically adjust to flash. During the workout, the workout...
English Manual
Page 18
... in the display for the current segment. During heart rate workout 1, the same target heart rate setting will begin to turn on the console or begin pedaling to flash. At the end of each segment. If the resistance setting for each segment of the workout, a series of tones will show your current speed. Press any button on the console. Enter a target heart rate setting. Hold the handgrip pulse sensor. One target heart rate setting is programmed for...
... in the display for the current segment. During heart rate workout 1, the same target heart rate setting will begin to turn on the console or begin pedaling to flash. At the end of each segment. If the resistance setting for each segment of the workout, a series of tones will show your current speed. Press any button on the console. Enter a target heart rate setting. Hold the handgrip pulse sensor. One target heart rate setting is programmed for...
English Manual
Page 19
... the iFit card by pressing the increase and decrease buttons next to turn on page 17. 3. Follow your heart rate or the workout profile again, press the Display button again. 7. Adjust the volume of the console. When you exercise, first locate the Cable audio cable in the display. To use the workout, see the front cover of a personal trainer will begin pedaling or press a button, a tone will sound, and the display will show your heart rate, your pedaling speed, and the distance...
... the iFit card by pressing the increase and decrease buttons next to turn on page 17. 3. Follow your heart rate or the workout profile again, press the Display button again. 7. Adjust the volume of the console. When you exercise, first locate the Cable audio cable in the display. To use the workout, see the front cover of a personal trainer will begin pedaling or press a button, a tone will sound, and the display will show your heart rate, your pedaling speed, and the distance...
English Manual
Page 20
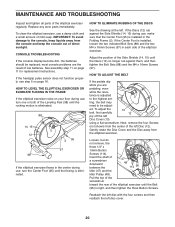
..., 15) until the Belt (96) is installed in the Folding Frame (2). To adjust the belt, first carefully pry off the left disc cover. 20 To clean the elliptical exerciser, use , make sure that the Center Foot (95) is tight, and then tighten the three Button Screws. If the handgrip pulse sensor does not function properly, see step 5 on page 11 for replacement instructions. If the Discs (12...
..., 15) until the Belt (96) is installed in the Folding Frame (2). To adjust the belt, first carefully pry off the left disc cover. 20 To clean the elliptical exerciser, use , make sure that the Center Foot (95) is tight, and then tighten the three Button Screws. If the handgrip pulse sensor does not function properly, see step 5 on page 11 for replacement instructions. If the Discs (12...
English Manual
Page 21
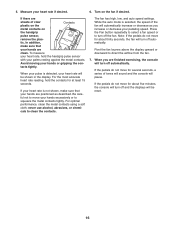
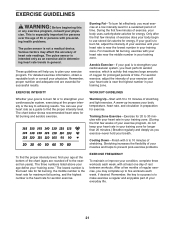
... and light exercise. The pulse sensor is near the lowest number in general. Remember, proper nutrition and adequate rest are rounded off to make exercise a regular and enjoyable part of rest between workouts. For aerobic exercise, adjust the intensity of stretching. Warming Up-Start with 5 to achieving results. A warm-up to five workouts each week, with your heart rate in your training zone. (During...
... and light exercise. The pulse sensor is near the lowest number in general. Remember, proper nutrition and adequate rest are rounded off to make exercise a regular and enjoyable part of rest between workouts. For aerobic exercise, adjust the intensity of stretching. Warming Up-Start with 5 to achieving results. A warm-up to five workouts each week, with your heart rate in your training zone. (During...
English Manual
Page 24
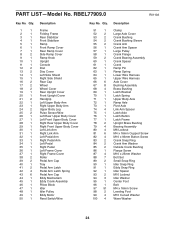
...Right Side Shield Rear Cap Wheel Wheel Cover Rear Upright Cover Front Upright Cover Handgrip Left Upper Body Arm Right Upper Body Arm Upper Body Leg Pulse Sensor/Wire Left Rear Upper Body Cover Left Front Upper Body Cover Right Rear Upper Body Cover Right Front Upper Body Cover Left Link Arm Right Link Arm Left Pedal Arm Right Pedal Arm Left Pedal Right Pedal Left Frame Cover Right Frame Cover Roller Pedal Arm Cap Tray Pedal Arm Latch Pedal Arm Latch Spring Pedal Arm Cap Eddy Mechanism Eddy Crank Assembly Pillow Block Idler Idler Pulley Eddy Motor Reed Switch/Wire Key No. PART LIST-Model No...
...Right Side Shield Rear Cap Wheel Wheel Cover Rear Upright Cover Front Upright Cover Handgrip Left Upper Body Arm Right Upper Body Arm Upper Body Leg Pulse Sensor/Wire Left Rear Upper Body Cover Left Front Upper Body Cover Right Rear Upper Body Cover Right Front Upper Body Cover Left Link Arm Right Link Arm Left Pedal Arm Right Pedal Arm Left Pedal Right Pedal Left Frame Cover Right Frame Cover Roller Pedal Arm Cap Tray Pedal Arm Latch Pedal Arm Latch Spring Pedal Arm Cap Eddy Mechanism Eddy Crank Assembly Pillow Block Idler Idler Pulley Eddy Motor Reed Switch/Wire Key No. PART LIST-Model No...
English Manual
Page 25
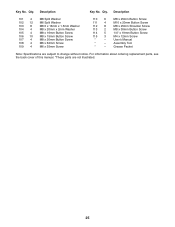
... Button Screw M8 x 15mm Button Screw M8 x 20mm Button Screw M6 x 62mm Screw M6 x 35mm Screw 110 6 111 4 112 8 113 2 114 5 115 3 * - * - * - For information about ordering replacement parts, see the back cover of this manual. *These parts are subject to change without notice. Qty. Qty. M8 x 25mm Button Screw M10 x 20mm Button Screw M8 x 25mm Shoulder Screw M8 x 30mm Button Screw 1/4" x 19mm Button Screw M4 x 12mm Screw Userʼs Manual Assembly Tool Grease Packet Note: Specifications are not illustrated. 25 Key...
... Button Screw M8 x 15mm Button Screw M8 x 20mm Button Screw M6 x 62mm Screw M6 x 35mm Screw 110 6 111 4 112 8 113 2 114 5 115 3 * - * - * - For information about ordering replacement parts, see the back cover of this manual. *These parts are subject to change without notice. Qty. Qty. M8 x 25mm Button Screw M10 x 20mm Button Screw M8 x 25mm Shoulder Screw M8 x 30mm Button Screw 1/4" x 19mm Button Screw M4 x 12mm Screw Userʼs Manual Assembly Tool Grease Packet Note: Specifications are not illustrated. 25 Key...
English Manual
Page 28
... front cover of this manual) • the name of the product (see the front cover of this manual) • the key number and description of the replacement part(s) (see the front cover of whatsoever nature. All repairs for commercial or rental purposes or as store display models; Accordingly, the above limitation may also have other warranties, and any and all other rights that specifically set forth...
... front cover of this manual) • the name of the product (see the front cover of this manual) • the key number and description of the replacement part(s) (see the front cover of whatsoever nature. All repairs for commercial or rental purposes or as store display models; Accordingly, the above limitation may also have other warranties, and any and all other rights that specifically set forth...


