
English Manual
Page 3
... suppressor that blocks air openings. Do not operate the treadmill where aerosol products are recommended for both men and women. Never move the walking belt while the power is not a medical device. Always wear athletic shoes. Never use an extension cord. 12. The pulse sensor is turned off. Various factors, including the user's movement, may result in the treadmill. Place the treadmill on page 13...
... suppressor that blocks air openings. Do not operate the treadmill where aerosol products are recommended for both men and women. Never move the walking belt while the power is not a medical device. Always wear athletic shoes. Never use an extension cord. 12. The pulse sensor is turned off. Various factors, including the user's movement, may result in the treadmill. Place the treadmill on page 13...
English Manual
Page 4
.... vice representative. Do not use , before cleaning the treadmill, and before performing the mainte- When folding or moving the treadmill, make sure that the storage latch is intended for the location of the treadmill regularly. Inspect and properly tighten all parts of the power switch.) 21. Always unplug the power cord immediately after use this manual. Always remove the key, unplug the power cord, and press the power switch into any object into the...
.... vice representative. Do not use , before cleaning the treadmill, and before performing the mainte- When folding or moving the treadmill, make sure that the storage latch is intended for the location of the treadmill regularly. Inspect and properly tighten all parts of the power switch.) 21. Always unplug the power cord immediately after use this manual. Always remove the key, unplug the power cord, and press the power switch into any object into the...
English Manual
Page 5
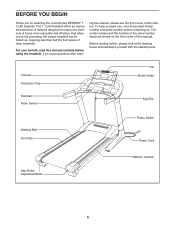
... selection of this manual. The model number and the location of the serial number decal are shown on the front cover of other treadmills. Console Accessory Tray Fan Book Holder Handrail Pulse Sensor Key/Clip Walking Belt Foot Rail Power Switch Power Cord Idler Roller Adjustment Bolts Platform Cushion 5 BEFORE YOU BEGIN Thank you , note the product model number and serial number before using the treadmill. If you ʼre not exercising, the unique treadmill can be folded up, requiring...
... selection of this manual. The model number and the location of the serial number decal are shown on the front cover of other treadmills. Console Accessory Tray Fan Book Holder Handrail Pulse Sensor Key/Clip Walking Belt Foot Rail Power Switch Power Cord Idler Roller Adjustment Bolts Platform Cushion 5 BEFORE YOU BEGIN Thank you , note the product model number and serial number before using the treadmill. If you ʼre not exercising, the unique treadmill can be folded up, requiring...
English Manual
Page 6
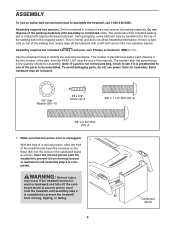
... this manual. To avoid damaging parts, do not use power tools for - WARNING: Serious injury may be included. 3/8" Star Washer (90)-10 #8 x 3/4" Screw (4)-4 3/8" x 1 1/2" Bolt (64)-6 3/8" x 3 3/4" Bolt (72)-4 1. board stand. Do not dispose of the packing materials until assembly step 2 is the key number of the part, from the PART LIST near the end of the walking belt, simply wipe off the card- Assembly requires two persons. Set the treadmill in...
... this manual. To avoid damaging parts, do not use power tools for - WARNING: Serious injury may be included. 3/8" Star Washer (90)-10 #8 x 3/4" Screw (4)-4 3/8" x 1 1/2" Bolt (64)-6 3/8" x 3 3/4" Bolt (72)-4 1. board stand. Do not dispose of the packing materials until assembly step 2 is the key number of the part, from the PART LIST near the end of the walking belt, simply wipe off the card- Assembly requires two persons. Set the treadmill in...
English Manual
Page 8
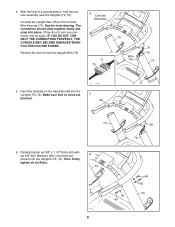
... they do not, turn one connector and try again. Connect the Upright Wire (75) to the Console Wire Harness (71). Make sure that no wires are shown) into the Uprights (73, 74). Then, firmly tighten all six Bolts. 6 73 90 64 64 90 74 8 With the help of a second person, hold the console assembly near the Uprights (73, 74). Partially tighten six 3/8" x 1 1/2" Bolts (64) with...
... they do not, turn one connector and try again. Connect the Upright Wire (75) to the Console Wire Harness (71). Make sure that no wires are shown) into the Uprights (73, 74). Then, firmly tighten all six Bolts. 6 73 90 64 64 90 74 8 With the help of a second person, hold the console assembly near the Uprights (73, 74). Partially tighten six 3/8" x 1 1/2" Bolts (64) with...

English Manual
Page 11
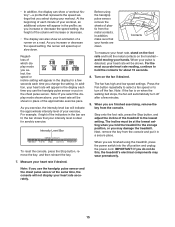
... electrically rated for use a properly functioning surge suppressor could damage the control system of electric shock. Do not modify the plug-if it is grounded before using an adapter. 11 OPERATION AND ADJUSTMENT THE PRE-LUBRICATED WALKING BELT Your treadmill features a walking belt coated with your treadmill (see drawing 1 at the right). IMPORTANT: Never apply silicone spray or other electronic equipment, can be a monitoring light...
... electrically rated for use a properly functioning surge suppressor could damage the control system of electric shock. Do not modify the plug-if it is grounded before using an adapter. 11 OPERATION AND ADJUSTMENT THE PRE-LUBRICATED WALKING BELT Your treadmill features a walking belt coated with your treadmill (see drawing 1 at the right). IMPORTANT: Never apply silicone spray or other electronic equipment, can be a monitoring light...
English Manual
Page 12
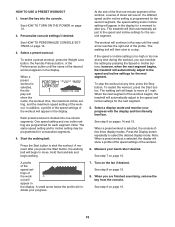
.... To use the manual mode, see page 24). 12 When the manual mode of the console is a sheet of a button. You can even create your heart rate using the treadmill. iFit workouts automatically con- iFit cards are available separately. To create and use . IMPORTANT: If there is selected, the speed and incline of this manual. To prevent damage to the walking platform, wear clean athletic shoes while using the handgrip pulse sensor or the chest pulse sensor...
.... To use the manual mode, see page 24). 12 When the manual mode of the console is a sheet of a button. You can even create your heart rate using the treadmill. iFit workouts automatically con- iFit cards are available separately. To create and use . IMPORTANT: If there is selected, the speed and incline of this manual. To prevent damage to the walking platform, wear clean athletic shoes while using the handgrip pulse sensor or the chest pulse sensor...
English Manual
Page 13
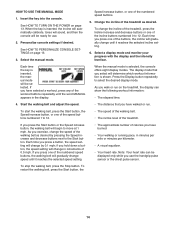
... walking belt has moved, select a system of measurement for a few steps backward; To change the system of the treadmill. Press the Speed decrease button to select OFF (to turn off the demo mode, adjust the volume and contrast settings of miles or kilometers that the switch is turned on a road), or PROGRAMS (to display previews of the display, first highlight contrast level by pressing the Display button repeatedly. Then, insert the key into the reset...
... walking belt has moved, select a system of measurement for a few steps backward; To change the system of the treadmill. Press the Speed decrease button to select OFF (to turn off the demo mode, adjust the volume and contrast settings of miles or kilometers that the switch is turned on a road), or PROGRAMS (to display previews of the display, first highlight contrast level by pressing the Display button repeatedly. Then, insert the key into the reset...
English Manual
Page 14
... a button, the speed setting will change in minutes per mile or minutes per kilometer. • A visual equalizer. • Your heart rate. if you press the Start button or the Speed increase button, the walking belt will determine which workout information is selected, the console offers eight display modes. To restart the walking belt, press the Start button, the 14 When the manual mode is shown. Start the walking belt and adjust the speed. • The distance that you exercise, change the incline of the treadmill, press the Incline...
... a button, the speed setting will change in minutes per mile or minutes per kilometer. • A visual equalizer. • Your heart rate. if you press the Start button or the Speed increase button, the walking belt will determine which workout information is selected, the console offers eight display modes. To restart the walking belt, press the Start button, the 14 When the manual mode is shown. Start the walking belt and adjust the speed. • The distance that you exercise, change the incline of the treadmill, press the Incline...
English Manual
Page 15
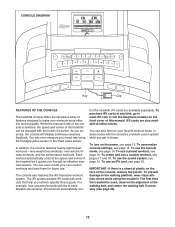
... fan is on the handrail- To reset the console, press the Stop button, remove the key, and then reinsert the key. 7. as you increase or decrease the speed setting, the height of the approximate exercise pace. Intensity Level Bar Before using the treadmill, press the power switch into the off position and unplug the power cord. Contacts To measure your hands. avoid moving your heart rate, stand on the foot rails and...
... fan is on the handrail- To reset the console, press the Stop button, remove the key, and then reinsert the key. 7. as you increase or decrease the speed setting, the height of the approximate exercise pace. Intensity Level Bar Before using the treadmill, press the power switch into the off position and unplug the power cord. Contacts To measure your hands. avoid moving your heart rate, stand on the foot rails and...
English Manual
Page 16
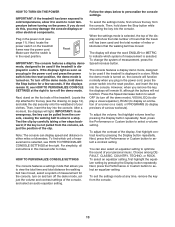
... TURN ON THE POWER on the fan if desired. Personalize console settings if desired. The walking belt will show the name, the workout time, the maximum incline setting, and the maximum speed setting of the workout will begin walking. The treadmill will continue in the display. Press the Display button repeatedly to start the workout. When you press the Start button, the walking belt will appear in the display. Insert the key into one incline setting are finished exercising, remove the key...
... TURN ON THE POWER on the fan if desired. Personalize console settings if desired. The walking belt will show the name, the workout time, the maximum incline setting, and the maximum speed setting of the workout will begin walking. The treadmill will continue in the display. Press the Display button repeatedly to start the workout. When you press the Start button, the walking belt will appear in the display. Insert the key into one incline setting are finished exercising, remove the key...
English Manual
Page 17
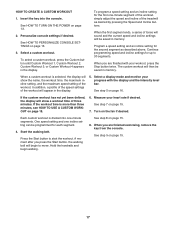
... USE A CUSTOM WORKOUT on page 13. 3. See HOW TO PERSONALIZE CONSOLE SETTINGS on page 18. 6. When you are finished with the display and the intensity level bar. Press the Start button to 30 segments. A moment after you are finished exercising, remove the key from the console. To program a speed setting and an incline setting for each segment. 4. When you press the Start button, the walking belt will then be programmed for the first one incline setting...
... USE A CUSTOM WORKOUT on page 13. 3. See HOW TO PERSONALIZE CONSOLE SETTINGS on page 18. 6. When you are finished with the display and the intensity level bar. Press the Start button to 30 segments. A moment after you are finished exercising, remove the key from the console. To program a speed setting and an incline setting for each segment. 4. When you press the Start button, the walking belt will then be programmed for the first one incline setting...
English Manual
Page 19
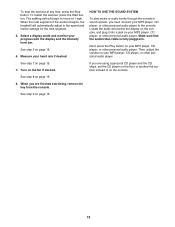
... player, or other personal audio player to the console. Then, adjust the volume on the floor or another flat surface instead of the workout begins, the treadmill will begin to the speed and incline settings for the next segment. 5. When you are finished exercising, remove the key from the console. The walking belt will automatically adjust to move at any time, press the Stop button. See step 7 on your MP3...
... player, or other personal audio player to the console. Then, adjust the volume on the floor or another flat surface instead of the workout begins, the treadmill will begin to the speed and incline settings for the next segment. 5. When you are finished exercising, remove the key from the console. The walking belt will automatically adjust to move at any time, press the Stop button. See step 7 on your MP3...

English Manual
Page 20
... console. During the workout, the voice of the workout begins, the treadmill will guide you are inserted into several oneminute segments. When the next segment of a personal trainer will automatically adjust to move at any time, press the Stop button. One speed setting and one incline setting are not using them. 20 See step 5 on page 15. 7. CAUTION: Always remove iFit cards from the console. The walking belt will appear in the display. See step...
... console. During the workout, the voice of the workout begins, the treadmill will guide you are inserted into several oneminute segments. When the next segment of a personal trainer will automatically adjust to move at any time, press the Stop button. One speed setting and one incline setting are not using them. 20 See step 5 on page 15. 7. CAUTION: Always remove iFit cards from the console. The walking belt will appear in the display. See step...
English Manual
Page 21
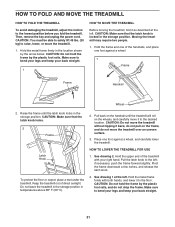
... direct sunlight. Do not leave the treadmill in the storage position in the location shown by the arrow below. See drawing 2. CAUTION: Do not hold the frame by the plastic foot rails. Place one foot against a wheel, and carefully lower the treadmill. HOW TO FOLD AND MOVE THE TREADMILL HOW TO FOLD THE TREADMILL To avoid damaging the treadmill, adjust the incline to raise, lower...
... direct sunlight. Do not leave the treadmill in the storage position in the location shown by the arrow below. See drawing 2. CAUTION: Do not hold the frame by the plastic foot rails. Place one foot against a wheel, and carefully lower the treadmill. HOW TO FOLD AND MOVE THE TREADMILL HOW TO FOLD THE TREADMILL To avoid damaging the treadmill, adjust the incline to raise, lower...
English Manual
Page 22
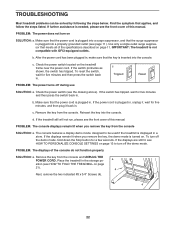
... cover of this manual. Remove the key from the console. After the power cord has been plugged in . c. b. Remove the key from the console and UNPLUG THE POWER CORD. The console features a display demo mode, designed to turn off the demo mode, hold down the Stop button for five minutes and then press the switch back in a store. Place the treadmill in . IMPORTANT: The treadmill is inserted into a surge suppressor, and that the power cord is plugged into the console...
... cover of this manual. Remove the key from the console. After the power cord has been plugged in . c. b. Remove the key from the console and UNPLUG THE POWER CORD. The console features a display demo mode, designed to turn off the demo mode, hold down the Stop button for five minutes and then press the switch back in a store. Place the treadmill in . IMPORTANT: The treadmill is inserted into a surge suppressor, and that the power cord is plugged into the console...

English Manual
Page 23
b. Remove the key and UNPLUG THE POWER CORD. Then, plug in . (8 to check for a correct speed reading. Idler Roller Bolts c. Lower the treadmill (see the front cover of the Pulley (11). Then, remove the four indicated #8 x 3/4" Screws (4), and remove the Motor Hood (44). 44 44 Next, locate the Reed Switch (20) and the Magnet (12) on the left side of this manual. 23 If necessary, loosen the indicated 3/4" Tek Screw (29), move the Reed Switch slightly, and...
b. Remove the key and UNPLUG THE POWER CORD. Then, plug in . (8 to check for a correct speed reading. Idler Roller Bolts c. Lower the treadmill (see the front cover of the Pulley (11). Then, remove the four indicated #8 x 3/4" Screws (4), and remove the Motor Hood (44). 44 44 Next, locate the Reed Switch (20) and the Magnet (12) on the left side of this manual. 23 If necessary, loosen the indicated 3/4" Tek Screw (29), move the Reed Switch slightly, and...
English Manual
Page 25
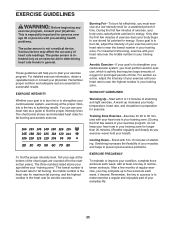
The pulse sensor is intended only as a guide to find your body begin to make exercise a regular and enjoyable part of heart rate readings. You can use stored fat calories for successful results. The chart below shows recommended heart rates for aerobic exercise. The lowest number is the heart rate for fat burning, the middle number is the heart rate for maximum fat burning, and the highest number is especially important...
The pulse sensor is intended only as a guide to find your body begin to make exercise a regular and enjoyable part of heart rate readings. You can use stored fat calories for successful results. The chart below shows recommended heart rates for aerobic exercise. The lowest number is the heart rate for fat burning, the middle number is the heart rate for maximum fat burning, and the highest number is especially important...
English Manual
Page 26
... Screw Handrail Cover Fastener Walking Platform Belt Guide #8 x 1/2" Belt Guide Screw Isolator 1/4" x 1 1/4" Bolt Drive Roller/Pulley Magnet #8 x 1/2" Screw Reed Switch Clamp Incline Rod Bushing Lift Arm 3/8" x 3/4" Bolt Hood Mount Lift Arm Spacer Reed Switch Console Clamp 3/8" x 1 3/4" Bolt Chest Pulse Strap 3/8" x 1 3/4" Incline Motor Bolt Chest Pulse Sensor Left Grip Right Grip Motor Belt 3/4" Tek Screw Lift Pivot Bolt Drive Motor Motor Bolt 1/4" Nut Electronic Bracket Front Cap Controller Incline Rod 3/8" Nut Lift Motor 3/8" x 2" Incline Motor Bolt Power Switch Platform Cushion Power Cord...
... Screw Handrail Cover Fastener Walking Platform Belt Guide #8 x 1/2" Belt Guide Screw Isolator 1/4" x 1 1/4" Bolt Drive Roller/Pulley Magnet #8 x 1/2" Screw Reed Switch Clamp Incline Rod Bushing Lift Arm 3/8" x 3/4" Bolt Hood Mount Lift Arm Spacer Reed Switch Console Clamp 3/8" x 1 3/4" Bolt Chest Pulse Strap 3/8" x 1 3/4" Incline Motor Bolt Chest Pulse Sensor Left Grip Right Grip Motor Belt 3/4" Tek Screw Lift Pivot Bolt Drive Motor Motor Bolt 1/4" Nut Electronic Bracket Front Cap Controller Incline Rod 3/8" Nut Lift Motor 3/8" x 2" Incline Motor Bolt Power Switch Platform Cushion Power Cord...
English Manual
Page 32
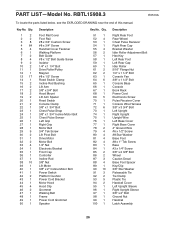
... the use and service conditions. ORDERING REPLACEMENT PARTS To order replacement parts, please see the PART LIST and the EXPLODED DRAWING near the end of this manual) LIMITED WARRANTY IMPORTANT: You must be free from the date of purchase. To help us assist you, be prepared to provide the following information when contacting us: • the model number and serial number of the product (see the front cover...
... the use and service conditions. ORDERING REPLACEMENT PARTS To order replacement parts, please see the PART LIST and the EXPLODED DRAWING near the end of this manual) LIMITED WARRANTY IMPORTANT: You must be free from the date of purchase. To help us assist you, be prepared to provide the following information when contacting us: • the model number and serial number of the product (see the front cover...


