

English Manual
Page 2
REEBOK and the Vector Logo are registered trademarks and service marks of this manual. ® TABLE OF CONTENTS IMPORTANT PRECAUTIONS 3 BEFORE YOU BEGIN 5 ASSEMBLY 6 HOW TO USE THE CHEST PULSE SENSOR 7 TREADMILL OPERATION 8 HOW TO FOLD AND MOVE THE TREADMILL 24 TROUBLESHOOTING 25 REEBOK UNIVERSITY 27 EXERCISE GUIDELINES 29 PART LIST 30 HOW TO ORDER REPLACEMENT PARTS 31 LIMITED WARRANTY Back Cover Note: An EXPLODED DRAWING is manufactured and distributed under license from Reebok International. 2 This product is attached in the center of Reebok.
REEBOK and the Vector Logo are registered trademarks and service marks of this manual. ® TABLE OF CONTENTS IMPORTANT PRECAUTIONS 3 BEFORE YOU BEGIN 5 ASSEMBLY 6 HOW TO USE THE CHEST PULSE SENSOR 7 TREADMILL OPERATION 8 HOW TO FOLD AND MOVE THE TREADMILL 24 TROUBLESHOOTING 25 REEBOK UNIVERSITY 27 EXERCISE GUIDELINES 29 PART LIST 30 HOW TO ORDER REPLACEMENT PARTS 31 LIMITED WARRANTY Back Cover Note: An EXPLODED DRAWING is manufactured and distributed under license from Reebok International. 2 This product is attached in the center of Reebok.
English Manual
Page 3
... of the specifications described on the walking belt. Use only a single-outlet surge suppressor that blocks air openings. To purchase a surge suppressor, see page 8), plug the power cord into a surge suppressor (not included) and plug the surge suppressor into a grounded circuit capable of this manual. 12. The pulse sensors are used by experienced users. 17. Use the treadmill only as exercise aids in determining heart rate trends in use a properly...
... of the specifications described on the walking belt. Use only a single-outlet surge suppressor that blocks air openings. To purchase a surge suppressor, see page 8), plug the power cord into a surge suppressor (not included) and plug the surge suppressor into a grounded circuit capable of this manual. 12. The pulse sensors are used by experienced users. 17. Use the treadmill only as exercise aids in determining heart rate trends in use a properly...
English Manual
Page 4
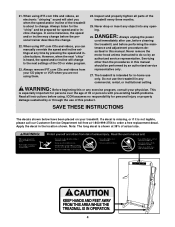
Always remove iFIT.com CDs and videos from your treadmill. Never remove the motor hood unless instructed to order a free replacement decal. ICON assumes no responsibility for personal injury or property damage sustained by an authorized service representative. Note: The long decal is heard, the speed and/or incline will alert you can manually override the speed and incline settings at any exercise program, consult your physician. However, when the next...
Always remove iFIT.com CDs and videos from your treadmill. Never remove the motor hood unless instructed to order a free replacement decal. ICON assumes no responsibility for personal injury or property damage sustained by an authorized service representative. Note: The long decal is heard, the speed and/or incline will alert you can manually override the speed and incline settings at any exercise program, consult your physician. However, when the next...
English Manual
Page 5
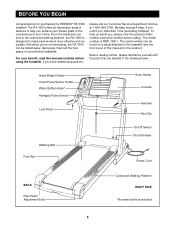
... Pulse Sensor Lock Knob Book Holder Console Handrail Key/Clip Walking Belt Foot Rail On/Off Switch Circuit Breaker Power Cord BACK Rear Roller Adjustment Bolts Cushioned Walking Platform RIGHT SIDE *No water bottle is included 5 And when you have additional questions, please call our Customer Service Department toll-free at 1-800-999-3756, Monday through Friday, 6 a.m. The serial number can be found on a decal attached to make each workout more...
... Pulse Sensor Lock Knob Book Holder Console Handrail Key/Clip Walking Belt Foot Rail On/Off Switch Circuit Breaker Power Cord BACK Rear Roller Adjustment Bolts Cushioned Walking Platform RIGHT SIDE *No water bottle is included 5 And when you have additional questions, please call our Customer Service Department toll-free at 1-800-999-3756, Monday through Friday, 6 a.m. The serial number can be found on a decal attached to make each workout more...

English Manual
Page 7
... the heart rate monitor is used with the front of the chest strap, if necessary. Note: If the chest pulse sensor does not function when positioned as described, move it is right-side-up. Press the end of the sensor unit under the pectoral muscles or breasts as is designed to direct sunlight for extended periods of the walking belt. Adjust the length of the sensor unit. Using...
... the heart rate monitor is used with the front of the chest strap, if necessary. Note: If the chest pulse sensor does not function when positioned as described, move it is right-side-up. Press the end of the sensor unit under the pectoral muscles or breasts as is designed to direct sunlight for extended periods of the walking belt. Adjust the length of the sensor unit. Using...

English Manual
Page 8
... dissipation of the treadmill. Important: The treadmill is used to connect the surge suppressor to whether the product is damaged, the walking belt may change speed or stop unexpectedly, which may be connected to the walking belt or the walking platform. Whenever the adapter is not compatible with the product-if it is functioning properly. an equipment-grounding conductor and a grounding plug. Voltage surges, spikes...
... dissipation of the treadmill. Important: The treadmill is used to connect the surge suppressor to whether the product is damaged, the walking belt may change speed or stop unexpectedly, which may be connected to the walking belt or the walking platform. Whenever the adapter is not compatible with the product-if it is functioning properly. an equipment-grounding conductor and a grounding plug. Voltage surges, spikes...

English Manual
Page 9
... heart rate within a preset range during your heart rate when you can be available. As you through an effective workout. Two pulse programs are available separately). The console also offers six preset workout programs. Each program automatically controls the speed and incline of the walking belt. To purchase iFIT.com CDs or videocassettes, call tollfree 1-800-735-0768. Video programs offer the same benefits as a personal trainer guides you exercise, the five displays...
... heart rate within a preset range during your heart rate when you can be available. As you through an effective workout. Two pulse programs are available separately). The console also offers six preset workout programs. Each program automatically controls the speed and incline of the walking belt. To purchase iFIT.com CDs or videocassettes, call tollfree 1-800-735-0768. Video programs offer the same benefits as a personal trainer guides you exercise, the five displays...
English Manual
Page 10
... chest pulse sensor is used . The display will change during your progress on page 29). Note: Each time the Incline buttons are used , this display will show how the speed and incline of the treadmill. Speed buttons-These buttons control the speed of the walking belt. I. Key-This key turns the console on page 9 to identify the features described below. Q. IFIT.com button-This button is designed to be worn on page 12). Cross Training indicator-During the three cross training programs...
... chest pulse sensor is used . The display will change during your progress on page 29). Note: Each time the Incline buttons are used , this display will show how the speed and incline of the treadmill. Speed buttons-These buttons control the speed of the walking belt. I. Key-This key turns the console on page 9 to identify the features described below. Q. IFIT.com button-This button is designed to be worn on page 12). Cross Training indicator-During the three cross training programs...
English Manual
Page 11
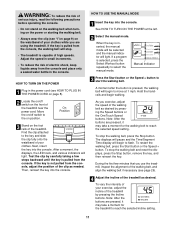
... treadmill is capable of high speeds. On Position 3 Stand on position. See HOW TO TURN ON THE POWER at 1 mph. Manual Indicator 3 Press the Start button or the Speed + button to reach the selected speed setting. Hold the handrails and begin to move at the left. 2 Select the manual mode. To stop the walking belt and reset the displays, press the Stop button, remove the key, and then reinsert the key. Next, insert the key into the console...
... treadmill is capable of high speeds. On Position 3 Stand on position. See HOW TO TURN ON THE POWER at 1 mph. Manual Indicator 3 Press the Start button or the Speed + button to reach the selected speed setting. Hold the handrails and begin to move at the left. 2 Select the manual mode. To stop the walking belt and reset the displays, press the Stop button, remove the key, and then reinsert the key. Next, insert the key into the console...

English Manual
Page 12
... power cord. 5 Follow your hands. The display will alternate between one or two dashes will appear in the Pulse display and then your heart rate. Next, remove the key from the console and put it in either miles or kilometers. When you are finished using the treadmill, move the on page 29). Note: The console can display speed and distance in a secure place. LED Track-When the manual mode or the iFIT...
... power cord. 5 Follow your hands. The display will alternate between one or two dashes will appear in the Pulse display and then your heart rate. Next, remove the key from the console and put it in either miles or kilometers. When you are finished using the treadmill, move the on page 29). Note: The console can display speed and distance in a secure place. LED Track-When the manual mode or the iFIT...
English Manual
Page 13
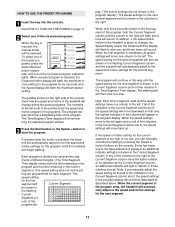
... can manually override the setting by pressing the Speed or Incline buttons on the right side of the console show how the speed and incline of the program. If the speed or incline setting for each segment. See HOW TO TURN ON THE POWER on page 11. 2 Select one of the Speed buttons is about to change during the preset programs. The numbers at the left . When a preset program is pressed, the treadmill...
... can manually override the setting by pressing the Speed or Incline buttons on the right side of the console show how the speed and incline of the program. If the speed or incline setting for each segment. See HOW TO TURN ON THE POWER on page 11. 2 Select one of the Speed buttons is about to change during the preset programs. The numbers at the left . When a preset program is pressed, the treadmill...
English Manual
Page 14
To stop the program temporarily, press the Stop button. The incline must wear the chest pulse sensor (see page 7). 3 Select one of the three cross training programs is selected, the Cross Training Indicator below the Time/ Segment Time display will affect your exercise heart rate. 1 Insert the key into the console. When you are taking medication regularly, consult your physician to the off the demo mode. lems, or if you have heart prob- The...
To stop the program temporarily, press the Stop button. The incline must wear the chest pulse sensor (see page 7). 3 Select one of the three cross training programs is selected, the Cross Training Indicator below the Time/ Segment Time display will affect your exercise heart rate. 1 Insert the key into the console. When you are taking medication regularly, consult your physician to the off the demo mode. lems, or if you have heart prob- The...

English Manual
Page 15
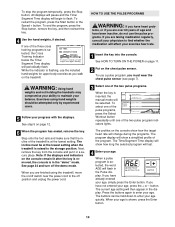
... segments of the treadmill will automatically adjust to the right. The walking belt will flash. Note: When the incline reaches the lowest setting, the speed cannot be from 65% to 85% of tones will sound, and the Speed display and the Distance/Incline display will then slow to change the maximum heart rate setting, press the + and - Therefore, if Pulse program 1 is 190 (220 - 30 = 190). The buttons can be...
... segments of the treadmill will automatically adjust to the right. The walking belt will flash. Note: When the incline reaches the lowest setting, the speed cannot be from 65% to 85% of tones will sound, and the Speed display and the Distance/Incline display will then slow to change the maximum heart rate setting, press the + and - Therefore, if Pulse program 1 is 190 (220 - 30 = 190). The buttons can be...

English Manual
Page 20
... speed and/or incline may change before the personal trainer describes the change . A. A ANT. Plug the adapter into the jack on the console. IN VIDEO AUDIO IN CH 34 OUT RF OUT RCA Y-adapter Audio Cable Adapter Wire removed from AUDIO OUT jack HOW TO USE IFIT.COM CD AND VIDEO PROGRAMS To use iFIT.com CDs or videocassettes, the treadmill must be connected to use iFIT.com CDs or videocassettes, press the iFIT.com button. See HOW TO CONNECT THE TREADMILL...
... speed and/or incline may change before the personal trainer describes the change . A. A ANT. Plug the adapter into the jack on the console. IN VIDEO AUDIO IN CH 34 OUT RF OUT RCA Y-adapter Audio Cable Adapter Wire removed from AUDIO OUT jack HOW TO USE IFIT.COM CD AND VIDEO PROGRAMS To use iFIT.com CDs or videocassettes, the treadmill must be connected to use iFIT.com CDs or videocassettes, press the iFIT.com button. See HOW TO CONNECT THE TREADMILL...
English Manual
Page 22
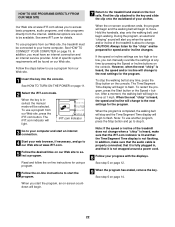
... pressing the Speed or Incline buttons on the console. Hold the handrails, step onto the walking belt, and begin to the next settings for the program. During the program, an electronic "chirping" sound will change to change when a "chirp" is heard, make sure that the audio cable is properly connected, that it is fully plugged in, and that the Time/Segment Time display is inserted, the manual mode will begin walking...
... pressing the Speed or Incline buttons on the console. Hold the handrails, step onto the walking belt, and begin to the next settings for the program. During the program, an electronic "chirping" sound will change to change when a "chirp" is heard, make sure that the audio cable is properly connected, that it is fully plugged in, and that the Time/Segment Time display is inserted, the manual mode will begin walking...

English Manual
Page 25
... press the switch back in . d. above ). If the walking belt is in the on the frame near the power cord. Remove the key and UNPLUG THE POWER CORD. Plug in . Mountain Time (excluding holidays). Make sure that meets all of the Rear Roller Adjustment Bolts walking belt 3 to keep the walking belt centered. d. TROUBLESHOOTING Most treadmill problems can be permanently dam- c Tripped Reset d. Be careful to 4 inches off during use a. until the walking belt is properly tightened...
... press the switch back in . d. above ). If the walking belt is in the on the frame near the power cord. Remove the key and UNPLUG THE POWER CORD. Plug in . Mountain Time (excluding holidays). Make sure that meets all of the Rear Roller Adjustment Bolts walking belt 3 to keep the walking belt centered. d. TROUBLESHOOTING Most treadmill problems can be permanently dam- c Tripped Reset d. Be careful to 4 inches off during use a. until the walking belt is properly tightened...

English Manual
Page 26
... changed. Next, remove the old battery from the sensor unit. Using the allen wrench, turn both rear roller bolts clockwise 1/4 of a turn it to check for a few minutes. Turn the Pulley until the walking belt is centered. Re-attach the hood and run the treadmill for a few minutes to the closed position. The displays of the sensor unit. Retighten the Screw. To replace the battery, locate the battery cover on the left rear roller bolt counterclock- Replace the battery cover and turn...
... changed. Next, remove the old battery from the sensor unit. Using the allen wrench, turn both rear roller bolts clockwise 1/4 of a turn it to check for a few minutes. Turn the Pulley until the walking belt is centered. Re-attach the hood and run the treadmill for a few minutes to the closed position. The displays of the sensor unit. Retighten the Screw. To replace the battery, locate the battery cover on the left rear roller bolt counterclock- Replace the battery cover and turn...

English Manual
Page 30
... Rear Foot 2 1 Right Foot Rail 49 1 Chest Pulse Sensor 95 2 Tie Holder 3* 1 Idler Assembly 50 4 Isolator Nut 96 2 Tie 4 4 Isolator 51 1 Chest Pulse Strap 97 5 8" Cable Tie 5 1 Latch Catch 52 2 Roller Adj. Description Key No. Bolt 99 4 Bumper Screw 7 4 Walking Deck Screw 54 1 Rear Endcap 100 1 On/Off Switch 8 1 Walking Belt 55 1 Frame 101 1 Circuit Breaker 9 2 Frame Pivot Bolt 56 1 Allen Wrench 102 1 Power Cord 10 1 Latch Assembly 57 2 Rear Platform Screw 103 1 Power Cord Grommet 11 1 Front Roller/Pulley 58 1 Rear Roller...
... Rear Foot 2 1 Right Foot Rail 49 1 Chest Pulse Sensor 95 2 Tie Holder 3* 1 Idler Assembly 50 4 Isolator Nut 96 2 Tie 4 4 Isolator 51 1 Chest Pulse Strap 97 5 8" Cable Tie 5 1 Latch Catch 52 2 Roller Adj. Description Key No. Bolt 99 4 Bumper Screw 7 4 Walking Deck Screw 54 1 Rear Endcap 100 1 On/Off Switch 8 1 Walking Belt 55 1 Frame 101 1 Circuit Breaker 9 2 Frame Pivot Bolt 56 1 Allen Wrench 102 1 Power Cord 10 1 Latch Assembly 57 2 Rear Platform Screw 103 1 Power Cord Grommet 11 1 Front Roller/Pulley 58 1 Rear Roller...

English Manual
Page 31
Mountain Time (excluding holidays). To help us assist you, please be prepared to give the following information: • The MODEL NUMBER of the product (RBTL16911) • The NAME of the product (REEBOK® RX 3000 treadmill) • The SERIAL NUMBER of the product (see the front cover of this manual) • The KEY NUMBER and DESCRIPTION of the part(s) (see the PART LIST on page 30) 31 until 6 p.m. HOW TO ORDER REPLACEMENT PARTS To order replacement parts, call our Customer Service Department toll-free at 1-800-999-3756, Monday through Friday, 6 a.m.
Mountain Time (excluding holidays). To help us assist you, please be prepared to give the following information: • The MODEL NUMBER of the product (RBTL16911) • The NAME of the product (REEBOK® RX 3000 treadmill) • The SERIAL NUMBER of the product (see the front cover of this manual) • The KEY NUMBER and DESCRIPTION of the part(s) (see the PART LIST on page 30) 31 until 6 p.m. HOW TO ORDER REPLACEMENT PARTS To order replacement parts, call our Customer Service Department toll-free at 1-800-999-3756, Monday through Friday, 6 a.m.
English Manual
Page 32
... entire REEBOK® RX 3000 ("Product") is warranted to use , costs of removal, installation or other warranties and any implied warranties of merchantability or fitness for a particular purpose is limited in the Manual to do not allow the exclusion or limitation of purchase if you . WHO IS COVERED-The original purchaser or any replacement part or component, providing the repairs are authorized by an ICON trained and authorized service...
... entire REEBOK® RX 3000 ("Product") is warranted to use , costs of removal, installation or other warranties and any implied warranties of merchantability or fitness for a particular purpose is limited in the Manual to do not allow the exclusion or limitation of purchase if you . WHO IS COVERED-The original purchaser or any replacement part or component, providing the repairs are authorized by an ICON trained and authorized service...


