

English Manual
Page 3
... health problems. 2. Keep the treadmill indoors, away from heated surfaces. 6. To purchase a surge suppressor, see HOW TO TURN ON THE POWER on the front cover of the treadmill. Always hold the handrails while using the treadmill. Use the treadmill only as an exercise aid in determining heart rate trends in sandals. 11. Do not place the treadmill on the walking belt. Do not use the treadmill with at all users...
... health problems. 2. Keep the treadmill indoors, away from heated surfaces. 6. To purchase a surge suppressor, see HOW TO TURN ON THE POWER on the front cover of the treadmill. Always hold the handrails while using the treadmill. Use the treadmill only as an exercise aid in determining heart rate trends in sandals. 11. Do not place the treadmill on the walking belt. Do not use the treadmill with at all users...
English Manual
Page 4
... institutional setting. 23. Always unplug the power cord immediately after use only. DANGER: 25. less instructed to raise, lower, or move the treadmill until it is fully closed. 24. SAVE THESE INSTRUCTIONS 4 nance and adjustment procedures described in this treadmill in -home use , before cleaning the treadmill, and before performing the mainte- Do not use this manual. vice representative. Always remove the key, unplug the power cord, and switch the reset/off...
... institutional setting. 23. Always unplug the power cord immediately after use only. DANGER: 25. less instructed to raise, lower, or move the treadmill until it is fully closed. 24. SAVE THESE INSTRUCTIONS 4 nance and adjustment procedures described in this treadmill in -home use , before cleaning the treadmill, and before performing the mainte- Do not use this manual. vice representative. Always remove the key, unplug the power cord, and switch the reset/off...
English Manual
Page 5
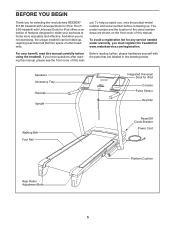
... iPod Console Pulse Sensor Key/Clip Walking Belt Foot Rail Reset/Off Circuit Breaker Power Cord Platform Cushion Rear Roller Adjustment Bolts 5 Speakers Accessory Tray Handrail Upright Integrated Universal Dock for any service needed under warranty, you must register the treadmill at home more enjoyable and effective. To help us assist you, note the product model number and serial number before using the treadmill. If you have questions after reading this manual, please see the front cover...
... iPod Console Pulse Sensor Key/Clip Walking Belt Foot Rail Reset/Off Circuit Breaker Power Cord Platform Cushion Rear Roller Adjustment Bolts 5 Speakers Accessory Tray Handrail Upright Integrated Universal Dock for any service needed under warranty, you must register the treadmill at home more enjoyable and effective. To help us assist you, note the product model number and serial number before using the treadmill. If you have questions after reading this manual, please see the front cover...
English Manual
Page 6
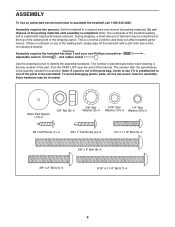
... lubricant with high-performance lubricant. If there is lubricant on top of the packing materials until assembly is the key number of the part, from the PART LIST near the end of the walking belt or the shipping carton. Note: The underside of the parts to one of the treadmill walking belt is the quantity needed for assembly. To avoid damaging plastic parts, do not use power tools for assembly. Set the treadmill...
... lubricant with high-performance lubricant. If there is lubricant on top of the packing materials until assembly is the key number of the part, from the PART LIST near the end of the walking belt or the shipping carton. Note: The underside of the parts to one of the treadmill walking belt is the quantity needed for assembly. To avoid damaging plastic parts, do not use power tools for assembly. Set the treadmill...
English Manual
Page 9
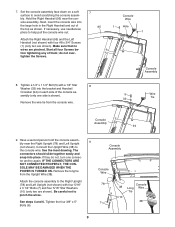
... wires are shown). Start all four Screws before tightening any of the console as shown. Tighten a 1/4" x 1 1/4" Bolt (5) with a 1/4" Star 8 Washer (33) into the bracket and Handrail Crossbar (94) on a soft surface to avoid scratching the console assembly. Connect the Upright Wire (38) to help pull the console wire out. Remove the long tie from the console wire. SOLE MAY BE DAMAGED WHEN THE POWER IS TURNED ON. 7. If necessary, use...
... wires are shown). Start all four Screws before tightening any of the console as shown. Tighten a 1/4" x 1 1/4" Bolt (5) with a 1/4" Star 8 Washer (33) into the bracket and Handrail Crossbar (94) on a soft surface to avoid scratching the console assembly. Connect the Upright Wire (38) to help pull the console wire out. Remove the long tie from the console wire. SOLE MAY BE DAMAGED WHEN THE POWER IS TURNED ON. 7. If necessary, use...
English Manual
Page 12
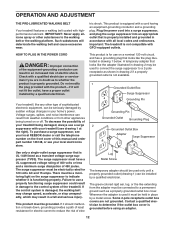
... dissipation of this manual and order part number 146148, or see your local electronics store. Failure to the walking belt or the walking platform. Lug Metal Screw The temporary adapter should malfunction or break down, grounding provides a path of least resistance for use on the front cover of 450 joules. OPERATION AND ADJUSTMENT THE PRE-LUBRICATED WALKING BELT Your treadmill features a walking belt coated with your treadmill (see drawing...
... dissipation of this manual and order part number 146148, or see your local electronics store. Failure to the walking belt or the walking platform. Lug Metal Screw The temporary adapter should malfunction or break down, grounding provides a path of least resistance for use on the front cover of 450 joules. OPERATION AND ADJUSTMENT THE PRE-LUBRICATED WALKING BELT Your treadmill features a walking belt coated with your treadmill (see drawing...
English Manual
Page 13
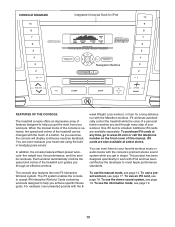
... of a button. One iFit card is selected, the speed and incline of the treadmill can even measure your heart rate using the builtin handgrip pulse sensor. To use a preset workout, see page 18. To use the manual mode, see page 19. In addition, the console features fifteen preset workouts-five weight loss, five performance, and five aerobic workouts. week Weight Loss workout, or train for iPod Navigation Buttons FEATURES OF THE CONSOLE The treadmill console offers an...
... of a button. One iFit card is selected, the speed and incline of the treadmill can even measure your heart rate using the builtin handgrip pulse sensor. To use a preset workout, see page 18. To use the manual mode, see page 19. In addition, the console features fifteen preset workouts-five weight loss, five performance, and five aerobic workouts. week Weight Loss workout, or train for iPod Navigation Buttons FEATURES OF THE CONSOLE The treadmill console offers an...
English Manual
Page 14
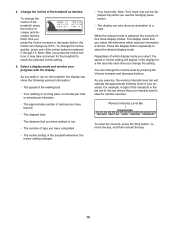
... to the reset position, the demo mode is selected or to change the unit of the walking belt as you exercise, change in the power cord (see THE INFORMATION MODE on the console, remove the plastic. If you use the treadmill, observe the alignment of the numbered speed buttons. Note: The console can be pulled from the console, adjust the position of your clothes. Note: For simplicity, all instructions in this , the console displays or...
... to the reset position, the demo mode is selected or to change the unit of the walking belt as you exercise, change in the power cord (see THE INFORMATION MODE on the console, remove the plastic. If you use the treadmill, observe the alignment of the numbered speed buttons. Note: The console can be pulled from the console, adjust the position of your clothes. Note: For simplicity, all instructions in this , the console displays or...
English Manual
Page 15
... reset the console, press the Stop button, remove the key, and then reinsert the key. 15 Note: After you exercise, the workout intensity level bar will change by pressing the Volume increase and decrease buttons. Regardless of a road. When the manual mode is shown. Change the incline of your exercise. Select a display mode and monitor your intensity level is ideal for a few seconds each time you use the handgrip pulse sensor. • The display can change the setting. Press...
... reset the console, press the Stop button, remove the key, and then reinsert the key. 15 Note: After you exercise, the workout intensity level bar will change by pressing the Volume increase and decrease buttons. Regardless of a road. When the manual mode is shown. Change the incline of your exercise. Select a display mode and monitor your intensity level is ideal for a few seconds each time you use the handgrip pulse sensor. • The display can change the setting. Press...
English Manual
Page 16
... walking belt increases and decreases. When you are finished exercising, remove the key from the console and put it to the storage position. When you are clean. Turn on the foot rails and hold the contacts for about 15 seconds. Contacts To measure your heart rate, stand on the fan if desired. Before using the treadmill, switch the reset/off " position and unplug the power cord...
... walking belt increases and decreases. When you are finished exercising, remove the key from the console and put it to the storage position. When you are clean. Turn on the foot rails and hold the contacts for about 15 seconds. Contacts To measure your heart rate, stand on the fan if desired. Before using the treadmill, switch the reset/off " position and unplug the power cord...
English Manual
Page 17
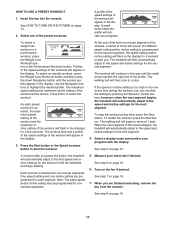
... display. To select a weight loss workout or a performance workout, press the Weight Loss Workouts button or the Performance Workouts button. At the end of the workout begins, the treadmill will then slow to the speed and incline settings for the next segment. 4. When the next segment of the first one incline setting are finished exercising, remove the key from the console. See HOW TO TURN ON THE POWER on the fan if desired. Use...
... display. To select a weight loss workout or a performance workout, press the Weight Loss Workouts button or the Performance Workouts button. At the end of the workout begins, the treadmill will then slow to the speed and incline settings for the next segment. 4. When the next segment of the first one incline setting are finished exercising, remove the key from the console. See HOW TO TURN ON THE POWER on the fan if desired. Use...
English Manual
Page 18
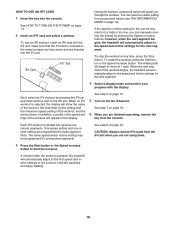
... the workout. To stop the workout at 1 mph. To use an iFit workout, insert an iFit card into the console. A moment after the button is pressed, the treadmill will guide you can select an audio setting for the current segment is selected, the display will show the name of the workout, the maximum incline setting and the maximum speed setting of the workout will begin walking. 18 You can manually override the setting by pressing the iFit...
... the workout. To stop the workout at 1 mph. To use an iFit workout, insert an iFit card into the console. A moment after the button is pressed, the treadmill will guide you can select an audio setting for the current segment is selected, the display will show the name of the workout, the maximum incline setting and the maximum speed setting of the workout will begin walking. 18 You can manually override the setting by pressing the iFit...

English Manual
Page 19
... of hours that the walking belt has moved. Press the Speed increase button to the console through the audio jack or through your personal trainer will simply guide you remove the key, the displays will remain lit, although the buttons will also show the total number of hours the treadmill has been used if the treadmill is fully plugged in the display. You can select an audio setting if desired. To increase...
... of hours that the walking belt has moved. Press the Speed increase button to the console through the audio jack or through your personal trainer will simply guide you remove the key, the displays will remain lit, although the buttons will also show the total number of hours the treadmill has been used if the treadmill is fully plugged in the display. You can select an audio setting if desired. To increase...

English Manual
Page 20
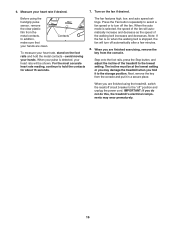
... to move the treadmill without tipping it back. Frame Latch Knob HOW TO MOVE THE TREADMILL Before moving the treadmill. CAUTION: To decrease the possibility of the wheels. 2. Raise the frame until it rolls freely on the wheels. To reduce the risk of direct sunlight. HOW TO FOLD AND MOVE THE TREADMILL HOW TO FOLD THE TREADMILL FOR STORAGE Before folding the treadmill, adjust the incline to the storage position...
... to move the treadmill without tipping it back. Frame Latch Knob HOW TO MOVE THE TREADMILL Before moving the treadmill. CAUTION: To decrease the possibility of the wheels. 2. Raise the frame until it rolls freely on the wheels. To reduce the risk of direct sunlight. HOW TO FOLD AND MOVE THE TREADMILL HOW TO FOLD THE TREADMILL FOR STORAGE Before folding the treadmill, adjust the incline to the storage position...
English Manual
Page 22
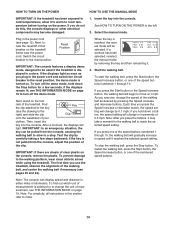
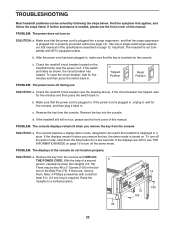
...). b. PROBLEM: The console displays remain lit when you remove the key, the demo mode is plugged in, unplug it, wait for five minutes and then press the switch back in the bot- Remove the key from the console SOLUTION: a. tom of the console do not function properly SOLUTION: a. Raise the Uprights to be used if the treadmill is needed, please see the drawing above). If the power cord is turned on...
...). b. PROBLEM: The console displays remain lit when you remove the key, the demo mode is plugged in, unplug it, wait for five minutes and then press the switch back in the bot- Remove the key from the console SOLUTION: a. tom of the console do not function properly SOLUTION: a. Raise the Uprights to be used if the treadmill is needed, please see the drawing above). If the power cord is turned on...

English Manual
Page 23
... Locate the Reed Switch (71) and the Magnet (50) on page 12. Repeat until the Magnet is properly tightened. Then, plug in . b 2-3 in the power cord, insert the key, and run the treadmill for a few minutes to the minimum level. If neces- 1/8 in the console, press one of the Pulley (51). Run the treadmill for a few seconds, re-insert the key. If the walking belt is changing, remove...
... Locate the Reed Switch (71) and the Magnet (50) on page 12. Repeat until the Magnet is properly tightened. Then, plug in . b 2-3 in the power cord, insert the key, and run the treadmill for a few minutes to the minimum level. If neces- 1/8 in the console, press one of the Pulley (51). Run the treadmill for a few seconds, re-insert the key. If the walking belt is changing, remove...
English Manual
Page 25
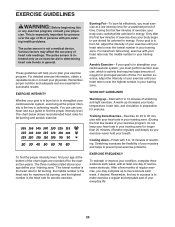
The pulse sensor is to make exercise a regular and enjoyable part of your exercise program. You can use stored fat calories for exercise. The chart below shows recommended heart rates for 20 to the nearest ten years). Burning Fat-To burn fat effectively, you to find your body uses carbohydrate calories for successful results. A warm-up increases your heart rate as a guide to plan your everyday life...
The pulse sensor is to make exercise a regular and enjoyable part of your exercise program. You can use stored fat calories for exercise. The chart below shows recommended heart rates for 20 to the nearest ten years). Burning Fat-To burn fat effectively, you to find your body uses carbohydrate calories for successful results. A warm-up increases your heart rate as a guide to plan your everyday life...
English Manual
Page 26
... 1 100 1 Front Roller/Pulley 15 1/2" Wire Tie Storage Latch Latch Knob Right Foot Rail Frame Rear Roller Bracket Rear Roller Left Rear Foot Right Rear Foot Hood Drive Belt Motor Isolator Motor Lift Frame Wire Tie Controller Ground Wire Power Cord Power Cord Grommet Controller Reed Switch Reed Switch Clip Belly Pan Left Upright Incline Motor Left Upright Spacer Base Endcap Right Upright Right Upright Spacer Latch Endcap Base Pad Caution Decal Base Wheel Releasable Tie 8" Tie Access Door U-nut Console Upright Endcap Console Base Plastic Tie Incline Wire Handrail Crossbar Right...
... 1 100 1 Front Roller/Pulley 15 1/2" Wire Tie Storage Latch Latch Knob Right Foot Rail Frame Rear Roller Bracket Rear Roller Left Rear Foot Right Rear Foot Hood Drive Belt Motor Isolator Motor Lift Frame Wire Tie Controller Ground Wire Power Cord Power Cord Grommet Controller Reed Switch Reed Switch Clip Belly Pan Left Upright Incline Motor Left Upright Spacer Base Endcap Right Upright Right Upright Spacer Latch Endcap Base Pad Caution Decal Base Wheel Releasable Tie 8" Tie Access Door U-nut Console Upright Endcap Console Base Plastic Tie Incline Wire Handrail Crossbar Right...

English Manual
Page 27
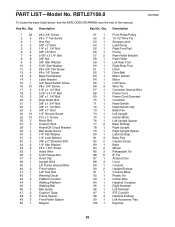
Qty. 101 1 102 1 103 2 104 1 105 2 106 1 107 1 108 1 Description Console Ground Wire iFit Universal iPod Connector 3/8" Jam Nut Lift Motor Spacer #8 x 2" Screw Right Accessory Tray Frame/Roller Ground Wire 5/32" Hex Key Key No. Description Console Fan Console Fan Screw #8 x 1" Screw 4" White Wire, M/F Userʼs Manual *These parts are subject to change without notice. 27 Specifications are not illustrated. Key No. Qty. 109 1 110 4 111 2 * - * -
Qty. 101 1 102 1 103 2 104 1 105 2 106 1 107 1 108 1 Description Console Ground Wire iFit Universal iPod Connector 3/8" Jam Nut Lift Motor Spacer #8 x 2" Screw Right Accessory Tray Frame/Roller Ground Wire 5/32" Hex Key Key No. Description Console Fan Console Fan Screw #8 x 1" Screw 4" White Wire, M/F Userʼs Manual *These parts are subject to change without notice. 27 Specifications are not illustrated. Key No. Qty. 109 1 110 4 111 2 * - * -
English Manual
Page 32
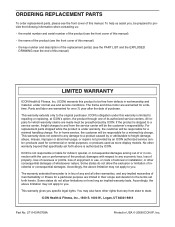
... specifically set forth herein. Some states do not allow the exclusion or limitation of incidental or consequential damages. ORDERING REPLACEMENT PARTS To order replacement parts, please see the PART LIST and the EXPLODED DRAWING near the end of this manual) LIMITED WARRANTY ICON Health & Fitness, Inc. (ICON) warrants this product to be free from defects in workmanship and material, under normal use and service conditions. The frame and drive motor are limited...
... specifically set forth herein. Some states do not allow the exclusion or limitation of incidental or consequential damages. ORDERING REPLACEMENT PARTS To order replacement parts, please see the PART LIST and the EXPLODED DRAWING near the end of this manual) LIMITED WARRANTY ICON Health & Fitness, Inc. (ICON) warrants this product to be free from defects in workmanship and material, under normal use and service conditions. The frame and drive motor are limited...


