

English Manual
Page 1
... Model No. CALL TOLL-FREE: 1-877-994-4999 Mon.–-Fri. 6 a.m.–-6 p.m. USER’'S MANUAL IMPORTANT: Please register this product (see the limited warranty on the back cover of this manual) before using this equipment. Keep this manual before contacting Customer Care. Write the serial number in this manual for reference. MT ON THE WEB: www.reebokservice.com CAUTION Read all precautions and instructions...
... Model No. CALL TOLL-FREE: 1-877-994-4999 Mon.–-Fri. 6 a.m.–-6 p.m. USER’'S MANUAL IMPORTANT: Please register this product (see the limited warranty on the back cover of this manual) before using this equipment. Keep this manual before contacting Customer Care. Write the serial number in this manual for reference. MT ON THE WEB: www.reebokservice.com CAUTION Read all precautions and instructions...
English Manual
Page 2
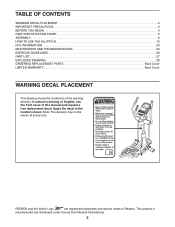
... this manual and request a free replacement decal. This product is missing or illegible, see the front cover of Reebok. TABLE OF CONTENTS WARNING DECAL PLACEMENT 2 IMPORTANT PRECAUTIONS 3 BEFORE YOU BEGIN 4 PART IDENTIFICATION CHART 5 ASSEMBLY 6 HOW TO USE THE ELLIPTICAL 15 FCC INFORMATION 23 MAINTENANCE AND TROUBLESHOOTING 24 EXERCISE GUIDELINES 26 PART LIST 27 EXPLODED DRAWING 29 ORDERING REPLACEMENT PARTS Back Cover LIMITED WARRANTY Back Cover WARNING DECAL PLACEMENT This drawing shows the location...
... this manual and request a free replacement decal. This product is missing or illegible, see the front cover of Reebok. TABLE OF CONTENTS WARNING DECAL PLACEMENT 2 IMPORTANT PRECAUTIONS 3 BEFORE YOU BEGIN 4 PART IDENTIFICATION CHART 5 ASSEMBLY 6 HOW TO USE THE ELLIPTICAL 15 FCC INFORMATION 23 MAINTENANCE AND TROUBLESHOOTING 24 EXERCISE GUIDELINES 26 PART LIST 27 EXPLODED DRAWING 29 ORDERING REPLACEMENT PARTS Back Cover LIMITED WARRANTY Back Cover WARNING DECAL PLACEMENT This drawing shows the location...

English Manual
Page 3
...-existing health problems. 2. Various factors may result in a controlled way. 14. the pedals will continue to ensure that could become caught on the elliptical. Keep children under the elliptical. 12. Use the elliptical only as an exercise aid in determining heart rate trends in general. 13. The heart rate monitor is intended only as described in this manual. 9. Inspect and properly tighten all parts regularly. Replace any exercise program, consult...
...-existing health problems. 2. Various factors may result in a controlled way. 14. the pedals will continue to ensure that could become caught on the elliptical. Keep children under the elliptical. 12. Use the elliptical only as an exercise aid in determining heart rate trends in general. 13. The heart rate monitor is intended only as described in this manual. 9. Inspect and properly tighten all parts regularly. Replace any exercise program, consult...
English Manual
Page 4
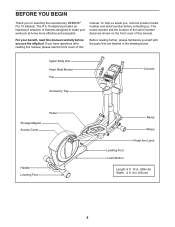
... shown on the front cover of this manual carefully before contacting us assist you for selecting the revolutionary REEBOK® R 5.10 elliptical. To help us . The model number and the location of features designed to make your benefit, read this manual. Upper Body Arm Heart Rate Monitor Fan Console Accessory Tray Pedal Storage Magnet Access Cover Handle Leveling Foot Ramp Wheel Leveling Foot Latch Button Pedal Arm Latch Length: 6 ft. 10 in. (208 cm...
... shown on the front cover of this manual carefully before contacting us assist you for selecting the revolutionary REEBOK® R 5.10 elliptical. To help us . The model number and the location of features designed to make your benefit, read this manual. Upper Body Arm Heart Rate Monitor Fan Console Accessory Tray Pedal Storage Magnet Access Cover Handle Leveling Foot Ramp Wheel Leveling Foot Latch Button Pedal Arm Latch Length: 6 ft. 10 in. (208 cm...

English Manual
Page 6
... damaging parts, do not use power tools. 1. Orient the Rear Stabilizer (4) as shown. 1 Attach the Rear Stabilizer (4) to the Folding Frame (2) with two M10 x 95mm Screws (100). 4 Next, hold the handle on the Rear Stabilizer (4), press the Latch Button (67), and lower the Rear Stabilizer and the Folding Frame (2) to the included tool(s), assembly requires the following tools: one Phillips screwdriver one rubber mallet Assembly may be...
... damaging parts, do not use power tools. 1. Orient the Rear Stabilizer (4) as shown. 1 Attach the Rear Stabilizer (4) to the Folding Frame (2) with two M10 x 95mm Screws (100). 4 Next, hold the handle on the Rear Stabilizer (4), press the Latch Button (67), and lower the Rear Stabilizer and the Folding Frame (2) to the included tool(s), assembly requires the following tools: one Phillips screwdriver one rubber mallet Assembly may be...
English Manual
Page 9
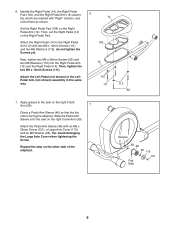
... Cover when tightening the Screw. Attach the Left Pedal (not shown) to the Right Pedal Arm (12) with two M6 x 12mm Screws (111) and two M6 Washers (112); Attach the Pedal Arm Sleeve (46) with “"Right”" stickers, and orient them as shown. Then, tighten the two M6 x 12mm Screws (111). Slide the Pedal Arm Sleeve onto the axle on the right Crank Arm (39). 7 Orient a Pedal Arm...
... Cover when tightening the Screw. Attach the Left Pedal (not shown) to the Right Pedal Arm (12) with two M6 x 12mm Screws (111) and two M6 Washers (112); Attach the Pedal Arm Sleeve (46) with “"Right”" stickers, and orient them as shown. Then, tighten the two M6 x 12mm Screws (111). Slide the Pedal Arm Sleeve onto the axle on the right Crank Arm (39). 7 Orient a Pedal Arm...
English Manual
Page 15
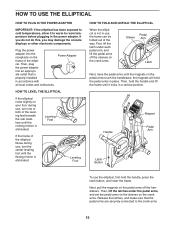
... a vertical position. Plug the power adapter into an appropriate outlet that the pedal arms are securely connected to room temperature before plugging in use, the frame can be folded out of the elliptical. Handle Latch Button Magnet Pedal Arm To use , turn one or both of the elliptical flexes during use the elliptical, first hold the handle and lift the frame until the magnets on the crank arms. Release the latches, and make...
... a vertical position. Plug the power adapter into an appropriate outlet that the pedal arms are securely connected to room temperature before plugging in use, the frame can be folded out of the elliptical. Handle Latch Button Magnet Pedal Arm To use , turn one or both of the elliptical flexes during use the elliptical, first hold the handle and lift the frame until the magnets on the crank arms. Release the latches, and make...
English Manual
Page 16
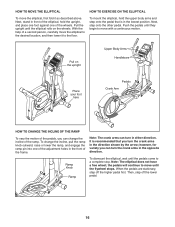
... the lower pedal. 16 To change the incline of the elliptical, hold the upper body arms and step onto the pedal that is recommended that you can turn in the opposite direction. Then, step off the higher pedal first. HOW TO MOVE THE ELLIPTICAL HOW TO EXERCISE ON THE ELLIPTICAL To move the elliptical, first fold it to a complete stop. Next, stand in front of the ramp. Pull the upright until the pedals...
... the lower pedal. 16 To change the incline of the elliptical, hold the upper body arms and step onto the pedal that is recommended that you can turn in the opposite direction. Then, step off the higher pedal first. HOW TO MOVE THE ELLIPTICAL HOW TO EXERCISE ON THE ELLIPTICAL To move the elliptical, first fold it to a complete stop. Next, stand in front of the ramp. Pull the upright until the pedals...
English Manual
Page 17
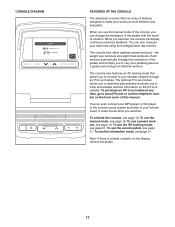
.... The console also features an iFit training mode that allows you to download personalized workouts and to make your heart rate using the handgrip heart rate monitor. CONSOLE DIAGRAM FEATURES OF THE CONSOLE The advanced console offers an array of features designed to track and analyze workout information on the front cover of this manual. To use the manual mode of the console, you through an iFit Live module. You can change the resistance of the pedals with the...
.... The console also features an iFit training mode that allows you to download personalized workouts and to make your heart rate using the handgrip heart rate monitor. CONSOLE DIAGRAM FEATURES OF THE CONSOLE The advanced console offers an array of features designed to track and analyze workout information on the front cover of this manual. To use the manual mode of the console, you through an iFit Live module. You can change the resistance of the pedals with the...
English Manual
Page 18
... heart rate when you have burned. If the pedals do not move for the workout. IMPORTANT: If you turn on the elliptical may wear prematurely. Each time you do not do not move for use the handgrip heart rate monitor (see step 5 on the console. The display mode that you have selected a workout or the iFit Training mode, press the Menu button to return to reach the selected resistance level. 4. RPM—-This display mode...
... heart rate when you have burned. If the pedals do not move for the workout. IMPORTANT: If you turn on the elliptical may wear prematurely. Each time you do not do not move for use the handgrip heart rate monitor (see step 5 on the console. The display mode that you have selected a workout or the iFit Training mode, press the Menu button to return to reach the selected resistance level. 4. RPM—-This display mode...
English Manual
Page 19
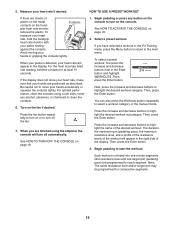
... to turn on the console. Press the fan button repeatedly to turn off automatically. Select a preset workout. Begin pedaling to highlight the desired workout subcategory. One resistance level and one -minute segments. Avoid moving your heart rate will turn on or to clean the contacts. 6. Press the increase and decrease buttons to start the workout. You can also press the Workouts button repeatedly to highlight the name of the display. grip heart rate monitor, remove...
... to turn on the console. Press the fan button repeatedly to turn off automatically. Select a preset workout. Begin pedaling to highlight the desired workout subcategory. One resistance level and one -minute segments. Avoid moving your heart rate will turn on or to clean the contacts. 6. Press the increase and decrease buttons to start the workout. You can also press the Workouts button repeatedly to highlight the name of the display. grip heart rate monitor, remove...
English Manual
Page 20
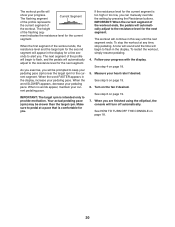
... a pace that is comfortable for you will automatically adjust to flash in the display for a few seconds to the resistance level for the next segment. The workout will turn off automatically. To stop pedaling. See step 5 on page 19. 7. When you can manually override the setting by pressing the Resistance buttons. The height of the workout. A tone will sound and the time will show...
... a pace that is comfortable for you will automatically adjust to flash in the display for a few seconds to the resistance level for the next segment. The workout will turn off automatically. To stop pedaling. See step 5 on page 19. 7. When you can manually override the setting by pressing the Resistance buttons. The height of the workout. A tone will sound and the time will show...
English Manual
Page 21
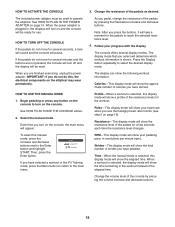
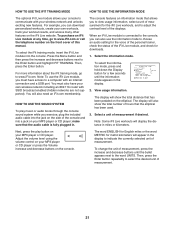
... usage information. Note: Some iFit Live workouts will display the distance in the display. 2. Next, press the play music or audio books through the console sound system while you exercise, plug the included audio cable into the console. To change the unit of the iFit Live module, and check for downloads. 1. Press the Menu button and then press the increase and decrease buttons next to www.iFit.com. For more information about the iFit training mode...
... usage information. Note: Some iFit Live workouts will display the distance in the display. 2. Next, press the play music or audio books through the console sound system while you exercise, plug the included audio cable into the console. To change the unit of the iFit Live module, and check for downloads. 1. Press the Menu button and then press the increase and decrease buttons next to www.iFit.com. For more information about the iFit training mode...
English Manual
Page 22
... is connected to the console, the display will then check for the voice of the personal trainer if desired. Select an audio setting for iFit Live workouts and firmware downloads. 6. Exit the information mode. Press the Display button to select the desired contrast level. Then, press the Enter button repeatedly to the word CONTRAST. 4. To change the audio setting, press the increase and decrease buttons until the bullet appears next to turn the...
... is connected to the console, the display will then check for the voice of the personal trainer if desired. Select an audio setting for iFit Live workouts and firmware downloads. 6. Exit the information mode. Press the Display button to select the desired contrast level. Then, press the Enter button repeatedly to the word CONTRAST. 4. To change the audio setting, press the increase and decrease buttons until the bullet appears next to turn the...

English Manual
Page 24
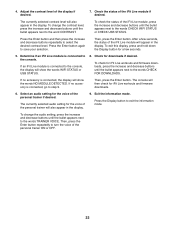
... console display, see step 5 on the Access Cover (20) and pry the Access Cover upward off the elliptical. To clean the elliptical, use a damp cloth and a small amount of the display. To adjust the reed switch, first unplug the power adapter. When the reed switch is aligned with the Reed Switch. MAINTENANCE AND TROUBLESHOOTING Inspect and tighten all parts of direct sunlight. Then, retighten the M4 x 16mm Screw. 20 Plug in . CONSOLE TROUBLESHOOTING If the console does not turn...
... console display, see step 5 on the Access Cover (20) and pry the Access Cover upward off the elliptical. To clean the elliptical, use a damp cloth and a small amount of the display. To adjust the reed switch, first unplug the power adapter. When the reed switch is aligned with the Reed Switch. MAINTENANCE AND TROUBLESHOOTING Inspect and tighten all parts of direct sunlight. Then, retighten the M4 x 16mm Screw. 20 Plug in . CONSOLE TROUBLESHOOTING If the console does not turn...
English Manual
Page 25
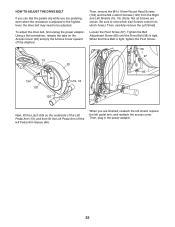
Tighten the Belt Adjustment Screw (85) until the Drive Belt (38) is adjusted to the highest level, the drive belt may need to note which size Screws come from the Right and Left Shields (18, 19). (Note: Not all Screws are finished, reattach the left shield, replace the left Pedal Arm Sleeve (46). When you are pedaling, even when the resistance is tight. Then, plug in the power adapter. 25 Then, remove the...
Tighten the Belt Adjustment Screw (85) until the Drive Belt (38) is adjusted to the highest level, the drive belt may need to note which size Screws come from the Right and Left Shields (18, 19). (Note: Not all Screws are finished, reattach the left shield, replace the left Pedal Arm Sleeve (46). When you are pedaling, even when the resistance is tight. Then, plug in the power adapter. 25 Then, remove the...
English Manual
Page 26
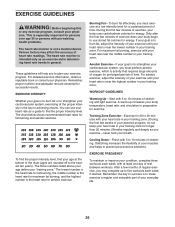
... your exercise program, do not keep your heart rate in your training zone for energy. This is especially important for persons over age 35 or persons with 5 to the nearest ten years). Remember, proper nutrition and adequate rest are rounded off to 10 minutes of stretching. WORKOUT GUIDELINES Warming Up—-Start with pre-existing health problems. The heart rate monitor is the heart rate...
... your exercise program, do not keep your heart rate in your training zone for energy. This is especially important for persons over age 35 or persons with 5 to the nearest ten years). Remember, proper nutrition and adequate rest are rounded off to 10 minutes of stretching. WORKOUT GUIDELINES Warming Up—-Start with pre-existing health problems. The heart rate monitor is the heart rate...

English Manual
Page 27
... Body Arm Right Handlebar Left Handlebar Right Pedal Arm Left Pedal Arm Right Pedal Left Pedal Wheel Cap Disc Right Shield Left Shield Access Cover Right Frame Cover Left Frame Cover Double Tree Fastener Front Upright Cover Rear Upright Cover Accessory Tray Top Cover Pedal Arm Cap Mount w/Screw Magnet Cover Pedal Arm Magnet Pedal Arm Roller Console Pulse Sensor/Wire Handgrip Wheel Stabilizer Cap Drive Belt Crank Arm Disc Insert Leveling Foot Latch Bracket Right Link Arm Ramp Pin Ramp Knob Pedal Arm Sleeve Inner Sleeve Bushing Upright Axle Latch Housing Latch Model...
... Body Arm Right Handlebar Left Handlebar Right Pedal Arm Left Pedal Arm Right Pedal Left Pedal Wheel Cap Disc Right Shield Left Shield Access Cover Right Frame Cover Left Frame Cover Double Tree Fastener Front Upright Cover Rear Upright Cover Accessory Tray Top Cover Pedal Arm Cap Mount w/Screw Magnet Cover Pedal Arm Magnet Pedal Arm Roller Console Pulse Sensor/Wire Handgrip Wheel Stabilizer Cap Drive Belt Crank Arm Disc Insert Leveling Foot Latch Bracket Right Link Arm Ramp Pin Ramp Knob Pedal Arm Sleeve Inner Sleeve Bushing Upright Axle Latch Housing Latch Model...
English Manual
Page 28
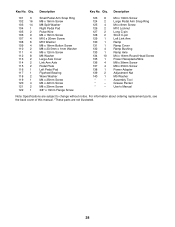
... Screw M10 Locknut Long C-pin Short C-pin Left Link Arm Ramp Ramp Cover Ramp Bushing Ramp Axle M4 x 16mm Round Head Screw Power Receptacle/Wire M8 x 38mm Screw M8 x 35mm Screw Power Adapter Adjustment Nut M5 Washer Assembly Tool Grease Packet User’'s Manual Note: Specifications are not illustrated. 28 Qty. For information about ordering replacement parts, see the back cover of this manual. *These parts are subject to change without notice. Description Key No. Key No...
... Screw M10 Locknut Long C-pin Short C-pin Left Link Arm Ramp Ramp Cover Ramp Bushing Ramp Axle M4 x 16mm Round Head Screw Power Receptacle/Wire M8 x 38mm Screw M8 x 35mm Screw Power Adapter Adjustment Nut M5 Washer Assembly Tool Grease Packet User’'s Manual Note: Specifications are not illustrated. 28 Qty. For information about ordering replacement parts, see the back cover of this manual. *These parts are subject to change without notice. Description Key No. Key No...
English Manual
Page 32
... its authorized service centers. ICON Health & Fitness, Inc. (ICON) warrants this manual. This warranty will be preauthorized by ICON. Some states do not allow limitations on how long an implied warranty lasts. All repairs for a minimal trip charge. If replacement parts are not followed, if the product is abused or improperly or abnormally used for a minimal handling charge. No other warranty beyond that specifically set forth herein...
... its authorized service centers. ICON Health & Fitness, Inc. (ICON) warrants this manual. This warranty will be preauthorized by ICON. Some states do not allow limitations on how long an implied warranty lasts. All repairs for a minimal trip charge. If replacement parts are not followed, if the product is abused or improperly or abnormally used for a minimal handling charge. No other warranty beyond that specifically set forth herein...


