
English Manual
Page 2
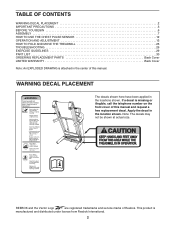
... this manual and request a free replacement decal. Apply the decal in the locations shown. This product is manufactured and distributed under license from Reebok International. 2 TABLE OF CONTENTS WARNING DECAL PLACEMENT 2 IMPORTANT PRECAUTIONS 3 BEFORE YOU BEGIN 6 ASSEMBLY 7 HOW TO USE THE CHEST PULSE SENSOR 12 OPERATION AND ADJUSTMENT 13 HOW TO FOLD AND MOVE THE TREADMILL 25 TROUBLESHOOTING 26 EXERCISE GUIDELINES 29 PART LIST 30 ORDERING REPLACEMENT PARTS Back Cover LIMITED WARRANTY Back Cover...
... this manual and request a free replacement decal. Apply the decal in the locations shown. This product is manufactured and distributed under license from Reebok International. 2 TABLE OF CONTENTS WARNING DECAL PLACEMENT 2 IMPORTANT PRECAUTIONS 3 BEFORE YOU BEGIN 6 ASSEMBLY 7 HOW TO USE THE CHEST PULSE SENSOR 12 OPERATION AND ADJUSTMENT 13 HOW TO FOLD AND MOVE THE TREADMILL 25 TROUBLESHOOTING 26 EXERCISE GUIDELINES 29 PART LIST 30 ORDERING REPLACEMENT PARTS Back Cover LIMITED WARRANTY Back Cover...
English Manual
Page 3
... speed. 18. Athletic support clothes are adequately informed of all important precautions and in a fall and serious injury. 13. Do not use of this manual and order part number 146148, or see HOW TO TURN ON THE POWER on your treadmill before using your treadmill. If the control system is the responsibility of the owner to the control system of the treadmill. Never allow more amps. Plug...
... speed. 18. Athletic support clothes are adequately informed of all important precautions and in a fall and serious injury. 13. Do not use of this manual and order part number 146148, or see HOW TO TURN ON THE POWER on your treadmill before using your treadmill. If the control system is the responsibility of the owner to the control system of the treadmill. Never allow more amps. Plug...

English Manual
Page 4
... system installer's attention to qualified service personnel. 21. Never remove the motor hood unless instructed to the "off circuit breaker to do not remove the cover or the back of any opening. This will prevent damage due to raise, lower, or move the treadmill until it is held securely by placing objects under the treadmill. 22. Always remove the key, unplug the power cord, and switch the reset/off...
... system installer's attention to qualified service personnel. 21. Never remove the motor hood unless instructed to the "off circuit breaker to do not remove the cover or the back of any opening. This will prevent damage due to raise, lower, or move the treadmill until it is held securely by placing objects under the treadmill. 22. Always remove the key, unplug the power cord, and switch the reset/off...
English Manual
Page 6
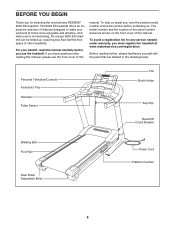
... not exercising, the unique 9500 ES treadmill can be folded up, requiring less than half the floor space of features designed to make your benefit, read this manual carefully before contacting us. Personal Television/Console Accessory Tray Handrail Pulse Sensor Fan Book Holder Key/Clip Reset/Off Circuit Breaker Walking Belt Foot Rail Rear Roller Adjustment Bolts Power Cord Platform Cushion 6 BEFORE YOU BEGIN Thank you use the treadmill. For your workouts at...
... not exercising, the unique 9500 ES treadmill can be folded up, requiring less than half the floor space of features designed to make your benefit, read this manual carefully before contacting us. Personal Television/Console Accessory Tray Handrail Pulse Sensor Fan Book Holder Key/Clip Reset/Off Circuit Breaker Walking Belt Foot Rail Rear Roller Adjustment Bolts Power Cord Platform Cushion 6 BEFORE YOU BEGIN Thank you use the treadmill. For your workouts at...
English Manual
Page 9
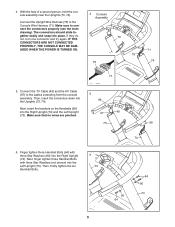
... a second person, hold the console assembly near the Uprights (73, 74). 4 Console Assembly Connect the Upright Wire Harness (75) to - IF THE CONNECTORS ARE NOT CONNECTED PROPERLY, THE CONSOLE MAY BE DAM- gether easily and snap into the Right Upright (74) and the Left Upright (73). AGED WHEN THE POWER IS TURNED ON. 75 75 71 74 71 5. Connect the TV Cable (49) and the AV...
... a second person, hold the console assembly near the Uprights (73, 74). 4 Console Assembly Connect the Upright Wire Harness (75) to - IF THE CONNECTORS ARE NOT CONNECTED PROPERLY, THE CONSOLE MAY BE DAM- gether easily and snap into the Right Upright (74) and the Left Upright (73). AGED WHEN THE POWER IS TURNED ON. 75 75 71 74 71 5. Connect the TV Cable (49) and the AV...
English Manual
Page 11
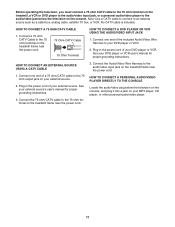
... treadmill frame near the power cord. 3. HOW TO CONNECT A PERSONAL AUDIO/VIDEO PLAYER DIRECTLY TO THE CONSOLE Locate the audio/video plug below the television on your external source. Connect one end of the included Audio/Video Wire Harness to the 75 ohm terminal on the treadmill frame near the power cord. 75 Ohm CATV Cable 75 Ohm Terminal HOW TO CONNECT A DVD PLAYER OR VCR USING THE AUDIO/VIDEO INPUT JACK 1. Plug in the power cord...
... treadmill frame near the power cord. 3. HOW TO CONNECT A PERSONAL AUDIO/VIDEO PLAYER DIRECTLY TO THE CONSOLE Locate the audio/video plug below the television on your external source. Connect one end of the included Audio/Video Wire Harness to the 75 ohm terminal on the treadmill frame near the power cord. 75 Ohm CATV Cable 75 Ohm Terminal HOW TO CONNECT A DVD PLAYER OR VCR USING THE AUDIO/VIDEO INPUT JACK 1. Plug in the power cord...
English Manual
Page 12
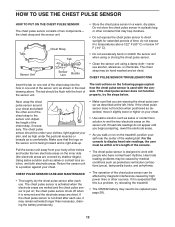
... to direct sunlight for extended periods of the walking belt. If the chest pulse sensor is designed to work with the front of the chest strap to temperatures above . If heart rate readings do not expose it may trap moisture. • Do not expose the chest pulse sensor to a position against your chest and attach the other end of the sensor unit. For the console to display heart rate readings, the user...
... to direct sunlight for extended periods of the walking belt. If the chest pulse sensor is designed to work with the front of the chest strap to temperatures above . If heart rate readings do not expose it may trap moisture. • Do not expose the chest pulse sensor to a position against your chest and attach the other end of the sensor unit. For the console to display heart rate readings, the user...
English Manual
Page 13
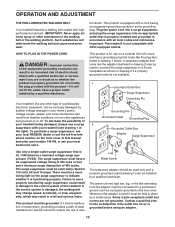
... highperformance lubricant. HOW TO PLUG IN THE POWER CORD DANGER: Improper connection of least resistance for 120 volts AC and 15 amps. Contact a qualified electrician to determine if the outlet box cover is UL 1449 listed as to the walking belt or the walking platform. A temporary adapter that looks like extending from other substances to whether the product is damaged, the walking belt may change speed...
... highperformance lubricant. HOW TO PLUG IN THE POWER CORD DANGER: Improper connection of least resistance for 120 volts AC and 15 amps. Contact a qualified electrician to determine if the outlet box cover is UL 1449 listed as to the walking belt or the walking platform. A temporary adapter that looks like extending from other substances to whether the product is damaged, the walking belt may change speed...
English Manual
Page 14
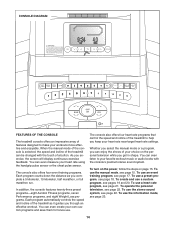
... treadmill can even create your heart rate using the handgrip pulse sensor or the chest pulse sensor. In addition, the console features twenty-three preset programs-eight Aerobic Fitness programs, seven Performance programs, and eight Weight Loss programs. Each program automatically controls the speed and incline of the treadmill as you through an effective workout. CONSOLE DIAGRAM FEATURES OF THE CONSOLE The treadmill console offers an impressive array of features designed to make your favorite workout music or audio...
... treadmill can even create your heart rate using the handgrip pulse sensor or the chest pulse sensor. In addition, the console features twenty-three preset programs-eight Aerobic Fitness programs, seven Performance programs, and eight Weight Loss programs. Each program automatically controls the speed and incline of the treadmill as you through an effective workout. CONSOLE DIAGRAM FEATURES OF THE CONSOLE The treadmill console offers an impressive array of features designed to make your favorite workout music or audio...

English Manual
Page 15
... is pressed, the incline will be pulled from the console, adjust the position of the program buttons (Event Training, Aerobic Fitness, Performance, Custom, Heart Rate Control, or Weight Loss) repeatedly until it reaches the selected speed setting. To change the speed of 0.5 mph. If one of the numbered speed (MPH) buttons. 4. Next, locate the reset/off circuit breaker on the console, peel off circuit breaker to be used , observe the alignment of the treadmill...
... is pressed, the incline will be pulled from the console, adjust the position of the program buttons (Event Training, Aerobic Fitness, Performance, Custom, Heart Rate Control, or Weight Loss) repeatedly until it reaches the selected speed setting. To change the speed of 0.5 mph. If one of the numbered speed (MPH) buttons. 4. Next, locate the reset/off circuit breaker on the console, peel off circuit breaker to be used , observe the alignment of the treadmill...
English Manual
Page 16
... the chest pulse sensor. • When the manual mode is detected, your heart rate using the treadmill, switch the reset/off circuit breaker to miles. • The speed of the walking belt. • The approximate number of the treadmill will automatically turn on the Contacts handgrip pulse sensor. Next, stand on the bottom of three display modes-the information can be at low speed, press the button a second time. Step onto the foot rails, press the Stop button, and adjust the incline...
... the chest pulse sensor. • When the manual mode is detected, your heart rate using the treadmill, switch the reset/off circuit breaker to miles. • The speed of the walking belt. • The approximate number of the treadmill will automatically turn on the Contacts handgrip pulse sensor. Next, stand on the bottom of three display modes-the information can be at low speed, press the button a second time. Step onto the foot rails, press the Stop button, and adjust the incline...
English Manual
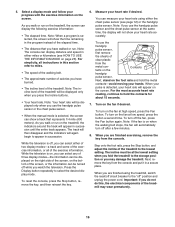
Page 19
... change the speed of the walking belt or the incline of the walking belt will then slow to 5 mph for 2 minutes. The speed of the treadmill at 1 mph. Adjust the speed of the walking belt as desired by pressing the Speed increase or decrease button or one of kilometers or miles still to 5 mph. If the speed of tones will begin walking. HOW TO USE AN EVENT TRAINING PROGRAM 1. Insert the key into...
... change the speed of the walking belt or the incline of the walking belt will then slow to 5 mph for 2 minutes. The speed of the treadmill at 1 mph. Adjust the speed of the walking belt as desired by pressing the Speed increase or decrease button or one of kilometers or miles still to 5 mph. If the speed of tones will begin walking. HOW TO USE AN EVENT TRAINING PROGRAM 1. Insert the key into...
English Manual
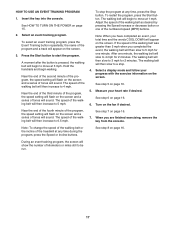
Page 20
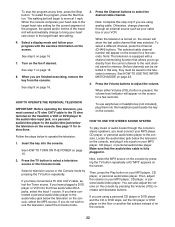
... a stop the program at 1 mph. See step 7 on page 16. 18 Insert the key into several one incline setting are finished exercising, remove the key from the console. Select a display mode and follow your weight. Enter your progress with the exercise information on the screen to start the program. increase and decrease buttons repeatedly. See HOW TO TURN ON THE POWER on page 16. 6. In addition, a diagram of the workout intensity settings of...
... a stop the program at 1 mph. See step 7 on page 16. 18 Insert the key into several one incline setting are finished exercising, remove the key from the console. Select a display mode and follow your weight. Enter your progress with the exercise information on the screen to start the program. increase and decrease buttons repeatedly. See HOW TO TURN ON THE POWER on page 16. 6. In addition, a diagram of the workout intensity settings of...
English Manual
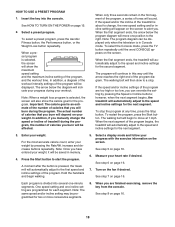
Page 23
... slow to use a heart rate program. 1. The same target heart rate setting is about to change, the speed setting and/or incline setting will flash on the screen. During each segment. The arrow below to a stop. Note: You must wear the chest pulse sensor to start the program. Enter a target heart rate setting. Press the Start button to use the heart rate programs. If you are divided into the console. Each time the speed and/or incline of the treadmill is programmed for...
... slow to use a heart rate program. 1. The same target heart rate setting is about to change, the speed setting and/or incline setting will flash on the screen. During each segment. The arrow below to a stop. Note: You must wear the chest pulse sensor to start the program. Enter a target heart rate setting. Press the Start button to use the heart rate programs. If you are divided into the console. Each time the speed and/or incline of the treadmill is programmed for...
English Manual
Page 24
... step 8 on page 23. 4. The selected cable channel number will automatically change channels through the console's stereo speakers, you are using analog cable. Make sure that was selected. Then, press the Play button on your MP3 player, CD player, or personal audio/video player. To stop the program at 1 mph. To restart the program, press the Start button. The walking belt will show the last cable channel that the audio/video cable is turned...
... step 8 on page 23. 4. The selected cable channel number will automatically change channels through the console's stereo speakers, you are using analog cable. Make sure that was selected. Then, press the Play button on your MP3 player, CD player, or personal audio/video player. To stop the program at 1 mph. To restart the program, press the Start button. The walking belt will show the last cable channel that the audio/video cable is turned...
English Manual
Page 25
... select an equalizer setting, first press the Start/Stop button. Then, press the Rate/Wt. Press the TV button again and save cable channels into the console. In addition, the center of the display will show the total number of miles or kilometers that the walking belt has moved (Distance) and the total number of the screen will save channels into the console. 2. When the demo mode is selected, the lower part of hours...
... select an equalizer setting, first press the Start/Stop button. Then, press the Rate/Wt. Press the TV button again and save cable channels into the console. In addition, the center of the display will show the total number of miles or kilometers that the walking belt has moved (Distance) and the total number of the screen will save channels into the console. 2. When the demo mode is selected, the lower part of hours...
English Manual
Page 29
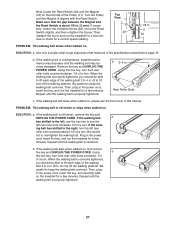
... Pulley until the walking belt is aligned with the Reed Switch. If necessary, loosen the indicated Screw (29), move the Reed Switch slightly, and then retighten the Screw. Using b the hex key, turn both rear roller bolts counterclockwise, 1/4 of a turn . Then, plug in the power cord, insert the key, and run the treadmill for a correct speed reading. Be careful to keep the walking belt centered. If the walking belt still slows when walked on, please see the front cover...
... Pulley until the walking belt is aligned with the Reed Switch. If necessary, loosen the indicated Screw (29), move the Reed Switch slightly, and then retighten the Screw. Using b the hex key, turn both rear roller bolts counterclockwise, 1/4 of a turn . Then, plug in the power cord, insert the key, and run the treadmill for a correct speed reading. Be careful to keep the walking belt centered. If the walking belt still slows when walked on, please see the front cover...
English Manual
Page 32
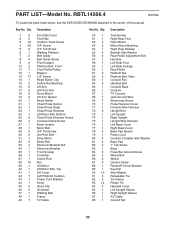
...Belt Guide Screw Front Isolator Platform Bolt, Front Front Roller/Pulley Magnet 1/2" Screw Reed Switch Clip Incline Rod Bushing Lift Arm Lift Pivot Bolt Hood Mount Lift Arm Spacer Reed Switch Chest Pulse Sensor Chest Pulse Strap Chest Pulse Receiver Lift Motor Bolt, Bottom Chest Pulse Receiver Screw Console Clamp Screw Motor Isolator Motor Belt 3/4" Tek Screw Lift Pivot Bolt Drive Motor Motor Bolt Electronic Bracket Nut Electronic Bracket Front Endcap Controller Incline Rod Nut Lift Motor Lift Motor Bolt, Top AV Cover Left Platform Cushion Power Cord Bracket Hood Hood Clip Grommet Walking Belt...
...Belt Guide Screw Front Isolator Platform Bolt, Front Front Roller/Pulley Magnet 1/2" Screw Reed Switch Clip Incline Rod Bushing Lift Arm Lift Pivot Bolt Hood Mount Lift Arm Spacer Reed Switch Chest Pulse Sensor Chest Pulse Strap Chest Pulse Receiver Lift Motor Bolt, Bottom Chest Pulse Receiver Screw Console Clamp Screw Motor Isolator Motor Belt 3/4" Tek Screw Lift Pivot Bolt Drive Motor Motor Bolt Electronic Bracket Nut Electronic Bracket Front Endcap Controller Incline Rod Nut Lift Motor Lift Motor Bolt, Top AV Cover Left Platform Cushion Power Cord Bracket Hood Hood Clip Grommet Walking Belt...
English Manual
Page 33
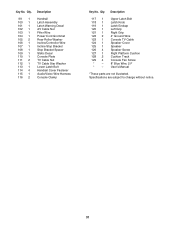
... Track Console Fan Screw 8" Blue Wire, 2 F User's Manual *These parts are subject to change without notice. 31 Description 99 1 100 1 101 1 102 1 103 1 104 1 105 2 106 1 107 1 108 1 109 1 110 1 111 2 112 1 113 1 114 4 115 1 116 2 Handrail Latch Assembly Latch Warning Decal AV Cable Nut Filter Wire Power Cord Grommet Rear Roller Washer Incline/Controller Wire Incline Stop Bracket Stop Bracket Spacer Static Decal Console Plate TV Cable Nut TV Cable Star Washer Lower Latch Bolt Handrail Cover Fastener Audio/Video Wire Harness Console...
... Track Console Fan Screw 8" Blue Wire, 2 F User's Manual *These parts are subject to change without notice. 31 Description 99 1 100 1 101 1 102 1 103 1 104 1 105 2 106 1 107 1 108 1 109 1 110 1 111 2 112 1 113 1 114 4 115 1 116 2 Handrail Latch Assembly Latch Warning Decal AV Cable Nut Filter Wire Power Cord Grommet Rear Roller Washer Incline/Controller Wire Incline Stop Bracket Stop Bracket Spacer Static Decal Console Plate TV Cable Nut TV Cable Star Washer Lower Latch Bolt Handrail Cover Fastener Audio/Video Wire Harness Console...
English Manual
Page 34
... removal or installation or other warranty beyond that specifically set forth herein. to replacing or repairing, at ICON's option, the product through one (1) year after the date of purchase. ORDERING REPLACEMENT PARTS To order replacement parts, please see the PART LIST near the end of this manual and the EXPLODED DRAWING attached in USA © 2008 ICON IP, Inc. To help us assist you . The frame and drive motor...
... removal or installation or other warranty beyond that specifically set forth herein. to replacing or repairing, at ICON's option, the product through one (1) year after the date of purchase. ORDERING REPLACEMENT PARTS To order replacement parts, please see the PART LIST near the end of this manual and the EXPLODED DRAWING attached in USA © 2008 ICON IP, Inc. To help us assist you . The frame and drive motor...


