
English Manual
Page 2
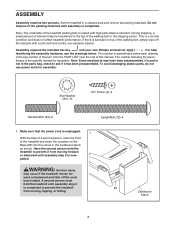
TABLE OF CONTENTS WARNING DECAL PLACEMENT 2 IMPORTANT PRECAUTIONS 3 BEFORE YOU BEGIN 6 ASSEMBLY 7 HOW TO USE THE CHEST PULSE SENSOR 12 OPERATION AND ADJUSTMENT 13 HOW TO FOLD AND MOVE THE TREADMILL 25 TROUBLESHOOTING 26 EXERCISE GUIDELINES 29 PART LIST 30 ORDERING REPLACEMENT PARTS Back Cover... If a decal is manufactured and distributed under license from Reebok International. 2 Note: The decals may not be shown at actual size. 259345 REEBOK and the Vector Logo are registered trademarks and service marks of Reebok. This product is missing or illegible, call the telephone ...
TABLE OF CONTENTS WARNING DECAL PLACEMENT 2 IMPORTANT PRECAUTIONS 3 BEFORE YOU BEGIN 6 ASSEMBLY 7 HOW TO USE THE CHEST PULSE SENSOR 12 OPERATION AND ADJUSTMENT 13 HOW TO FOLD AND MOVE THE TREADMILL 25 TROUBLESHOOTING 26 EXERCISE GUIDELINES 29 PART LIST 30 ORDERING REPLACEMENT PARTS Back Cover... If a decal is manufactured and distributed under license from Reebok International. 2 Note: The decals may not be shown at actual size. 259345 REEBOK and the Vector Logo are registered trademarks and service marks of Reebok. This product is missing or illegible, call the telephone ...

English Manual
Page 4
...in use the treadmill in proper operating condition. Refer servicing to lightning and power line surges. 29. Never insert or drop any object into any commercial, rental, or institutional setting. 27. Inspect and properly tighten all parts of the NEC that the unit is properly assembled. (See ASSEMBLY on page 7,... and HOW TO FOLD AND MOVE THE TREADMILL on the latch knob. 23. Do not change the incline of cable entry as close to Article 820-40...
...in use the treadmill in proper operating condition. Refer servicing to lightning and power line surges. 29. Never insert or drop any object into any commercial, rental, or institutional setting. 27. Inspect and properly tighten all parts of the NEC that the unit is properly assembled. (See ASSEMBLY on page 7,... and HOW TO FOLD AND MOVE THE TREADMILL on the latch knob. 23. Do not change the incline of cable entry as close to Article 820-40...
English Manual
Page 7
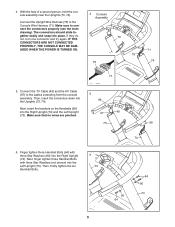
... Bolt (64)-6 Upright Bolt (72)-4 1. A second person must hold the treadmill to prevent the treadmill 83 from the PART LIST near the end of the walking belt, sSimppalcyewr Sipcereowff (60)-2 Assembly requires the included hex key and your own Phillips screwdriver . Nut (38)-2 ...Cardboard Stand 7 Console Bolt (72)-4 Have the second person hold the treadmill until assembly is lubricant cleaner. board stand. Do not Was dispose of the treadmill1w/2a"lkSinilgvebreSltcirsecwoated with high-performance lubricant. If...
... Bolt (64)-6 Upright Bolt (72)-4 1. A second person must hold the treadmill to prevent the treadmill 83 from the PART LIST near the end of the walking belt, sSimppalcyewr Sipcereowff (60)-2 Assembly requires the included hex key and your own Phillips screwdriver . Nut (38)-2 ...Cardboard Stand 7 Console Bolt (72)-4 Have the second person hold the treadmill until assembly is lubricant cleaner. board stand. Do not Was dispose of the treadmill1w/2a"lkSinilgvebreSltcirsecwoated with high-performance lubricant. If...
English Manual
Page 9
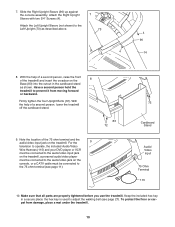
... 9 The connectors should slide to con- With the help of a second person, hold the console assembly near the Uprights (73, 74). 4 Console Assembly Connect the Upright Wire Harness (75) to the cables extending from the console assembly. IF THE CONNECTORS ARE NOT CONNECTED PROPERLY, THE CONSOLE MAY BE DAM- If they do 73...
... 9 The connectors should slide to con- With the help of a second person, hold the console assembly near the Uprights (73, 74). 4 Console Assembly Connect the Upright Wire Harness (75) to the cables extending from the console assembly. IF THE CONNECTORS ARE NOT CONNECTED PROPERLY, THE CONSOLE MAY BE DAM- If they do 73...
English Manual
Page 10
... as shown. To protect the floor or carpet from moving forward or backward. With the help of a second person, raise the front of the treadmill and insert the crossbar on the 8 Base (83) into the cutout in a secure place; Keep the included hex key in the cardboard stand...must be connected to the audio/video jack on the treadmill. Firmly tighten the four Upright Bolts (72). Have a second person hold the treadmill to the 75 ohm terminal (see page 27). Slide the Right Upright Sleeve (96) up against the console assembly. Attach the Right Upright Sleeve with two 3/4" Screws ...
... as shown. To protect the floor or carpet from moving forward or backward. With the help of a second person, raise the front of the treadmill and insert the crossbar on the 8 Base (83) into the cutout in a secure place; Keep the included hex key in the cardboard stand...must be connected to the audio/video jack on the treadmill. Firmly tighten the four Upright Bolts (72). Have a second person hold the treadmill to the 75 ohm terminal (see page 27). Slide the Right Upright Sleeve (96) up against the console assembly. Attach the Right Upright Sleeve with two 3/4" Screws ...

English Manual
Page 33
Qty. Description 99 1 100 1 101 1 102 1 103 1 104 1 105 2 106 1 107 1 108 1 109 1 110 1 111 2 112 1 113 1 114 4 115 1 116 2 Handrail Latch Assembly Latch Warning Decal AV Cable Nut Filter Wire Power Cord Grommet Rear Roller Washer Incline/Controller Wire Incline Stop Bracket Stop Bracket Spacer Static Decal ...
Qty. Description 99 1 100 1 101 1 102 1 103 1 104 1 105 2 106 1 107 1 108 1 109 1 110 1 111 2 112 1 113 1 114 4 115 1 116 2 Handrail Latch Assembly Latch Warning Decal AV Cable Nut Filter Wire Power Cord Grommet Rear Roller Washer Incline/Controller Wire Incline Stop Bracket Stop Bracket Spacer Static Decal ...