
User Manual
Page 2
... 7 ASSEMBLY 8 OPERATION AND ADJUSTMENT 15 HOW TO FOLD AND MOVE THE TREADMILL 22 TROUBLESHOOTING 23 EXERCISE GUIDELINES 26 PART LIST 27 EXPLODED DRAWING 28 ORDERING REPLACEMENT PARTS Back Cover LIMITED WARRANTY Back Cover WARNING DECAL PLACEMENT This drawing shows the locations of Reebok. REEBOK and the Vector Logo are registered trademarks and service marks of...
... 7 ASSEMBLY 8 OPERATION AND ADJUSTMENT 15 HOW TO FOLD AND MOVE THE TREADMILL 22 TROUBLESHOOTING 23 EXERCISE GUIDELINES 26 PART LIST 27 EXPLODED DRAWING 28 ORDERING REPLACEMENT PARTS Back Cover LIMITED WARRANTY Back Cover WARNING DECAL PLACEMENT This drawing shows the locations of Reebok. REEBOK and the Vector Logo are registered trademarks and service marks of...
User Manual
Page 4
... the off position (see the drawing on page 6 for the location of the treadmill by an authorized ser- Inspect and properly tighten all parts of heart rate readings. DANGER: 27. Do not attempt to move the treadmill. 23. Do not change the incline of the power switch), and unplug the... power cord when the treadmill is holding the frame securely in use , before performing ...
... the off position (see the drawing on page 6 for the location of the treadmill by an authorized ser- Inspect and properly tighten all parts of heart rate readings. DANGER: 27. Do not attempt to move the treadmill. 23. Do not change the incline of the power switch), and unplug the... power cord when the treadmill is holding the frame securely in use , before performing ...
User Manual
Page 6
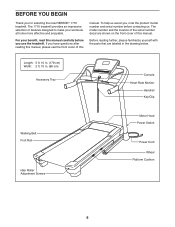
... reading further, please familiarize yourself with the parts that are shown on the front cover of features designed to make your benefit, read this manual. BEFORE YOU BEGIN Thank you , note the product model number and serial number before you use the treadmill. The 1710 treadmill provides an impressive selection of this manual. The... after reading this manual, please see the front cover of this manual carefully before contacting us. To help us assist you for selecting the new REEBOK® 1710 treadmill.
... reading further, please familiarize yourself with the parts that are shown on the front cover of features designed to make your benefit, read this manual. BEFORE YOU BEGIN Thank you , note the product model number and serial number before you use the treadmill. The 1710 treadmill provides an impressive selection of this manual. The... after reading this manual, please see the front cover of this manual carefully before contacting us. To help us assist you for selecting the new REEBOK® 1710 treadmill.
User Manual
Page 8
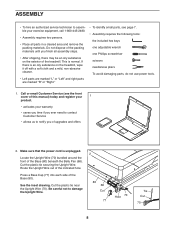
...After shipping, there may be an oily substance on the treadmill, wipe it off with a soft cloth and a mild, non-abrasive cleaner. • Left parts are marked "L" or "Left" and right parts are marked "R" or "Right." • To identify small parts, see the front cover of this manual) today and ... the included hex keys one adjustable wrench one Phillips screwdriver scissors needlenose pliers To avoid damaging parts, do not use power tools. 1. If there is an oily substance on the exterior of the treadmill. See the inset drawing. Press a Base Cap (77) into each side of upgrades ...
...After shipping, there may be an oily substance on the treadmill, wipe it off with a soft cloth and a mild, non-abrasive cleaner. • Left parts are marked "L" or "Left" and right parts are marked "R" or "Right." • To identify small parts, see the front cover of this manual) today and ... the included hex keys one adjustable wrench one Phillips screwdriver scissors needlenose pliers To avoid damaging parts, do not use power tools. 1. If there is an oily substance on the exterior of the treadmill. See the inset drawing. Press a Base Cap (77) into each side of upgrades ...
User Manual
Page 14
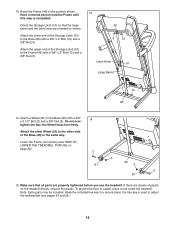
... of the Storage Latch (51) to the Base (80) with a 3/8" x 2 1/2" Bolt (2) and a 3/8" Nut (3). To protect the floor or carpet, place a mat under the treadmill. If there are oriented as shown. Raise the Frame (49) to adjust the walking belt (see HOW TO LOWER THE... TREADMILL FOR USE on the treadmill decals, remove the plastic. Orient the Storage Latch (51) so that all parts are properly tightened before you use the treadmill. Do not over- 14 tighten the Nut; 13. Attach the lower end of...
... of the Storage Latch (51) to the Base (80) with a 3/8" x 2 1/2" Bolt (2) and a 3/8" Nut (3). To protect the floor or carpet, place a mat under the treadmill. If there are oriented as shown. Raise the Frame (49) to adjust the walking belt (see HOW TO LOWER THE... TREADMILL FOR USE on the treadmill decals, remove the plastic. Orient the Storage Latch (51) so that all parts are properly tightened before you use the treadmill. Do not over- 14 tighten the Nut; 13. Attach the lower end of...

