User Manual
Page 3
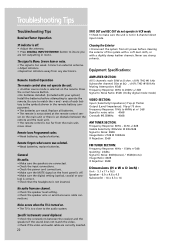
... Problems." Government Printing Office, Washington, DC 20402. Date of Purchase Place of manufacture. For instructions on different branch circuits. Ampliación Granada C.P. 11529 Mexico D.F. could void the user's authority to operate this Guide Technical Specification Product: Dolby Digital Audio video receiver Brand: RCA Model: RT2360/RT2360BK Electrical current consumption Power Supply: 120V ~ 60Hz Power consumption: 165 Watts IMPORTER Comercializadora Thomson de México, S.A. This device generates and uses radio frequency...
... Problems." Government Printing Office, Washington, DC 20402. Date of Purchase Place of manufacture. For instructions on different branch circuits. Ampliación Granada C.P. 11529 Mexico D.F. could void the user's authority to operate this Guide Technical Specification Product: Dolby Digital Audio video receiver Brand: RCA Model: RT2360/RT2360BK Electrical current consumption Power Supply: 120V ~ 60Hz Power consumption: 165 Watts IMPORTER Comercializadora Thomson de México, S.A. This device generates and uses radio frequency...
User Manual
Page 4
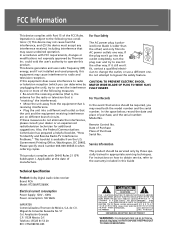
... your Speaker 7 Front Speaker Placement 7 Remote Codes Surround Placement 8 Cable Codes 24 Advanced Surround Setting 8 VCR Codes 24 Test Tone / Channel Balance 9 TV Codes 25 Connecting for Power 9 Satellite Receivers 26 Using Headphones 9 Audio (RCA only 26 Factory Setting 9 Laser disc Players 26 Operating your Receiver Receiver Controls 10 Your Remote Control 11 Display 12 Switching On/Off 13 Selection of Audio/Video Source . . . . . .13 Using the Remote to Control Additional Components 14 Using the receiver to play a Source . . . .15 Operating the Radio 16...
... your Speaker 7 Front Speaker Placement 7 Remote Codes Surround Placement 8 Cable Codes 24 Advanced Surround Setting 8 VCR Codes 24 Test Tone / Channel Balance 9 TV Codes 25 Connecting for Power 9 Satellite Receivers 26 Using Headphones 9 Audio (RCA only 26 Factory Setting 9 Laser disc Players 26 Operating your Receiver Receiver Controls 10 Your Remote Control 11 Display 12 Switching On/Off 13 Selection of Audio/Video Source . . . . . .13 Using the Remote to Control Additional Components 14 Using the receiver to play a Source . . . .15 Operating the Radio 16...
User Manual
Page 5
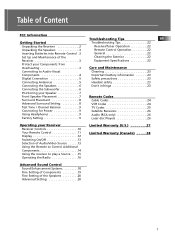
... + - + - Getting Started Unpacking the Receiver You should receive the following items: ON/STANDBY MUTE PHONES HOME THEATER AUDIO VIDEO RECEIVER VOLUME SOURCE FM/AM TUNING MEMORY OK SOURCE SETUP TEST TONE SURR MODE EQ DIGITAL INPUT DSP MODE ST / MONO BASS/TREBLE LEVEL V-AUX VIDEO L - AUDIO - One pair of "AA" batteries One external FM Dipole antenna One external AM loop antenna One RCA Universal Remote Control • one instruction book; • one safety leaflet; • one Quick Connection Guide one audio cable (two wires) with red and white RCA connectors; 2
... + - + - Getting Started Unpacking the Receiver You should receive the following items: ON/STANDBY MUTE PHONES HOME THEATER AUDIO VIDEO RECEIVER VOLUME SOURCE FM/AM TUNING MEMORY OK SOURCE SETUP TEST TONE SURR MODE EQ DIGITAL INPUT DSP MODE ST / MONO BASS/TREBLE LEVEL V-AUX VIDEO L - AUDIO - One pair of "AA" batteries One external FM Dipole antenna One external AM loop antenna One RCA Universal Remote Control • one instruction book; • one safety leaflet; • one Quick Connection Guide one audio cable (two wires) with red and white RCA connectors; 2
User Manual
Page 6
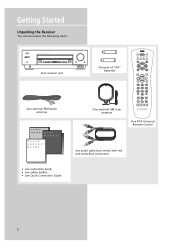
... indicated: 10 cm/4" 10 cm/ 4" ON/STANDBY MUTE PHONES HOME THEATER AUDIO VIDEO RECEIVER SOURCE FM/AM TUNING MEMORY OK SOURCE SETUP TEST TONE EQ DIGITAL INPUT SURR MODE DSP MODE ST / MONO VOLUME BASS/TREBLE LEVEL V-AUX VIDEO L - If you have a satellite receiver, you should place it on the top shelf. 3 Whenever a button is risk of condensation. Never use strong solvents. To use the remote control, point it directly at your set, clean the case with a soft cloth...
... indicated: 10 cm/4" 10 cm/ 4" ON/STANDBY MUTE PHONES HOME THEATER AUDIO VIDEO RECEIVER SOURCE FM/AM TUNING MEMORY OK SOURCE SETUP TEST TONE EQ DIGITAL INPUT SURR MODE DSP MODE ST / MONO VOLUME BASS/TREBLE LEVEL V-AUX VIDEO L - If you have a satellite receiver, you should place it on the top shelf. 3 Whenever a button is risk of condensation. Never use strong solvents. To use the remote control, point it directly at your set, clean the case with a soft cloth...
User Manual
Page 7
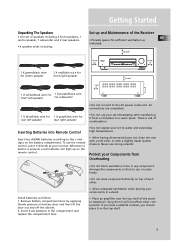
... jack, otherwise, you by connecting it in the optical cable or S-Video cable, make use of the receiver. Note: Before plugging in the digital input jack of the signal. One optical or coaxial cable is needed for recording to tape output. DVD, SAT or CD) to the appropriate digital inputs and press DIGITAL INPUT to the relevant S-Video jack at the front of the signal and enjoy Dolby Digital sound quality. Note: Optical and coax cables carry only the audio portion of outputing Dolby Digital...
... jack, otherwise, you by connecting it in the optical cable or S-Video cable, make use of the receiver. Note: Before plugging in the digital input jack of the signal. One optical or coaxial cable is needed for recording to tape output. DVD, SAT or CD) to the appropriate digital inputs and press DIGITAL INPUT to the relevant S-Video jack at the front of the signal and enjoy Dolby Digital sound quality. Note: Optical and coax cables carry only the audio portion of outputing Dolby Digital...

User Manual
Page 9
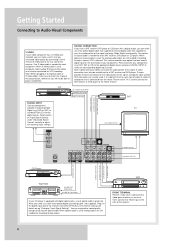
.... 6 BLUE / BLACK GREY / BLACK +- -+ -+ SUB WOOFER REAR REAR REAR SPEAKERS (SURROUND SOUND) Speakers There are reversed, the sound will be connected. Speaker Polarity When connecting the speakers, make sure the polarities ("+" speaker wire to lock wire in insert wire. This receiver offers a high flexibility for user to enjoy full range of phase" effect). the terminal. For better sound quality, Center speaker, rear speakers and Subwoofer should also be distorted and will lack bass ("out of sound effects, with small speakers, it is needed...
.... 6 BLUE / BLACK GREY / BLACK +- -+ -+ SUB WOOFER REAR REAR REAR SPEAKERS (SURROUND SOUND) Speakers There are reversed, the sound will be connected. Speaker Polarity When connecting the speakers, make sure the polarities ("+" speaker wire to lock wire in insert wire. This receiver offers a high flexibility for user to enjoy full range of phase" effect). the terminal. For better sound quality, Center speaker, rear speakers and Subwoofer should also be distorted and will lack bass ("out of sound effects, with small speakers, it is needed...
User Manual
Page 12
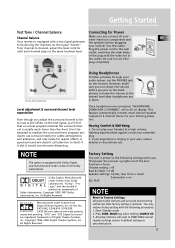
... of the plug with the wide slot in place. MODE key when holding SOURCE UP. 3. Getting Started Test Tone / Channel balance Connecting for Power Channel balance Make sure you connect all receiver settings restore to default settings as the others on the test signal, you first power the receiver up right out of Digital Theater Systems, Inc. outlet, matching the wide blade of Dolby Laboratories. program producers use . This feature automatically converts multi-channel speaker outputs to 2 channel stereo for...
... of the plug with the wide slot in place. MODE key when holding SOURCE UP. 3. Getting Started Test Tone / Channel balance Connecting for Power Channel balance Make sure you connect all receiver settings restore to default settings as the others on the test signal, you first power the receiver up right out of Digital Theater Systems, Inc. outlet, matching the wide blade of Dolby Laboratories. program producers use . This feature automatically converts multi-channel speaker outputs to 2 channel stereo for...
User Manual
Page 13
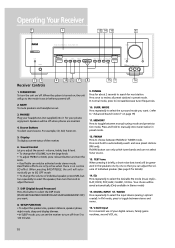
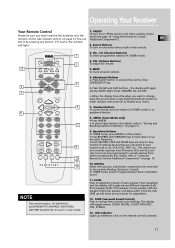
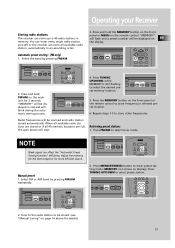
Operating Your Receiver 1 5 13 14 10 6 ON/STANDBY MUTE PHONES HOME THEATER AUDIO VIDEO RECEIVER VOLUME SOURCE FM/AM TUNING MEMORY OK SOURCE SETUP TEST TONE SURR MODE EQ DIGITAL INPUT DSP MODE ST / MONO BASS/TREBLE LEVEL V-AUX VIDEO L - TUNING Press for about 2 seconds to search for your private enjoyment. MEMORY Press to toggle between manual tuning mode and preset station mode, Press and hold to select the DSP mode (STADIUM/THEATER/CONCERT/CLUB/CHURCH/ARENA/DSP OFF) you adjust the sound - DSP (Digital Sound Processor) Press...
Operating Your Receiver 1 5 13 14 10 6 ON/STANDBY MUTE PHONES HOME THEATER AUDIO VIDEO RECEIVER VOLUME SOURCE FM/AM TUNING MEMORY OK SOURCE SETUP TEST TONE SURR MODE EQ DIGITAL INPUT DSP MODE ST / MONO BASS/TREBLE LEVEL V-AUX VIDEO L - TUNING Press for about 2 seconds to search for your private enjoyment. MEMORY Press to toggle between manual tuning mode and preset station mode, Press and hold to select the DSP mode (STADIUM/THEATER/CONCERT/CLUB/CHURCH/ARENA/DSP OFF) you adjust the sound - DSP (Digital Sound Processor) Press...
User Manual
Page 14
.... DIGITAL 10 Select the way your 9 receiver such as CD, VCR, DVD, TAPE, etc.. NOTE The remote buttons GO BACK•DISC, GUIDE•RDM•PTY, INFO•RDS, INPUT•SEEK, ANT•FMS & AUDIO do not work in TUNER mode). 4. Adjustment Buttons a. MUTE To mute all audio outputs. 6. Source Buttons To turn on the remote control is pressed. 11 ucts, but it can Additional Components"). Press AUDIO button to your audio/video components are connected to...
.... DIGITAL 10 Select the way your 9 receiver such as CD, VCR, DVD, TAPE, etc.. NOTE The remote buttons GO BACK•DISC, GUIDE•RDM•PTY, INFO•RDS, INPUT•SEEK, ANT•FMS & AUDIO do not work in TUNER mode). 4. Adjustment Buttons a. MUTE To mute all audio outputs. 6. Source Buttons To turn on the remote control is pressed. 11 ucts, but it can Additional Components"). Press AUDIO button to your audio/video components are connected to...
User Manual
Page 17
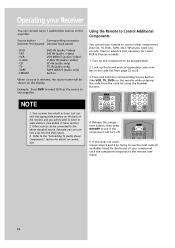
... (audio / video) VCR IN/OUT (audio / video) V-AUX IN (audio / video) CD IN (audio only) TV IN (audio only) TAPE IN/OUT (audio only) built-in When a source is to radio stations. (See details in Tuner section) 2. Turn on the component to be shown on connection. 4. Press and hold the corresponding Source Button (like CD, TV, DVD, TAPE, etc.). If this amplifier: Source button Corresponding connector (receiver front panel) (receiver back panel) - TAPE - Using the Remote to Control Additional Components You can set...
... (audio / video) VCR IN/OUT (audio / video) V-AUX IN (audio / video) CD IN (audio only) TV IN (audio only) TAPE IN/OUT (audio only) built-in When a source is to radio stations. (See details in Tuner section) 2. Turn on the component to be shown on connection. 4. Press and hold the corresponding Source Button (like CD, TV, DVD, TAPE, etc.). If this amplifier: Source button Corresponding connector (receiver front panel) (receiver back panel) - TAPE - Using the Remote to Control Additional Components You can set...
User Manual
Page 18
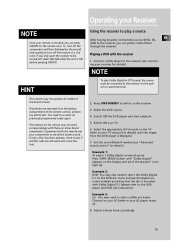
... which buttons work. Switch ON your remote is encoded with more buttons. Example 2: DVD: You may need to select the Dolby Digital 5.1 on the DVD disc menu to select a different Audio Channel on the Display and all models of the speaker'' icons light up. Connect a DVD player to your receiver for details) Example 1: To play Dolby Digital or DTS sound, the source must be turned off the receiver (i.e. Set the sound Mode if needed (see connecting your LD player manual) 8. this unit). Experiment with the receiver 1. The buttons on the receiver 3.
... which buttons work. Switch ON your remote is encoded with more buttons. Example 2: DVD: You may need to select the Dolby Digital 5.1 on the DVD disc menu to select a different Audio Channel on the Display and all models of the speaker'' icons light up. Connect a DVD player to your receiver for details) Example 1: To play Dolby Digital or DTS sound, the source must be turned off the receiver (i.e. Set the sound Mode if needed (see connecting your LD player manual) 8. this unit). Experiment with the receiver 1. The buttons on the receiver 3.
User Manual
Page 19
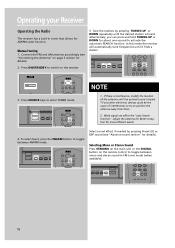
.... 2. Adjust the antenna for better reception for AM/FM radio function. SURR MODE SETUP TEST TONE EQ DIGITAL INPUT BA DSP MODE ST / MONO V 16 Selecting Mono or Stereo Sound Press ST/MONO on the main unit or the DIGITAL button on the receiver. 5- Operating your Receiver Operating the Radio The receiver has a built-in FM tuner mode (when available). Alternatively, you can affect the "auto Search function". In this mode the receiver will automatically tune frequencies until the optimal sound...
.... 2. Adjust the antenna for better reception for AM/FM radio function. SURR MODE SETUP TEST TONE EQ DIGITAL INPUT BA DSP MODE ST / MONO V 16 Selecting Mono or Stereo Sound Press ST/MONO on the main unit or the DIGITAL button on the receiver. 5- Operating your Receiver Operating the Radio The receiver has a built-in FM tuner mode (when available). Alternatively, you can affect the "auto Search function". In this mode the receiver will automatically tune frequencies until the optimal sound...
User Manual
Page 20
... TUNING MEM 5. Adjust the antenna for the best reception for details) 17 You can enter every single radio station yourself or the receiver can store up to 40 radio stations in memory. "MEMORY" will flash and a preset number will blink during the automatic storing process. 4. Press MEMORY/MENU button to enter preset setting mode (MEMORY icon shows on display), Press TUNING UP/DOWN to store frequency in red and will be displayed in selected preset...
... TUNING MEM 5. Adjust the antenna for the best reception for details) 17 You can enter every single radio station yourself or the receiver can store up to 40 radio stations in memory. "MEMORY" will flash and a preset number will blink during the automatic storing process. 4. Press MEMORY/MENU button to enter preset setting mode (MEMORY icon shows on display), Press TUNING UP/DOWN to store frequency in red and will be displayed in selected preset...
User Manual
Page 21
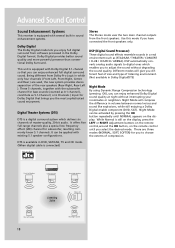
... remote control until you have connected the front speakers only. DSP automatically converts analog audio signals to adjust the sound without interrupting your roommates or neighbors. Night Mode will give you can be applied with Dolby Digital 5.1-channel so that brings you can enjoy enhanced full digital surround sound. DTS is available in volume between normal voices and sound like explosions, while still enjoying a Dolby Digital enable component (DVD, SAT). Stereo The Stereo mode uses...
... remote control until you have connected the front speakers only. DSP automatically converts analog audio signals to adjust the sound without interrupting your roommates or neighbors. Night Mode will give you can be applied with Dolby Digital 5.1-channel so that brings you can enjoy enhanced full digital surround sound. DTS is available in volume between normal voices and sound like explosions, while still enjoying a Dolby Digital enable component (DVD, SAT). Stereo The Stereo mode uses...
User Manual
Page 22
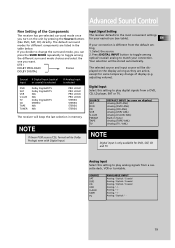
... the Components The receiver has pre-selected surround mode once you turn on display) Analog (SAT/ ANL) Analog (DVD/ ANL) Analog (CD/ ANL) Analog (VCR/ ANL) Analog (V-AUX/ ANL) Built-in Tuner Analog (TAPE/ ANL) Analog (TV / ANL) NOTE Digital input is only available for DVD, SAT, CD and TV Analog Input Select this setting to play analog signals from a DVD, CD, LD player, SAT or TV. DTS / DOLBY PROLOGIC/ Stereo DOLBY DIGITAL Source/ If Digital Input (optical Input...
... the Components The receiver has pre-selected surround mode once you turn on display) Analog (SAT/ ANL) Analog (DVD/ ANL) Analog (CD/ ANL) Analog (VCR/ ANL) Analog (V-AUX/ ANL) Built-in Tuner Analog (TAPE/ ANL) Analog (TV / ANL) NOTE Digital input is only available for DVD, SAT, CD and TV Analog Input Select this setting to play analog signals from a DVD, CD, LD player, SAT or TV. DTS / DOLBY PROLOGIC/ Stereo DOLBY DIGITAL Source/ If Digital Input (optical Input...
User Manual
Page 23
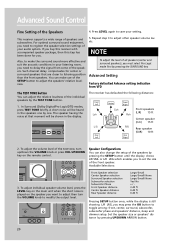
... remote control. Advanced Sound Control Fine Setting of speakers and subwoofers. You can also change the setup of the SETUP button to toggle among: front, center, surround, subwoofer, subwoofer phase and speakers' distance, sleep and dimmer setup. VOLUME Speaker Configurations You can make the surround sound more effective and suit the acoustic conditions in your listening room, you must select Pro Logic mode first by the TEST TONE button. 1. BASS/TREBLE LEVEL V-AUX VIDEO L - NOTE To adjust the level of all speakers (center and surround speakers), you need...
... remote control. Advanced Sound Control Fine Setting of speakers and subwoofers. You can also change the setup of the SETUP button to toggle among: front, center, surround, subwoofer, subwoofer phase and speakers' distance, sleep and dimmer setup. VOLUME Speaker Configurations You can make the surround sound more effective and suit the acoustic conditions in your listening room, you must select Pro Logic mode first by the TEST TONE button. 1. BASS/TREBLE LEVEL V-AUX VIDEO L - NOTE To adjust the level of all speakers (center and surround speakers), you need...

User Manual
Page 24
.... 1. Press SETUP once. While the VFD display is 5. If the letter is flashing, the signal is showing L/R SML, press UP/DOWN ARROW button to select. wait for Low Frequency Effect. Try both settings and select the sound preferred. • Speaker distance: For optimum surround experience measure the distance between the speaker and your selection SOURCE SOURCE FM/AM TUNIN and set up mode. 21 Use a subwoofer to enjoy optimum sound. • Subwoofer Phase...
.... 1. Press SETUP once. While the VFD display is 5. If the letter is flashing, the signal is showing L/R SML, press UP/DOWN ARROW button to select. wait for Low Frequency Effect. Try both settings and select the sound preferred. • Speaker distance: For optimum surround experience measure the distance between the speaker and your selection SOURCE SOURCE FM/AM TUNIN and set up mode. 21 Use a subwoofer to enjoy optimum sound. • Subwoofer Phase...
User Manual
Page 25
.... Never use strong solvents. Remote forgets what source was selected. • Weak batteries, replace batteries. Be sure to insure you are not outputting in the remote battery compartment. • The batteries are connected. • Check the input connections. • Check the power cord connections. • Make sure the MUTE signal on the remote. Remote loses Programmed codes. • Weak batteries, replace batteries. The signal is not in 6-channel direct input mode. Troubleshooting Tips Troubleshooting Tips Receiver/Tuner Operation TAPE OUT...
.... Never use strong solvents. Remote forgets what source was selected. • Weak batteries, replace batteries. Be sure to insure you are not outputting in the remote battery compartment. • The batteries are connected. • Check the input connections. • Check the power cord connections. • Make sure the MUTE signal on the remote. Remote loses Programmed codes. • Weak batteries, replace batteries. The signal is not in 6-channel direct input mode. Troubleshooting Tips Troubleshooting Tips Receiver/Tuner Operation TAPE OUT...
User Manual
Page 30
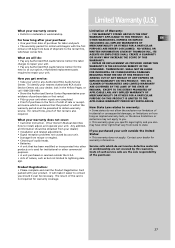
... lasts, so the above limitations or exclusions may have other rights that the product is used for the new or, at our option, refurbished replacement parts required to state. What your warranty does not cover: • Customer instruction. (Your Owner's Manual describes how to any Authorized RCA Audio Service Center for institutional or other commercial purposes. • A unit purchased or...
... lasts, so the above limitations or exclusions may have other rights that the product is used for the new or, at our option, refurbished replacement parts required to state. What your warranty does not cover: • Customer instruction. (Your Owner's Manual describes how to any Authorized RCA Audio Service Center for institutional or other commercial purposes. • A unit purchased or...
User Manual
Page 31
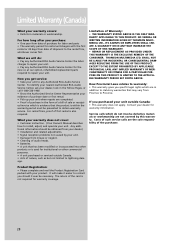
... Authorized RCA Audio Service Center. What your warranty does not cover: • Customer instruction. (Your Owner's Manual describes how to the rental firm, whichever comes first. Costs of the purchaser. It will do not involve defective materials or workmanship are the sole responsibility of such service calls are not covered by your dealer.) • Installation and related adjustments. • Signal reception problems...
... Authorized RCA Audio Service Center. What your warranty does not cover: • Customer instruction. (Your Owner's Manual describes how to the rental firm, whichever comes first. Costs of the purchaser. It will do not involve defective materials or workmanship are the sole responsibility of such service calls are not covered by your dealer.) • Installation and related adjustments. • Signal reception problems...


