
User Manual
Page 4
... Against Power Surges 5 Protect Devices from Overheating 5 Position Cables Properly to Avoid Audio Interference 5 Use Indirect Light 5 Check Supplied Parts 5 Get the Picture 6 Getting Channels 6 Choose Your Connection 7 Video (Basic) Connection 8 Component Video (Advanced) Connection .......... 8 HDMI/DVI Connection 10 USB Connection 12 ... Blocking Unrated/Exempt Programs 33 Future Rating Region 33 Additional Features 33 Screen Formats 33 PIP (Picture-in-Picture) Operation 34 Chapter 4: Using the TV's Menu System Using the Menu System 36 Channel List Menu 36 Sound Menu ...
... Against Power Surges 5 Protect Devices from Overheating 5 Position Cables Properly to Avoid Audio Interference 5 Use Indirect Light 5 Check Supplied Parts 5 Get the Picture 6 Getting Channels 6 Choose Your Connection 7 Video (Basic) Connection 8 Component Video (Advanced) Connection .......... 8 HDMI/DVI Connection 10 USB Connection 12 ... Blocking Unrated/Exempt Programs 33 Future Rating Region 33 Additional Features 33 Screen Formats 33 PIP (Picture-in-Picture) Operation 34 Chapter 4: Using the TV's Menu System Using the Menu System 36 Channel List Menu 36 Sound Menu ...
User Manual
Page 6
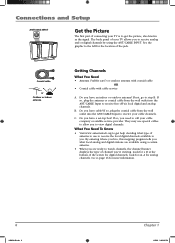
... Input to receive free off-air local digital and analog channels. C. What You Need To Know • Visit www.antennaweb.org to get the picture, also known as the signal. By entering where you live, this mapping program tells you what type of antenna to use special cables to allow...• Antenna ("rabbit ears") or outdoor antenna with coaxial cable OR • Coaxial cable with cable service A. Connections and Setup ANT/CABLE INPUT Get the Picture The first part of connecting your TV is to get help deciding what local analog and digital stations are available using the ANT/CABLE...
... Input to receive free off-air local digital and analog channels. C. What You Need To Know • Visit www.antennaweb.org to get the picture, also known as the signal. By entering where you live, this mapping program tells you what type of antenna to use special cables to allow...• Antenna ("rabbit ears") or outdoor antenna with coaxial cable OR • Coaxial cable with cable service A. Connections and Setup ANT/CABLE INPUT Get the Picture The first part of connecting your TV is to get help deciding what local analog and digital stations are available using the ANT/CABLE...

User Manual
Page 8
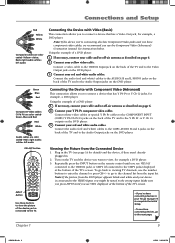
... using the Component Video jacks. Connections and Setup Video (Basic) Connection This is an example of a connection using the Video jack. Go to get a picture. Go to get a picture. Go to the middle of page 9 for specific instructions. 1 2 Don't forget: If necessary, connect antenna or cable to page 6 for specifi...
... using the Component Video jacks. Connections and Setup Video (Basic) Connection This is an example of a connection using the Video jack. Go to get a picture. Go to get a picture. Go to the middle of page 9 for specific instructions. 1 2 Don't forget: If necessary, connect antenna or cable to page 6 for specifi...
User Manual
Page 9
...and L jacks on the back of the TV and to connect a device that has a Video Out jack, for example, a DVD player. Viewing the Picture from the input list. Chapter 1 9 1668591B.indb 9 6/5/06 3:28:06 PM Connections and Setup Red Yellow White Composite cables are color coded- white... or press CH+/- See instructions below. Connect your yellow video cable. Turn on the remote control until you use the number buttons to view the picture of the TV's screen. Yellow= video; Red= right audio; Plug in . 2. Using the example of a DVD player: 1. Red= right ...
...and L jacks on the back of the TV and to connect a device that has a Video Out jack, for example, a DVD player. Viewing the Picture from the input list. Chapter 1 9 1668591B.indb 9 6/5/06 3:28:06 PM Connections and Setup Red Yellow White Composite cables are color coded- white... or press CH+/- See instructions below. Connect your yellow video cable. Turn on the remote control until you use the number buttons to view the picture of the TV's screen. Yellow= video; Red= right audio; Plug in . 2. Using the example of a DVD player: 1. Red= right ...

User Manual
Page 10
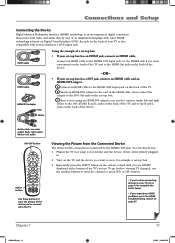
Connections and Setup HDMI/DVI Connection This is an example of a connection using the HDMI/DVI jack. * *Don't forget: If necessary, connect antenna or cable to page 6 for instructions. L DVI/ AUDIO R HDMI1 /DVI C A Device with HDMI Y Pb Pr Video Out R L Audio Out HDMI Out OR B DVI Out R L Audio Out Device with DVI 10 1668591B.indb 10 Chapter 1 6/5/06 3:28:07 PM Go to get a picture.
Connections and Setup HDMI/DVI Connection This is an example of a connection using the HDMI/DVI jack. * *Don't forget: If necessary, connect antenna or cable to page 6 for instructions. L DVI/ AUDIO R HDMI1 /DVI C A Device with HDMI Y Pb Pr Video Out R L Audio Out HDMI Out OR B DVI Out R L Audio Out Device with DVI 10 1668591B.indb 10 Chapter 1 6/5/06 3:28:07 PM Go to get a picture.
User Manual
Page 11
... Multimedia Interface (HDMI) technology is an uncompressed digital connection that have a DVI output jack. Chapter 1 1668591B.indb 11 11 6/5/06 3:28:08 PM Viewing the Picture from the Connected Device The device in . 2. To go to page 14 to complete the Initial Setup. • If you want to the R and L ...DVD GO BACK VOL CH MENU ZOOMCLEAR MUTE INFO + CH CTRL PRESETS ZOOM+ GUIDE INPUT INPUT SUB CH button Use these buttons to view the picture of the device you've connected to the HDMI1/DVI Input jack on the back of the TV. A. Connect an HDMI cable to the TV...
... Multimedia Interface (HDMI) technology is an uncompressed digital connection that have a DVI output jack. Chapter 1 1668591B.indb 11 11 6/5/06 3:28:08 PM Viewing the Picture from the Connected Device The device in . 2. To go to page 14 to complete the Initial Setup. • If you want to the R and L ...DVD GO BACK VOL CH MENU ZOOMCLEAR MUTE INFO + CH CTRL PRESETS ZOOM+ GUIDE INPUT INPUT SUB CH button Use these buttons to view the picture of the device you've connected to the HDMI1/DVI Input jack on the back of the TV. A. Connect an HDMI cable to the TV...

User Manual
Page 12
INPUT INPUT SUB CH button Use these buttons to view the picture of the device you've connected to page 43 for more information. Plug in the TV and the USB device...'t already plugged in. 2. To access and adjust the options of the USB device, press MENU then choose USB from a folder not a picture. Go to the TV. 12 1668591B.indb 12 Chapter 1 6/5/06 3:28:08 PM Turn on the TV. ON•OFF button Viewing the... the USB jack. Connections and Setup USB Connection This is an example of a connection using a USB connection, you can play a picture slideshow from the Main menu.
INPUT INPUT SUB CH button Use these buttons to view the picture of the device you've connected to page 43 for more information. Plug in the TV and the USB device...'t already plugged in. 2. To access and adjust the options of the USB device, press MENU then choose USB from a folder not a picture. Go to the TV. 12 1668591B.indb 12 Chapter 1 6/5/06 3:28:08 PM Turn on the TV. ON•OFF button Viewing the... the USB jack. Connections and Setup USB Connection This is an example of a connection using a USB connection, you can play a picture slideshow from the Main menu.

User Manual
Page 13
.... To hear sound from the TV while using the VGA jacks. 1 VGA AUDIO Don't forget: If necessary, VGA VIDEO connect antenna or cable to get a picture. Repeatedly press the INPUT button on the TV and the PC. 3. Connect a 3.5 mm stereo mini pin cable (sometimes referred to as described on the back...
.... To hear sound from the TV while using the VGA jacks. 1 VGA AUDIO Don't forget: If necessary, VGA VIDEO connect antenna or cable to get a picture. Repeatedly press the INPUT button on the TV and the PC. 3. Connect a 3.5 mm stereo mini pin cable (sometimes referred to as described on the back...

User Manual
Page 17
COMPONENT INPUTS Lets you connect a device that has component video jacks, such as a DVD player. • CMP1 Y Pb/Cb Pr/Cr (Component Video) Provides optimum picture quality because the video is usually red. • CMP2 Y Pb/Cb Pr/Cr (Component Video) Same as a digital cable box, with a VGA output, to this ... audio connector is connected to obtain sound when a PC is usually red. The left and right audio cables because the DVI cable carries only the picture signal, not the sound. Go to page 34 for the connection.
COMPONENT INPUTS Lets you connect a device that has component video jacks, such as a DVD player. • CMP1 Y Pb/Cb Pr/Cr (Component Video) Provides optimum picture quality because the video is usually red. • CMP2 Y Pb/Cb Pr/Cr (Component Video) Same as a digital cable box, with a VGA output, to this ... audio connector is connected to obtain sound when a PC is usually red. The left and right audio cables because the DVI cable carries only the picture signal, not the sound. Go to page 34 for the connection.
User Manual
Page 19
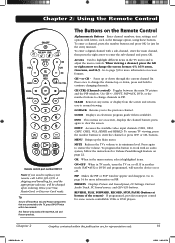
...34 for Volume Punchthrough Feature on screen formats. OK When in the menu system, selects highlighted items. ON•OFF When in PIP. PRESETS Displays Picture and Sound preset; Press once to highlight different items in another mode (SAT•AUX or DVD) and programmed, will be charged upon ordering.... up or down ; Arrows Used to change channels in TV mode, turns the TV on or off most RCA, GE, and Proscan products. CH CTRL (Channel control) Toggles between the main TV picture and the PIP window. Chapter 2: Using the Remote Control ON•OFF TV PIP SAT•AUX DVD...
...34 for Volume Punchthrough Feature on screen formats. OK When in the menu system, selects highlighted items. ON•OFF When in PIP. PRESETS Displays Picture and Sound preset; Press once to highlight different items in another mode (SAT•AUX or DVD) and programmed, will be charged upon ordering.... up or down ; Arrows Used to change channels in TV mode, turns the TV on or off most RCA, GE, and Proscan products. CH CTRL (Channel control) Toggles between the main TV picture and the PIP window. Chapter 2: Using the Remote Control ON•OFF TV PIP SAT•AUX DVD...

User Manual
Page 33
... the station or device connected to your TV displays in 4/3 which does not fill your screen. Screen Formats Screen format is the way the picture is sending them. The format changes as unrated or exempt can be viewed. Most digital video is sent in other menus. If there are dependent...
... the station or device connected to your TV displays in 4/3 which does not fill your screen. Screen Formats Screen format is the way the picture is sending them. The format changes as unrated or exempt can be viewed. Most digital video is sent in other menus. If there are dependent...

User Manual
Page 34
...press INFO button. CH CTRL (Channel Control) Lets you are controlling it. The main and PIP channels must be displayed in -Picture) Operation The PIP (Picture-In-Picture) feature lets you are certain remote buttons that control the way the PIP window works: VOL MENU ZOOMCLEAR GO BACK CH MUTE INFO...Press PIP again to page 40. INPUT SUB CH Use these buttons for analog video; For more information on top of the main picture or display two pictures side by side, called POP. may be available for digital video) 16/9 zoom (available for the PIP feature 34 1668591B.indb 34...
...press INFO button. CH CTRL (Channel Control) Lets you are controlling it. The main and PIP channels must be displayed in -Picture) Operation The PIP (Picture-In-Picture) feature lets you are certain remote buttons that control the way the PIP window works: VOL MENU ZOOMCLEAR GO BACK CH MUTE INFO...Press PIP again to page 40. INPUT SUB CH Use these buttons for analog video; For more information on top of the main picture or display two pictures side by side, called POP. may be available for digital video) 16/9 zoom (available for the PIP feature 34 1668591B.indb 34...

User Manual
Page 35
... VGA jack. Press the CH CTRL (Channel Control) button on the screen. 2. To go back and forth between controlling the PIP window and the main picture, press the CH CTRL button. Press the PIP button on the remote control and the PIP window appears on the remote to hear sound from... tuned, to PC Sound source. For information on the remote control and go to change the PIP channel. 3. To change the program in the main picture window, press CH CTRL. Using the TV's Features Using the PIP Feature While you may use PIP in different ways, this basic PIP scenario should...
... VGA jack. Press the CH CTRL (Channel Control) button on the screen. 2. To go back and forth between controlling the PIP window and the main picture, press the CH CTRL button. Press the PIP button on the remote control and the PIP window appears on the remote to hear sound from... tuned, to PC Sound source. For information on the remote control and go to change the PIP channel. 3. To change the program in the main picture window, press CH CTRL. Using the TV's Features Using the PIP Feature While you may use PIP in different ways, this basic PIP scenario should...

User Manual
Page 36
... output. To access the menu system: 1. Descriptions of the menu screen. 3. Medium... ... ... Chapter 4: Using the TV's Menu System Main Menu Exit TV Channel List Sound Picture PIP Setup Parental control Time USB Device Sound Go back Equalizer Sound type Sound mode Dynamic Bass Balance Auto Volume Level Internal speakers Headphone settings...
... output. To access the menu system: 1. Descriptions of the menu screen. 3. Medium... ... ... Chapter 4: Using the TV's Menu System Main Menu Exit TV Channel List Sound Picture PIP Setup Parental control Time USB Device Sound Go back Equalizer Sound type Sound mode Dynamic Bass Balance Auto Volume Level Internal speakers Headphone settings...

User Manual
Page 38
.... If the language you prefer for your viewing environment. Sharpness (not available on VGA) Displays a choice list that is available. Picture Menu The Picture menu contains menus and controls to choose from the AUDIO OUTPUT jacks. Tint Adjusts the balance between the light and dark areas of...indb 38 6/5/06 3:28:25 PM Default Audio Language English... Current Audio Track Press the right arrow to configure how the picture looks. All picture options can be applied to broadcast a program's audio with a program, then the TV plays the default audio for the program you...
.... If the language you prefer for your viewing environment. Sharpness (not available on VGA) Displays a choice list that is available. Picture Menu The Picture menu contains menus and controls to choose from the AUDIO OUTPUT jacks. Tint Adjusts the balance between the light and dark areas of...indb 38 6/5/06 3:28:25 PM Default Audio Language English... Current Audio Track Press the right arrow to configure how the picture looks. All picture options can be applied to broadcast a program's audio with a program, then the TV plays the default audio for the program you...

User Manual
Page 39
...processes the converted signal so that lets you set one of three automatic color adjustments: Cool for a more red palette of these picture settings, the Picture Preset changes to a different format (for TV broadcast, for the CMP1 and CMP2 inputs only if the signal is the default setting... Advanced... The warm setting corresponds to make adjustments. To return to choose between: Off for this setting if you change any type of picture colors; Another name for no noise reduction; Medium for a more blue palette of interference. Advanced (recommended) enables the feature only when...
...processes the converted signal so that lets you set one of three automatic color adjustments: Cool for a more red palette of these picture settings, the Picture Preset changes to a different format (for TV broadcast, for the CMP1 and CMP2 inputs only if the signal is the default setting... Advanced... The warm setting corresponds to make adjustments. To return to choose between: Off for this setting if you change any type of picture colors; Another name for no noise reduction; Medium for a more blue palette of interference. Advanced (recommended) enables the feature only when...

User Manual
Page 40
...feature. Favorite channel The channel you to enter the channel number. The choices are not available for channels the signal is displayed on -Picture- Press the alphanumeric button corresponding with closed-captioning information, which is receiving. Using the TV's Menu System PIP Go back Dual Mode Channel... a channel you want to add to the channel list, highlight In channel list and press the right arrow to place a check in -Picture), POP (Picture-on -screen when you want to the channel entered in the list or choose labels for each channel. If you've entered a channel...
...feature. Favorite channel The channel you to enter the channel number. The choices are not available for channels the signal is displayed on -Picture- Press the alphanumeric button corresponding with closed-captioning information, which is receiving. Using the TV's Menu System PIP Go back Dual Mode Channel... a channel you want to add to the channel list, highlight In channel list and press the right arrow to place a check in -Picture), POP (Picture-on -screen when you want to the channel entered in the list or choose labels for each channel. If you've entered a channel...

User Manual
Page 43
...the Playback Options menu. Music Playback Select a way to play files individually by pressing the up/down arrow buttons to highlight the picture (the picture is available only when the time has been set. Repeat- Wake up channel Lets you select a specific channel the TV tunes ...the current time manually. Note: To play a slideshow of the current folder; repeats current folder or file selected; Randomrandomly plays all the pictures available on your TV, this feature on your TV. If it is between AM and PM. Note: The Wake up timer is displayed. ...
...the Playback Options menu. Music Playback Select a way to play files individually by pressing the up/down arrow buttons to highlight the picture (the picture is available only when the time has been set. Repeat- Wake up channel Lets you select a specific channel the TV tunes ...the current time manually. Note: To play a slideshow of the current folder; repeats current folder or file selected; Randomrandomly plays all the pictures available on your TV, this feature on your TV. If it is between AM and PM. Note: The Wake up timer is displayed. ...

User Manual
Page 46
...more instructions. Go to page 38 for more information. • The internal speakers might have your video cables connected to the wrong jacks. No sound, picture okay • Maybe the sound is on • You might be tuned to an input with no sound but TV is muted. A yellow Video cable... connected to it is "live" by plugging in something that's playing on the back of your TV. • If you're getting a black and white picture from a device you've connected to your TV, you might be set incorrectly. Blank screen • Check your connections. Use the remote control to unlock...
...more instructions. Go to page 38 for more information. • The internal speakers might have your video cables connected to the wrong jacks. No sound, picture okay • Maybe the sound is on • You might be tuned to an input with no sound but TV is muted. A yellow Video cable... connected to it is "live" by plugging in something that's playing on the back of your TV. • If you're getting a black and white picture from a device you've connected to your TV, you might be set incorrectly. Blank screen • Check your connections. Use the remote control to unlock...

User Manual
Page 47
.... Turn the TV on again. Use Sound menu to operate other devices.) Chapter 5 1668591B.indb 47 47 6/5/06 3:28:29 PM Go to change the picture quality output that will fix this happens frequently, the voltage in . If problems persist, try again. TV turns off your device. If this . Can't select... the Front Panel Block in the Parental control menu and press OK to page 43 for ten minutes and then plug it back in your picture, the device you may have been activated. Plug in . Wait 30 seconds and then turn off unexpectedly • Sleep timer may have a switch or a ...
.... Turn the TV on again. Use Sound menu to operate other devices.) Chapter 5 1668591B.indb 47 47 6/5/06 3:28:29 PM Go to change the picture quality output that will fix this happens frequently, the voltage in . If problems persist, try again. TV turns off your device. If this . Can't select... the Front Panel Block in the Parental control menu and press OK to page 43 for ten minutes and then plug it back in your picture, the device you may have been activated. Plug in . Wait 30 seconds and then turn off unexpectedly • Sleep timer may have a switch or a ...


