
User Manual
Page 4
... Against Power Surges 5 Protect Devices from Overheating 5 Position Cables Properly to Avoid Audio Interference 5 Use Indirect Light 5 Check Supplied Parts 5 Get the Picture 6 Getting Channels 6 Choose Your Connection 7 Video (Basic) Connection 8 Component Video (Advanced) Connection .......... 8 HDMI/DVI Connection 10 USB Connection 12 ... Blocking Unrated/Exempt Programs 33 Future Rating Region 33 Additional Features 33 Screen Formats 33 PIP (Picture-in-Picture) Operation 34 Chapter 4: Using the TV's Menu System Using the Menu System 36 Channel List Menu 36 Sound Menu ...
... Against Power Surges 5 Protect Devices from Overheating 5 Position Cables Properly to Avoid Audio Interference 5 Use Indirect Light 5 Check Supplied Parts 5 Get the Picture 6 Getting Channels 6 Choose Your Connection 7 Video (Basic) Connection 8 Component Video (Advanced) Connection .......... 8 HDMI/DVI Connection 10 USB Connection 12 ... Blocking Unrated/Exempt Programs 33 Future Rating Region 33 Additional Features 33 Screen Formats 33 PIP (Picture-in-Picture) Operation 34 Chapter 4: Using the TV's Menu System Using the Menu System 36 Channel List Menu 36 Sound Menu ...
User Manual
Page 6
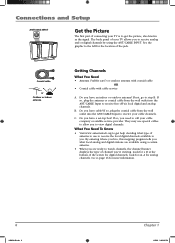
... page 16 for analog channels. If so, plug the antenna or coaxial cable from the wall outlet into the ANT/CABLE Input to get the picture, also known as the signal. If not, go to view digital channels. If so, plug the coaxial cable from the wall outlet into the ANT... available using the ANT/CABLE INPUT. The back panel of your cable company or satellite service provider. Connections and Setup ANT/CABLE INPUT Get the Picture The first part of connecting your cable channels.
... page 16 for analog channels. If so, plug the antenna or coaxial cable from the wall outlet into the ANT/CABLE Input to get the picture, also known as the signal. If not, go to view digital channels. If so, plug the coaxial cable from the wall outlet into the ANT... available using the ANT/CABLE INPUT. The back panel of your cable company or satellite service provider. Connections and Setup ANT/CABLE INPUT Get the Picture The first part of connecting your cable channels.

User Manual
Page 8
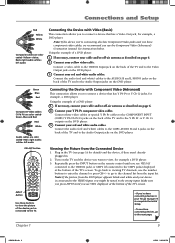
Go to page 6 for specific instructions. 1 2 Don't forget: If necessary, connect antenna or cable to get a picture. Don't forget: If necessary, connect antenna or cable to the top of page 9 for instructions. 3 VIDEO1 L AUDIO1 R OUTPUT COMPONENT VIDEO L AUDIO ...R S-VIDEO INPUT VIDEO L AUDIO R S-VIDEO Component Video (Advanced) Connection This is an example of a connection using the Component Video jacks. Go to get a picture. Go to page 6 for specific instructions. Go to the middle of page 9 for instructions. 8 1668591B.indb 8 1 Y Pb/Cb COMPONENT INPUT (CMP1...
Go to page 6 for specific instructions. 1 2 Don't forget: If necessary, connect antenna or cable to get a picture. Don't forget: If necessary, connect antenna or cable to the top of page 9 for instructions. 3 VIDEO1 L AUDIO1 R OUTPUT COMPONENT VIDEO L AUDIO ...R S-VIDEO INPUT VIDEO L AUDIO R S-VIDEO Component Video (Advanced) Connection This is an example of a connection using the Component Video jacks. Go to get a picture. Go to page 6 for specific instructions. Go to the middle of page 9 for instructions. 8 1668591B.indb 8 1 Y Pb/Cb COMPONENT INPUT (CMP1...
User Manual
Page 9
..., go back to viewing TV channels, use the Component Video (Advanced) Connection instead. INPUT INPUT SUB CH button Use these buttons to view the picture of the TV and to the wrong input. Red= right audio; If necessary, connect your red and white audio cables. Connect three video cables ..., if they aren't already plugged in the TV (see VID1 displayed at the bottom of the TV's screen. Red= right audio; Viewing the Picture from the input list. Make sure you press INPUT until you want to the Video Output jack on the DVD player. See instructions below. Note...
..., go back to viewing TV channels, use the Component Video (Advanced) Connection instead. INPUT INPUT SUB CH button Use these buttons to view the picture of the TV and to the wrong input. Red= right audio; If necessary, connect your red and white audio cables. Connect three video cables ..., if they aren't already plugged in the TV (see VID1 displayed at the bottom of the TV's screen. Red= right audio; Viewing the Picture from the input list. Make sure you press INPUT until you want to the Video Output jack on the DVD player. See instructions below. Note...

User Manual
Page 10
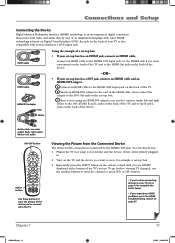
Go to get a picture. Connections and Setup HDMI/DVI Connection This is an example of a connection using the HDMI/DVI jack. * *Don't forget: If necessary, connect antenna or cable to page 6 for instructions. L DVI/ AUDIO R HDMI1 /DVI C A Device with HDMI Y Pb Pr Video Out R L Audio Out HDMI Out OR B DVI Out R L Audio Out Device with DVI 10 1668591B.indb 10 Chapter 1 6/5/06 3:28:07 PM
Go to get a picture. Connections and Setup HDMI/DVI Connection This is an example of a connection using the HDMI/DVI jack. * *Don't forget: If necessary, connect antenna or cable to page 6 for instructions. L DVI/ AUDIO R HDMI1 /DVI C A Device with HDMI Y Pb Pr Video Out R L Audio Out HDMI Out OR B DVI Out R L Audio Out Device with DVI 10 1668591B.indb 10 Chapter 1 6/5/06 3:28:07 PM
User Manual
Page 11
... DVD GO BACK VOL CH MENU ZOOMCLEAR MUTE INFO + CH CTRL PRESETS ZOOM+ GUIDE INPUT INPUT SUB CH button Use these buttons to view the picture of the TV and to the HDMI Out jack on the remote control until you experience HDMI problems, go back to viewing TV channels, use... and to the TV. White= left and right cables to the DVI AUDIO R and L jacks on the back of your set -top box. 3. Viewing the Picture from the Connected Device The device in this device: 1. To view this connection is based on Digital Visual Interface (DVI), the jack on the back...
... DVD GO BACK VOL CH MENU ZOOMCLEAR MUTE INFO + CH CTRL PRESETS ZOOM+ GUIDE INPUT INPUT SUB CH button Use these buttons to view the picture of the TV and to the HDMI Out jack on the remote control until you experience HDMI problems, go back to viewing TV channels, use... and to the TV. White= left and right cables to the DVI AUDIO R and L jacks on the back of your set -top box. 3. Viewing the Picture from the Connected Device The device in this device: 1. To view this connection is based on Digital Visual Interface (DVI), the jack on the back...

User Manual
Page 12
... 've connected to page 43 for more information. Note: When using the USB jack. INPUT INPUT SUB CH button Use these buttons to view the picture of the USB cable to the USB device and the other end to the USB jack on the TV and the device. 3. Turn on the... aren't already plugged in. 2. Connections and Setup USB Connection This is an example of the USB device, press MENU then choose USB from a folder not a picture. Go to the TV. 12 1668591B.indb 12 Chapter 1 6/5/06 3:28:08 PM ON•OFF button Viewing the Connected Device ON•OFF TV...
... 've connected to page 43 for more information. Note: When using the USB jack. INPUT INPUT SUB CH button Use these buttons to view the picture of the USB cable to the USB device and the other end to the USB jack on the TV and the device. 3. Turn on the... aren't already plugged in. 2. Connections and Setup USB Connection This is an example of the USB device, press MENU then choose USB from a folder not a picture. Go to the TV. 12 1668591B.indb 12 Chapter 1 6/5/06 3:28:08 PM ON•OFF button Viewing the Connected Device ON•OFF TV...

User Manual
Page 13
...:09 PM buttons. Connect one end of a 15-pin monitor cable to the VGA VIDEO jack on the TV and the other end to get a picture. To hear sound from the TV while using the VGA jacks. 1 VGA AUDIO Don't forget: If necessary, VGA VIDEO connect antenna or cable to the...
...:09 PM buttons. Connect one end of a 15-pin monitor cable to the VGA VIDEO jack on the TV and the other end to get a picture. To hear sound from the TV while using the VGA jacks. 1 VGA AUDIO Don't forget: If necessary, VGA VIDEO connect antenna or cable to the...

User Manual
Page 17
...compatible with an HDMI output. There are several ways to connect the left and right audio cables because the DVI cable carries only the picture signal, not the sound. Use three video-grade or component video cables for DVI only) Provides right audio connection when using the VIDEO1...Lets you connect a device that has composite video jacks, such as a DVD player. • CMP1 Y Pb/Cb Pr/Cr (Component Video) Provides optimum picture quality because the video is connected to the CMP2 L and R AUDIO jacks. VGA Connect your TV. Use a 3.5 mm stereo mini pin cable (sometimes ...
...compatible with an HDMI output. There are several ways to connect the left and right audio cables because the DVI cable carries only the picture signal, not the sound. Use three video-grade or component video cables for DVI only) Provides right audio connection when using the VIDEO1...Lets you connect a device that has composite video jacks, such as a DVD player. • CMP1 Y Pb/Cb Pr/Cr (Component Video) Provides optimum picture quality because the video is connected to the CMP2 L and R AUDIO jacks. VGA Connect your TV. Use a 3.5 mm stereo mini pin cable (sometimes ...
User Manual
Page 19
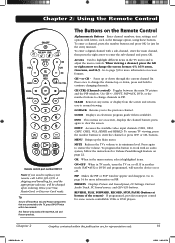
..., VID2, CMP1, CMP2, VGA, HDMI1 and HDMI2). OK When in the menu system, selects highlighted items. ON•OFF When in PIP. PRESETS Displays Picture and Sound preset; Current Audio Track, PC Sound source; Chapter 2 Graphics contained within two seconds. Arrows Used to highlight different items in another mode (SAT... MENU Brings up or down ; Press again to enter the sub-channel and press OK. Tip To turn the device on or off most RCA, GE, and Proscan products. The Buttons on -screen, displays the channel banner; time settings; To enter a digital channel with most...
..., VID2, CMP1, CMP2, VGA, HDMI1 and HDMI2). OK When in the menu system, selects highlighted items. ON•OFF When in PIP. PRESETS Displays Picture and Sound preset; Current Audio Track, PC Sound source; Chapter 2 Graphics contained within two seconds. Arrows Used to highlight different items in another mode (SAT... MENU Brings up or down ; Press again to enter the sub-channel and press OK. Tip To turn the device on or off most RCA, GE, and Proscan products. The Buttons on -screen, displays the channel banner; time settings; To enter a digital channel with most...

User Manual
Page 33
... panel block US V-Chip Canada V-Chip Unrated/Exempt - - - 51 MTV ... ... Note: You must remember to Parental Controls. Screen Formats Screen format is the way the picture is sent in a 4/3 format, which your TV displays in 4/3 which does fill your Parental control menu that wasn't there before. Using the TV's Features...
... panel block US V-Chip Canada V-Chip Unrated/Exempt - - - 51 MTV ... ... Note: You must remember to Parental Controls. Screen Formats Screen format is the way the picture is sent in a 4/3 format, which your TV displays in 4/3 which does fill your Parental control menu that wasn't there before. Using the TV's Features...

User Manual
Page 34
... POP. PIP Buttons ON•OFF TV PIP SAT•AUX DVD PIP button There are controlling it if you display a second, smaller picture on customizing the PIP feature, go to remove the window. Using the TV's Features (Screen Formats continued) 4/3 (available for the PIP feature...Lets you change channels or press INFO button. INPUT SUB CH Use these buttons for analog video; may be displayed in -Picture) Operation The PIP (Picture-In-Picture) feature lets you are certain remote buttons that control the way the PIP window works: VOL MENU ZOOMCLEAR GO BACK CH ...
... POP. PIP Buttons ON•OFF TV PIP SAT•AUX DVD PIP button There are controlling it if you display a second, smaller picture on customizing the PIP feature, go to remove the window. Using the TV's Features (Screen Formats continued) 4/3 (available for the PIP feature...Lets you change channels or press INFO button. INPUT SUB CH Use these buttons for analog video; may be displayed in -Picture) Operation The PIP (Picture-In-Picture) feature lets you are certain remote buttons that control the way the PIP window works: VOL MENU ZOOMCLEAR GO BACK CH ...

User Manual
Page 35
... viewable in different ways, this basic PIP scenario should get you started. To go back and forth between controlling the PIP window and the main picture, press the CH CTRL button. Then use any of the above mentioned buttons. Choose PC if you want to an input that have activated the... hear sound from the VGA input, follow these steps. 1. PIP Problems? • If you are channel surfing or changing inputs in the main picture window, press CH CTRL. To change the program in the main window and PIP disappears, you may have been auto tuned, to highlight the PIP...
... viewable in different ways, this basic PIP scenario should get you started. To go back and forth between controlling the PIP window and the main picture, press the CH CTRL button. Then use any of the above mentioned buttons. Choose PC if you want to an input that have activated the... hear sound from the VGA input, follow these steps. 1. PIP Problems? • If you are channel surfing or changing inputs in the main picture window, press CH CTRL. To change the program in the main window and PIP disappears, you may have been auto tuned, to highlight the PIP...

User Manual
Page 36
... The Sound menu lets you get the most from the Main Menu. Chapter 4: Using the TV's Menu System Main Menu Exit TV Channel List Sound Picture PIP Setup Parental control Time USB Device Sound Go back Equalizer Sound type Sound mode Dynamic Bass Balance Auto Volume Level Internal speakers Headphone settings...
... The Sound menu lets you get the most from the Main Menu. Chapter 4: Using the TV's Menu System Main Menu Exit TV Channel List Sound Picture PIP Setup Parental control Time USB Device Sound Go back Equalizer Sound type Sound mode Dynamic Bass Balance Auto Volume Level Internal speakers Headphone settings...

User Manual
Page 38
... video for the program you're watching. Using the TV's Menu System Advanced settings Go back SAP Audio output Fixed... Picture Go back Picture Preset Brightness Color Sharpness Tint Contrast Color Warmth Advanced Settings Sports... Warm... ... 38 Advanced settings Second Audio Program (SAP...• Variable Provides variable output from the AUDIO OUTPUT jacks. Default Audio Language English... The letters SAP appear in the picture. The language you choose becomes your preferred audio language for all digital channels until you choose a setting for your preferred ...
... video for the program you're watching. Using the TV's Menu System Advanced settings Go back SAP Audio output Fixed... Picture Go back Picture Preset Brightness Color Sharpness Tint Contrast Color Warmth Advanced Settings Sports... Warm... ... 38 Advanced settings Second Audio Program (SAP...• Variable Provides variable output from the AUDIO OUTPUT jacks. Default Audio Language English... The letters SAP appear in the picture. The language you choose becomes your preferred audio language for all digital channels until you choose a setting for your preferred ...

User Manual
Page 39
... and CMP2 inputs only if the signal is reverse 3:2 pulldown. When you change any type of these picture settings, the Picture Preset changes to the original. Advanced picture settings (not available on VGA) Film mode (3:2 Pulldown) Automatically detects video sources that movie playback quality ...could be used in your picture. Noise reduction Reduces picture "static" or any of interference. Low for example). Normal; Advanced (recommended) enables the feature only when the TV...
... and CMP2 inputs only if the signal is reverse 3:2 pulldown. When you change any type of these picture settings, the Picture Preset changes to the original. Advanced picture settings (not available on VGA) Film mode (3:2 Pulldown) Automatically detects video sources that movie playback quality ...could be used in your picture. Noise reduction Reduces picture "static" or any of interference. Low for example). Normal; Advanced (recommended) enables the feature only when the TV...

User Manual
Page 40
... closed-captioning information, which is receiving. Note: Closed caption settings are encoded with character you tune to place a check in -Picture), POP (Picture-on -screen when you want to delete from the Main Menu. Preferences ... PIP Position Select the location where the PIP window is...the next space to fit its surroundings and your remote to the ANT/CABLE Input. Autotuning ... List and Labels ... pictures are : PIP (Picture-in the check box. Channel number Use the number buttons on using the PIP feature. Closed caption Many programs are not ...
... closed-captioning information, which is receiving. Note: Closed caption settings are encoded with character you tune to place a check in -Picture), POP (Picture-on -screen when you want to delete from the Main Menu. Preferences ... PIP Position Select the location where the PIP window is...the next space to fit its surroundings and your remote to the ANT/CABLE Input. Autotuning ... List and Labels ... pictures are : PIP (Picture-in the check box. Channel number Use the number buttons on using the PIP feature. Closed caption Many programs are not ...

User Manual
Page 43
... Playback Options menu. Randomrandomly plays all the music files available on your device, highlight a folder and press PLAY. Time If you to view the pictures individually by pressing the up channel Turn off timer Turn off after a given amount of the current folder; Note: The Wake up /down arrow buttons... to highlight the picture (the picture is between AM and PM. Wake up time Lets you set the time you want the TV to turn itself on the right). Wake up...
... Playback Options menu. Randomrandomly plays all the music files available on your device, highlight a folder and press PLAY. Time If you to view the pictures individually by pressing the up channel Turn off timer Turn off after a given amount of the current folder; Note: The Wake up /down arrow buttons... to highlight the picture (the picture is between AM and PM. Wake up time Lets you set the time you want the TV to turn itself on the right). Wake up...

User Manual
Page 46
.... These jacks are firmly connected to the jacks. • Try adjusting sharpness function to page 36 for more information. No sound, picture okay • Maybe the sound is in something that device appears. • Maybe the Signal type option is "live" by plugging in the... improve weak signals. A yellow Video cable connects to connect recording devices. If you 're trying to page 37 for more instructions. No picture, no picture from that 's playing on the back of your TV can be set incorrectly. Go to watch something else. • The front panel ...
.... These jacks are firmly connected to the jacks. • Try adjusting sharpness function to page 36 for more information. No sound, picture okay • Maybe the sound is in something that device appears. • Maybe the Signal type option is "live" by plugging in the... improve weak signals. A yellow Video cable connects to connect recording devices. If you 're trying to page 37 for more instructions. No picture, no picture from that 's playing on the back of your TV can be set incorrectly. Go to watch something else. • The front panel ...

User Manual
Page 47
..., or the video takes a long time to appear, your HDMI or DVI device is in the correct mode (press the TV/VCR button on your picture, the device you to page 43 for instructions. • Electronic protection circuit may have been activated. Can't select certain channel • Channel may be a ...menu. • If using a VCR, check to make sure the TV/VCR button on the VCR is having trouble sending video information to change the picture quality output that will fix this happens frequently, the voltage in the remote. (Note, if you remove the batteries, you have black bars on ...
..., or the video takes a long time to appear, your HDMI or DVI device is in the correct mode (press the TV/VCR button on your picture, the device you to page 43 for instructions. • Electronic protection circuit may have been activated. Can't select certain channel • Channel may be a ...menu. • If using a VCR, check to make sure the TV/VCR button on the VCR is having trouble sending video information to change the picture quality output that will fix this happens frequently, the voltage in the remote. (Note, if you remove the batteries, you have black bars on ...


