
User Guide & Warranty
Page 4
... 8 Component Video (Advanced) Connection .......... 8 HDMI/DVI Connection 10 VGA Connection 12 Plug in the TV 13 Put Batteries in the Remote 13 Turn on the TV 13 How to Use the Remote Control to Complete the Initial Setup 13 Complete the Initial Setup 14 Set the Menu Language 14 Complete Channel Setup... and Other Jacks On Your TV 17 Front Panel Buttons 17 Right Side Input Jacks (when facing back of TV) 17 The Buttons on the Remote Control 18 Chapter 2: Using the TV's Features Channel Banner 19 Parental Controls and V-Chip 20 How V-Chip Works for USA and Canada 20 Lock/Unlock...
... 8 Component Video (Advanced) Connection .......... 8 HDMI/DVI Connection 10 VGA Connection 12 Plug in the TV 13 Put Batteries in the Remote 13 Turn on the TV 13 How to Use the Remote Control to Complete the Initial Setup 13 Complete the Initial Setup 14 Set the Menu Language 14 Complete Channel Setup... and Other Jacks On Your TV 17 Front Panel Buttons 17 Right Side Input Jacks (when facing back of TV) 17 The Buttons on the Remote Control 18 Chapter 2: Using the TV's Features Channel Banner 19 Parental Controls and V-Chip 20 How V-Chip Works for USA and Canada 20 Lock/Unlock...
User Guide & Warranty
Page 5
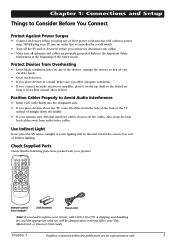
...or amplifier, place it won't flow around other devices. Use soft or indirect lighting. FAV OK INFO FREEZE CLEAR ZOOM+ Remote control Part # R130A1 2 AA batteries Power cord Note: If you need to Avoid Audio Interference • Insert each cable firmly ... power cords into the wall outlet or power strip. Chapter 1 Graphics contained within this publication are properly grounded. Position Cables Properly to replace your remote, call 1-800-338-0376. Check Supplied Parts Check that air can circulate freely. • Don't stack devices. • If you place ...
...or amplifier, place it won't flow around other devices. Use soft or indirect lighting. FAV OK INFO FREEZE CLEAR ZOOM+ Remote control Part # R130A1 2 AA batteries Power cord Note: If you need to Avoid Audio Interference • Insert each cable firmly ... power cords into the wall outlet or power strip. Chapter 1 Graphics contained within this publication are properly grounded. Position Cables Properly to replace your remote, call 1-800-338-0376. Check Supplied Parts Check that air can circulate freely. • Don't stack devices. • If you place ...
User Guide & Warranty
Page 9
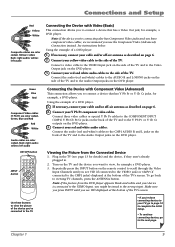
... continue connecting devices, go back to the next page. Turn on page 6. 2. Chapter 1 9 Connect your cable and/or off -air antenna as described on the remote control to scroll through the Video Input Channels until you see VID displayed at the bottom of the TV and to the wrong input. Red...
... continue connecting devices, go back to the next page. Turn on page 6. 2. Chapter 1 9 Connect your cable and/or off -air antenna as described on the remote control to scroll through the Video Input Channels until you see VID displayed at the bottom of the TV and to the wrong input. Red...
User Guide & Warranty
Page 11
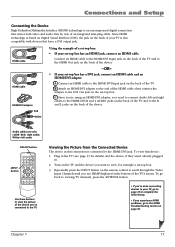
... back of the TV and to the TV. Viewing the Picture from the Connected Device The device in . 2. Repeatedly press the INPUT button on the remote control to scroll through the Video Input Channels until you need to the end of the TV's screen. C. Attach an HDMI/DVI adapter to connect...
... back of the TV and to the TV. Viewing the Picture from the Connected Device The device in . 2. Repeatedly press the INPUT button on the remote control to scroll through the Video Input Channels until you need to the end of the TV's screen. C. Attach an HDMI/DVI adapter to connect...

User Guide & Warranty
Page 12
... example of a 15-pin monitor cable to the VGA VIDEO jack on the TV and the other end to the Audio Output jack on the remote control to scroll through the Video Input Channels until you to listen to the sound from the TV while the PC is 1280 x 1024. Go...
... example of a 15-pin monitor cable to the VGA VIDEO jack on the TV and the other end to the Audio Output jack on the remote control to scroll through the Video Input Channels until you to listen to the sound from the TV while the PC is 1280 x 1024. Go...
User Guide & Warranty
Page 13
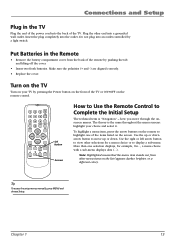
..., brighter, or a different color). CH+ MUTE SKIP VOL+ GO BACK MENU ZOOM- Chapter 1 13 Connections and Setup Plug in the Remote • Remove the battery compartment cover from other selections for a menu choice or to highlight one selection displays, for example, On...; Use... the right or left arrow button to view other menu items on the remote control. 1 4 7 INPUT ON•OFF 2 3 SLEEP 5 6 CC 8 9 ANTENNA PRESETS SOUND VOL- Make sure the polarities (+ and -) are aligned correctly...
..., brighter, or a different color). CH+ MUTE SKIP VOL+ GO BACK MENU ZOOM- Chapter 1 13 Connections and Setup Plug in the Remote • Remove the battery compartment cover from other selections for a menu choice or to highlight one selection displays, for example, On...; Use... the right or left arrow button to view other menu items on the remote control. 1 4 7 INPUT ON•OFF 2 3 SLEEP 5 6 CC 8 9 ANTENNA PRESETS SOUND VOL- Make sure the polarities (+ and -) are aligned correctly...
User Guide & Warranty
Page 17
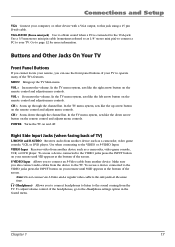
...the Headphone settings option in the Sound menu. > > Chapter 1 17 Buttons and Other Jacks On Your TV Front Panel Buttons If you cannot locate your remote until SVID appears at the same time. (Headphones) Allows you can use the front panel buttons of the screen. VOL > Increases the volume. In the...access a device connected to this jack using a 15 pin D-sub cable. To access a device connected to the VIDEO jacks press the INPUT button on your remote until VID appears at the bottom of your computer, or other device with a VGA output, to the VIDEO jacks press the INPUT button on the...
...the Headphone settings option in the Sound menu. > > Chapter 1 17 Buttons and Other Jacks On Your TV Front Panel Buttons If you cannot locate your remote until SVID appears at the same time. (Headphones) Allows you can use the front panel buttons of the screen. VOL > Increases the volume. In the...access a device connected to this jack using a 15 pin D-sub cable. To access a device connected to the VIDEO jacks press the INPUT button on your remote until VID appears at the bottom of your computer, or other device with a VGA output, to the VIDEO jacks press the INPUT button on the...

User Guide & Warranty
Page 18
... the channel banner; press and hold 1 until "1" and two dashes (- -) appear, then add the second two digits. Press repeatedly to replace your remote, call 1-800-338-0376. Aud. In VGA mode, switches to its minimum level. A shipping and handling fee, and the appropriate sales tax, will...controls. (0-9) Number Buttons Enter channel numbers and time settings directly through the current channel list. ON•OFF Turns the TV on the Remote Control Arrows Used to highlight different items in the menu system, displays sub-menus. To enter a digital channel with a sub-channel, ...
... the channel banner; press and hold 1 until "1" and two dashes (- -) appear, then add the second two digits. Press repeatedly to replace your remote, call 1-800-338-0376. Aud. In VGA mode, switches to its minimum level. A shipping and handling fee, and the appropriate sales tax, will...controls. (0-9) Number Buttons Enter channel numbers and time settings directly through the current channel list. ON•OFF Turns the TV on the Remote Control Arrows Used to highlight different items in the menu system, displays sub-menus. To enter a digital channel with a sub-channel, ...
User Guide & Warranty
Page 19
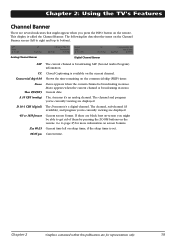
Chapter 2: Using the TV's Features Channel Banner There are black bars on-screen you might appear when you press the INFO button on the remote. SAP Stereo A 10 CBS CC 4/3 Format Analog Channel Banner Commercial Skip: 030 Thur 09/29/05 ZZz 00:25 06:05 PM English Stereo D 10-1... current channel is set. If there are several indicators that might be able to get rid of them by pressing the ZOOM buttons on the remote. Chapter 2 Graphics contained within this publication are for more information on sleep timer, if the sleep timer is broadcasting in mono. This display is ...
Chapter 2: Using the TV's Features Channel Banner There are black bars on-screen you might appear when you press the INFO button on the remote. SAP Stereo A 10 CBS CC 4/3 Format Analog Channel Banner Commercial Skip: 030 Thur 09/29/05 ZZz 00:25 06:05 PM English Stereo D 10-1... current channel is set. If there are several indicators that might be able to get rid of them by pressing the ZOOM buttons on the remote. Chapter 2 Graphics contained within this publication are for more information on sleep timer, if the sleep timer is broadcasting in mono. This display is ...

User Guide & Warranty
Page 20
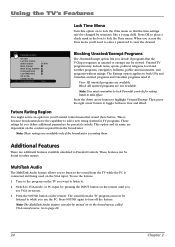
.../or content themes that are not available for V-Chip, Channel Block, or Front Panel Block will receive the message This channel is explained on the remote for USA and Canada V-Chip reads the program's age-based rating (TV-MA, TV-14, etc.) and content themes [(Violence (V), Adult Language (L), etc.)]. You can...
.../or content themes that are not available for V-Chip, Channel Block, or Front Panel Block will receive the message This channel is explained on the remote for USA and Canada V-Chip reads the program's age-based rating (TV-MA, TV-14, etc.) and content themes [(Violence (V), Adult Language (L), etc.)]. You can...
User Guide & Warranty
Page 21
... the selected rating, and whether the status of where items are located within the Rating Limit screen. on the front panel and CLEAR on the remote for rating limits to take effect. Press the up /down arrow button to scroll to the rating corresponding with the lowest rating you can block...
... the selected rating, and whether the status of where items are located within the Rating Limit screen. on the front panel and CLEAR on the remote for rating limits to take effect. Press the up /down arrow button to scroll to the rating corresponding with the lowest rating you can block...

User Guide & Warranty
Page 23
... channel Block all dig. Use the number buttons to enter the channel you don't, the front panel block will not take effect. The remote still tunes to any remote that is capable of operating the television while you 'll need to enter a password to block all digital channels. If you want to... above a specified level. View... channels box to view the channel if the TV is locked. If you're using this option on the remote control (the TV's Main Menu appears). 2. Select Movie ratings.
... channel Block all dig. Use the number buttons to enter the channel you don't, the front panel block will not take effect. The remote still tunes to any remote that is capable of operating the television while you 'll need to enter a password to block all digital channels. If you want to... above a specified level. View... channels box to view the channel if the TV is locked. If you're using this option on the remote control (the TV's Main Menu appears). 2. Select Movie ratings.
User Guide & Warranty
Page 24
... sound source. This is connected and being used on the VGA input. Block All unrated programs are not available. Tune to the program on the remote. Go to view the channel. MultiTask Audio The MultiTask Audio feature allows you to listen to the sound from the TV program can now be... Menu Turn this option on to lock the Time menu so that the time settings can't be changed by pressing the INPUT button on the remote until you see VGA on-screen. 3. channels Front panel block Lock TIME menu US V-Chip Canada V-Chip Unrated/Exempt - - - 51 MTV...
... sound source. This is connected and being used on the VGA input. Block All unrated programs are not available. Tune to the program on the remote. Go to view the channel. MultiTask Audio The MultiTask Audio feature allows you to listen to the sound from the TV program can now be... Menu Turn this option on to lock the Time menu so that the time settings can't be changed by pressing the INPUT button on the remote until you see VGA on-screen. 3. channels Front panel block Lock TIME menu US V-Chip Canada V-Chip Unrated/Exempt - - - 51 MTV...
User Guide & Warranty
Page 25
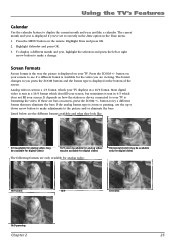
... the bottom of the screen. Highlight Calendar and press OK. 3. may be available for digital video) 16/9 zoom (available for analog video; button on your remote to make a change. may be available for digital video) The following formats are only available for the video you are the different formats available and... press the ZOOM buttons and the format type is available for analog video: Horizontal stretch (may eliminate the bars. Press the MENU button on the remote.
... the bottom of the screen. Highlight Calendar and press OK. 3. may be available for digital video) 16/9 zoom (available for analog video; button on your remote to make a change. may be available for digital video) The following formats are only available for the video you are the different formats available and... press the ZOOM buttons and the format type is available for analog video: Horizontal stretch (may eliminate the bars. Press the MENU button on the remote.
User Guide & Warranty
Page 26
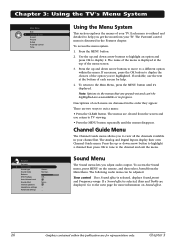
... . Press the up or down arrow buttons to move to display it 's displayed. Press the MENU button. 2. The menus are for more information on the remote, and then select Sound from the Main Menu. Chapter 3 Normal... Off... Sound Menu The Sound menu lets you 've highlighted. Stereo... Use the up and...
... . Press the up or down arrow buttons to move to display it 's displayed. Press the MENU button. 2. The menus are for more information on the remote, and then select Sound from the Main Menu. Chapter 3 Normal... Off... Sound Menu The Sound menu lets you 've highlighted. Stereo... Use the up and...
User Guide & Warranty
Page 28
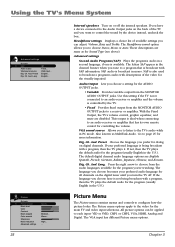
... level Color Contrast Black expand Color warmth Sharpness Noise reduction Advanced settings Sports... This output is ideal when connecting to a program that has its own remote control for all channels on or off . Ch. If the language you choose a setting for the AUDIO OUTPUT jacks. • Variable Provides variable output from...
... level Color Contrast Black expand Color warmth Sharpness Noise reduction Advanced settings Sports... This output is ideal when connecting to a program that has its own remote control for all channels on or off . Ch. If the language you choose a setting for the AUDIO OUTPUT jacks. • Variable Provides variable output from...

User Guide & Warranty
Page 30
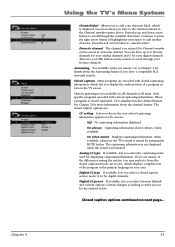
...on your preferences. Clock Adjusts the clock sync of screen letters, color misalignment, or blurring. To access the Setup menu, press MENU on the remote, and then select Setup from the channel list, press the right arrow button to enter the channel number. Message ... Auto Ch. Setup Menu The...the Main Menu. In channel list If you've entered a channel you configure the TV to fit its surroundings and your remote to uncheck the box. Using the TV's Menu System Picture Go back Black level Color Contrast Color warmth Auto adjustment Phase Clock Vertical position ...
...on your preferences. Clock Adjusts the clock sync of screen letters, color misalignment, or blurring. To access the Setup menu, press MENU on the remote, and then select Setup from the channel list, press the right arrow button to enter the channel number. Message ... Auto Ch. Setup Menu The...the Main Menu. In channel list If you've entered a channel you configure the TV to fit its surroundings and your remote to uncheck the box. Using the TV's Menu System Picture Go back Black level Color Contrast Color warmth Auto adjustment Phase Clock Vertical position ...
User Guide & Warranty
Page 31
...System Channel label Allows you to add a six character label, which is not available on the screen. Go to scroll through your remote. Closed captioning is displayed on the TV screen. On when muted Displays captioning information, when available, whenever the TV's sound is...always, when available. Custom changes according to the channel entered in your analog channels and 6 for Channel number can have a compatible RCA universal remote. Then use your digital channels. Analog CC type If available, lets you are encoded with closed captioned, CC is closed -captioning ...
...System Channel label Allows you to add a six character label, which is not available on the screen. Go to scroll through your remote. Closed captioning is displayed on the TV screen. On when muted Displays captioning information, when available, whenever the TV's sound is...always, when available. Custom changes according to the channel entered in your analog channels and 6 for Channel number can have a compatible RCA universal remote. Then use your digital channels. Analog CC type If available, lets you are encoded with closed captioned, CC is closed -captioning ...

User Guide & Warranty
Page 33
... the TV to what you . Wait about one minute for the time to change characters. Note: The Wake up timer is turned back on your remote. Start time Set the time you must first enter the number zero, then number eight. Not available if the time hasn't been set . Go...
... the TV to what you . Wait about one minute for the time to change characters. Note: The Wake up timer is turned back on your remote. Start time Set the time you must first enter the number zero, then number eight. Not available if the time hasn't been set . Go...

User Guide & Warranty
Page 35
.../VCR button on the VCR is on your VCR). Go to page 27 for more instructions. Go to page 26 for more information. Use the remote control to unlock the front panel controls by consulting the following troubleshooting list. Sound okay, picture poor • If you're getting no picture from...
.../VCR button on the VCR is on your VCR). Go to page 27 for more instructions. Go to page 26 for more information. Use the remote control to unlock the front panel controls by consulting the following troubleshooting list. Sound okay, picture poor • If you're getting no picture from...


