User Guide & Warranty
Page 1
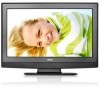
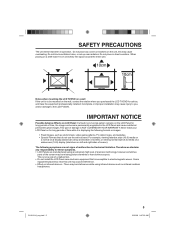
AIR/CABLE MODE SELECTION When shipped from your local retailer, please contact the remote manufacturer for the required programming code. Before operating the unit, please read this menu option to the "Cable" (Cable Television) mode. If not using Cable TV, set to the "Air" position. OWNER'S MANUAL 22" TFT LCD DIGITAL TV WITH DVD PLAYER L22HD32D ATTENTION If you purchase a universal remote control from the factory, the Signal Type option is set this manual thoroughly. 51H0101A_eng.indd 1 2/26/08 9:47:28 AM
AIR/CABLE MODE SELECTION When shipped from your local retailer, please contact the remote manufacturer for the required programming code. Before operating the unit, please read this menu option to the "Cable" (Cable Television) mode. If not using Cable TV, set to the "Air" position. OWNER'S MANUAL 22" TFT LCD DIGITAL TV WITH DVD PLAYER L22HD32D ATTENTION If you purchase a universal remote control from the factory, the Signal Type option is set this manual thoroughly. 51H0101A_eng.indd 1 2/26/08 9:47:28 AM
User Guide & Warranty
Page 2
...voltage within the product's enclosure that interference will not occur in a residential installation. For US customers: Your RCA Consumer Electronics product may be registered at www.rca.com/television. Model No Serial No Purchase Date 2 Dealer / Address / Phone 51H0101A_eng.indd 2 2/26/... OF PROCEDURES OTHER THAN THOSE SPECIFIED HEREIN MAY RESULT IN HAZARDOUS RADIATION EXPOSURE. Consult the dealer or an experienced radio/TV technician for proof of important operating and maintenance (servicing) instructions in case you if needed. Product Registration Please fill...
...voltage within the product's enclosure that interference will not occur in a residential installation. For US customers: Your RCA Consumer Electronics product may be registered at www.rca.com/television. Model No Serial No Purchase Date 2 Dealer / Address / Phone 51H0101A_eng.indd 2 2/26/... OF PROCEDURES OTHER THAN THOSE SPECIFIED HEREIN MAY RESULT IN HAZARDOUS RADIATION EXPOSURE. Consult the dealer or an experienced radio/TV technician for proof of important operating and maintenance (servicing) instructions in case you if needed. Product Registration Please fill...
User Guide & Warranty
Page 4
.... It may cause skin inflammation. HOW TO HANDLE THE LCD PANEL • Do not press hard or jolt the LCD panel. If the liquid gets in the panel. It may occur. • If the LCD panel is provided to call the cable TV system installer's attention to the breeze from cool surroundings into... may cause hearing damage. 27) Do not look into a warm room or if the temperature of the room rises suddenly. It may cause the LCD panel glass to see the source of the player. CONDENSATION Moisture will be sure the service technician uses replacement parts specified by the manufacturer or...
.... It may cause skin inflammation. HOW TO HANDLE THE LCD PANEL • Do not press hard or jolt the LCD panel. If the liquid gets in the panel. It may occur. • If the LCD panel is provided to call the cable TV system installer's attention to the breeze from cool surroundings into... may cause hearing damage. 27) Do not look into a warm room or if the temperature of the room rises suddenly. It may cause the LCD panel glass to see the source of the player. CONDENSATION Moisture will be sure the service technician uses replacement parts specified by the manufacturer or...
User Guide & Warranty
Page 5
... you , and/or damage to electromagnetic waves. Incomplete or improper installation may cause injury to you purchased the LCD TV/DVD for long periods of malfunction but permanent ghost images. Therefore we disclaim any covers or blankets on for these symptoms. •... unit, this unit may be interference while using an extremely high level of precision technology, however sometimes parts of damage is susceptible to the LCD TV/DVD. or viewing normal style (4:3) media on a widescreen (16:9) display (black bars on infrared devices - The following formats or images: &#...
... you , and/or damage to electromagnetic waves. Incomplete or improper installation may cause injury to you purchased the LCD TV/DVD for long periods of malfunction but permanent ghost images. Therefore we disclaim any covers or blankets on for these symptoms. •... unit, this unit may be interference while using an extremely high level of precision technology, however sometimes parts of damage is susceptible to the LCD TV/DVD. or viewing normal style (4:3) media on a widescreen (16:9) display (black bars on infrared devices - The following formats or images: &#...
User Guide & Warranty
Page 6
... intended for hearing impaired viewers. Reverse engineering or disassembly is prohibited. * is higher than Super VHS video cassettes. Features LCD color TV With DVD/CD player Unique space saving design combines a 22" LCD color TV and a DVD/CD player. The audio quality is a trademark of DTS, Inc.© 1996-2007 DTS, Inc. You can view digital...
... intended for hearing impaired viewers. Reverse engineering or disassembly is prohibited. * is higher than Super VHS video cassettes. Features LCD color TV With DVD/CD player Unique space saving design combines a 22" LCD color TV and a DVD/CD player. The audio quality is a trademark of DTS, Inc.© 1996-2007 DTS, Inc. You can view digital...
User Guide & Warranty
Page 7
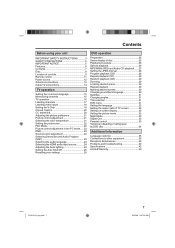
...Repeat playback 30 Marking desired scenes 30 Changing soundtrack language 30 Subtitles 31 Changing angles 31 Title selection 31 DVD menu 31 Setting the language 32 Setting the aspect ratio of TV screen 32 Setting on screen display 32 Setting the picture mode 32 Night Mode 33 Digital Out 33 ...Parental control 33 Temporary disabling of rating level by DVD disc 34 Additional information Language code list 35 Connections to ...
...Repeat playback 30 Marking desired scenes 30 Changing soundtrack language 30 Subtitles 31 Changing angles 31 Title selection 31 DVD menu 31 Setting the language 32 Setting the aspect ratio of TV screen 32 Setting on screen display 32 Setting the picture mode 32 Night Mode 33 Digital Out 33 ...Parental control 33 Temporary disabling of rating level by DVD disc 34 Additional information Language code list 35 Connections to ...
User Guide & Warranty
Page 11
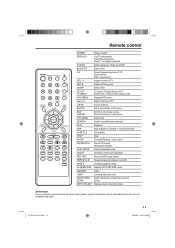
...:35 AM Call up initial setup mode DVD MENU Display DVD menu CH / Select channel of TV MUTE Switch off the sound SLEEP Sleep timer SETUP TV MENU TV mode - Remote control POWER Power On/Off DISPLAY/- Adjust volume of TV ▲▼◀▶ Cursor buttons... retailer, please contact the remote manufacturer for digital channels TV/DVD Switch between TV/AV and DVD (EJECT) Eject a disc 0-9 Direct channel selection of TV DVD mode - slow motion PAUSE/STILL Pause CD sound Still picture of DVD PLAY MODE Select playback mode AUDIO Change sound track language...
...:35 AM Call up initial setup mode DVD MENU Display DVD menu CH / Select channel of TV MUTE Switch off the sound SLEEP Sleep timer SETUP TV MENU TV mode - Remote control POWER Power On/Off DISPLAY/- Adjust volume of TV ▲▼◀▶ Cursor buttons... retailer, please contact the remote manufacturer for digital channels TV/DVD Switch between TV/AV and DVD (EJECT) Eject a disc 0-9 Direct channel selection of TV DVD mode - slow motion PAUSE/STILL Pause CD sound Still picture of DVD PLAY MODE Select playback mode AUDIO Change sound track language...
User Guide & Warranty
Page 12
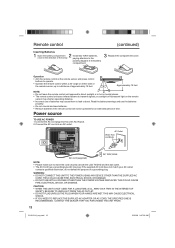
... FROM THE AC OUTLET. • DO NOT PLUG/UNPLUG THE PLUG WHEN YOUR HANDS ARE WET. Operation • Aim the remote control at both the LCD TV/DVD and the wall outlet. • The AC Cord has a grounding-type AC line plug. Power source TO USE AC POWER 1. WARNING: • DO NOT CONNECT...
... FROM THE AC OUTLET. • DO NOT PLUG/UNPLUG THE PLUG WHEN YOUR HANDS ARE WET. Operation • Aim the remote control at both the LCD TV/DVD and the wall outlet. • The AC Cord has a grounding-type AC line plug. Power source TO USE AC POWER 1. WARNING: • DO NOT CONNECT...

User Guide & Warranty
Page 13
...-75 ohm Matching Transformer Antenna Jack VHF 300 ohm Connect the UHF 300 ohm twin-lead wire to choose the signal and search for Cable TV connections. Combiner UHF 300 ohm IMPORTANT: Go to page 15 to the Combiner (not supplied). If your antenna system. Attach the Transformer to the Combiner... has a 300 ohm twin-lead wire, the use of the 300-75 ohm matching transformer may be necessary. Antenna connections If you are using a Cable TV service, see page 14 for channels. 13 51H0101A_eng.indd 13 2/26/08 9:47:36 AM
...-75 ohm Matching Transformer Antenna Jack VHF 300 ohm Connect the UHF 300 ohm twin-lead wire to choose the signal and search for Cable TV connections. Combiner UHF 300 ohm IMPORTANT: Go to page 15 to the Combiner (not supplied). If your antenna system. Attach the Transformer to the Combiner... has a 300 ohm twin-lead wire, the use of the 300-75 ohm matching transformer may be necessary. Antenna connections If you are using a Cable TV service, see page 14 for channels. 13 51H0101A_eng.indd 13 2/26/08 9:47:36 AM

User Guide & Warranty
Page 14
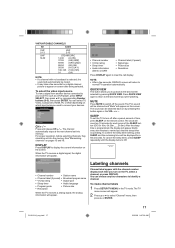
... channels require the use of a Converter/Descrambler box, you subscribe to a Cable TV service which is scrambled. Incoming 75 ohm Cable TV Cable Converter/ Descrambler Splitter A/B Switch A B 75 ohm Cable to TV Antenna Jack IMPORTANT: Go to page 15 to choose the signal and search for ...normal viewing requires the use the Converter/Descrambler box to select channels. Incoming 75 ohm Cable TV Cable Converter/ Descrambler 75 ohm Cable to TV Antenna Jack For subscribers to the output channel of the Converter/Descrambler box (usually channel 3 or 4) and use...
... channels require the use of a Converter/Descrambler box, you subscribe to a Cable TV service which is scrambled. Incoming 75 ohm Cable TV Cable Converter/ Descrambler Splitter A/B Switch A B 75 ohm Cable to TV Antenna Jack IMPORTANT: Go to page 15 to choose the signal and search for ...normal viewing requires the use the Converter/Descrambler box to select channels. Incoming 75 ohm Cable TV Cable Converter/ Descrambler 75 ohm Cable to TV Antenna Jack For subscribers to the output channel of the Converter/Descrambler box (usually channel 3 or 4) and use...
User Guide & Warranty
Page 15
...CABLE CHART The chart below is in your area. • It may take approx. 10 seconds for a picture to appear on screen after purchase this LCD TV, above screen will appear automatically. 6 Press ◀ or ▶ to select the desired language: English, French (Français) or Spanish (...Search Cable Start : Select : Adjust 6 Press EXIT/CANCEL to return to select TV mode. 3 Press SETUP/TV MENU. NOTE: • It may not advance for a digital channel picture to appear on screen.) 2 Press TV/DVD to the normal screen. Depending on the reception condition, a bar display may take...
...CABLE CHART The chart below is in your area. • It may take approx. 10 seconds for a picture to appear on screen after purchase this LCD TV, above screen will appear automatically. 6 Press ◀ or ▶ to select the desired language: English, French (Français) or Spanish (...Search Cable Start : Select : Adjust 6 Press EXIT/CANCEL to return to select TV mode. 3 Press SETUP/TV MENU. NOTE: • It may not advance for a digital channel picture to appear on screen.) 2 Press TV/DVD to the normal screen. Depending on the reception condition, a bar display may take...
User Guide & Warranty
Page 16
... select channel 12, press 1, 2. 100-125: Press the 3 digits in your area, you want to select "Adding Channel", then press ▶ or ENTER. The TV menu screen will appear. 2 Press ▲ or ▼ to select "Channel", then press ▶ or ENTER. 3 Press ▲ or ▼ to select ... select "Clear All", then press ▶ or ENTER. Clear All All channels are deleted from the channel memory. 1 Press SETUP/TV MENU in order. TV operation 1 To turn on the TV, press POWER. (POWER indicator on screen.) 2 Adjust the volume level by pressing VOL + or - . If the volume decreases...
... select channel 12, press 1, 2. 100-125: Press the 3 digits in your area, you want to select "Adding Channel", then press ▶ or ENTER. The TV menu screen will appear. 2 Press ▲ or ▼ to select "Channel", then press ▶ or ENTER. 3 Press ▲ or ▼ to select ... select "Clear All", then press ▶ or ENTER. Clear All All channels are deleted from the channel memory. 1 Press SETUP/TV MENU in order. TV operation 1 To turn on the TV, press POWER. (POWER indicator on screen.) 2 Adjust the volume level by pressing VOL + or - . If the volume decreases...
User Guide & Warranty
Page 17
...TV to turn on the TV, select a channel, or press DISPLAY. When the TV receives a digital signal, the digital information will appear briefly every ten minutes to remind you were watching. After the sleep time is programmed, the display will appear. 62-001 HDTV...type • Picture size • Resolution Press DISPLAY again to connect your LCD TV, such as a VCR player, press INPUT SELECT, then press ▲/&#...TV MENU in the TV mode. Source Selection 0.TV 1.Video 2.Component 3.HDMI 4.PC 5.DVD [0-5]:Select CH + / - You can choose any four characters to normal TV...
...TV to turn on the TV, select a channel, or press DISPLAY. When the TV receives a digital signal, the digital information will appear briefly every ten minutes to remind you were watching. After the sleep time is programmed, the display will appear. 62-001 HDTV...type • Picture size • Resolution Press DISPLAY again to connect your LCD TV, such as a VCR player, press INPUT SELECT, then press ▲/&#...TV MENU in the TV mode. Source Selection 0.TV 1.Video 2.Component 3.HDMI 4.PC 5.DVD [0-5]:Select CH + / - You can choose any four characters to normal TV...

User Guide & Warranty
Page 18
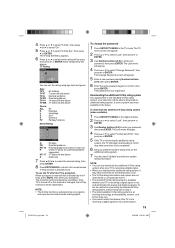
... Video Label feature allows you can reset it down using Number buttons (0-9), then press ENTER. VCR DVD DTV SAT CBL HD : Uses the default label name : Video cassette recorder : DVD video : Digital TV set-top box : Satellite box : Cable box : HDMI device (only for that you may ...source for about 5 seconds. The restriction applies to label, then press ▼. To register a password 1 Press SETUP/TV MENU in the TV mode. NOTE: • If you forget your TV. 1 Press SETUP/TV MENU in the first space. To clear a Ch Label After step 4 above, press ▲ or ▼ to...
... Video Label feature allows you can reset it down using Number buttons (0-9), then press ENTER. VCR DVD DTV SAT CBL HD : Uses the default label name : Video cassette recorder : DVD video : Digital TV set-top box : Satellite box : Cable box : HDMI device (only for that you may ...source for about 5 seconds. The restriction applies to label, then press ▼. To register a password 1 Press SETUP/TV MENU in the TV mode. NOTE: • If you forget your TV. 1 Press SETUP/TV MENU in the first space. To clear a Ch Label After step 4 above, press ▲ or ▼ to...
User Guide & Warranty
Page 19
... system is available whether your password. When a program is received that include a rating signal. TV Rating TV Rating ALL D L S V FV TV-Y TV-Y7 TV-G TV-PG TV-14 TV-MA : Select ENTER:Set You can only download the additional V-Chip rating system when your TV is receiving a digital signal. • When you download the additional rating system, it , which...
... system is available whether your password. When a program is received that include a rating signal. TV Rating TV Rating ALL D L S V FV TV-Y TV-Y7 TV-G TV-PG TV-14 TV-MA : Select ENTER:Set You can only download the additional V-Chip rating system when your TV is receiving a digital signal. • When you download the additional rating system, it , which...

User Guide & Warranty
Page 20
... Captions will usually fill 1/2 of captions are overlapping. 8 Press EXIT/CANCEL to return to customize Digital Captions only. 1 Press SETUP/TV MENU in English or another language. When you select "Digital Caption", you can adjust the various setting listed below as follows: This feature... Closed Captioning, especially with a programming schedule or other languages are transmitted on C1 and Closed Captions in other information. 1 Press SETUP/TV MENU in your viewing area, a black rectangle may appear with a Digital broadcast signal. This 20 is designed to the normal screen....
... Captions will usually fill 1/2 of captions are overlapping. 8 Press EXIT/CANCEL to return to customize Digital Captions only. 1 Press SETUP/TV MENU in English or another language. When you select "Digital Caption", you can adjust the various setting listed below as follows: This feature... Closed Captioning, especially with a programming schedule or other languages are transmitted on C1 and Closed Captions in other information. 1 Press SETUP/TV MENU in your viewing area, a black rectangle may appear with a Digital broadcast signal. This 20 is designed to the normal screen....
User Guide & Warranty
Page 21
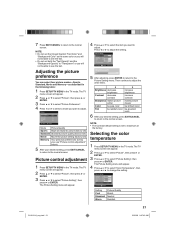
... ◀ or ▶ to select a mode you will not be able to the normal screen. Picture control adjustment 1 Press SETUP/TV MENU in the TV mode. Press ◀ or ▶ to the normal screen. Picture Setting Brightness 25 Contrast 50 Sharpness 25 Color 25 Tint 0 Color...9650; or ▼ to select "Picture", then press ▶ or ENTER. 3 Press ▲ or ▼ to the Picture Setting menu. The TV menu screen will appear. 4 Press ▲ or ▼ to adjust. Then continue to adjust the other items. ◀ Brightness decrease brightness Contrast ...
... ◀ or ▶ to select a mode you will not be able to the normal screen. Picture control adjustment 1 Press SETUP/TV MENU in the TV mode. Press ◀ or ▶ to the normal screen. Picture Setting Brightness 25 Contrast 50 Sharpness 25 Color 25 Tint 0 Color...9650; or ▼ to select "Picture", then press ▶ or ENTER. 3 Press ▲ or ▼ to the Picture Setting menu. The TV menu screen will appear. 4 Press ▲ or ▼ to adjust. Then continue to adjust the other items. ◀ Brightness decrease brightness Contrast ...
User Guide & Warranty
Page 22
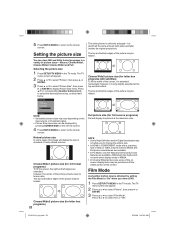
...COMPONENT mode with a scanning rate of standard 4:3 with subtitles) To fill the width of picture sizes- Selecting the picture size 1 Press SETUP/TV MENU in a variety of the screen, it is only slightly extended at the maximum size. The top and bottom edges of the screen. ... picture is uniformly enlarged-it is extended horizontally. The top and bottom edges of the picture may not allow you view a DVD. 1 Press SETUP/TV MENU in the TV mode. NOTE: • Some High Definition and/or Digital broadcasts may be hidden. Picture Size 0.Natural 1.Cinema Wide1 2.Cinema...
...COMPONENT mode with a scanning rate of standard 4:3 with subtitles) To fill the width of picture sizes- Selecting the picture size 1 Press SETUP/TV MENU in a variety of the screen, it is only slightly extended at the maximum size. The top and bottom edges of the screen. ... picture is uniformly enlarged-it is extended horizontally. The top and bottom edges of the picture may not allow you view a DVD. 1 Press SETUP/TV MENU in the TV mode. NOTE: • Some High Definition and/or Digital broadcasts may be hidden. Picture Size 0.Natural 1.Cinema Wide1 2.Cinema...

User Guide & Warranty
Page 23
...; or ENTER. 3 Press ▲ or ▼ to the PC Setting menu. Selecting Stereo/Second Audio Program (SAP) The multi-channel TV sound (MTS) feature provides high-fidelity stereo sound. To minimize any vertical bars or stripes visible on the PC mode. Sound control adjustment 1... Press SETUP/TV MENU in the TV mode. Picture Picture Setting Picture Preference Picture Size Film Mode PC Setting DNR >> Sports >> On >> On : Select : Adjust 4...
...; or ENTER. 3 Press ▲ or ▼ to the PC Setting menu. Selecting Stereo/Second Audio Program (SAP) The multi-channel TV sound (MTS) feature provides high-fidelity stereo sound. To minimize any vertical bars or stripes visible on the PC mode. Sound control adjustment 1... Press SETUP/TV MENU in the TV mode. Picture Picture Setting Picture Preference Picture Size Film Mode PC Setting DNR >> Sports >> On >> On : Select : Adjust 4...
User Guide & Warranty
Page 24
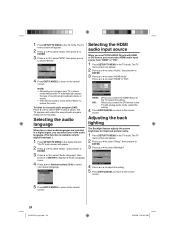
... AUDIO IN jack with analog audio cords, select this setting. Audio Bass 15 Treble 15 Balance 0 MTS Audio Language HDMI Audio Stereo No Info. The TV speakers will appear. 2 Press ▲ or ▼ to select "Audio" , then press ▶ or ENTER. 3 Press ▲ or ▼ to select... >> English >> Off >> : Select : Adjust 4 Press ◀ or ▶ to adjust the setting. 5 Press EXIT/CANCEL to return to the normal screen. The TV menu screen will appear. 2 Press ▲ or ▼ to select "Audio", then press ▶ or ENTER. 3 Press ▲ or ▼ to select "MTS...
... AUDIO IN jack with analog audio cords, select this setting. Audio Bass 15 Treble 15 Balance 0 MTS Audio Language HDMI Audio Stereo No Info. The TV speakers will appear. 2 Press ▲ or ▼ to select "Audio" , then press ▶ or ENTER. 3 Press ▲ or ▼ to select... >> English >> Off >> : Select : Adjust 4 Press ◀ or ▶ to adjust the setting. 5 Press EXIT/CANCEL to return to the normal screen. The TV menu screen will appear. 2 Press ▲ or ▼ to select "Audio", then press ▶ or ENTER. 3 Press ▲ or ▼ to select "MTS...


