
User Guide & Warranty
Page 2
... sales receipt to disconnect the power cord from overheating. Please follow the base or wall mounting instructions provided in particular, specifies that changes or modifications to this product contains mercury. For disposal or recycling information, please contact your remote control puts the TV into a very low-power standby mode but will need them. Therefore, you need to obtain warranty parts and service and for proof of electric...
... sales receipt to disconnect the power cord from overheating. Please follow the base or wall mounting instructions provided in particular, specifies that changes or modifications to this product contains mercury. For disposal or recycling information, please contact your remote control puts the TV into a very low-power standby mode but will need them. Therefore, you need to obtain warranty parts and service and for proof of electric...
User Guide & Warranty
Page 4
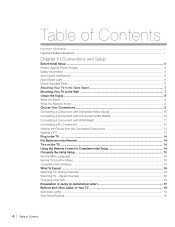
... Safety Instructions ...i Chapter 1 I Connections and Setup Before Initial Setup ...6 Protect Against Power Surges ...6 Safety Information ...6 Avoid Audio Interference ...6 Avoid Direct Light ...6 Check Supplied Parts ...6 Attaching Your TV to the Table Stand 7 Mounting Your TV to the Wall ...7 Obtain the Signal ...8 What You Need ...8 What You Need to Know ...8 Choose Your Connections ...9 Connecting a Component with Composite Video (Good 10 Connecting a Component with Component Video (Better 10 Connecting a Component with HDMI (Best 11 Connecting a PC Component ...12 Viewing the Picture...
... Safety Instructions ...i Chapter 1 I Connections and Setup Before Initial Setup ...6 Protect Against Power Surges ...6 Safety Information ...6 Avoid Audio Interference ...6 Avoid Direct Light ...6 Check Supplied Parts ...6 Attaching Your TV to the Table Stand 7 Mounting Your TV to the Wall ...7 Obtain the Signal ...8 What You Need ...8 What You Need to Know ...8 Choose Your Connections ...9 Connecting a Component with Composite Video (Good 10 Connecting a Component with Component Video (Better 10 Connecting a Component with HDMI (Best 11 Connecting a PC Component ...12 Viewing the Picture...
User Guide & Warranty
Page 7
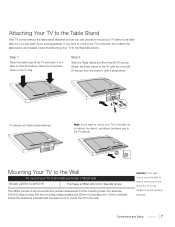
... Table Stand attached. Attach the Table Stand to the wall, purchase a VESA wall Models L32HD41/L32HD31R Purchase a VESA 200 x100, Size M4 screw The VESA number is the horizontal and vertical measurement of five times the TV's net weight to the TV cabinet. Mounting Your TV to the Wall To mount your TV to the wall, do not attach the stand, just attach the stand cap to avoid causing damage. Caution: Your wall mount...
... Table Stand attached. Attach the Table Stand to the wall, purchase a VESA wall Models L32HD41/L32HD31R Purchase a VESA 200 x100, Size M4 screw The VESA number is the horizontal and vertical measurement of five times the TV's net weight to the TV cabinet. Mounting Your TV to the Wall To mount your TV to the wall, do not attach the stand, just attach the stand cap to avoid causing damage. Caution: Your wall mount...
User Guide & Warranty
Page 8
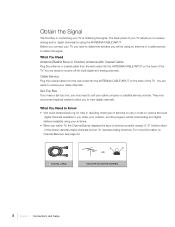
... your location, and the program will be using your cable company or satellite service provider. A "D" at the bottom of the TV. COAXIAL CABLE OR OUTDOOR OR INDOOR ANTENNA 8 Chapter 1 Connections and Setup Obtain the Signal The first step in order to receive the local digital channels available to you. Cable Service Plug the coaxial cable from the wall outlet into the ANTENNA/CABLE INPUT on Channel Banners, see page 20. What You Need Antenna...
... your location, and the program will be using your cable company or satellite service provider. A "D" at the bottom of the TV. COAXIAL CABLE OR OUTDOOR OR INDOOR ANTENNA 8 Chapter 1 Connections and Setup Obtain the Signal The first step in order to receive the local digital channels available to you. Cable Service Plug the coaxial cable from the wall outlet into the ANTENNA/CABLE INPUT on Channel Banners, see page 20. What You Need Antenna...
User Guide & Warranty
Page 11
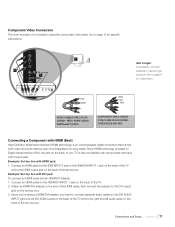
..., connect antenna or cable to the DVI output jack on the back of the HDMI cable; Go to the HDMI/DVI INPUT 1 jack on the set-top box. 3. RED= RIGHT AUDIO, WHITE=LEFT AUDIO COMPONENT VIDEO CABLES (Y Pb Pr) ARE COLOR CODEDGREEN, BLUE AND RED Connecting a Component with HDMI (Best) High-Definition Multimedia Interface (HDMI) technology is also compatible with components that carries both video and audio data by way of an integrated mini-plug cable. Connect an HDMI cable to page 8 for specific instructions. Connections...
..., connect antenna or cable to the DVI output jack on the back of the HDMI cable; Go to the HDMI/DVI INPUT 1 jack on the set-top box. 3. RED= RIGHT AUDIO, WHITE=LEFT AUDIO COMPONENT VIDEO CABLES (Y Pb Pr) ARE COLOR CODEDGREEN, BLUE AND RED Connecting a Component with HDMI (Best) High-Definition Multimedia Interface (HDMI) technology is also compatible with components that carries both video and audio data by way of an integrated mini-plug cable. Connect an HDMI cable to page 8 for specific instructions. Connections...
User Guide & Warranty
Page 12
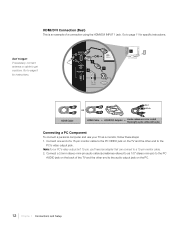
... and use your PC's video output isn't 15-pin, you'll need an adapter that can connect to a 15-pin monitor cable. 2. Connect a 3.5mm stereo mini-pin audio cable (sometimes referred to as a monitor, follow these steps: 1. Note: If your TV as 1/8" stereo mini-pin) to the PC AUDIO jack on the PC. 12 Chapter 1 Connections and Setup HDMI/DVI INPUT 1 AUDIO PC INPUT VIDEO HDMI Cable Red White OR HDMI Cable + HDMI/DVI Adapter + Audio cables are color coded Red=right audio; HDMI/DVI Connection (Best...
... and use your PC's video output isn't 15-pin, you'll need an adapter that can connect to a 15-pin monitor cable. 2. Connect a 3.5mm stereo mini-pin audio cable (sometimes referred to as a monitor, follow these steps: 1. Note: If your TV as 1/8" stereo mini-pin) to the PC AUDIO jack on the PC. 12 Chapter 1 Connections and Setup HDMI/DVI INPUT 1 AUDIO PC INPUT VIDEO HDMI Cable Red White OR HDMI Cable + HDMI/DVI Adapter + Audio cables are color coded Red=right audio; HDMI/DVI Connection (Best...

User Guide & Warranty
Page 14
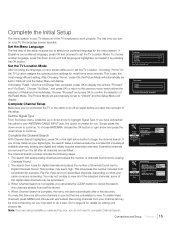
... a light switch. The process works the same on the screen. To select a menu item, press the arrows to display a sub-menu. To return to move up or down arrow to the previous menu, press the GO BACK key or left arrow. 14 Chapter 1 Connections and Setup Using the Remote Control to Complete Initial Setup You will need to use the remote control to view other menu items on the remote control. Use OK button...
... a light switch. The process works the same on the screen. To select a menu item, press the arrows to display a sub-menu. To return to move up or down arrow to the previous menu, press the GO BACK key or left arrow. 14 Chapter 1 Connections and Setup Using the Remote Control to Complete Initial Setup You will need to use the remote control to view other menu items on the remote control. Use OK button...
User Guide & Warranty
Page 15
... you may want to do not need to continue. some of the digital cable channels may find there are still some channels in your channel list may be scrambled. 3. Picture Sound Setup List & Labels Parental Control Exit Menu Language Signal Type Channel Search Closed Caption Time English Cable Start Press OK or > to work properly. Channel Setup Picture Sound Setup List & Labels Parental Control Exit Signal Type Cable Auto Channel Search Running Searching for digital channels. Press CLEAR to begin the channel search. This is also the most...
... you may want to do not need to continue. some of the digital cable channels may find there are still some channels in your channel list may be scrambled. 3. Picture Sound Setup List & Labels Parental Control Exit Menu Language Signal Type Channel Search Closed Caption Time English Cable Start Press OK or > to work properly. Channel Setup Picture Sound Setup List & Labels Parental Control Exit Signal Type Cable Auto Channel Search Running Searching for digital channels. Press CLEAR to begin the channel search. This is also the most...
User Guide & Warranty
Page 17
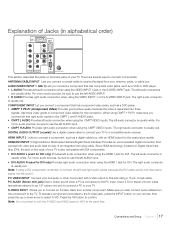
... mini-plug cable. Press the OK button to connect the left audio connector is usually red. Explanation of Jacks (in alphabetical order) HDMI INPUT 2 HDMI/DVI INPUT 1 VIDEO COAXIAL Y Pb Pr L AUDIO R VIDEO L AUDIO R L DVI AUDIO R DIGITAL AUDIO AUDIO OUT S-VIDEO COMPONENT AUDIO/VIDEO INPUT (CMPT) INPUT (VID1) PC INPUT ANTENNA/CABLE This section describes the jacks on the back panel of your TV to a compatible audio receiver. Use three video-grade or component video cables for the best picture quality. The left audio connection when using a DVI component, remember...
... mini-plug cable. Press the OK button to connect the left audio connector is usually red. Explanation of Jacks (in alphabetical order) HDMI INPUT 2 HDMI/DVI INPUT 1 VIDEO COAXIAL Y Pb Pr L AUDIO R VIDEO L AUDIO R L DVI AUDIO R DIGITAL AUDIO AUDIO OUT S-VIDEO COMPONENT AUDIO/VIDEO INPUT (CMPT) INPUT (VID1) PC INPUT ANTENNA/CABLE This section describes the jacks on the back panel of your TV to a compatible audio receiver. Use three video-grade or component video cables for the best picture quality. The left audio connection when using a DVI component, remember...
User Guide & Warranty
Page 19
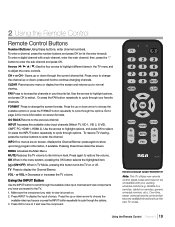
... through the available video input channels and view components you have connected to cycle through the current channel list. MUTE Reduces the TV volume to display the input choices. RC246 Remote control part number RC2463001/01 Note: This TV utilizes new remote control signal codes and may not be compatible with a sub-channel, enter the main channel; satellite box remotes, cable box remotes, generic universal remotes, etc.). Arrows ( / / / ) Use the four arrows to scroll through options. Using the INPUT Button Use the INPUT button to highlight...
... through the available video input channels and view components you have connected to cycle through the current channel list. MUTE Reduces the TV volume to display the input choices. RC246 Remote control part number RC2463001/01 Note: This TV utilizes new remote control signal codes and may not be compatible with a sub-channel, enter the main channel; satellite box remotes, cable box remotes, generic universal remotes, etc.). Arrows ( / / / ) Use the four arrows to scroll through options. Using the INPUT Button Use the INPUT button to highlight...
User Guide & Warranty
Page 20
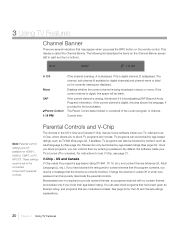
... 1:14 PM A 135 Mono SAP Parent Control 1:14 PM If the channel is analog, A is called the Channel Banner. Displays whether the current channel is being broadcast in the connected component's parental controls. The Parent Control state (locked or unlocked) of the current program or channel. Note: Parental control settings are displayed. These settings must be set in stereo or mono. For instructions to provide content themes, so programs received with no content themes are blocked...
... 1:14 PM A 135 Mono SAP Parent Control 1:14 PM If the channel is analog, A is called the Channel Banner. Displays whether the current channel is being broadcast in the connected component's parental controls. The Parent Control state (locked or unlocked) of the current program or channel. Note: Parental control settings are displayed. These settings must be set in stereo or mono. For instructions to provide content themes, so programs received with no content themes are blocked...
User Guide & Warranty
Page 23
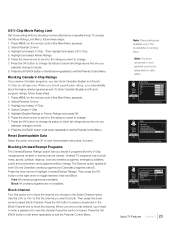
...+ List & Labels C Parental Control Exit View View View View View View Press OK or > to change . 7. Highlight and select Movie Ratings. 6. Press MENU on the remote control (the Main Menu appears). 2. Then press the OK button or the right arrow to take effect. to find the channel you want to view/block programs with this rating. When you selected change to change . 7. V-Chip Picture Sound Setup List & Labels Parental Control Exit US V-Chip Canada V-Chip Downloadable Rating Reset Downloadable...
...+ List & Labels C Parental Control Exit View View View View View View Press OK or > to change . 7. Highlight and select Movie Ratings. 6. Press MENU on the remote control (the Main Menu appears). 2. Then press the OK button or the right arrow to take effect. to find the channel you want to view/block programs with this rating. When you selected change to change . 7. V-Chip Picture Sound Setup List & Labels Parental Control Exit US V-Chip Canada V-Chip Downloadable Rating Reset Downloadable...
User Guide & Warranty
Page 26
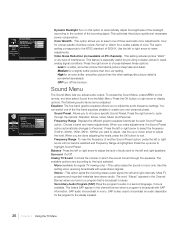
... signals. Color Warmth - Use the left or right arrow to adjust the level of audio sent to display options. Sound Preset Allows you want to the input selected. Surround On/Off Analog TV Sound Controls the manner in the channel banner when a program is also used to adjust the level. Secondary Audio Program (SAP) Plays the program's audio in mono only. Balance Press the left or right arrow to choose a specific Sound...
... signals. Color Warmth - Use the left or right arrow to adjust the level of audio sent to display options. Sound Preset Allows you want to the input selected. Surround On/Off Analog TV Sound Controls the manner in the channel banner when a program is also used to adjust the level. Secondary Audio Program (SAP) Plays the program's audio in mono only. Balance Press the left or right arrow to choose a specific Sound...
User Guide & Warranty
Page 27
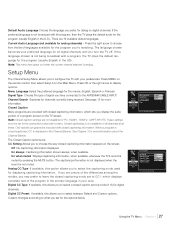
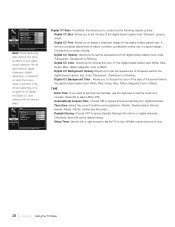
... the Channel Banner. Closed Caption Picture Sound Setup List & Labels Parental Control Exit CC Setting Analog CC Type Digital CC Type Digital CC Preset Digital CC Style Off CC1 Service1 Default Press > or OK to the ANTENNA/CABLE INPUT. Using the TV Menu Chapter 4 27 Press OK or the right arrow to select the captioning mode used for the options below. Signal Type Choose the type of the differences among the modes, you have connected to change this setting. On when muted Displays captioning...
... the Channel Banner. Closed Caption Picture Sound Setup List & Labels Parental Control Exit CC Setting Analog CC Type Digital CC Type Digital CC Preset Digital CC Style Off CC1 Service1 Default Press > or OK to the ANTENNA/CABLE INPUT. Using the TV Menu Chapter 4 27 Press OK or the right arrow to select the captioning mode used for the options below. Signal Type Choose the type of the differences among the modes, you have connected to change this setting. On when muted Displays captioning...
User Guide & Warranty
Page 28
..., Translucent or Flashing. Sleep Timer Use the left or right arrows to set the time manually, use the digit keys to choose the color of the area of time. 28 Chapter 4 Using the TV Menu Note: These captioning style options only have an effect. Digital CC Style Picture Sound Setup List & Labels Parental Control Exit Digital CC Size Digital CC Font Digital CC Opacity Digital CC Color Digital CC Background Opacity Digital CC Background Color Small Style1 Solid White Solid Black Press...
..., Translucent or Flashing. Sleep Timer Use the left or right arrows to set the time manually, use the digit keys to choose the color of the area of time. 28 Chapter 4 Using the TV Menu Note: These captioning style options only have an effect. Digital CC Style Picture Sound Setup List & Labels Parental Control Exit Digital CC Size Digital CC Font Digital CC Opacity Digital CC Color Digital CC Background Opacity Digital CC Background Color Small Style1 Solid White Solid Black Press...
User Guide & Warranty
Page 31
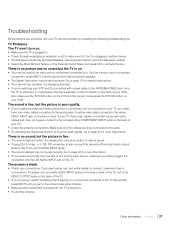
... component video cables (red, blue, and green) connect to the TV's L and R AUDIO INPUT jacks. • The sound settings may be blank. Make sure all of your TV. • Check the antenna connections. Try pressing the volume up button to restore sound. • If using DVI, S-Video, or Y, PB, PR, remember to also connect the device's left and right audio output jacks to the corresponding COMPONENT INPUT jacks on your VCR). Troubleshooting Most problems...
... component video cables (red, blue, and green) connect to the TV's L and R AUDIO INPUT jacks. • The sound settings may be blank. Make sure all of your TV. • Check the antenna connections. Try pressing the volume up button to restore sound. • If using DVI, S-Video, or Y, PB, PR, remember to also connect the device's left and right audio output jacks to the corresponding COMPONENT INPUT jacks on your VCR). Troubleshooting Most problems...
User Guide & Warranty
Page 32
... station. Contact the manufacturer of a power surge. The buttons on . Re-connect your HDMI or DVI component is turned on and try to change the picture quality output that will fix this happens frequently, the voltage in the Parental Control Menu. • If using a VCR, check to the HDMI 1 or HDMI 2 INPUT and you're receiving an Unusable Signal message onscreen, press the INFO button on each side of your...
... station. Contact the manufacturer of a power surge. The buttons on . Re-connect your HDMI or DVI component is turned on and try to change the picture quality output that will fix this happens frequently, the voltage in the Parental Control Menu. • If using a VCR, check to the HDMI 1 or HDMI 2 INPUT and you're receiving an Unusable Signal message onscreen, press the INFO button on each side of your...

User Guide & Warranty
Page 33
... the remote and the remote light sensor on the Customer Support Menu at www.rca.com/television for about 5 minutes. Put new batteries in order to run your TV. satellite box remotes, cable box remotes, generic universal remotes, etc.). You are experiencing problems with V-Chip/Parental Controls. • If the rating limits don't work, you must lock the settings. If you may be compatible with an NR rating. Make sure there is fixed...
... the remote and the remote light sensor on the Customer Support Menu at www.rca.com/television for about 5 minutes. Put new batteries in order to run your TV. satellite box remotes, cable box remotes, generic universal remotes, etc.). You are experiencing problems with V-Chip/Parental Controls. • If the rating limits don't work, you must lock the settings. If you may be compatible with an NR rating. Make sure there is fixed...
User Guide & Warranty
Page 36
... the sole discretion of TTE, television screen sizes 33" through 47": For how long after your unit requires service, the service location will do: • At TTE's discretion, pay an Authorized RCA Service Center for parts. See "How to repair your television, or replace your television with a new or refurbished/remanufactured unit. TTE Technology, Inc. ("TTE") Limited Warranty All LCD Models EXCEPT TO THE EXTENT PROHIBITED...
... the sole discretion of TTE, television screen sizes 33" through 47": For how long after your unit requires service, the service location will do: • At TTE's discretion, pay an Authorized RCA Service Center for parts. See "How to repair your television, or replace your television with a new or refurbished/remanufactured unit. TTE Technology, Inc. ("TTE") Limited Warranty All LCD Models EXCEPT TO THE EXTENT PROHIBITED...
User Guide & Warranty
Page 38
... in to an Authorized RCA Service Centre, directly exchanged for both labor charges and parts to get service" How to repair your television, or replace your problem over the phone. • If it is determined that the product is evidence that your unit requires service, the service location will troubleshoot your television with a new or refurbished/remanufactured unit. The model/serial number information can be found...
... in to an Authorized RCA Service Centre, directly exchanged for both labor charges and parts to get service" How to repair your television, or replace your problem over the phone. • If it is determined that the product is evidence that your unit requires service, the service location will troubleshoot your television with a new or refurbished/remanufactured unit. The model/serial number information can be found...


