User Guide
Page 5
...Parts Checklist 8 Telephone Jack Requirements 8 Important Installation Information 8 Base Layout 9 Important Installation Guidelines 10 Installing the Phone 10 Data Port 12 System Verification 13 Other System Phones 13 Answering System 13 Auto Attendant 14 Programming the Telephone 14 Language 14 Volume 14 Ringer Volume 14 Speakerphone, ...Handset, and Headset Volume 14 Ringer Tone 15 Priority Line 15 Delay Ring 16 Phone ID 16 Phone Name 16 Intercom Auto Answer 17 Flash Time 17 Call Alert Tone 18 No ...
...Parts Checklist 8 Telephone Jack Requirements 8 Important Installation Information 8 Base Layout 9 Important Installation Guidelines 10 Installing the Phone 10 Data Port 12 System Verification 13 Other System Phones 13 Answering System 13 Auto Attendant 14 Programming the Telephone 14 Language 14 Volume 14 Ringer Volume 14 Speakerphone, ...Handset, and Headset Volume 14 Ringer Tone 15 Priority Line 15 Delay Ring 16 Phone ID 16 Phone Name 16 Intercom Auto Answer 17 Flash Time 17 Call Alert Tone 18 No ...
User Guide
Page 9
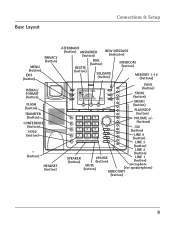
Base Layout Connections & Setup PRIVACY (button) MENU (button) EXIT (button) REDIAL/ FORMAT (button) FLASH (button) TRANSFER (button) CONFERENCE (button) HOLD (button) * (button) HEADSET (button) ATTENDANT (button) ANSWERER (button) NEW MESSAGE (indicator) DELETE (button) DIAL (button) SEL/SAVE (button) INTERCOM (button) MEMORY 1-16 (buttons) PAGE (button) STORE (button) MEMO (...
Base Layout Connections & Setup PRIVACY (button) MENU (button) EXIT (button) REDIAL/ FORMAT (button) FLASH (button) TRANSFER (button) CONFERENCE (button) HOLD (button) * (button) HEADSET (button) ATTENDANT (button) ANSWERER (button) NEW MESSAGE (indicator) DELETE (button) DIAL (button) SEL/SAVE (button) INTERCOM (button) MEMORY 1-16 (buttons) PAGE (button) STORE (button) MEMO (...
User Guide
Page 14
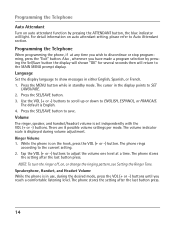
... after the last button press. There are 8 possible volume settings per mode. Volume The ringer, speaker, and handset/headset volume is English. 4. The phone rings according to Auto Attendant section. For detail information on auto attendant setting, please refer to the current setting. 2.... in the display points to ENGLISH, ESPANOL, or FRANCAIS. The volume indicator scale is in standby mode. Speakerphone, Handset, and Headset Volume While the phone is displayed during the desired mode, press the VOL (+ or -) buttons until you wish to discontinue or stop programming, press ...
... after the last button press. There are 8 possible volume settings per mode. Volume The ringer, speaker, and handset/headset volume is English. 4. The phone rings according to Auto Attendant section. For detail information on auto attendant setting, please refer to the current setting. 2.... in the display points to ENGLISH, ESPANOL, or FRANCAIS. The volume indicator scale is in standby mode. Speakerphone, Handset, and Headset Volume While the phone is displayed during the desired mode, press the VOL (+ or -) buttons until you wish to discontinue or stop programming, press ...
User Guide
Page 27
... occupied, it selects an open line. The phone will show Error for several seconds. 27 Press the HEADSET button and the phone automatically selects the priority line. Wait for a dial tone, then dial a phone number. 3. CAUTION: Use only the Thomson Inc. 5-2425 headset that is compatible with the Optional Headset 1. If the priority line is pressed...
... occupied, it selects an open line. The phone will show Error for several seconds. 27 Press the HEADSET button and the phone automatically selects the priority line. Wait for a dial tone, then dial a phone number. 3. CAUTION: Use only the Thomson Inc. 5-2425 headset that is compatible with the Optional Headset 1. If the priority line is pressed...
User Guide
Page 28
...handset, pick up the handset and press the corresponding line button (handset mode), OR 2. Press MUTE to handset cancels mute. 28 With the phone idle and the handset on . Pick up the handset. Press the SPEAKER button and press the corresponding line button (speakerphone mode), OR 3. ... hear them. 1. When finished, hang up the handset (handset mode), OR 2. Switching Between the Speakerphone, Handset, and Headset To switch to turn it off. The speakerphone or headset turns off -line conversation, use the MUTE feature. The party on the other than the priority line, 1. SET button....
...handset, pick up the handset and press the corresponding line button (handset mode), OR 2. Press MUTE to handset cancels mute. 28 With the phone idle and the handset on . Pick up the handset. Press the SPEAKER button and press the corresponding line button (speakerphone mode), OR 3. ... hear them. 1. When finished, hang up the handset (handset mode), OR 2. Switching Between the Speakerphone, Handset, and Headset To switch to turn it off. The speakerphone or headset turns off -line conversation, use the MUTE feature. The party on the other than the priority line, 1. SET button....
User Guide
Page 29
...or the corresponding LINE button to 24 hours. 3. Pick up the handset. NOTE: The call forwarding, which are available through your local phone company. The phone emits a beep every 30 seconds as call waiting or call on hold . NOTE: If you can be disabled. 4. Flash Use the... To cancel, press PRIVACY again or hang up the handset (handset mode), or press the SPEAKER button (speakerphone mode), or press the HEADSET button (headset mode) and the priority line is activated. Basic Operation Do Not Disturb This feature is idle, press the PRIVACY button. When the unit...
...or the corresponding LINE button to 24 hours. 3. Pick up the handset. NOTE: The call forwarding, which are available through your local phone company. The phone emits a beep every 30 seconds as call waiting or call on hold . NOTE: If you can be disabled. 4. Flash Use the... To cancel, press PRIVACY again or hang up the handset (handset mode), or press the SPEAKER button (speakerphone mode), or press the HEADSET button (headset mode) and the priority line is activated. Basic Operation Do Not Disturb This feature is idle, press the PRIVACY button. When the unit...
User Guide
Page 31
... another line button and dial the telephone number of 2 lines. To disconnect one but you want to continue speaking with, and the other phone which you want and dial the telephone number. Speak to 25423, 25424, 25425, 25413, 25414, 25415, 25403 and 25404... phones. The indicator turns on a line, press the PRIVACY button. However, other party is automatically disconnected. To cancel, press PRIVACY again or hang up the handset, or press the SPEAKER or HEADSET button. To connect and conference: 1. Press the CONFERENCE button....
... another line button and dial the telephone number of 2 lines. To disconnect one but you want to continue speaking with, and the other phone which you want and dial the telephone number. Speak to 25423, 25424, 25425, 25413, 25414, 25415, 25403 and 25404... phones. The indicator turns on a line, press the PRIVACY button. However, other party is automatically disconnected. To cancel, press PRIVACY again or hang up the handset, or press the SPEAKER or HEADSET button. To connect and conference: 1. Press the CONFERENCE button....
User Guide
Page 32
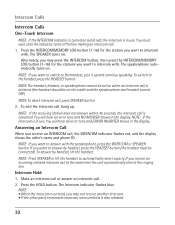
... , hang up and continue speaking. You will hear an error tone and NO ANSWER shows in use . To answer by headset, press the HEADSET button (the headset must wait until the indicator turns off before making an intercom call , the INTERCOM indicator flashes red, and the display shows the... caller's name and phone ID. Intercom Calls Intercom Calls One-Touch Intercom NOTE: If the INTERCOM indicator is turned on . The SPEAKER...
... , hang up and continue speaking. You will hear an error tone and NO ANSWER shows in use . To answer by headset, press the HEADSET button (the headset must wait until the indicator turns off before making an intercom call , the INTERCOM indicator flashes red, and the display shows the... caller's name and phone ID. Intercom Calls Intercom Calls One-Touch Intercom NOTE: If the INTERCOM indicator is turned on . The SPEAKER...

User Guide
Page 33
... 1. Press the HOLD button. 3. Paging All Stations 1. When finished, hang up the handset, or press the SPEAKER button. plug in headset, press HEADSET button, the press PAGE button. 33 cally activate their speakerphones and receive your page. 3. After 30 seconds, the page is turned on ...an intercom call . 2. Press the CONFERENCE button. 5. Press the PAGE button and listen for the person you want to conference with optional headset. NOTE: You will not receive a page when Do Not Disturb is cancelled. 4. To disconnect both parties. To disconnect one party on another...
... 1. Press the HOLD button. 3. Paging All Stations 1. When finished, hang up the handset, or press the SPEAKER button. plug in headset, press HEADSET button, the press PAGE button. 33 cally activate their speakerphones and receive your page. 3. After 30 seconds, the page is turned on ...an intercom call . 2. Press the CONFERENCE button. 5. Press the PAGE button and listen for the person you want to conference with optional headset. NOTE: You will not receive a page when Do Not Disturb is cancelled. 4. To disconnect both parties. To disconnect one party on another...
User Guide
Page 41
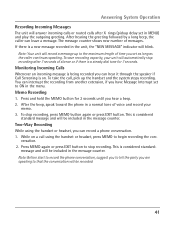
.... 1. Note: Your unit will record a message up the handset and the system stops recording. After the beep, speak toward the phone in a normal tone of voice and record your unit will automatically stop recording after X rings (pickup delay set in the menu. To stop recording...you have Message Interrupt set as long as the caller continues speaking. You can leave a message. Two-Way Recording While using the handset or headset, press MEMO to ON in MENU) and play the outgoing greeting. Answering System Operation Recording Incoming Messages The unit will answer incoming calls or routed...
.... 1. Note: Your unit will record a message up the handset and the system stops recording. After the beep, speak toward the phone in a normal tone of voice and record your unit will automatically stop recording after X rings (pickup delay set in the menu. To stop recording...you have Message Interrupt set as long as the caller continues speaking. You can leave a message. Two-Way Recording While using the handset or headset, press MEMO to ON in MENU) and play the outgoing greeting. Answering System Operation Recording Incoming Messages The unit will answer incoming calls or routed...
User Guide
Page 47
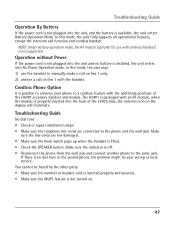
...cordless handset) is not turned on. 47 If there is possible to the phone and the wall jack. in the second phone, the problem might be heard by the other party. • Make sure the handset or headset cord is inserted properly and securely. • Make sure the MUTE feature is... not supported. Cordless Phone Option It is no battery is available, the unit enters Battery Operation Mode. NOTE: Under battery operation mode...
...cordless handset) is not turned on. 47 If there is possible to the phone and the wall jack. in the second phone, the problem might be heard by the other party. • Make sure the handset or headset cord is inserted properly and securely. • Make sure the MUTE feature is... not supported. Cordless Phone Option It is no battery is available, the unit enters Battery Operation Mode. NOTE: Under battery operation mode...
User Guide
Page 52
...Program Your Local Area Code35 If You Programmed Your Local Area Code 35 Important Installation Guidelines 10 Important Installation Information 8 Installing the Phone 10 Intercom Auto Answer17 Intercom Calls 32 Intercom Conference Calls 33 Intercom Hold 32 Interference Information 3 Introduction 7 L Language 14 ...Local Area Code 19 M Mailbox 23 Making Calls with the Handset 27 Making Calls with the Optional Headset 27 Making Calls with the Answering System 42 Cordless Phone Option47 D Data Port 12 Delay Ring 16 Deleting a CID Record 35 Deleting All Call Records 35...
...Program Your Local Area Code35 If You Programmed Your Local Area Code 35 Important Installation Guidelines 10 Important Installation Information 8 Installing the Phone 10 Intercom Auto Answer17 Intercom Calls 32 Intercom Conference Calls 33 Intercom Hold 32 Interference Information 3 Introduction 7 L Language 14 ...Local Area Code 19 M Mailbox 23 Making Calls with the Handset 27 Making Calls with the Optional Headset 27 Making Calls with the Answering System 42 Cordless Phone Option47 D Data Port 12 Delay Ring 16 Deleting a CID Record 35 Deleting All Call Records 35...

User Guide
Page 53
... Area Codes 19 Releasing a Call from Hold 29 Remote Password 23 Restoring the Default Settings 21 Reviewing CID Records 34 Index Reviewing Phone Book Memory 37 Reviewing the Intercom/Memory Log 37 Reviewing the Redial Numbers 30 Ringer Tone 15 Ringer Volume 14 S Saving a ... in Memory 36 Storing a Pause in Memory 38 Storing the Last Number Dialed 37 Summary Screen 34 Switching Between the Speakerphone, Handset, and Headset 28 System Verification 13 T Table of Contents 5, 6 Telephone Jack Requirements 8 Toll Saver Operation 43 Transferring a Call to Another Station 30 ...
... Area Codes 19 Releasing a Call from Hold 29 Remote Password 23 Restoring the Default Settings 21 Reviewing CID Records 34 Index Reviewing Phone Book Memory 37 Reviewing the Intercom/Memory Log 37 Reviewing the Redial Numbers 30 Ringer Tone 15 Ringer Volume 14 S Saving a ... in Memory 36 Storing a Pause in Memory 38 Storing the Last Number Dialed 37 Summary Screen 34 Switching Between the Speakerphone, Handset, and Headset 28 System Verification 13 T Table of Contents 5, 6 Telephone Jack Requirements 8 Toll Saver Operation 43 Transferring a Call to Another Station 30 ...

