
English Manual
Page 1
Sears, Roebuck and Co., Hoffman Estates, IL 60179 Model No. 831.295051 Serial No. Save this equipment. Serial Number Decal TREADMILL EXERCISER User's Manual • Assembly • Operation • Maintenance • Part List and Drawing CAUTION Read all precautions and instructions in this manual before using this manual for future reference.
Sears, Roebuck and Co., Hoffman Estates, IL 60179 Model No. 831.295051 Serial No. Save this equipment. Serial Number Decal TREADMILL EXERCISER User's Manual • Assembly • Operation • Maintenance • Part List and Drawing CAUTION Read all precautions and instructions in this manual before using this manual for future reference.
English Manual
Page 2
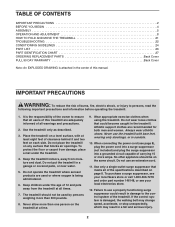
... the control system is damaged, the walking belt may change speed, accelerate, or stop unexpectedly, which may result in the center of all users of this treadmill are recommended for both men and women. TABLE OF CONTENTS IMPORTANT PRECAUTIONS 2 BEFORE YOU BEGIN 4 ASSEMBLY 5 OPERATION AND ADJUSTMENT 8 HOW TO FOLD AND MOVE THE TREADMILL 21 TROUBLESHOOTING 22 CONDITIONING GUIDELINES 24 PART LIST 26 PART IDENTIFICATION CHART 27 ORDERING REPLACEMENT PARTS Back Cover...
... the control system is damaged, the walking belt may change speed, accelerate, or stop unexpectedly, which may result in the center of all users of this treadmill are recommended for both men and women. TABLE OF CONTENTS IMPORTANT PRECAUTIONS 2 BEFORE YOU BEGIN 4 ASSEMBLY 5 OPERATION AND ADJUSTMENT 8 HOW TO FOLD AND MOVE THE TREADMILL 21 TROUBLESHOOTING 22 CONDITIONING GUIDELINES 24 PART LIST 26 PART IDENTIFICATION CHART 27 ORDERING REPLACEMENT PARTS Back Cover...
English Manual
Page 3
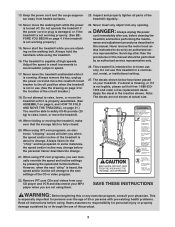
... remove the motor hood un- SAVE THESE INSTRUCTIONS WARNING: Before beginning this manual. treadmill regularly. 14. Always remove the key, unplug the power cord and move the reset/off circuit breaker to avoid sudden jumps in the location shown. However, when the next "chirp" is not in this or any opening. Never move the treadmill. 24. Do not attempt to raise, lower, or move the walking belt while the power is turned...
... remove the motor hood un- SAVE THESE INSTRUCTIONS WARNING: Before beginning this manual. treadmill regularly. 14. Always remove the key, unplug the power cord and move the reset/off circuit breaker to avoid sudden jumps in the location shown. However, when the next "chirp" is not in this or any opening. Never move the treadmill. 24. Do not attempt to raise, lower, or move the walking belt while the power is turned...
English Manual
Page 4
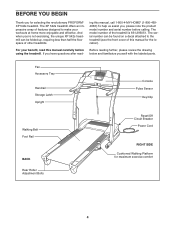
...; XP 542s treadmill. For your workouts at home more enjoyable and effective. Fan Accessory Tray Handrail Storage Latch Upright Console Pulse Sensor Key/Clip Walking Belt Foot Rail BACK Rear Roller Adjustment Bolts Reset/Off Circuit Breaker Power Cord RIGHT SIDE Cushioned Walking Platform for the location). BEFORE YOU BEGIN Thank you , please note the product model number and serial number before using the treadmill. The model number of this manual for maximum exercise comfort 4 The XP 542s treadmill offers an impressive array of other treadmills. The serial number...
...; XP 542s treadmill. For your workouts at home more enjoyable and effective. Fan Accessory Tray Handrail Storage Latch Upright Console Pulse Sensor Key/Clip Walking Belt Foot Rail BACK Rear Roller Adjustment Bolts Reset/Off Circuit Breaker Power Cord RIGHT SIDE Cushioned Walking Platform for the location). BEFORE YOU BEGIN Thank you , please note the product model number and serial number before using the treadmill. The model number of this manual for maximum exercise comfort 4 The XP 542s treadmill offers an impressive array of other treadmills. The serial number...

English Manual
Page 6
...); See drawing 4c. Attach the Latch Assembly (82) to each Upright with the two Latch Screws (46); start both Latch 3 Screws before tightening any of the Console Base. See step 6 and locate the four Upright Bolts (86). Connect the Wire Harness and the pulse wire to three turns. IF THE CONNECTORS ARE NOT CONNECTED PROPERLY, THE CONSOLE MAY BE DAMAGED WHEN THE POWER IS TURNED ON. Insert the excess Wire Harness and pulse wire up into place...
...); See drawing 4c. Attach the Latch Assembly (82) to each Upright with the two Latch Screws (46); start both Latch 3 Screws before tightening any of the Console Base. See step 6 and locate the four Upright Bolts (86). Connect the Wire Harness and the pulse wire to three turns. IF THE CONNECTORS ARE NOT CONNECTED PROPERLY, THE CONSOLE MAY BE DAMAGED WHEN THE POWER IS TURNED ON. Insert the excess Wire Harness and pulse wire up into place...
English Manual
Page 8
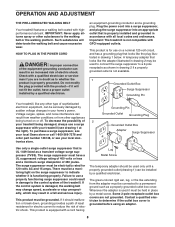
..., see your home's power. If the control system is damaged, the walking belt may change speed, accelerate or stop unexpectedly, which may be used to connect the surge suppressor to reduce the risk of electric shock. This product must be a monitoring light on or off. This product is not available. 1 Grounded Outlet Box Surge Suppressor Grounding Pin Your treadmill, like the plug illustrated in...
..., see your home's power. If the control system is damaged, the walking belt may change speed, accelerate or stop unexpectedly, which may be used to connect the surge suppressor to reduce the risk of electric shock. This product must be a monitoring light on or off. This product is not available. 1 Grounded Outlet Box Surge Suppressor Grounding Pin Your treadmill, like the plug illustrated in...
English Manual
Page 9
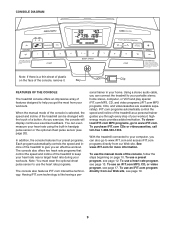
... heart rate using the built-in your workouts. To use an iFIT.com program directly from our Web site. You can also go to keep your heart rate near a target heart rate during your home. To use a heart rate program, see page 12. The console also offers two heart rate programs that control the speed and incline of the treadmill to www.iFIT.com. Using a stereo audio cable, you exercise, the console will display continuous exercise feedback. To use the manual mode of the console, follow the steps...
... heart rate using the built-in your workouts. To use an iFIT.com program directly from our Web site. You can also go to keep your heart rate near a target heart rate during your home. To use a heart rate program, see page 12. The console also offers two heart rate programs that control the speed and incline of the treadmill to www.iFIT.com. Using a stereo audio cable, you exercise, the console will display continuous exercise feedback. To use the manual mode of the console, follow the steps...
English Manual
Page 10
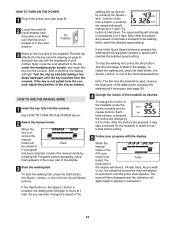
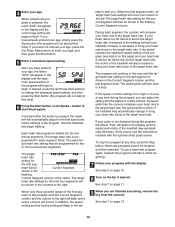
... THE POWER 1 Plug in the power cord (see page 23). 4 Change the incline of the treadmill as desired. To start the walking belt, press the Start button, the Speed + button, or one of the display. 3 Start the walking belt. The time will gradually increase in speed until the entire track appears. When the manual mode or the iFIT.com mode is pressed, the incline will begin to move at 1 mph. If the Start button or the Speed + button is pulled from the console, adjust...
... THE POWER 1 Plug in the power cord (see page 23). 4 Change the incline of the treadmill as desired. To start the walking belt, press the Start button, the Speed + button, or one of the display. 3 Start the walking belt. The time will gradually increase in speed until the entire track appears. When the manual mode or the iFIT.com mode is pressed, the incline will begin to move at 1 mph. If the Start button or the Speed + button is pulled from the console, adjust...

English Manual
Page 11
... "demo" mode. To turn on the fan if desired. Step onto the foot rails, press the Stop button, and adjust the incline of the treadmill to hold down the Stop button while inserting the key into the console. Note: Each time the incline changes, the display will show the incline setting for metric kilometers will be shown. When your heart rate when you are finished using the handgrip pulse sensor, make sure that your heart rate...
... "demo" mode. To turn on the fan if desired. Step onto the foot rails, press the Stop button, and adjust the incline of the treadmill to hold down the Stop button while inserting the key into the console. Note: Each time the incline changes, the display will show the incline setting for metric kilometers will be shown. When your heart rate when you are finished using the handgrip pulse sensor, make sure that your heart rate...
English Manual
Page 13
... finished using the treadmill, switch the reset/off circuit breaker to use a heart rate program. 2 Insert the key into the console. See page 20 and turn off position and unplug the power cord. When you have been inactive, do not use a heart rate program. 1 Put on the optional chest pulse sensor. You must wear the optional chest pulse sensor (see page 20) to the off the demo mode. To select a heart rate program, press the Program Select button repeatedly. During heart rate program 2, your...
... finished using the treadmill, switch the reset/off circuit breaker to use a heart rate program. 2 Insert the key into the console. See page 20 and turn off position and unplug the power cord. When you have been inactive, do not use a heart rate program. 1 Put on the optional chest pulse sensor. You must wear the optional chest pulse sensor (see page 20) to the off the demo mode. To select a heart rate program, press the Program Select button repeatedly. During heart rate program 2, your...
English Manual
Page 14
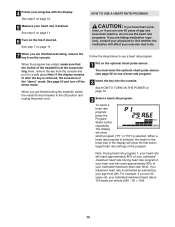
... program (see the instructions included with the optional chest pulse sensor. If the speed or incline setting is too high or too low at any time, press the Stop button. See step 5 on page 10. 8 Turn on page 11. 9 When you have already entered your heart rate closer to the target heart rate. If you are finished exercising, remove the key from the console. Hold the handrails and begin to a stop the program...
... program (see the instructions included with the optional chest pulse sensor. If the speed or incline setting is too high or too low at any time, press the Stop button. See step 5 on page 10. 8 Turn on page 11. 9 When you have already entered your heart rate closer to the target heart rate. If you are finished exercising, remove the key from the console. Hold the handrails and begin to a stop the program...

English Manual
Page 16
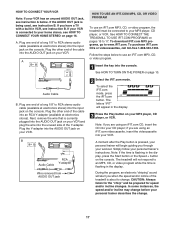
... plug your stereo and plug the wire into the input jack on the console. B CD VCR Amp LINE OUT Audio Cable RCA Y-adapter Wire removed from LINE OUT jack 16 HOW TO CONNECT YOUR HOME STEREO Note: If your stereo. Note: While the cable is being used, see instruction A below. Note: While the Y-adapter is plugged into the input jack on the console. Note: While the cable is plugged...
... plug your stereo and plug the wire into the input jack on the console. B CD VCR Amp LINE OUT Audio Cable RCA Y-adapter Wire removed from LINE OUT jack 16 HOW TO CONNECT YOUR HOME STEREO Note: If your stereo. Note: While the cable is being used, see instruction A below. Note: While the Y-adapter is plugged into the input jack on the console. Note: While the cable is plugged...
English Manual
Page 17
... the treadmill is connected to your CD player; A Plug the Y-adapter into your home stereo, see HOW TO CONNECT YOUR HOME STEREO on pages 15 to change before your workout. To download iFIT.com MP3 programs, go to an MP3, CD, or video program while the time is flashing in the display. 3 Press the Play button on the console. To purchase iFIT.com CDs or videocassettes, call toll-free 1-888...
... the treadmill is connected to your CD player; A Plug the Y-adapter into your home stereo, see HOW TO CONNECT YOUR HOME STEREO on pages 15 to change before your workout. To download iFIT.com MP3 programs, go to an MP3, CD, or video program while the time is flashing in the display. 3 Press the Play button on the console. To purchase iFIT.com CDs or videocassettes, call toll-free 1-888...
English Manual
Page 18
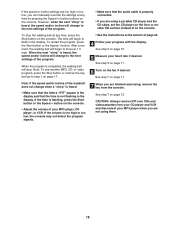
... the audio cable is flashing, press the Start button or the Speed + button on the console. • Adjust the volume of the program. See step 6 on page 11. 6 Turn on page 17. See step 7 on the console. • See the instructions at 1.0 mph. Note: If the speed and/or incline of on page 13. However, when the next "chirp" is completed, the walking belt will change to flash in the display...
... the audio cable is flashing, press the Start button or the Speed + button on the console. • Adjust the volume of the program. See step 6 on page 11. 6 Turn on page 17. See step 7 on the console. • See the instructions at 1.0 mph. Note: If the speed and/or incline of on page 13. However, when the next "chirp" is completed, the walking belt will change to flash in the display...
English Manual
Page 19
... internet connection and an internet service provider. In addition, you are finished exercising, remove the key from the internet. Follow the steps below to access basic programs, audio programs, and video programs directly from the console. To select the iFIT.com mode, press the iFIT.com button. Read and follow the on the console. A list of the treadmill is not flashing in the display. To restart the program, press the Start button or the Speed + button. See step 5 on...
... internet connection and an internet service provider. In addition, you are finished exercising, remove the key from the internet. Follow the steps below to access basic programs, audio programs, and video programs directly from the console. To select the iFIT.com mode, press the iFIT.com button. Read and follow the on the console. A list of the treadmill is not flashing in the display. To restart the program, press the Start button or the Speed + button. See step 5 on...

English Manual
Page 20
... number of hours Miles Hours that the walking belt has moved. When the console is in the demo mode, the power cord can be plugged in, the key can be shown in the display: The left side of the display will not operate. The information mode also allows you to the console. THE INFORMATION MODE/DEMO MODE THE OPTIONAL CHEST PULSE SENSOR The console features an information mode that keeps track of the total number of hours that the treadmill...
... number of hours Miles Hours that the walking belt has moved. When the console is in the demo mode, the power cord can be plugged in, the key can be shown in the display: The left side of the display will not operate. The information mode also allows you to the console. THE INFORMATION MODE/DEMO MODE THE OPTIONAL CHEST PULSE SENSOR The console features an information mode that keeps track of the total number of hours that the treadmill...

English Manual
Page 22
... and then press the switch back in . d. PROBLEM: The incline of the console do not function properly SOLUTION: a. With the help of the Incline buttons. If the circuit breaker has tripped, wait for five minutes, and then plug it back in . See assembly step 7 on page 8. If the power cord is needed, call toll-free 1-800-4-MY-HOME® (1-800-469-4663). If the treadmill still...
... and then press the switch back in . d. PROBLEM: The incline of the console do not function properly SOLUTION: a. With the help of the Incline buttons. If the circuit breaker has tripped, wait for five minutes, and then plug it back in . See assembly step 7 on page 8. If the power cord is needed, call toll-free 1-800-4-MY-HOME® (1-800-469-4663). If the treadmill still...
English Manual
Page 23
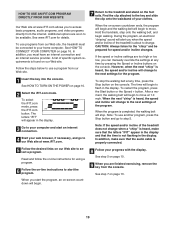
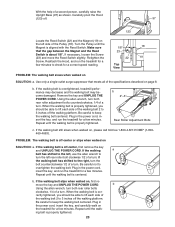
... wrench, turn both rear roller adjustment bolts counterclockwise, 1/4 of a turn . Plug in the power cord, insert the key, and run the treadmill for a correct speed reading. Make sure 1/8" 18 that meets all of the walking belt 2 to lift each side of a turn . Top View PROBLEM: The walking belt slows when walked on , first re- PROBLEM: The walking belt is about 1/8". rectly tightened, you should be able to 3 inches off . 97 123 Locate the Reed Switch (22...
... wrench, turn both rear roller adjustment bolts counterclockwise, 1/4 of a turn . Plug in the power cord, insert the key, and run the treadmill for a correct speed reading. Make sure 1/8" 18 that meets all of the walking belt 2 to lift each side of a turn . Top View PROBLEM: The walking belt slows when walked on , first re- PROBLEM: The walking belt is about 1/8". rectly tightened, you should be able to 3 inches off . 97 123 Locate the Reed Switch (22...

English Manual
Page 24
... condition, complete three workouts each workout with at a relatively low intensity level for a sustained period of the treadmill until your heart rate during exercise, use stored fat calories for fat burning; A proper warm-up -Start each week if desired. Next, find your age near the middle number in your exercise program. The sensor is to exercise with preexisting health problems. The pulse sensor is especially important for...
... condition, complete three workouts each workout with at a relatively low intensity level for a sustained period of the treadmill until your heart rate during exercise, use stored fat calories for fat burning; A proper warm-up -Start each week if desired. Next, find your age near the middle number in your exercise program. The sensor is to exercise with preexisting health problems. The pulse sensor is especially important for...

English Manual
Page 26
... 1 Motor Pulley 29 1 Motor Star Washer 30 1 Motor Tension Nut 31 1 Right Top Handgrip 32 1 Drive Motor 33 1 Lift Frame 34 1 Right Handrail 35 2 Walking Platform Nut 36 1 Motor Pivot Pin 37 1 Incline Motor 38 2 Incline Motor Bolt 39 6 1/4" Washer 40 4 1" Tek Screw 41 1 Front Roller Adj. Bolt 42 2 Walking Platform Screw (Front) 43 1 Left Bottom Handgrip 44 5 Hood Screw 45 6 Star Washer 46 2 Latch Screw 47 1 Reset/Off Circuit Breaker 48 1 Controller 49 1 Power Cord 50 1 Power Cord...
... 1 Motor Pulley 29 1 Motor Star Washer 30 1 Motor Tension Nut 31 1 Right Top Handgrip 32 1 Drive Motor 33 1 Lift Frame 34 1 Right Handrail 35 2 Walking Platform Nut 36 1 Motor Pivot Pin 37 1 Incline Motor 38 2 Incline Motor Bolt 39 6 1/4" Washer 40 4 1" Tek Screw 41 1 Front Roller Adj. Bolt 42 2 Walking Platform Screw (Front) 43 1 Left Bottom Handgrip 44 5 Hood Screw 45 6 Star Washer 46 2 Latch Screw 47 1 Reset/Off Circuit Breaker 48 1 Controller 49 1 Power Cord 50 1 Power Cord...


