
English Manual
Page 2
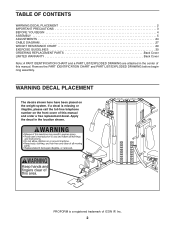
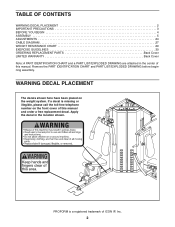
... manual. Remove the PART IDENTIFICATION CHART and PART LIST/EXPLODED DRAWING before beginning assembly. WARNING DECAL PLACEMENT The decals shown here have been placed on the front cover of this manual and order a free replacement decal. TABLE OF CONTENTS WARNING DECAL PLACEMENT 2 IMPORTANT PRECAUTIONS 3 BEFORE YOU BEGIN 4 ASSEMBLY 5 ADJUSTMENTS 24 CABLE DIAGRAM 27 WEIGHT RESISTANCE CHART 29 EXERCISE GUIDELINES 30 ORDERING REPLACEMENT PARTS Back Cover LIMITED WARRANTY Back Cover Note: A PART IDENTIFICATION CHART and a PART LIST/EXPLODED DRAWING are attached...
... manual. Remove the PART IDENTIFICATION CHART and PART LIST/EXPLODED DRAWING before beginning assembly. WARNING DECAL PLACEMENT The decals shown here have been placed on the front cover of this manual and order a free replacement decal. TABLE OF CONTENTS WARNING DECAL PLACEMENT 2 IMPORTANT PRECAUTIONS 3 BEFORE YOU BEGIN 4 ASSEMBLY 5 ADJUSTMENTS 24 CABLE DIAGRAM 27 WEIGHT RESISTANCE CHART 29 EXERCISE GUIDELINES 30 ORDERING REPLACEMENT PARTS Back Cover LIMITED WARRANTY Back Cover Note: A PART IDENTIFICATION CHART and a PART LIST/EXPLODED DRAWING are attached...
English Manual
Page 3
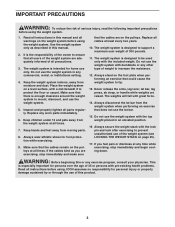
... this manual. 2. Use the weight system only as you feel pain or dizziness at all instructions in any worn parts immediately. 6. Do not use the weight system with the included weight. Inspect and properly tighten all times. Always wear athletic shoes for home use the lat bar. 15. If the cables bind as described in an elevated position. 16. Never release the arms, leg lever, lat bar, leg press, ab strap...
... this manual. 2. Use the weight system only as you feel pain or dizziness at all instructions in any worn parts immediately. 6. Do not use the weight system with the included weight. Inspect and properly tighten all times. Always wear athletic shoes for home use the lat bar. 15. If the cables bind as described in an elevated position. 16. Never release the arms, leg lever, lat bar, leg press, ab strap...
English Manual
Page 4
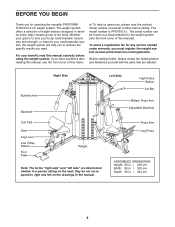
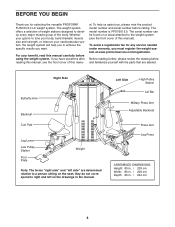
... Lat Bar Military Press Arm Adjustable Backrest Curl Pad Seat Leg Lever Low Pulley Station Foot Plate Weight Note: The terms "right side" and "left side" are labeled. Press Arm Leg Press ASSEMBLED DIMENSIONS: Height: 80 in. / 203 cm Width: 80 in. / 203 cm Depth: 96 in the manual. For your cardiovascular system, the weight system will help us assist you, please note the product model number and serial number before using...
... Lat Bar Military Press Arm Adjustable Backrest Curl Pad Seat Leg Lever Low Pulley Station Foot Plate Weight Note: The terms "right side" and "left side" are labeled. Press Arm Leg Press ASSEMBLED DIMENSIONS: Height: 80 in. / 203 cm Width: 80 in. / 203 cm Depth: 96 in the manual. For your cardiovascular system, the weight system will help us assist you, please note the product model number and serial number before using...

English Manual
Page 5
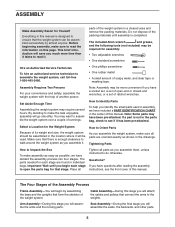
... assemble the seats, the backrests, and other parts. 5 Place all Tighten all parts are found in a cleared area and remove the packing materials. Important: Wait until assembly is completed. ASSEMBLY Make Assembly Easier for Yourself Everything in this manual is designed to ensure that the weight system can be more time than it will save you will attach the cables and pulleys that connect the arms...
... assemble the seats, the backrests, and other parts. 5 Place all Tighten all parts are found in a cleared area and remove the packing materials. Important: Wait until assembly is completed. ASSEMBLY Make Assembly Easier for Yourself Everything in this manual is designed to ensure that the weight system can be more time than it will save you will attach the cables and pulleys that connect the arms...

English Manual
Page 10
.... Repeat this step with the indicated 13 hole closer to the Center Base (5) in step 3. Slide another Weight (34) onto the set of Weight Guides (30). Tighten the M10 x 70mm Bolts (57) used in the same manner. Orient a Weight Guide (30) with the other three Weight Guides (30) to the bottom. Slide a Weight Bumper (66) onto the Weight Guide. 30 30 Attach the other stack of Weights (34).
.... Repeat this step with the indicated 13 hole closer to the Center Base (5) in step 3. Slide another Weight (34) onto the set of Weight Guides (30). Tighten the M10 x 70mm Bolts (57) used in the same manner. Orient a Weight Guide (30) with the other three Weight Guides (30) to the bottom. Slide a Weight Bumper (66) onto the Weight Guide. 30 30 Attach the other stack of Weights (34).

English Manual
Page 13
... 29 Cable Assembly 25 92 25. the Press Arm Handle must be able to the Leg Press (12) with an M8 x 25mm Shoulder Bolt (92) and an M8 Nylon Locknut (101). Repeat this step with the welded spacer on pages 27 and 28 to an M10 x 75mm Bolt (96). Apply grease to identify the cables and ensure proper cable routing. 7 101 Locate the Butterfly Cable...
... 29 Cable Assembly 25 92 25. the Press Arm Handle must be able to the Leg Press (12) with an M8 x 25mm Shoulder Bolt (92) and an M8 Nylon Locknut (101). Repeat this step with the welded spacer on pages 27 and 28 to an M10 x 75mm Bolt (96). Apply grease to identify the cables and ensure proper cable routing. 7 101 Locate the Butterfly Cable...
English Manual
Page 24
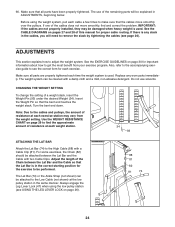
... by tightening the cables (see page 26). The use solvents. Also, refer to the accompanying exercise guide to see USING THE LEG LEVER LOCK on pages 27 and 28 of the remaining parts will need to make sure that the Lat Bar is used . Do not use of this manual for important information about how to find and correct the problem. CHANGING THE WEIGHT SETTING To change the setting of resistance at...
... by tightening the cables (see page 26). The use solvents. Also, refer to the accompanying exercise guide to see USING THE LEG LEVER LOCK on pages 27 and 28 of the remaining parts will need to make sure that the Lat Bar is used . Do not use of this manual for important information about how to find and correct the problem. CHANGING THE WEIGHT SETTING To change the setting of resistance at...

English Manual
Page 26
... the weight pin into the middle of the Press Cable (72). 47 15 43 111 46 48 49 46 106 43 43 50 103 72 26 Make sure that the Cable and Pulley move smoothly. Reattach the Pulley, Cable B Trap, and Finger Guards using the low pulley station, engage the Leg Lever Lock (47) onto the Leg Lever (15) tube. Adjust the Pulley (43) attached to...
... the weight pin into the middle of the Press Cable (72). 47 15 43 111 46 48 49 46 106 43 43 50 103 72 26 Make sure that the Cable and Pulley move smoothly. Reattach the Pulley, Cable B Trap, and Finger Guards using the low pulley station, engage the Leg Lever Lock (47) onto the Leg Lever (15) tube. Adjust the Pulley (43) attached to...

English Manual
Page 29
...resistance at each exercise station. Weight resistance shown for the butterfly arm station is for each arm. The numbers refer to differences in individual weight plates as well as friction between the cables, pulleys, and weight guides. WEIGHT 1 2 3 4 5 6 7 8 9 10 11 12 LOW PULLEY (lbs.) 27 45 64 77 94 108 122 136 151 173 187 198 LEG...117 126 135 PRESS ARM (lbs.) 40 59 78 90 112 128 156 179 190 201 222 244 LEG PRESS (lbs.) 75 94 114 133 161 205 233 273 297 325 349 369 29 weight plates. WEIGHT RESISTANCE CHART The chart below shows the approximate weight resistance at each ...
...resistance at each exercise station. Weight resistance shown for the butterfly arm station is for each arm. The numbers refer to differences in individual weight plates as well as friction between the cables, pulleys, and weight guides. WEIGHT 1 2 3 4 5 6 7 8 9 10 11 12 LOW PULLEY (lbs.) 27 45 64 77 94 108 122 136 151 173 187 198 LEG...117 126 135 PRESS ARM (lbs.) 40 59 78 90 112 128 156 179 190 201 222 244 LEG PRESS (lbs.) 75 94 114 133 161 205 233 273 297 325 349 369 29 weight plates. WEIGHT RESISTANCE CHART The chart below shows the approximate weight resistance at each ...
English Manual
Page 30
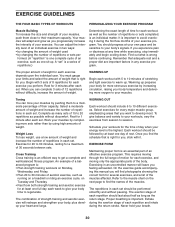
... sets completed, is an efficient way to get a complete and well-balanced fitness program. EXERCISE FORM Maintaining proper form is : • Plan strength training workouts on Monday, Wednesday, and Friday. • Plan 20 to 30 minutes of aerobic exercise, such as possible without difficulty, increase the amount of weight. This requires moving only the appropriate parts of the body. Refer to the muscle chart...
... sets completed, is an efficient way to get a complete and well-balanced fitness program. EXERCISE FORM Maintaining proper form is : • Plan strength training workouts on Monday, Wednesday, and Friday. • Plan 20 to 30 minutes of aerobic exercise, such as possible without difficulty, increase the amount of weight. This requires moving only the appropriate parts of the body. Refer to the muscle chart...
English Manual
Page 31
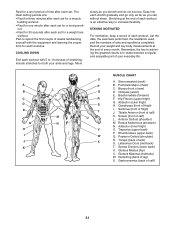
... after each set for a toning work- List the date, the exercises performed, the resistance used, and the numbers of calf) 31 Soleus (front of arm) S. Triceps (back of calf) L. Spinae Erectors (lower back) U. The ideal resting periods are: • Rest for three minutes after each set for a muscle building workout. • Rest for one minute after each set . Record your weight and key body measurements...
... after each set for a toning work- List the date, the exercises performed, the resistance used, and the numbers of calf) 31 Soleus (front of arm) S. Triceps (back of calf) L. Spinae Erectors (lower back) U. The ideal resting periods are: • Rest for three minutes after each set for a muscle building workout. • Rest for one minute after each set . Record your weight and key body measurements...
English Manual
Page 40
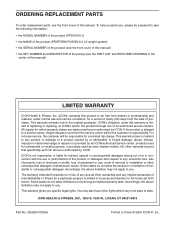
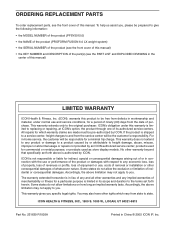
... limitations on how long an implied warranty lasts. This warranty extends only to you . This warranty gives you , please be prepared to give the following information: • the MODEL NUMBER of the product (PFSY5015.1) • the NAME of the product (PROFORM FUSION 6.0 LX weight system) • the SERIAL NUMBER of the product (see the front cover of this manual) • the KEY NUMBER and DESCRIPTION of the part...
... limitations on how long an implied warranty lasts. This warranty extends only to you . This warranty gives you , please be prepared to give the following information: • the MODEL NUMBER of the product (PFSY5015.1) • the NAME of the product (PROFORM FUSION 6.0 LX weight system) • the SERIAL NUMBER of the product (see the front cover of this manual) • the KEY NUMBER and DESCRIPTION of the part...
English Manual
Page 2
... of ICON IP, Inc. 2 Remove the PART IDENTIFICATION CHART and PART LIST/EXPLODED DRAWING before beginning assembly. Apply the decal in the center of this manual and order a free replacement decal. TABLE OF CONTENTS WARNING DECAL PLACEMENT 2 IMPORTANT PRECAUTIONS 3 BEFORE YOU BEGIN 4 ASSEMBLY 5 ADJUSTMENTS 24 CABLE DIAGRAM 27 WEIGHT RESISTANCE CHART 29 EXERCISE GUIDELINES 30 ORDERING REPLACEMENT PARTS Back Cover LIMITED WARRANTY Back Cover Note: A PART IDENTIFICATION CHART and a PART LIST/EXPLODED DRAWING are attached in the location shown. PROFORM is...
... of ICON IP, Inc. 2 Remove the PART IDENTIFICATION CHART and PART LIST/EXPLODED DRAWING before beginning assembly. Apply the decal in the center of this manual and order a free replacement decal. TABLE OF CONTENTS WARNING DECAL PLACEMENT 2 IMPORTANT PRECAUTIONS 3 BEFORE YOU BEGIN 4 ASSEMBLY 5 ADJUSTMENTS 24 CABLE DIAGRAM 27 WEIGHT RESISTANCE CHART 29 EXERCISE GUIDELINES 30 ORDERING REPLACEMENT PARTS Back Cover LIMITED WARRANTY Back Cover Note: A PART IDENTIFICATION CHART and a PART LIST/EXPLODED DRAWING are attached in the location shown. PROFORM is...
English Manual
Page 3
... the arms, leg lever, lat bar, leg press, ab strap, or handle while weights are adequately informed of this manual. 2. Always disconnect the lat bar from the weight system at any commercial, rental, or institutional setting. 4. Do not use the weight system with pre-existing health problems. Read all instructions before using. ICON assumes no responsibility for foot protection while exercising. 9. Keep the weight system indoors, away from moving parts. 8. Always stand on the pulleys at...
... the arms, leg lever, lat bar, leg press, ab strap, or handle while weights are adequately informed of this manual. 2. Always disconnect the lat bar from the weight system at any commercial, rental, or institutional setting. 4. Do not use the weight system with pre-existing health problems. Read all instructions before using. ICON assumes no responsibility for foot protection while exercising. 9. Keep the weight system indoors, away from moving parts. 8. Always stand on the pulleys at...
English Manual
Page 4
... Pulley Station Lat Bar Military Press Arm Adjustable Backrest Press Arm Leg Press ASSEMBLED DIMENSIONS: Height: 80 in. / 203 cm Width: 80 in. / 203 cm Depth: 96 in the manual. BEFORE YOU BEGIN Thank you for any service needed under warranty, you must register the weight system at www.proformservice.com/registration. The model number is to the weight system (see the front cover of this manu- Before reading further, please review...
... Pulley Station Lat Bar Military Press Arm Adjustable Backrest Press Arm Leg Press ASSEMBLED DIMENSIONS: Height: 80 in. / 203 cm Width: 80 in. / 203 cm Depth: 96 in the manual. BEFORE YOU BEGIN Thank you for any service needed under warranty, you must register the weight system at www.proformservice.com/registration. The model number is to the weight system (see the front cover of this manu- Before reading further, please review...
English Manual
Page 5
... into four stages. Select a Location for that connect the arms to read the information on this stage you have included a PART IDENTIFICATION CHART in a cleared area and remove the packing materials. Questions? Seat Assembly-During the final stage you much more convenient if you have a socket set, a set of open the parts bag for the Weight System Because of the weight system in the center...
... into four stages. Select a Location for that connect the arms to read the information on this stage you have included a PART IDENTIFICATION CHART in a cleared area and remove the packing materials. Questions? Seat Assembly-During the final stage you much more convenient if you have a socket set, a set of open the parts bag for the Weight System Because of the weight system in the center...

English Manual
Page 13
.... Attach the 23 Leg Press (12) and the 2 3/4" Bushing to the Leg Press (12) with the other Press Arm Handle (27) and the Right Press Arm (26). 23. Apply grease to identify the cables and ensure proper cable routing. 7 101 Locate the Butterfly Cable (73). Attach 24 the Leg Press Plate (29) and a 2 3/4" Bushing (65) to the Left Base (2) with the Bolt and an M10 Nylon Locknut (111). During steps...
.... Attach the 23 Leg Press (12) and the 2 3/4" Bushing to the Leg Press (12) with the other Press Arm Handle (27) and the Right Press Arm (26). 23. Apply grease to identify the cables and ensure proper cable routing. 7 101 Locate the Butterfly Cable (73). Attach 24 the Leg Press Plate (29) and a 2 3/4" Bushing (65) to the Left Base (2) with the Bolt and an M10 Nylon Locknut (111). During steps...

English Manual
Page 24
... Ankle Strap (not shown) can be explained in the same manner. Replace any slack in the correct starting position for important information about how to remove the slack by tightening the cables (see page 26). 66. See the CABLE DIAGRAMS on page 29 to the cables and pulleys, the amount of resistance at each weight station. 34 93 ATTACHING THE LAT BAR Attach the Lat Bar (74) to adjust the weight...
... Ankle Strap (not shown) can be explained in the same manner. Replace any slack in the correct starting position for important information about how to remove the slack by tightening the cables (see page 26). 66. See the CABLE DIAGRAMS on page 29 to the cables and pulleys, the amount of resistance at each weight station. 34 93 ATTACHING THE LAT BAR Attach the Lat Bar (74) to adjust the weight...

English Manual
Page 30
... of weight used • by pushing them close to 30 minutes, resting for you can complete 3 sets of 12 repetitions without difficulty, increase the amount of your body time to warm up . Each workout should be followed by at your heart and lungs. EXERCISE FORM Maintaining proper form is an essential part of the muscles affected. On the exercise guide accompanying this manual...
... of weight used • by pushing them close to 30 minutes, resting for you can complete 3 sets of 12 repetitions without difficulty, increase the amount of your body time to warm up . Each workout should be followed by at your heart and lungs. EXERCISE FORM Maintaining proper form is an essential part of the muscles affected. On the exercise guide accompanying this manual...
English Manual
Page 40
... display models. You may also have other warranties and any implied warranties of merchantability or fitness for a particular purpose is limited in -home service, the customer will be prepared to give the following information: • the MODEL NUMBER of the product (PFSY5015.0) • the NAME of the product (PROFORM FUSION 6.0 LX weight system) • the SERIAL NUMBER of the product (see the front cover of this manual) • the KEY NUMBER...
... display models. You may also have other warranties and any implied warranties of merchantability or fitness for a particular purpose is limited in -home service, the customer will be prepared to give the following information: • the MODEL NUMBER of the product (PFSY5015.0) • the NAME of the product (PROFORM FUSION 6.0 LX weight system) • the SERIAL NUMBER of the product (see the front cover of this manual) • the KEY NUMBER...

