

English Manual
Page 1
Serial Number Decal USER'S MANUAL QUESTIONS? Visit our website at www.proform.com new products, prizes, fitness tips, and much more! CALL TOLL-FREE: 1-888-533-1333 Mon.-Fri., 6 a.m.-6 p.m. Save this equipment. Model No. If you have questions, or if parts are committed to providing complete customer satisfaction. MST ON THE WEB: www...
Serial Number Decal USER'S MANUAL QUESTIONS? Visit our website at www.proform.com new products, prizes, fitness tips, and much more! CALL TOLL-FREE: 1-888-533-1333 Mon.-Fri., 6 a.m.-6 p.m. Save this equipment. Model No. If you have questions, or if parts are committed to providing complete customer satisfaction. MST ON THE WEB: www...
English Manual
Page 2
...4 ASSEMBLY 5 OPERATION AND ADJUSTMENT 8 HOW TO FOLD AND MOVE THE TREADMILL 21 TROUBLESHOOTING 22 CONDITIONING GUIDELINES 24 PART LIST 26 PART IDENTIFICATION CHART 27 ORDERING REPLACEMENT PARTS Back Cover LIMITED WARRANTY Back Cover Note: An EXPLODED DRAWING is attached in... the center of the treadmill. Athletic support clothes are used by persons weighing more amps. When connecting the power cord (see your local PROFORM...
...4 ASSEMBLY 5 OPERATION AND ADJUSTMENT 8 HOW TO FOLD AND MOVE THE TREADMILL 21 TROUBLESHOOTING 22 CONDITIONING GUIDELINES 24 PART LIST 26 PART IDENTIFICATION CHART 27 ORDERING REPLACEMENT PARTS Back Cover LIMITED WARRANTY Back Cover Note: An EXPLODED DRAWING is attached in... the center of the treadmill. Athletic support clothes are used by persons weighing more amps. When connecting the power cord (see your local PROFORM...
English Manual
Page 3
...The decals shown here have been placed on page 8). 16. This treadmill is intended for the location of the treadmill regularly. 25. Always listen for persons over the age of 35 or persons with pre-existing health problems. Read all parts of the circuit breaker.) 19. Remove iFIT.com CDs and videos... from your CD player and VCR and disconnect your MP3 player when you are standing on page 21.) You must be prepared. Do not attempt to change before using the treadmill (see OPERATION AND ...
...The decals shown here have been placed on page 8). 16. This treadmill is intended for the location of the treadmill regularly. 25. Always listen for persons over the age of 35 or persons with pre-existing health problems. Read all parts of the circuit breaker.) 19. Remove iFIT.com CDs and videos... from your CD player and VCR and disconnect your MP3 player when you are standing on page 21.) You must be prepared. Do not attempt to change before using the treadmill (see OPERATION AND ...
English Manual
Page 4
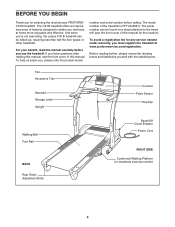
...folded up, requiring less than half the floor space of other treadmills. For your workouts at www.proformservice.com/registration. Before reading further, please review the drawing below and familiarize yourself with the labeled parts. The serial number can be found on a decal attached to...Rail BACK Rear Roller Adjustment Bolts Reset/Off Circuit Breaker Power Cord RIGHT SIDE Cushioned Walking Platform for selecting the revolutionary PROFORM® CX18i treadmill. The model number of this manual, see the front cover of this manual for any service needed under warranty, you...
...folded up, requiring less than half the floor space of other treadmills. For your workouts at www.proformservice.com/registration. Before reading further, please review the drawing below and familiarize yourself with the labeled parts. The serial number can be found on a decal attached to...Rail BACK Rear Roller Adjustment Bolts Reset/Off Circuit Breaker Power Cord RIGHT SIDE Cushioned Walking Platform for selecting the revolutionary PROFORM® CX18i treadmill. The model number of this manual, see the front cover of this manual for any service needed under warranty, you...

English Manual
Page 5
... and a Base Pads (99) as you tip the Uprights.) Make sure that the power cord is unplugged. 1 To identify small parts, use the PART IDENTIFICATION CHART on one of the treadmill walking belt is lubricant on top of the walking belt or the shipping carton. If there is coated with two 1" Tek... Assembly requires the included allen wrenches and your foot on page 27. tighten the Tek Screws without the Base Pads first. Set the treadmill in the parts bag, check to tip the Upright Base forward as shown; Make sure that the Extension Legs remain in the locations shown with high-...
... and a Base Pads (99) as you tip the Uprights.) Make sure that the power cord is unplugged. 1 To identify small parts, use the PART IDENTIFICATION CHART on one of the treadmill walking belt is lubricant on top of the walking belt or the shipping carton. If there is coated with two 1" Tek... Assembly requires the included allen wrenches and your foot on page 27. tighten the Tek Screws without the Base Pads first. Set the treadmill in the parts bag, check to tip the Upright Base forward as shown; Make sure that the Extension Legs remain in the locations shown with high-...
English Manual
Page 7
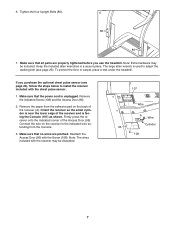
...large allen wrench is near the lower edge of the Access Door (96). If you use the treadmill. Make sure that no wires are properly tightened before you purchase the optional chest pulse sensor (... the chest pulse sensor. 1. Note: Extra hardware may be included. To protect the floor or carpet, place a mat under the treadmill. Firmly press the receiver onto the indicated corner of the receiver and is unplugged. Tighten the four Upright Bolts (86). 6 86 ... with the receiver may be discarded. 107 Wire A Wire Cylinder 96 108 7 6. Make sure that all parts are pinched.
...large allen wrench is near the lower edge of the Access Door (96). If you use the treadmill. Make sure that no wires are properly tightened before you purchase the optional chest pulse sensor (... the chest pulse sensor. 1. Note: Extra hardware may be included. To protect the floor or carpet, place a mat under the treadmill. Firmly press the receiver onto the indicated corner of the receiver and is unplugged. Tighten the four Upright Bolts (86). 6 86 ... with the receiver may be discarded. 107 Wire A Wire Cylinder 96 108 7 6. Make sure that all parts are pinched.

English Manual
Page 8
... volts AC and 15 amps. Do not modify the plug provided with highperformance lubricant. To purchase a surge suppressor, see your local PROFORM dealer or call the toll-free telephone number on the surge suppressor to the control system of the equipment-grounding conductor can be installed...and serious injury. Lug Metal Screw The temporary adapter should malfunction or break down, grounding provides a path of this manual and order part number 146148, or see your treadmill (see drawing 1 at the right). Some 2-pole receptacle outlet box covers are in doubt as to a 2-pole receptacle as ...
... volts AC and 15 amps. Do not modify the plug provided with highperformance lubricant. To purchase a surge suppressor, see your local PROFORM dealer or call the toll-free telephone number on the surge suppressor to the control system of the equipment-grounding conductor can be installed...and serious injury. Lug Metal Screw The temporary adapter should malfunction or break down, grounding provides a path of this manual and order part number 146148, or see your treadmill (see drawing 1 at the right). Some 2-pole receptacle outlet box covers are in doubt as to a 2-pole receptacle as ...
English Manual
Page 10
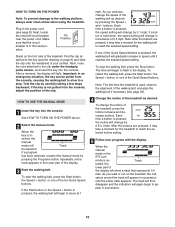
...of your progress with the display. Plug in succession. 10 Find the clip attached to the walking platform, always wear clean shoes when using the treadmill. Next, route the cord attached to move at 1 mph. HOW TO USE THE MANUAL MODE 1 Insert the key into the console. If the... setting will begin to flash in - Each time a button is in the display. To stop . The time will change the incline of the treadmill, press the Incline increase and decrease buttons. Track lected, the lower part of the treadmill. The track will then disappear and the indicators will light.
...of your progress with the display. Plug in succession. 10 Find the clip attached to the walking platform, always wear clean shoes when using the treadmill. Next, route the cord attached to move at 1 mph. HOW TO USE THE MANUAL MODE 1 Insert the key into the console. If the... setting will begin to flash in - Each time a button is in the display. To stop . The time will change the incline of the treadmill, press the Incline increase and decrease buttons. Track lected, the lower part of the treadmill. The track will then disappear and the indicators will light.
English Manual
Page 12
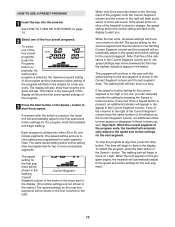
...show how long the program will continue in this way until the speed setting for the last segment is shown in the lower part of the program ends, the treadmill will be shown in the matrix.) The speed settings for the next segment. Note: The same speed setting and/or incline setting... the second segment will flash in those columns as the Current Segment column, an additional indicator may move at any of the program begins, the treadmill will appear or disappear in the display for a few times a Speed button is divided into the console. The walking belt will flash in the ...
...show how long the program will continue in this way until the speed setting for the last segment is shown in the lower part of the program ends, the treadmill will be shown in the matrix.) The speed settings for the next segment. Note: The same speed setting and/or incline setting... the second segment will flash in those columns as the Current Segment column, an additional indicator may move at any of the program begins, the treadmill will appear or disappear in the display for a few times a Speed button is divided into the console. The walking belt will flash in the ...
English Manual
Page 13
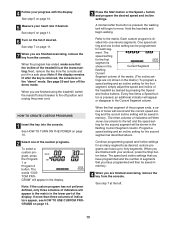
... will appear or disappear in memory. See page 20 and turn off position and unplug the power cord. If more than three columns of the treadmill is in memory. 4 When you are finished exercising, remove the key from the console. tings are finished exercising, remove the key from the ... incline of the display. Note: If the custom program has not yet been defined, only three columns of indicators will appear in the lower part of the treadmill as desired; 4 Follow your progress with your heart rate if desired. The words "CUSTOM PROGRAM" will appear in the matrix in the display....
... will appear or disappear in memory. See page 20 and turn off position and unplug the power cord. If more than three columns of the treadmill is in memory. 4 When you are finished exercising, remove the key from the console. tings are finished exercising, remove the key from the ... incline of the display. Note: If the custom program has not yet been defined, only three columns of indicators will appear in the lower part of the treadmill as desired; 4 Follow your progress with your heart rate if desired. The words "CUSTOM PROGRAM" will appear in the matrix in the display....
English Manual
Page 14
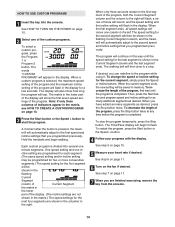
...CUSTOM PROGRAM on page 13. 3 Press the Start button or the Speed + button to flash. To increase the length of indicators appear in the lower part of the custom programs. To select a custom program, press the Program 1 or Program 2 button. The Time/Pace display will move one column to...desired, you programmed previously. When the current segment ends, the new setting will be shown in the flashing Current Segment column, and the treadmill will continue in the columns to the program while using it. When you are not shown in the display for the first segment will automatically...
...CUSTOM PROGRAM on page 13. 3 Press the Start button or the Speed + button to flash. To increase the length of indicators appear in the lower part of the custom programs. To select a custom program, press the Program 1 or Program 2 button. The Time/Pace display will move one column to...desired, you programmed previously. When the current segment ends, the new setting will be shown in the flashing Current Segment column, and the treadmill will continue in the columns to the program while using it. When you are not shown in the display for the first segment will automatically...
English Manual
Page 24
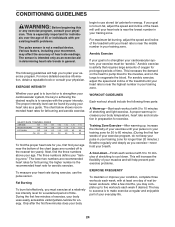
The sensor is to make exercise a regular and enjoyable part of the treadmill until your heart rate is not a medical device. If your goal is intended only as a guide. Next, find the three numbers above your training zone. ... is to burn fat, adjust the speed and incline of your training zone. The following three parts: A Warm-up-Start each week, with at a relatively low intensity level for individuals over the age of the treadmill until your heart rate is the recommended heart rate for fat burning and aerobic exercise. The...
The sensor is to make exercise a regular and enjoyable part of the treadmill until your heart rate is not a medical device. If your goal is intended only as a guide. Next, find the three numbers above your training zone. ... is to burn fat, adjust the speed and incline of your training zone. The following three parts: A Warm-up-Start each week, with at a relatively low intensity level for individuals over the age of the treadmill until your heart rate is the recommended heart rate for fat burning and aerobic exercise. The...

English Manual
Page 26
... 2 Controller Screw 96 1 Access Door 97 1 Upright Base 98 1 Photo Switch 99 4 Base Pad 100 2 Upright Base Endcap 26 Qty. PFTL64505.0 R0406A To locate the parts listed below, see the EXPLODED DRAWING attached in the center of this manual. Description 1 1 Left Foot Rail 2 12 Foot Rail Screw 3 2 Isolator Bolt (Top) 4 2 Isolator... Handrail 35 2 Walking Platform Nut 36 1 Motor Pivot Pin 37 1 Incline Motor 38 2 Incline Motor Bolt 39 6 1/4" Washer 40 6 1" Tek Screw 41 1 Front Roller Adj. PART LIST-Model No. Key No.
... 2 Controller Screw 96 1 Access Door 97 1 Upright Base 98 1 Photo Switch 99 4 Base Pad 100 2 Upright Base Endcap 26 Qty. PFTL64505.0 R0406A To locate the parts listed below, see the EXPLODED DRAWING attached in the center of this manual. Description 1 1 Left Foot Rail 2 12 Foot Rail Screw 3 2 Isolator Bolt (Top) 4 2 Isolator... Handrail 35 2 Walking Platform Nut 36 1 Motor Pivot Pin 37 1 Incline Motor 38 2 Incline Motor Bolt 39 6 1/4" Washer 40 6 1" Tek Screw 41 1 Front Roller Adj. PART LIST-Model No. Key No.
English Manual
Page 27
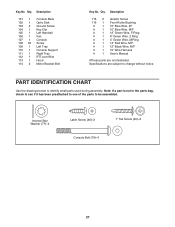
..., check to see if it has been preattached to one of the parts to identify small parts used during assembly. Qty. PART IDENTIFICATION CHART Use the drawings below to be assembled. Description 115 2 Isolator Screw 116 1 Front Roller Bushing # 1 10" Blue Wire..., F/Ring # 1 8" Green Wire, 2 Ring # 1 4" Green Wire, M/Ring # 1 14" Red Wire, M/F # 1 12" Black Wire, M/F # 1 10" Wire Harness # 1 User's Manual #These parts are subject to change without notice. Internal Star Washer (77)-4 Latch Screw (46)-2 Console Bolt (76)-4 1" Tek Screw (40)-6 27 Specifications are not illustrated. Key...
..., check to see if it has been preattached to one of the parts to identify small parts used during assembly. Qty. PART IDENTIFICATION CHART Use the drawings below to be assembled. Description 115 2 Isolator Screw 116 1 Front Roller Bushing # 1 10" Blue Wire..., F/Ring # 1 8" Green Wire, 2 Ring # 1 4" Green Wire, M/Ring # 1 14" Red Wire, M/F # 1 12" Black Wire, M/F # 1 10" Wire Harness # 1 User's Manual #These parts are subject to change without notice. Internal Star Washer (77)-4 Latch Screw (46)-2 Console Bolt (76)-4 1" Tek Screw (40)-6 27 Specifications are not illustrated. Key...
English Manual
Page 30
... from state to give the following information: • the MODEL NUMBER OF THE PRODUCT (PFTL64505.0) • the NAME OF THE PRODUCT (PROFORM CX18i treadmill) • the SERIAL NUMBER OF THE PRODUCT (see the front cover of this manual) • the KEY NUMBER AND DESCRIPTION OF THE...warranty gives you . Accordingly, the above is warranted for ten (10) years after the date of whatsoever nature. ORDERING REPLACEMENT PARTS To order replacement parts, see the PART LIST and EXPLODED DRAWING on how long an implied warranty lasts. ICON is limited in connection with the use or performance of...
... from state to give the following information: • the MODEL NUMBER OF THE PRODUCT (PFTL64505.0) • the NAME OF THE PRODUCT (PROFORM CX18i treadmill) • the SERIAL NUMBER OF THE PRODUCT (see the front cover of this manual) • the KEY NUMBER AND DESCRIPTION OF THE...warranty gives you . Accordingly, the above is warranted for ten (10) years after the date of whatsoever nature. ORDERING REPLACEMENT PARTS To order replacement parts, see the PART LIST and EXPLODED DRAWING on how long an implied warranty lasts. ICON is limited in connection with the use or performance of...


