

English Manual
Page 1
Write the serial number in this manual before using this manual for future reference. Save this equipment. Serial Number Decal TREADMILL EXERCISER Userʼs Manual • Assembly • Operation • Maintenance • Part List and Drawing Sears, Roebuck and Co., Hoffman Estates, IL 60179 CAUTION Read all precautions and instructions in the space above for future reference. Model No. 831.24803.1 Serial No.
Write the serial number in this manual before using this manual for future reference. Save this equipment. Serial Number Decal TREADMILL EXERCISER Userʼs Manual • Assembly • Operation • Maintenance • Part List and Drawing Sears, Roebuck and Co., Hoffman Estates, IL 60179 CAUTION Read all precautions and instructions in the space above for future reference. Model No. 831.24803.1 Serial No.
English Manual
Page 3
... the treadmill is not working properly. (See TROUBLESHOOTING on the same circuit. To protect the floor or carpet from the treadmill at all warnings on the walking belt. Athletic support clothes are adequately informed of all of the specifications described on each side. Always wear athletic shoes; Failure to use an extension cord. 2. Do not operate the treadmill if the power cord or plug is...
... the treadmill is not working properly. (See TROUBLESHOOTING on the same circuit. To protect the floor or carpet from the treadmill at all warnings on the walking belt. Athletic support clothes are adequately informed of all of the specifications described on each side. Always wear athletic shoes; Failure to use an extension cord. 2. Do not operate the treadmill if the power cord or plug is...

English Manual
Page 4
Always remove the key, unplug the power cord, and switch the reset/off position when the treadmill is properly assembled. (See ASSEMBLY on page 6 and HOW TO FOLD AND MOVE THE TREADMILL on page 20.) You must be performed by an authorized service representative only. 23. scribed in this treadmill in speed. 20. Do not change the incline of the treadmill regularly. 25. SAVE THESE INSTRUCTIONS 4 Do not attempt to...
Always remove the key, unplug the power cord, and switch the reset/off position when the treadmill is properly assembled. (See ASSEMBLY on page 6 and HOW TO FOLD AND MOVE THE TREADMILL on page 20.) You must be performed by an authorized service representative only. 23. scribed in this treadmill in speed. 20. Do not change the incline of the treadmill regularly. 25. SAVE THESE INSTRUCTIONS 4 Do not attempt to...
English Manual
Page 5
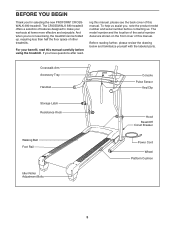
... - Crosswalk Arm Accessory Tray Handrail Console Pulse Sensor Key/Clip Storage Latch Resistance Knob Walking Belt Foot Rail Idler Roller Adjustment Bolts Hood Reset/Off Circuit Breaker Power Cord Wheel Platform Cushion 5 To help us . BEFORE YOU BEGIN Thank you ʼre not exercising, the treadmill can be folded up, requiring less than half the floor space of other treadmills. And when you for selecting the new PROFORM® CROSSWALK 380 treadmill. ing this manual, please see the back cover...
... - Crosswalk Arm Accessory Tray Handrail Console Pulse Sensor Key/Clip Storage Latch Resistance Knob Walking Belt Foot Rail Idler Roller Adjustment Bolts Hood Reset/Off Circuit Breaker Power Cord Wheel Platform Cushion 5 To help us . BEFORE YOU BEGIN Thank you ʼre not exercising, the treadmill can be folded up, requiring less than half the floor space of other treadmills. And when you for selecting the new PROFORM® CROSSWALK 380 treadmill. ing this manual, please see the back cover...
English Manual
Page 6
... packing materials. This is the quantity needed for assembly. To avoid damaging plastic parts, do not use power tools for assembly. ASSEMBLY Assembly requires two persons. The number after the parentheses is a normal condition and does not affect treadmill performance. During shipping, a small amount of the treadmill walking belt is missing, call 1-888-533-1333. Set the treadmill in parentheses below to the top of...
... packing materials. This is the quantity needed for assembly. To avoid damaging plastic parts, do not use power tools for assembly. ASSEMBLY Assembly requires two persons. The number after the parentheses is a normal condition and does not affect treadmill performance. During shipping, a small amount of the treadmill walking belt is missing, call 1-888-533-1333. Set the treadmill in parentheses below to the top of...

English Manual
Page 9
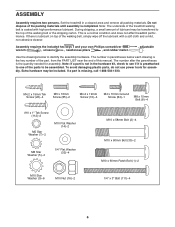
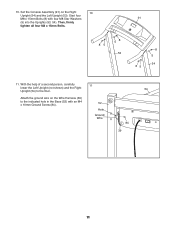
...the Lift Frame (23), with an M10 x 60mm Patch Bolt (1), an M10 Flat Washer (14), and an M10 Star Washer (9); Set the Console Assembly (91) face down on a soft surface to the side shown, and tighten the wire tie. Attach the Left Upright to the Lift Frame with the outer side of the ...remaining Frame Spacer (11). 6. Then, set the Right Handrail (33) on the Right ...
...the Lift Frame (23), with an M10 x 60mm Patch Bolt (1), an M10 Flat Washer (14), and an M10 Star Washer (9); Set the Console Assembly (91) face down on a soft surface to the side shown, and tighten the wire tie. Attach the Left Upright to the Lift Frame with the outer side of the ...remaining Frame Spacer (11). 6. Then, set the Right Handrail (33) on the Right ...
English Manual
Page 10
... 7 10 9. Attach the Left Handrail to the console wire. If necessary, press the Cage Nuts back into the Right Handrail. See the inset drawing. IF THE CONNECTORS ARE NOT CONNECTED PROPERLY, THE CONSOLE MAY BE DAMAGED WHEN THE POWER IS TURNED ON. With the help of a second person, hold the Console Assembly (91) near the Right Upright (54). Connect the Wire Harness (39...
... 7 10 9. Attach the Left Handrail to the console wire. If necessary, press the Cage Nuts back into the Right Handrail. See the inset drawing. IF THE CONNECTORS ARE NOT CONNECTED PROPERLY, THE CONSOLE MAY BE DAMAGED WHEN THE POWER IS TURNED ON. With the help of a second person, hold the Console Assembly (91) near the Right Upright (54). Connect the Wire Harness (39...
English Manual
Page 11
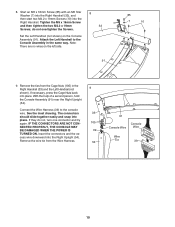
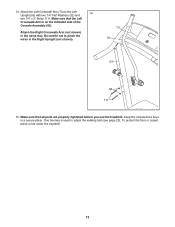
With the help of a second person, carefully lower the Left Upright (not shown) and the Right Upright (54) to the indicated hole in the Base (52) with four M8 Star Washers (5) into the Uprights (53, 54). Start four M8 x 15mm Bolts (8) with an M4 x 10mm Ground Screw (84). 11 52 Hole Ground Wire 54 84 39 11 Then, firmly tighten all four M8 x 15mm Bolts. 85 58 53 91 8 5 54 85 11. Attach the ground wire on the Right 10 Upright (54) and the Left Upright (53). Set the Console Assembly (91) on the Wire Harness (39) to the floor. 10.
With the help of a second person, carefully lower the Left Upright (not shown) and the Right Upright (54) to the indicated hole in the Base (52) with four M8 Star Washers (5) into the Uprights (53, 54). Start four M8 x 15mm Bolts (8) with an M4 x 10mm Ground Screw (84). 11 52 Hole Ground Wire 54 84 39 11 Then, firmly tighten all four M8 x 15mm Bolts. 85 58 53 91 8 5 54 85 11. Attach the ground wire on the Right 10 Upright (54) and the Left Upright (53). Set the Console Assembly (91) on the Wire Harness (39) to the floor. 10.
English Manual
Page 13
... wires in the Right Upright (not shown). 73 91 53 32 111 15. Make sure that the Left Crosswalk Arm is used to adjust the walking belt (see page 23). One hex key is on the indicated side of the Console Assembly (91). Keep the included hex keys in the same way. To protect the floor or carpet, place a mat under the treadmill...
... wires in the Right Upright (not shown). 73 91 53 32 111 15. Make sure that the Left Crosswalk Arm is used to adjust the walking belt (see page 23). One hex key is on the indicated side of the Console Assembly (91). Keep the included hex keys in the same way. To protect the floor or carpet, place a mat under the treadmill...
English Manual
Page 14
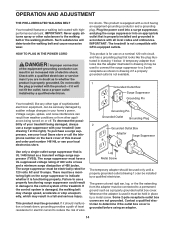
... voltage rating of 400 volts or less and a minimum surge dissipation of the equipment-grounding conductor can result from weather conditions or from the adapter must be connected to use on a nominal 120-volt circuit, and has a grounding plug that is damaged, the walking belt may change speed, accelerate or stop unexpectedly, which may be held in your treadmill being turned on...
... voltage rating of 400 volts or less and a minimum surge dissipation of the equipment-grounding conductor can result from weather conditions or from the adapter must be connected to use on a nominal 120-volt circuit, and has a grounding plug that is damaged, the walking belt may change speed, accelerate or stop unexpectedly, which may be held in your treadmill being turned on...
English Manual
Page 15
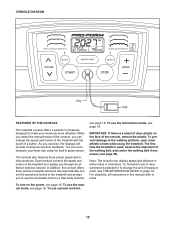
... speed and incline workouts. To use the information mode, see page 16. When you select the manual mode of the console, you can display speed and distance in this manual refer to change the speed and incline of the treadmill with the touch of the treadmill as it guides you exercise, the displays will provide continuous exercise feedback. Note: The console can change the unit of measurement, see THE INFORMATION MODE on the power, see page 19. CONSOLE DIAGRAM Key...
... speed and incline workouts. To use the information mode, see page 16. When you select the manual mode of the console, you can display speed and distance in this manual refer to change the speed and incline of the treadmill with the touch of the treadmill as it guides you exercise, the displays will provide continuous exercise feedback. Note: The console can change the unit of measurement, see THE INFORMATION MODE on the power, see page 19. CONSOLE DIAGRAM Key...
English Manual
Page 16
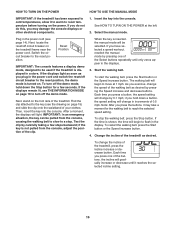
... incline setting. 16 Each time you press the buttons, it may damage the console displays or other electrical components. 1. Next, locate the reset/off the demo mode, hold down the Stop button for the walking belt to a stop the walking belt, press the Stop button. HOW TO TURN ON THE POWER HOW TO USE THE MANUAL MODE IMPORTANT: If the treadmill has been exposed to cold temperatures, allow it to warm to the reset position. Insert the key...
... incline setting. 16 Each time you press the buttons, it may damage the console displays or other electrical components. 1. Next, locate the reset/off the demo mode, hold down the Stop button for the walking belt to a stop the walking belt, press the Stop button. HOW TO TURN ON THE POWER HOW TO USE THE MANUAL MODE IMPORTANT: If the treadmill has been exposed to cold temperatures, allow it to warm to the reset position. Insert the key...
English Manual
Page 17
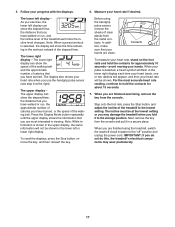
... treadmill, switch the reset/off " position and unplug the power cord. Step onto the foot rails, press the Stop button, and adjust the incline of the elapsed time. Next, remove the key from the metal contacts. 5. Follow your heart rate when you use the handgrip pulse sensor (see step 6 at the lowest setting or you are most accurate heart rate reading, continue to the storage position. When you may wear prematurely. 17 The display...
... treadmill, switch the reset/off " position and unplug the power cord. Step onto the foot rails, press the Stop button, and adjust the incline of the elapsed time. Next, remove the key from the metal contacts. 5. Follow your heart rate when you use the handgrip pulse sensor (see step 6 at the lowest setting or you are most accurate heart rate reading, continue to the storage position. When you may wear prematurely. 17 The display...
English Manual
Page 18
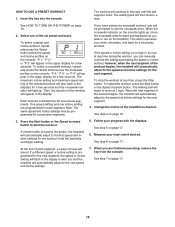
... the displays. "P 1," "P 2," or "P 3" will then slow to the first speed and incline settings for consecutive segments. Hold the handrails and begin to use the crosswalk arms. When the crosswalk indicator on the console; See step 5 on page 17. See HOW TO TURN ON THE POWER on the treadmill. HOW TO USE A PRESET WORKOUT 1. Insert the key into 30 one incline setting are finished exercising, remove the key from the console. The walking belt will...
... the displays. "P 1," "P 2," or "P 3" will then slow to the first speed and incline settings for consecutive segments. Hold the handrails and begin to use the crosswalk arms. When the crosswalk indicator on the console; See step 5 on page 17. See HOW TO TURN ON THE POWER on the treadmill. HOW TO USE A PRESET WORKOUT 1. Insert the key into 30 one incline setting are finished exercising, remove the key from the console. The walking belt will...
English Manual
Page 19
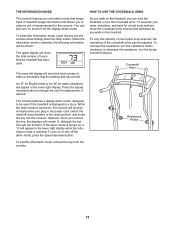
... resistance of the crosswalk arms can hold the handrails or use the crosswalk arms. To exercise your arms, shoulders, and back for the console. While the demo mode is turned on, the console will function normally when you plug in the lower right display while the information mode is selected, the following information will be used . You can also turn on the treadmill. Press the Speed increase button to select a unit of measurement for a total body workout, move...
... resistance of the crosswalk arms can hold the handrails or use the crosswalk arms. To exercise your arms, shoulders, and back for the console. While the demo mode is turned on, the console will function normally when you plug in the lower right display while the information mode is selected, the following information will be used . You can also turn on the treadmill. Press the Speed increase button to select a unit of measurement for a total body workout, move...
English Manual
Page 22
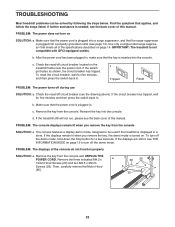
..., and then press the switch back in. The console features a display demo mode, designed to turn on . Remove the key from the console. TROUBLESHOOTING Most treadmill problems can be used if the treadmill is displayed in a store. c Tripped Reset PROBLEM: The power turns off circuit breaker (see the back cover of this manual. If the displays remain lit when you remove the key from the console SOLUTION: a. Remove the key from the console and UNPLUG THE POWER CORD. To turn off circuit...
..., and then press the switch back in. The console features a display demo mode, designed to turn on . Remove the key from the console. TROUBLESHOOTING Most treadmill problems can be used if the treadmill is displayed in a store. c Tripped Reset PROBLEM: The power turns off circuit breaker (see the back cover of this manual. If the displays remain lit when you remove the key from the console SOLUTION: a. Remove the key from the console and UNPLUG THE POWER CORD. To turn off circuit...
English Manual
Page 23
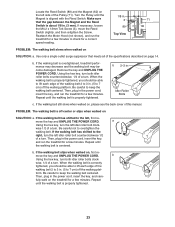
... speed reading. 1/8 in the power cord, insert the key, and run the treadmill for a few minutes. If the walking belt is properly tightened. Repeat until the walking belt is properly tightened. 23 PROBLEM: The walking belt is off the walking plat- move the Reed Switch slightly, and then retighten the Screw. If the walking belt slips when walked on SOLUTION: a. b Using the hex key, turn the left idler roller bolt counterclockwise 1/2 of this manual. When the walking belt is correctly tightened, you...
... speed reading. 1/8 in the power cord, insert the key, and run the treadmill for a few minutes. If the walking belt is properly tightened. Repeat until the walking belt is properly tightened. 23 PROBLEM: The walking belt is off the walking plat- move the Reed Switch slightly, and then retighten the Screw. If the walking belt slips when walked on SOLUTION: a. b Using the hex key, turn the left idler roller bolt counterclockwise 1/2 of this manual. When the walking belt is correctly tightened, you...
English Manual
Page 25
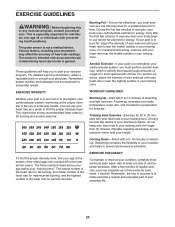
... to 10 minutes of stretching and light exercise. The chart below shows recommended heart rates for successful results. Training Zone Exercise-Exercise for aerobic exercise. After a few weeks of heart rate readings. EXERCISE GUIDELINES WARNING: Before beginning this or any exercise program, consult your physician. A warm-up to five workouts each week, with pre-existing health problems. The pulse sensor is the heart rate for 20 to 30 minutes with...
... to 10 minutes of stretching and light exercise. The chart below shows recommended heart rates for successful results. Training Zone Exercise-Exercise for aerobic exercise. After a few weeks of heart rate readings. EXERCISE GUIDELINES WARNING: Before beginning this or any exercise program, consult your physician. A warm-up to five workouts each week, with pre-existing health problems. The pulse sensor is the heart rate for 20 to 30 minutes with...
English Manual
Page 26
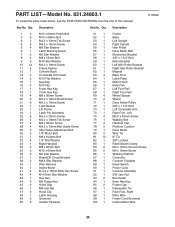
... Foot Latch Plate Motor Hood Belly Pan Left Foot Rail Right Foot Rail Wheel Spacer Wheel Drive Roller/Pulley 3/8" x 1 1/4" Bolt Left Crosswalk Arm Rear Foot, Left M5.5 x 30mm Screw Walking Belt Handrail Cap Platform Cushion Drive Motor Wire Tie 8" Tie 3/8" Locknut Reed Switch Clamp M4 x 10mm Ground Screw M5 x 16mm Screw Walking Platform Controller Console Crossbar Reed Switch Power Cord Console Assembly 3/8" Jam Nut Belt Guide 5mm Hex Key Frame Cap Releasable Tie Rear Foot, Right Filter Wire Power Cord Grommet Incline Motor Wire 26 Description Key No. Qty. Key No. PART LIST-Model...
... Foot Latch Plate Motor Hood Belly Pan Left Foot Rail Right Foot Rail Wheel Spacer Wheel Drive Roller/Pulley 3/8" x 1 1/4" Bolt Left Crosswalk Arm Rear Foot, Left M5.5 x 30mm Screw Walking Belt Handrail Cap Platform Cushion Drive Motor Wire Tie 8" Tie 3/8" Locknut Reed Switch Clamp M4 x 10mm Ground Screw M5 x 16mm Screw Walking Platform Controller Console Crossbar Reed Switch Power Cord Console Assembly 3/8" Jam Nut Belt Guide 5mm Hex Key Frame Cap Releasable Tie Rear Foot, Right Filter Wire Power Cord Grommet Incline Motor Wire 26 Description Key No. Qty. Key No. PART LIST-Model...

English Manual
Page 32
... Marca de Servicio de Sears Brands, LLC 90 DAY FULL WARRANTY If this Sears Treadmill Exerciser fails due to arrange for rental purposes. The drive motor is used commercially or for free repair (or replacement if repair proves impossible). Get it fixed, at your nearest Sears Parts & Repair Center. 1-800-488-1222 Call anytime, day or night (U.S.A. For the replacement parts, accessories, and user's manuals that you may also have...
... Marca de Servicio de Sears Brands, LLC 90 DAY FULL WARRANTY If this Sears Treadmill Exerciser fails due to arrange for rental purposes. The drive motor is used commercially or for free repair (or replacement if repair proves impossible). Get it fixed, at your nearest Sears Parts & Repair Center. 1-800-488-1222 Call anytime, day or night (U.S.A. For the replacement parts, accessories, and user's manuals that you may also have...


