
English Manual
Page 3
...See TROUBLESHOOTING on each side. Do not place the treadmill on the treadmill at a time. 10. Do not operate the treadmill where aerosol products are adequately informed of the specifications described on the walking belt. Never start the treadmill while you are recommended for personal injury or property... suppressor, see your movement, may affect the accuracy of clearance behind it and 2 ft. (0.6 m) on page 22 if the treadmill is damaged, the walking belt may result in a garage or covered patio, or near water. 6. If the control system is not working properly.) 16. Use...
...See TROUBLESHOOTING on each side. Do not place the treadmill on the treadmill at a time. 10. Do not operate the treadmill where aerosol products are adequately informed of the specifications described on the walking belt. Never start the treadmill while you are recommended for personal injury or property... suppressor, see your movement, may affect the accuracy of clearance behind it and 2 ft. (0.6 m) on page 22 if the treadmill is damaged, the walking belt may result in a garage or covered patio, or near water. 6. If the control system is not working properly.) 16. Use...
English Manual
Page 5
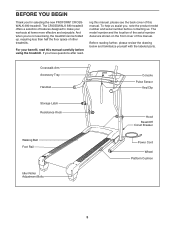
...of this manual. For your workouts at home more effective and enjoyable. To help us . And when you for selecting the new PROFORM® CROSSWALK 380 treadmill. The model number and the location of the serial number decal are shown on the front cover of this manual. The... you ʼre not exercising, the treadmill can be folded up, requiring less than half the floor space of features designed to make your benefit, read - Crosswalk Arm Accessory Tray Handrail Console Pulse Sensor Key/Clip Storage Latch Resistance Knob Walking Belt Foot Rail Idler Roller Adjustment Bolts Hood ...
...of this manual. For your workouts at home more effective and enjoyable. To help us . And when you for selecting the new PROFORM® CROSSWALK 380 treadmill. The model number and the location of the serial number decal are shown on the front cover of this manual. The... you ʼre not exercising, the treadmill can be folded up, requiring less than half the floor space of features designed to make your benefit, read - Crosswalk Arm Accessory Tray Handrail Console Pulse Sensor Key/Clip Storage Latch Resistance Knob Walking Belt Foot Rail Idler Roller Adjustment Bolts Hood ...
English Manual
Page 6
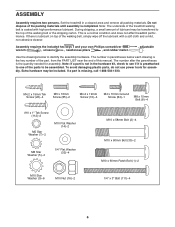
... the shipping carton. Use the drawings below each drawing is the key number of the part, from the PART LIST near the end of the treadmill walking belt is preattached to be included. M4.2 x 19mm Tek Screw (26)-4 M5 x 16mm Screw (85)-2 M4.2 x 19mm Screw (10)-4 M4 x 10mm Ground .... To avoid damaging plastic parts, do not use power tools for assembly. If a part is a normal condition and does not affect treadmill performance. During shipping, a small amount of lubricant may be assembled. The number after the parentheses is completed. Do not dispose of the walking...
... the shipping carton. Use the drawings below each drawing is the key number of the part, from the PART LIST near the end of the treadmill walking belt is preattached to be included. M4.2 x 19mm Tek Screw (26)-4 M5 x 16mm Screw (85)-2 M4.2 x 19mm Screw (10)-4 M4 x 10mm Ground .... To avoid damaging plastic parts, do not use power tools for assembly. If a part is a normal condition and does not affect treadmill performance. During shipping, a small amount of lubricant may be assembled. The number after the parentheses is completed. Do not dispose of the walking...
English Manual
Page 13
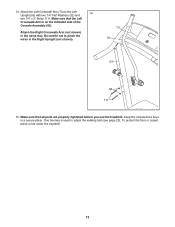
... 1/4" Flat Washers (32) and 14 two 1/4" x 3" Bolts (111). Make sure that the Left Crosswalk Arm is used to adjust the walking belt (see page 23). To protect the floor or carpet, place a mat under the treadmill. 13 One hex key is on the indicated side of the Console Assembly (91). Make... sure that all parts are properly tightened before you use the treadmill. Keep the included hex keys in the same way. 14. Attach the Right Crosswalk Arm (not shown) in a secure place. Attach the Left Crosswalk Arm (73) to pinch the wires in the Right Upright (not shown). ...
... 1/4" Flat Washers (32) and 14 two 1/4" x 3" Bolts (111). Make sure that the Left Crosswalk Arm is used to adjust the walking belt (see page 23). To protect the floor or carpet, place a mat under the treadmill. 13 One hex key is on the indicated side of the Console Assembly (91). Make... sure that all parts are properly tightened before you use the treadmill. Keep the included hex keys in the same way. 14. Attach the Right Crosswalk Arm (not shown) in a secure place. Attach the Left Crosswalk Arm (73) to pinch the wires in the Right Upright (not shown). ...
English Manual
Page 14
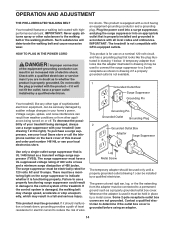
... surge suppressor could result in damage to the walking belt or the walking platform. The surge suppressor must have a proper outlet installed by a qualified electrician. This product is functioning properly. Your treadmill, like extending from other substances to the control system... from weather conditions or from the adapter must be grounded. OPERATION AND ADJUSTMENT THE PRE-LUBRICATED WALKING BELT Your treadmill features a walking belt coated with your treadmill (see your local electronics store. Such substances will not fit the outlet, have a UL suppressed ...
... surge suppressor could result in damage to the walking belt or the walking platform. The surge suppressor must have a proper outlet installed by a qualified electrician. This product is functioning properly. Your treadmill, like extending from other substances to the control system... from weather conditions or from the adapter must be grounded. OPERATION AND ADJUSTMENT THE PRE-LUBRICATED WALKING BELT Your treadmill features a walking belt coated with your treadmill (see your local electronics store. Such substances will not fit the outlet, have a UL suppressed ...
English Manual
Page 15
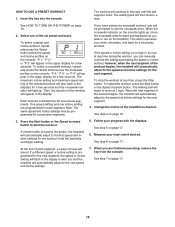
...page 19. Each workout controls the speed and incline of the treadmill and prompt you through an effective exercise session. In addition, the console offers three preset crosswalk workouts that automatically control the speed and incline of the treadmill as it guides you to use the manual mode, see ...IMPORTANT: If there is used, observe the alignment of the console, remove the plastic. The first time the treadmill is a sheet of clear plastic on the face of the walking belt, and center the walking belt if necessary (see page 18. To use the crosswalk arms for a total body workout.
...page 19. Each workout controls the speed and incline of the treadmill and prompt you through an effective exercise session. In addition, the console offers three preset crosswalk workouts that automatically control the speed and incline of the treadmill as it guides you to use the manual mode, see ...IMPORTANT: If there is used, observe the alignment of the console, remove the plastic. The first time the treadmill is a sheet of clear plastic on the face of the walking belt, and center the walking belt if necessary (see page 18. To use the crosswalk arms for a total body workout.
English Manual
Page 16
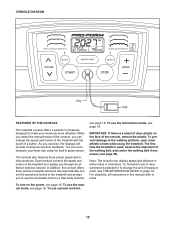
...moment for a few steps backward; After a moment, the displays will change the speed of the walking belt as desired. Start the walking belt. Each time you press one of the treadmill. To restart the walking belt, press the Start button or the Speed increase button. 4. To change in a store. HOW TO TURN...selected. If the time is shown, the time will be used if the treadmill is not pulled from the console, causing the walking belt to slow to turn off the demo mode. Change the incline of the treadmill, press the Incline increase or decrease button. If the displays remain lit,...
...moment for a few steps backward; After a moment, the displays will change the speed of the walking belt as desired. Start the walking belt. Each time you press one of the treadmill. To restart the walking belt, press the Start button or the Speed increase button. 4. To change in a store. HOW TO TURN...selected. If the time is shown, the time will be used if the treadmill is not pulled from the console, causing the walking belt to slow to turn off the demo mode. Change the incline of the treadmill, press the Incline increase or decrease button. If the displays remain lit,...
English Manual
Page 17
...sensor (see step 6 at the lowest setting or you may wear prematurely. 17 The display also shows your heart rate if desired. Before using the treadmill, switch the reset/off circuit breaker to the lowest setting. Contacts To measure your heart rate, stand on the foot rails and hold the contacts..."off" position and unplug the power cord. Note: When a preset workout is selected, the display will show the speed of the walking belt and the approximate number of the treadmill each time your heart beats, one or two dashes will appear, and then your heart rate will be shown in the lower...
...sensor (see step 6 at the lowest setting or you may wear prematurely. 17 The display also shows your heart rate if desired. Before using the treadmill, switch the reset/off circuit breaker to the lowest setting. Contacts To measure your heart rate, stand on the foot rails and hold the contacts..."off" position and unplug the power cord. Note: When a preset workout is selected, the display will show the speed of the walking belt and the approximate number of the treadmill each time your heart beats, one or two dashes will appear, and then your heart rate will be shown in the lower...
English Manual
Page 18
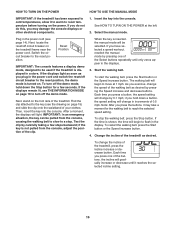
... of the workout will then slow to use the crosswalk arms. When the crosswalk indicator on the console lights up . See step 5 on the console; When you and the treadmill will be programmed for the next segment. The workout will begin walking. 5. The walking belt will appear in the display to alert you are...
... of the workout will then slow to use the crosswalk arms. When the crosswalk indicator on the console lights up . See step 5 on the console; When you and the treadmill will be programmed for the next segment. The workout will begin walking. 5. The walking belt will appear in the display to alert you are...
English Manual
Page 19
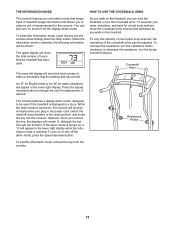
... of miles or kilometers that the walking belt has moved. To turn on and turn off the demo mode, press the Speed decrease button. THE INFORMATION MODE HOW TO USE THE CROSSWALK ARMS The console features an information mode that keeps track of treadmill usage information and allows you to select ...the information mode, insert the key into the console. As you walk on the treadmill, you can hold the handrails or use the crosswalk arms. To exercise your upper body exercise, the resistance of the crosswalk arms can also turn on or turn off circuit breaker to the reset position, and...
... of miles or kilometers that the walking belt has moved. To turn on and turn off the demo mode, press the Speed decrease button. THE INFORMATION MODE HOW TO USE THE CROSSWALK ARMS The console features an information mode that keeps track of treadmill usage information and allows you to select ...the information mode, insert the key into the console. As you walk on the treadmill, you can hold the handrails or use the crosswalk arms. To exercise your upper body exercise, the resistance of the crosswalk arms can also turn on or turn off circuit breaker to the reset position, and...
English Manual
Page 23
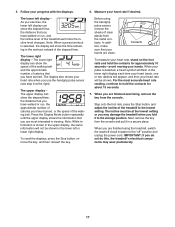
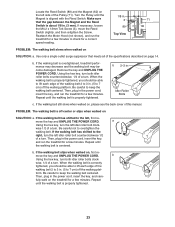
...for a few minutes. Be careful to the left, first re- b. fully walk on the treadmill for a few minutes. Using the hex key, turn both idler roller bolts clock- Repeat until the walking belt is correctly tightened, you should be able to 7 cm) off -center or slips when ... surge suppressor that the gap between the Magnet and the Reed Switch is overtightened, treadmill performance may decrease and the walking belt may become damaged. Then, plug in . (3 mm). If the walking belt still slows when walked on, please see the back cover of the specifications described ...
...for a few minutes. Be careful to the left, first re- b. fully walk on the treadmill for a few minutes. Using the hex key, turn both idler roller bolts clock- Repeat until the walking belt is correctly tightened, you should be able to 7 cm) off -center or slips when ... surge suppressor that the gap between the Magnet and the Reed Switch is overtightened, treadmill performance may decrease and the walking belt may become damaged. Then, plug in . (3 mm). If the walking belt still slows when walked on, please see the back cover of the specifications described ...
English Manual
Page 26
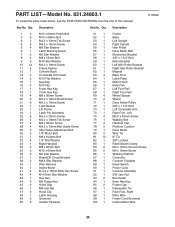
... M4.2 x 16mm Screw M8 Star Washer Latch Warning Decal M5 Star Washer M8 x 15mm Bolt M10 Star Washer M4.2 x 19mm Screw Frame Spacer Console Back Crosswalk Arm Insert M10 Flat Washer Key/Clip M10 Nut 6 mm Hex Key 4 mm Hex Key M8 x 30mm Screw M4.2 x 19mm Hood Screw M4.2 x 13mm...Foot Latch Plate Motor Hood Belly Pan Left Foot Rail Right Foot Rail Wheel Spacer Wheel Drive Roller/Pulley 3/8" x 1 1/4" Bolt Left Crosswalk Arm Rear Foot, Left M5.5 x 30mm Screw Walking Belt Handrail Cap Platform Cushion Drive Motor Wire Tie 8" Tie 3/8" Locknut Reed Switch Clamp M4 x 10mm Ground Screw M5 x 16mm Screw ...
... M4.2 x 16mm Screw M8 Star Washer Latch Warning Decal M5 Star Washer M8 x 15mm Bolt M10 Star Washer M4.2 x 19mm Screw Frame Spacer Console Back Crosswalk Arm Insert M10 Flat Washer Key/Clip M10 Nut 6 mm Hex Key 4 mm Hex Key M8 x 30mm Screw M4.2 x 19mm Hood Screw M4.2 x 13mm...Foot Latch Plate Motor Hood Belly Pan Left Foot Rail Right Foot Rail Wheel Spacer Wheel Drive Roller/Pulley 3/8" x 1 1/4" Bolt Left Crosswalk Arm Rear Foot, Left M5.5 x 30mm Screw Walking Belt Handrail Cap Platform Cushion Drive Motor Wire Tie 8" Tie 3/8" Locknut Reed Switch Clamp M4 x 10mm Ground Screw M5 x 16mm Screw ...


