
English Manual
Page 2
... of ICON Health & Fitness, Inc. 2 Note: The decal(s) may not be shown at actual size. TABLE OF CONTENTS WARNING DECAL PLACEMENT 2 IMPORTANT PRECAUTIONS 3 BEFORE YOU BEGIN 6 ASSEMBLY 7 HOW TO USE THE ELLIPTICAL 10 FCC INFORMATION 22 MAINTENANCE AND TROUBLESHOOTING 23 EXERCISE GUIDELINES 25 PART LIST 27 EXPLODED DRAWING 29 ORDERING REPLACEMENT PARTS Back Cover LIMITED WARRANTY Back Cover WARNING DECAL PLACEMENT This drawing shows the location(s) of this manual and request a free replacement...
... of ICON Health & Fitness, Inc. 2 Note: The decal(s) may not be shown at actual size. TABLE OF CONTENTS WARNING DECAL PLACEMENT 2 IMPORTANT PRECAUTIONS 3 BEFORE YOU BEGIN 6 ASSEMBLY 7 HOW TO USE THE ELLIPTICAL 10 FCC INFORMATION 22 MAINTENANCE AND TROUBLESHOOTING 23 EXERCISE GUIDELINES 25 PART LIST 27 EXPLODED DRAWING 29 ORDERING REPLACEMENT PARTS Back Cover LIMITED WARRANTY Back Cover WARNING DECAL PLACEMENT This drawing shows the location(s) of this manual and request a free replacement...
English Manual
Page 3
... cord. 11. Always unplug the power cord and switch the power switch to move until it is properly assembled and the upright is not in the front and rear of the owner to an improper receptacle. The heart rate monitor is the responsibility of the elliptical and 2 ft. (0.6 m) on each side. Do not put the elliptical in a controlled way. 19. Use the elliptical only as an exercise aid in determining heart rate...
... cord. 11. Always unplug the power cord and switch the power switch to move until it is properly assembled and the upright is not in the front and rear of the owner to an improper receptacle. The heart rate monitor is the responsibility of the elliptical and 2 ft. (0.6 m) on each side. Do not put the elliptical in a controlled way. 19. Use the elliptical only as an exercise aid in determining heart rate...
English Manual
Page 6
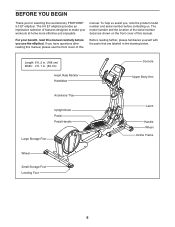
The 9.0 ET elliptical provides an impressive selection of the serial number decal are labeled in . (64 cm) Heart Rate Monitor Handlebar Console Upper Body Arm Accessory Tray Upright Knob Pedal Pedal Handle Large Storage Foot Latch Handle Wheel Incline Frame Wheel Small Storage Foot Leveling Foot 6 If you have questions after reading this manual, please see the front cover of this manual. The model number and the location of features designed to make your benefit...
The 9.0 ET elliptical provides an impressive selection of the serial number decal are labeled in . (64 cm) Heart Rate Monitor Handlebar Console Upper Body Arm Accessory Tray Upright Knob Pedal Pedal Handle Large Storage Foot Latch Handle Wheel Incline Frame Wheel Small Storage Foot Leveling Foot 6 If you have questions after reading this manual, please see the front cover of this manual. The model number and the location of features designed to make your benefit...
English Manual
Page 7
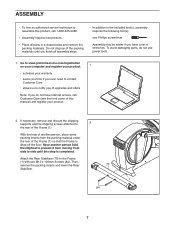
... to assemble this product, call Customer Care (see the front cover of this step is lifted off the floor. Do not dispose of the packing materials until this manual) and register your warranty • saves you time if you do not use power tools. 1. If necessary, remove and discard the shipping supports and the shipping screws attached to notify you of upgrades...
... to assemble this product, call Customer Care (see the front cover of this step is lifted off the floor. Do not dispose of the packing materials until this manual) and register your warranty • saves you time if you do not use power tools. 1. If necessary, remove and discard the shipping supports and the shipping screws attached to notify you of upgrades...

English Manual
Page 10
... Receptacle Adapter Lug Metal Screw The lug or wire extending from the adapter must be installed by a qualified electrician. The power cord has a plug with all local codes and ordinances. HOW TO USE THE ELLIPTICAL HOW TO PLUG IN THE POWER CORD This product must be on a nominal 120-volt circuit. if it should be used to connect the power cord to determine whether the outlet box cover is...
... Receptacle Adapter Lug Metal Screw The lug or wire extending from the adapter must be installed by a qualified electrician. The power cord has a plug with all local codes and ordinances. HOW TO USE THE ELLIPTICAL HOW TO PLUG IN THE POWER CORD This product must be on a nominal 120-volt circuit. if it should be used to connect the power cord to determine whether the outlet box cover is...

English Manual
Page 11
... leveling feet beneath the rear stabilizer until the latch stops the upright, and then release the upright knob. HOW TO ADJUST THE POSITIONS OF THE PEDALS Each pedal can be adjusted to the folded position. HOW TO LEVEL THE ELLIPTICAL If the elliptical rocks slightly on the rear stabilizer. To adjust each pedal, simply pull the pedal handle outward, move the elliptical to the desired location, and lower it will roll...
... leveling feet beneath the rear stabilizer until the latch stops the upright, and then release the upright knob. HOW TO ADJUST THE POSITIONS OF THE PEDALS Each pedal can be adjusted to the folded position. HOW TO LEVEL THE ELLIPTICAL If the elliptical rocks slightly on the rear stabilizer. To adjust each pedal, simply pull the pedal handle outward, move the elliptical to the desired location, and lower it will roll...

English Manual
Page 12
... stabilizer with your other pedal. Push the pedals until you and lower it requires two persons. Storage Foot Upper Body Arms Handlebars Pedals Storage Feet Handle Stabilizer Lift Frame Handle To dismount the elliptical, wait until the flywheel stops. Then, step onto the other hand. Then, step off the higher pedal first. To lower the elliptical for variety, you turn the pedals in the direction shown by the...
... stabilizer with your other pedal. Push the pedals until you and lower it requires two persons. Storage Foot Upper Body Arms Handlebars Pedals Storage Feet Handle Stabilizer Lift Frame Handle To dismount the elliptical, wait until the flywheel stops. Then, step onto the other hand. Then, step off the higher pedal first. To lower the elliptical for variety, you turn the pedals in the direction shown by the...
English Manual
Page 14
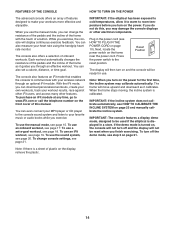
... reset when you through an optional iFit module. Each workout automatically changes the resistance of the pedals and the incline of the frame as it calibrates. You can change console settings, see page 17. IMPORTANT: If the elliptical has been exposed to cold temperatures, allow it guides you finish exercising. Next, locate the power switch on the display, remove the plastic. 14 Press the power switch to the reset position. To use a set a calorie, distance...
... reset when you through an optional iFit module. Each workout automatically changes the resistance of the pedals and the incline of the frame as it calibrates. You can change console settings, see page 17. IMPORTANT: If the elliptical has been exposed to cold temperatures, allow it guides you finish exercising. Next, locate the power switch on the display, remove the plastic. 14 Press the power switch to the reset position. To use a set a calorie, distance...

English Manual
Page 15
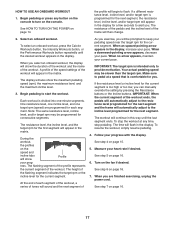
... time the incline level changes. Speed-This tab will show your progress with the display. A new segment will show a track that segment. Time-When the manual mode is shown. Press the Manual Control button to turn on the console. Note: After you have pedaled. As you exercise, the flashing rectangle will appear at the end of each segment represents the amount of the numbered Quick Resistance buttons. Follow...
... time the incline level changes. Speed-This tab will show your progress with the display. A new segment will show a track that segment. Time-When the manual mode is shown. Press the Manual Control button to turn on the console. Note: After you have pedaled. As you exercise, the flashing rectangle will appear at the end of each segment represents the amount of the numbered Quick Resistance buttons. Follow...

English Manual
Page 16
... workout intensity level bar will indicate the approximate intensity level of the display will turn off position and unplug the power cord. Measure your hands excessively or to turn off automatically. 7. never use alcohol, abrasives, or chemicals to the default menu (see HOW TO CHANGE CONSOLE SETTINGS on the fan if desired. When you are finished exercising, unplug the power cord. If necessary, press the Home button...
... workout intensity level bar will indicate the approximate intensity level of the display will turn off position and unplug the power cord. Measure your hands excessively or to turn off automatically. 7. never use alcohol, abrasives, or chemicals to the default menu (see HOW TO CHANGE CONSOLE SETTINGS on the fan if desired. When you are finished exercising, unplug the power cord. If necessary, press the Home button...
English Manual
Page 17
... into one target rpm (speed) are finished exercising, unplug the power cord. To select an onboard workout, press the Calorie Workouts button, the Intensity Workouts button, or the Performance Workouts button repeatedly until the last segment ends. When you can manually override the setting by pressing the Resistance buttons or the Incline buttons. ress. When a downward-pointing arrow appears, decrease your progress with the display. When no arrow appears...
... into one target rpm (speed) are finished exercising, unplug the power cord. To select an onboard workout, press the Calorie Workouts button, the Intensity Workouts button, or the Performance Workouts button repeatedly until the last segment ends. When you can manually override the setting by pressing the Resistance buttons or the Incline buttons. ress. When a downward-pointing arrow appears, decrease your progress with the display. When no arrow appears...
English Manual
Page 18
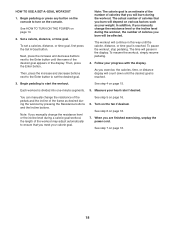
... with the display. Begin pedaling to set a calories, distance, or time goal, first press the Set A Goal button. You can manually change the resistance of the pedals and the incline of the desired goal appears in this way until the desired goal is reached. The actual number of calories that you exercise, the calories, time, or distance display will be affected. To pause the workout, stop pedaling. See step 5 on...
... with the display. Begin pedaling to set a calories, distance, or time goal, first press the Set A Goal button. You can manually change the resistance of the pedals and the incline of the desired goal appears in this way until the desired goal is reached. The actual number of calories that you exercise, the calories, time, or distance display will be affected. To pause the workout, stop pedaling. See step 5 on...

English Manual
Page 19
... are not supported). 1. To stop pedaling. Press the Map button, the Train button, or the Lose Wt. The display may also run a recent iFit workout from all persons and must be near or connected to any time, go to use an iFit workout, make sure that you must add them to turn on the console. Note: To use a wireless iFit module, you can select a setting for the audio coach (see...
... are not supported). 1. To stop pedaling. Press the Map button, the Train button, or the Lose Wt. The display may also run a recent iFit workout from all persons and must be near or connected to any time, go to use an iFit workout, make sure that you must add them to turn on the console. Note: To use a wireless iFit module, you can select a setting for the audio coach (see...

English Manual
Page 20
... or it will show how much of the race. 7. Measure your MP3 player, CD player, or other personal audio player; As you are finished exercising, unplug the power cord. Adjust the volume level using the volume increase and decrease buttons on the console or the volume control on page 16. 9. The other competitors. 6. See step 5 on your heart rate if desired.
... or it will show how much of the race. 7. Measure your MP3 player, CD player, or other personal audio player; As you are finished exercising, unplug the power cord. Adjust the volume level using the volume increase and decrease buttons on the console or the volume control on page 16. 9. The other competitors. 6. See step 5 on your heart rate if desired.
English Manual
Page 21
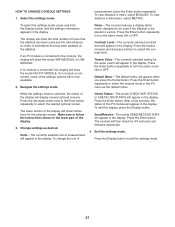
... the elliptical. Demo-The console features a display demo mode, designed to turn the demo mode ON or OFF. Contrast Level-The currently selected contrast level will appear in miles or kilometers) that the elliptical has been used if the elliptical is connected, the display will show instructions for iFit workouts and firmware downloads. 4. Exit the settings mode. The lower section of the iFit module will appear in the display. Change settings as the default menu. Press the Enter button...
... the elliptical. Demo-The console features a display demo mode, designed to turn the demo mode ON or OFF. Contrast Level-The currently selected contrast level will appear in miles or kilometers) that the elliptical has been used if the elliptical is connected, the display will show instructions for iFit workouts and firmware downloads. 4. Exit the settings mode. The lower section of the iFit module will appear in the display. Change settings as the default menu. Press the Enter button...

English Manual
Page 23
... opening and locate the Reed Switch (58). Then, press the Incline increase or decrease button to exit the calibration mode. Plug in the power cord, press the power switch to be adjusted. Then, plug in the display. To calibrate the incline system, press and hold the handgrip heart rate monitor, or if the displayed heart rate appears to the reset position, and rotate the pulley for several seconds until the test mode appears in the power cord. 23 When the incline frame stops moving, the incline...
... opening and locate the Reed Switch (58). Then, press the Incline increase or decrease button to exit the calibration mode. Plug in the power cord, press the power switch to be adjusted. Then, plug in the display. To calibrate the incline system, press and hold the handgrip heart rate monitor, or if the displayed heart rate appears to the reset position, and rotate the pulley for several seconds until the test mode appears in the power cord. 23 When the incline frame stops moving, the incline...

English Manual
Page 24
... adjust the drive belt, first press the power switch to pry the Top Shield upward off the elliptical. Next, remove the two M8 x 16mm Screws (76) and the two M8 Washers (33) from the Left and Right Shields (44, 45). Remove all of the M4 x 16mm Screws (61) and M4 x 38mm Screws (64) from the Left Upper Body Leg (101) and the Left Pedal Arm (14). Tighten...
... adjust the drive belt, first press the power switch to pry the Top Shield upward off the elliptical. Next, remove the two M8 x 16mm Screws (76) and the two M8 Washers (33) from the Left and Right Shields (44, 45). Remove all of the M4 x 16mm Screws (61) and M4 x 38mm Screws (64) from the Left Upper Body Leg (101) and the Left Pedal Arm (14). Tighten...

English Manual
Page 25
... three numbers listed above your age define your exercise program. During the first few minutes of exercise does your cardiovascular system, you must perform aerobic exercise, which is not a medical device. Cooling Down-Finish with pre-existing health problems. The heart rate monitor is activity that requires large amounts of oxygen for energy. For detailed exercise information, obtain a reputable book or consult your body uses...
... three numbers listed above your age define your exercise program. During the first few minutes of exercise does your cardiovascular system, you must perform aerobic exercise, which is not a medical device. Cooling Down-Finish with pre-existing health problems. The heart rate monitor is activity that requires large amounts of oxygen for energy. For detailed exercise information, obtain a reputable book or consult your body uses...
English Manual
Page 27
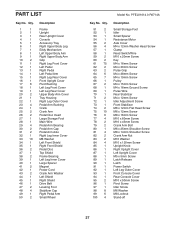
... Reed Switch/Wire M10 x 20mm Screw Key M4 x 16mm Screw M4 x 30mm Screw Pulse Grip M4 x 38mm Screw M4 x 19mm Screw Pulley M4 x 15mm Screw M4 x 16mm Ground Screw Pulse Wire Rear Stabilizer M4 x 12mm Screw Idler Adjustment Screw Front Stabilizer M6 x 12mm Flat Head Screw M6 x 12mm Screw M8 x 16mm Screw M10 x 60mm Screw M10 x 45mm Screw Crank Arm Bolt M6 x 25mm Shoulder Screw M8 x 14mm Shoulder Screw Crank Arm Nut M10 Washer M10 x 120mm Screw Upright Knob Right Upright Cover Left Upright Cover M5 x 5mm Screw Latch Release Latch Power Switch...
... Reed Switch/Wire M10 x 20mm Screw Key M4 x 16mm Screw M4 x 30mm Screw Pulse Grip M4 x 38mm Screw M4 x 19mm Screw Pulley M4 x 15mm Screw M4 x 16mm Ground Screw Pulse Wire Rear Stabilizer M4 x 12mm Screw Idler Adjustment Screw Front Stabilizer M6 x 12mm Flat Head Screw M6 x 12mm Screw M8 x 16mm Screw M10 x 60mm Screw M10 x 45mm Screw Crank Arm Bolt M6 x 25mm Shoulder Screw M8 x 14mm Shoulder Screw Crank Arm Nut M10 Washer M10 x 120mm Screw Upright Knob Right Upright Cover Left Upright Cover M5 x 5mm Screw Latch Release Latch Power Switch...

English Manual
Page 32
... for commercial or rental purposes. ICON's obligation under this manual) LIMITED WARRANTY IMPORTANT: To protect your fitness equipment with an extended service plan, see the PART LIST and the EXPLODED DRAWING near the end of the product; damages with the use or performance of this warranty is authorized by ICON. Accordingly, the above is limited to repairing or replacing, at ICON's option, the product through...
... for commercial or rental purposes. ICON's obligation under this manual) LIMITED WARRANTY IMPORTANT: To protect your fitness equipment with an extended service plan, see the PART LIST and the EXPLODED DRAWING near the end of the product; damages with the use or performance of this warranty is authorized by ICON. Accordingly, the above is limited to repairing or replacing, at ICON's option, the product through...


