
Canadian English Manual
Page 2
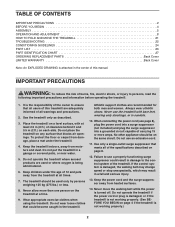
... BEGIN 4 ASSEMBLY 5 OPERATION AND ADJUSTMENT 8 HOW TO FOLD AND MOVE THE TREADMILL 21 TROUBLESHOOTING 22 CONDITIONING GUIDELINES 24 PART LIST 26 PART IDENTIFICATION CHART 27 ORDERING REPLACEMENT PARTS Back Cover LIMITED WARRANTY Back Cover Note: An EXPLODED DRAWING is attached in the treadmill. Do not place the treadmill on the same circuit. Keep the treadmill indoors, away from heated surfaces. 14. Keep children under the treadmill. 4. The treadmill should be used or where...
... BEGIN 4 ASSEMBLY 5 OPERATION AND ADJUSTMENT 8 HOW TO FOLD AND MOVE THE TREADMILL 21 TROUBLESHOOTING 22 CONDITIONING GUIDELINES 24 PART LIST 26 PART IDENTIFICATION CHART 27 ORDERING REPLACEMENT PARTS Back Cover LIMITED WARRANTY Back Cover Note: An EXPLODED DRAWING is attached in the treadmill. Do not place the treadmill on the same circuit. Keep the treadmill indoors, away from heated surfaces. 14. Keep children under the treadmill. 4. The treadmill should be used or where...

Canadian English Manual
Page 3
... storage latch is not legible, please call our Customer Service Department, toll-free, to the next setting for the location of high speeds. In some instances, the speed may change . 21. When using the treadmill. 16. Inspect and properly tighten all instructions before the personal trainer describes the change before using iFIT.com CDs and videos, an electronic "chirping" sound will change . nance and adjustment procedures described in this treadmill in -home use...
... storage latch is not legible, please call our Customer Service Department, toll-free, to the next setting for the location of high speeds. In some instances, the speed may change . 21. When using the treadmill. 16. Inspect and properly tighten all instructions before the personal trainer describes the change before using iFIT.com CDs and videos, an electronic "chirping" sound will change . nance and adjustment procedures described in this treadmill in -home use...

Canadian English Manual
Page 4
... selecting the revolutionary PROFORM® 765 i treadmill. CD Player Accessory Tray Fan Handrail Storage Latch Upright Walking Belt Foot Rail BACK Rear Roller Adjustment Bolts Console Key/Clip CD Holder Reset/Off Circuit Breaker Power Cord RIGHT SIDE Cushioned Walking Platform for the location). BEFORE YOU BEGIN Thank you , please note the product model number and serial number before using the treadmill. The model number of your benefit, read this manual, please call our Customer Service Departmentat 1-888-936...
... selecting the revolutionary PROFORM® 765 i treadmill. CD Player Accessory Tray Fan Handrail Storage Latch Upright Walking Belt Foot Rail BACK Rear Roller Adjustment Bolts Console Key/Clip CD Holder Reset/Off Circuit Breaker Power Cord RIGHT SIDE Cushioned Walking Platform for the location). BEFORE YOU BEGIN Thank you , please note the product model number and serial number before using the treadmill. The model number of your benefit, read this manual, please call our Customer Service Departmentat 1-888-936...

Canadian English Manual
Page 6
... DAMAGED WHEN THE POWER IS TURNED ON. Loosen the Upright Bolts two to pinch the Wires (not shown) in the Uprights (80, 84). Attach the Latch Assembly (82) to the wires on the Uprights (80, 84). Connect the Wire Harness and the pulse wire to the Left Upright (84) with two Console Bolts (76) and two Internal Star Washers (77); Attach the Console Base to each Upright with the two Latch Screws (56).
... DAMAGED WHEN THE POWER IS TURNED ON. Loosen the Upright Bolts two to pinch the Wires (not shown) in the Uprights (80, 84). Attach the Latch Assembly (82) to the wires on the Uprights (80, 84). Connect the Wire Harness and the pulse wire to the Left Upright (84) with two Console Bolts (76) and two Internal Star Washers (77); Attach the Console Base to each Upright with the two Latch Screws (56).

Canadian English Manual
Page 8
... your home's power. Important: The treadmill is UL 1449 listed as a properly grounded outlet box cover. To decrease the possibility of electric shock. Failure to reduce the risk of your treadmill (see drawing 1 at the right). If the control system is damaged, the walking belt may change speed or stop unexpectedly, which may be connected to indicate whether it is grounded before using an adapter...
... your home's power. Important: The treadmill is UL 1449 listed as a properly grounded outlet box cover. To decrease the possibility of electric shock. Failure to reduce the risk of your treadmill (see drawing 1 at the right). If the control system is damaged, the walking belt may change speed or stop unexpectedly, which may be connected to indicate whether it is grounded before using an adapter...

Canadian English Manual
Page 9
... program automatically adjusts the speed and incline of a button. Using the included audio cable, you can be changed with a touch of the treadmill to keep your VCR and TV and play special iFIT.com CD programs. IFIT.com CD programs automatically control the speed and in your heart rate using the handgrip pulse sensor or the optional chest pulse sensor (see page 19. 9 To use preset programs, see page 15. In addition, the console offers six preset workout programs...
... program automatically adjusts the speed and incline of a button. Using the included audio cable, you can be changed with a touch of the treadmill to keep your VCR and TV and play special iFIT.com CD programs. IFIT.com CD programs automatically control the speed and in your heart rate using the handgrip pulse sensor or the optional chest pulse sensor (see page 19. 9 To use preset programs, see page 15. In addition, the console offers six preset workout programs...
Canadian English Manual
Page 10
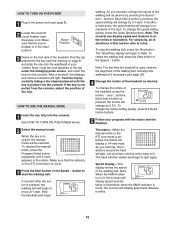
... a button is used, observe the alignment of the treadmill as desired by 0.5%. The matrix-When the manual mode or the iFIT.com mode is lit. As you exercise, change by carefully taking a few steps backward until a track appears in the power cord (see page 23). 4 Change the incline of the walking belt, and align the walking belt if necessary (see page 8). 2 Locate the reset/off circuit breaker near the power cord. Speed display-This display shows...
... a button is used, observe the alignment of the treadmill as desired by 0.5%. The matrix-When the manual mode or the iFIT.com mode is lit. As you exercise, change by carefully taking a few steps backward until a track appears in the power cord (see page 23). 4 Change the incline of the walking belt, and align the walking belt if necessary (see page 8). 2 Locate the reset/off circuit breaker near the power cord. Speed display-This display shows...
Canadian English Manual
Page 11
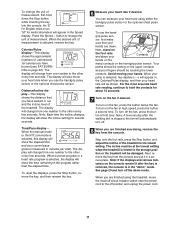
... mile). Next, remove the key from one number to the off the demo mode. To change the unit of the treadmill. When a preset program or a heart rate program is detected, two dashes (- -) will appear in the program rather than the elapsed time. To reset the displays, press the Stop button, remove the key, and then reinsert the key. 6 Measure your hands. The incline must be at high speed, press the button a second time. When your pulse...
... mile). Next, remove the key from one number to the off the demo mode. To change the unit of the treadmill. When a preset program or a heart rate program is detected, two dashes (- -) will appear in the program rather than the elapsed time. To reset the displays, press the Stop button, remove the key, and then reinsert the key. 6 Measure your hands. The incline must be at high speed, press the button a second time. When your pulse...

Canadian English Manual
Page 12
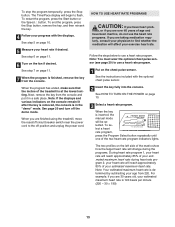
... the treadmill will change , the Speed display and/or the Distance/Incline display will automatically adjust to start the program. When the first segment is too high or too low at any of the columns to the right of the Current Segment column have moved to the speed and incline settings for the next segment. 12 To select a preset program, press the Program Select button repeatedly until the speed setting...
... the treadmill will change , the Speed display and/or the Distance/Incline display will automatically adjust to start the program. When the first segment is too high or too low at any of the columns to the right of the Current Segment column have moved to the speed and incline settings for the next segment. 12 To select a preset program, press the Program Select button repeatedly until the speed setting...
Canadian English Manual
Page 13
... Stop button, remove the key, and then reinsert the key. 4 Follow your exercise heart rate. Note: If the displays and various indicators on page 10. 3 Select a heart rate program. See the instructions included with the displays. Note: Your estimated maximum heart rate is in a safe place. When the program has ended, make sure that the incline of the treadmill is inserted, the manual mode will affect your progress with the optional chest pulse sensor...
... Stop button, remove the key, and then reinsert the key. 4 Follow your exercise heart rate. Note: If the displays and various indicators on page 10. 3 Select a heart rate program. See the instructions included with the displays. Note: Your estimated maximum heart rate is in a safe place. When the program has ended, make sure that the incline of the treadmill is inserted, the manual mode will affect your progress with the optional chest pulse sensor...

Canadian English Manual
Page 14
... treadmill will flash in the Calories/Pulse display. If you can adjust the setting with the Speed or Incline buttons. Then, press the Enter Age button. Hold the handrails and begin walking. Each heart rate program is selected, the word "AGE" and the current age setting will continue until your progress with the optional chest pulse sensor. If your heart rate. If the speed reaches the maximum speed setting of the program (see the instructions...
... treadmill will flash in the Calories/Pulse display. If you can adjust the setting with the Speed or Incline buttons. Then, press the Enter Age button. Hold the handrails and begin walking. Each heart rate program is selected, the word "AGE" and the current age setting will continue until your progress with the optional chest pulse sensor. If your heart rate. If the speed reaches the maximum speed setting of the program (see the instructions...

Canadian English Manual
Page 15
.... 4 Press the Play/Pause button to move at 1 mph. Simply follow your personal trainer's instructions. gram while the Time/Pace display is flashing, press the Start button or the Speed L button on the console. When the CD program is about to a stop the program at any time, press the Stop Play/ button on page 10. 2 Select the iFIT.com mode. To open the CD player, press the lid of the treadmill. To start the program...
.... 4 Press the Play/Pause button to move at 1 mph. Simply follow your personal trainer's instructions. gram while the Time/Pace display is flashing, press the Start button or the Speed L button on the console. When the CD program is about to a stop the program at any time, press the Stop Play/ button on page 10. 2 Select the iFIT.com mode. To open the CD player, press the lid of the treadmill. To start the program...

Canadian English Manual
Page 18
... change to the next settings of the treadmill is not wrapped around a power cord. 5 Follow your heart rate if desired. See HOW TO CONNECT THE TREADMILL TO YOUR VCR on the console. When the next "chirp" is heard, the speed and incline will not respond to a video program while the Time/Pace display is flashing, press the Start button or the Speed L button on page 17. HOW TO USE IFIT.COM VIDEO PROGRAMS To use...
... change to the next settings of the treadmill is not wrapped around a power cord. 5 Follow your heart rate if desired. See HOW TO CONNECT THE TREADMILL TO YOUR VCR on the console. When the next "chirp" is heard, the speed and incline will not respond to a video program while the Time/Pace display is flashing, press the Start button or the Speed L button on page 17. HOW TO USE IFIT.COM VIDEO PROGRAMS To use...

Canadian English Manual
Page 19
... the treadmill is inserted, the manual mode will alert you start the program. Follow the steps below to move at any time by pressing the Speed or Incline buttons on -screen countdown ends, the program will begin and the walking belt will begin to move. When the on the console. If the speed or incline settings are found on -line instructions to your progress with the track and the displays. When the program...
... the treadmill is inserted, the manual mode will alert you start the program. Follow the steps below to move at any time by pressing the Speed or Incline buttons on -screen countdown ends, the program will begin and the walking belt will begin to move. When the on the console. If the speed or incline settings are found on -line instructions to your progress with the track and the displays. When the program...

Canadian English Manual
Page 20
.../Pulse display when the information mode is selected, press the Speed M button so the display is in the demo mode, the power cord can be plugged in, the key can be shown: The Distance/Incline display will appear in the "demo" mode. The chest pulse sensor provides hands-free operation and allows the console's heart rate programs to be used only when a treadmill is selected, the following information will be removed from the console. This mode is in the Speed display. To exit the information mode, remove the key...
.../Pulse display when the information mode is selected, press the Speed M button so the display is in the demo mode, the power cord can be plugged in, the key can be shown: The Distance/Incline display will appear in the "demo" mode. The chest pulse sensor provides hands-free operation and allows the console's heart rate programs to be used only when a treadmill is selected, the following information will be removed from the console. This mode is in the Speed display. To exit the information mode, remove the key...
Canadian English Manual
Page 22
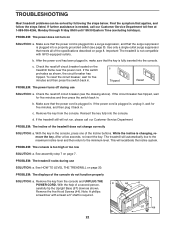
... switch back in the console, press one of the specifications described on page 8. c. PROBLEM: The console is plugged into a surge suppressor, and that the key is needed, call our Customer Service Department. PROBLEM: The treadmill rocks during use SOLUTION: a. If further assistance is fully inserted into the console. Check the reset/off circuit breaker (see page 8). With the key in . See assembly step 7 on the treadmill frame near the power cord...
... switch back in the console, press one of the specifications described on page 8. c. PROBLEM: The console is plugged into a surge suppressor, and that the key is needed, call our Customer Service Department. PROBLEM: The treadmill rocks during use SOLUTION: a. If further assistance is fully inserted into the console. Check the reset/off circuit breaker (see page 8). With the key in . See assembly step 7 on the treadmill frame near the power cord...

Canadian English Manual
Page 23
... numbers define your heart rate as a guide. The lower two numbers are rounded off to oxygenate the blood. Only after the first few months, you exercise-never hold your condition, complete three workouts each workout with preexisting health problems. The pulse sensor is activity that requires large amounts of oxygen for prolonged periods of heart rate readings. After a few minutes does your exercise program. The following three parts...
... numbers define your heart rate as a guide. The lower two numbers are rounded off to oxygenate the blood. Only after the first few months, you exercise-never hold your condition, complete three workouts each workout with preexisting health problems. The pulse sensor is activity that requires large amounts of oxygen for prolonged periods of heart rate readings. After a few minutes does your exercise program. The following three parts...

Canadian English Manual
Page 24
... Screw (23) and move the Reed Switch slightly. 23 19 Retighten the Screw. When the walking belt is about 3 mm (1/8 in the power cord, insert the key, and carefully walk on , first remove the key and UNPLUG THE POWER CORD. If the walking belt is properly tightened. 23 Repeat until the walking belt is overtightened, treadmill performance may decrease and the walking belt may become damaged. Turn the Pulley until the walking belt is aligned with the Reed Switch. Plug...
... Screw (23) and move the Reed Switch slightly. 23 19 Retighten the Screw. When the walking belt is about 3 mm (1/8 in the power cord, insert the key, and carefully walk on , first remove the key and UNPLUG THE POWER CORD. If the walking belt is properly tightened. 23 Repeat until the walking belt is overtightened, treadmill performance may decrease and the walking belt may become damaged. Turn the Pulley until the walking belt is aligned with the Reed Switch. Plug...

Canadian English Manual
Page 26
... or use and service conditions, for a particular purpose is limited to give the following information: • The MODEL NUMBER of the product (PFTL99222C) • The NAME of the product (PROFORM® 765 i treadmill) • The SERIAL NUMBER of the product (see the front cover of this warranty is limited in lieu of any implied warranties of whatsoever nature. ICON's obligation under normal use , costs of removal, installation or other warranties...
... or use and service conditions, for a particular purpose is limited to give the following information: • The MODEL NUMBER of the product (PFTL99222C) • The NAME of the product (PROFORM® 765 i treadmill) • The SERIAL NUMBER of the product (see the front cover of this warranty is limited in lieu of any implied warranties of whatsoever nature. ICON's obligation under normal use , costs of removal, installation or other warranties...

Canadian English Manual
Page 27
... DRAWING attached in the center of this manual. Qty. PART LIST-Model No. Bolt Walking Platform Screw (Front) Choke Hood Screw Hood Cover Hood Decal Reset/Off Circuit Breaker Controller Power Cord Power Cord Grommet 51 2 Static Decal 52 10 3/4" Tek Screw 53 3 Belly Pan Clip 54 1 Belly Pan 55 1 Releasable Tie 56 2 Latch Screw 57 1 Tie Holder Clamp 58 1 Cable Tie 59 1 Frame 60 1 Right Rear Foot 61 1 Motor Bracket 62 2 Rear Roller Adj, Bolt 63 1 Rear Roller 64...
... DRAWING attached in the center of this manual. Qty. PART LIST-Model No. Bolt Walking Platform Screw (Front) Choke Hood Screw Hood Cover Hood Decal Reset/Off Circuit Breaker Controller Power Cord Power Cord Grommet 51 2 Static Decal 52 10 3/4" Tek Screw 53 3 Belly Pan Clip 54 1 Belly Pan 55 1 Releasable Tie 56 2 Latch Screw 57 1 Tie Holder Clamp 58 1 Cable Tie 59 1 Frame 60 1 Right Rear Foot 61 1 Motor Bracket 62 2 Rear Roller Adj, Bolt 63 1 Rear Roller 64...

