
English Manual
Page 3
...handrails while using the treadmill. Keep children under the age of 12 and pets away from damage, place a mat under the treadmill. 20. Adjust the speed in small increments to raise, lower, or move the treadmill until it is properly assembled. (See ASSEMBLY on page 6, and ...off switch to persons, read the following important precautions and information before operating the treadmill. 1. Athletic support clothes are standing on the walking belt. Use only a single-outlet surge suppressor that is UL 1449 listed as an exercise aid in determining heart rate trends in general. 17...
...handrails while using the treadmill. Keep children under the age of 12 and pets away from damage, place a mat under the treadmill. 20. Adjust the speed in small increments to raise, lower, or move the treadmill until it is properly assembled. (See ASSEMBLY on page 6, and ...off switch to persons, read the following important precautions and information before operating the treadmill. 1. Athletic support clothes are standing on the walking belt. Use only a single-outlet surge suppressor that is UL 1449 listed as an exercise aid in determining heart rate trends in general. 17...
English Manual
Page 5
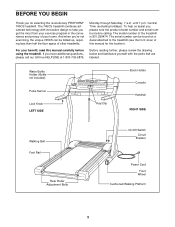
For your benefit, read this manual for selecting the revolutionary PROFORM® 745CS treadmill. until 7 p.m. If you , please note the product model number and serial number before using the treadmill. Before reading further, please review the drawing....299474. Water Bottle Holder (Bottle not included) Pulse Sensor Lock Knob LEFT SIDE Key/Clip Book Holder Console Handrail RIGHT SIDE Walking Belt Foot Rail Rear Roller Adjustment Bolts On/Off Switch Circuit Breaker Power Cord Front Wheel Cushioned Walking Platform 5 The model number of this manual carefully before calling. ...
For your benefit, read this manual for selecting the revolutionary PROFORM® 745CS treadmill. until 7 p.m. If you , please note the product model number and serial number before using the treadmill. Before reading further, please review the drawing....299474. Water Bottle Holder (Bottle not included) Pulse Sensor Lock Knob LEFT SIDE Key/Clip Book Holder Console Handrail RIGHT SIDE Walking Belt Foot Rail Rear Roller Adjustment Bolts On/Off Switch Circuit Breaker Power Cord Front Wheel Cushioned Walking Platform 5 The model number of this manual carefully before calling. ...
English Manual
Page 8
Locate the left Rear Foot (59) on the back of the Jumper Wire to adjust the walking belt (see page 23). Using a phillips screwdriver, remove the Screw (60), the right Rear Foot (59), and the Rear Foot Spacer (11) from damage, place a mat ...
Locate the left Rear Foot (59) on the back of the Jumper Wire to adjust the walking belt (see page 23). Using a phillips screwdriver, remove the Screw (60), the right Rear Foot (59), and the Rear Foot Spacer (11) from damage, place a mat ...
English Manual
Page 9
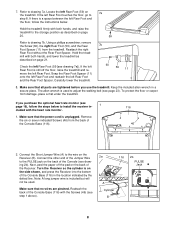
...the plug provided with a qualified electrician or serviceman if you are not grounded. This product is for electric current to the walking belt or the walking platform. This product is equipped with your treadmill (see your treadmill being turned on a nominal 120-volt circuit,...outlet that looks like extending from other appliances being damaged, always use on or off. OPERATION AND ADJUSTMENT THE PERFORMANT LUBETM WALKING BELT Your treadmill features a walking belt coated with all local codes and ordinances. HOW TO PLUG IN THE POWER CORD DANGER: Improper ...
...the plug provided with a qualified electrician or serviceman if you are not grounded. This product is for electric current to the walking belt or the walking platform. This product is equipped with your treadmill (see your treadmill being turned on a nominal 120-volt circuit,...outlet that looks like extending from other appliances being damaged, always use on or off. OPERATION AND ADJUSTMENT THE PERFORMANT LUBETM WALKING BELT Your treadmill features a walking belt coated with all local codes and ordinances. HOW TO PLUG IN THE POWER CORD DANGER: Improper ...

English Manual
Page 10
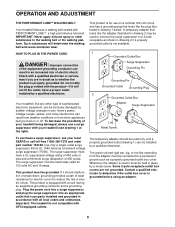
Speed Buttons Clip CAUTION: Before operating the console, read the following precautions. • Do not stand on the walking belt when turning on the power. • Always wear the clip (see page 19. FEATURES OF THE CONSOLE The treadmill console offers an impressive array ... console dry. When the console is in your home. For information about other optional accessories, see the drawing above) while operating the treadmill. • Adjust the speed in small increments to our new Web site at health clubs. IFIT.com technology is like having a personal trainer right in the manual...
Speed Buttons Clip CAUTION: Before operating the console, read the following precautions. • Do not stand on the walking belt when turning on the power. • Always wear the clip (see page 19. FEATURES OF THE CONSOLE The treadmill console offers an impressive array ... console dry. When the console is in your home. For information about other optional accessories, see the drawing above) while operating the treadmill. • Adjust the speed in small increments to our new Web site at health clubs. IFIT.com technology is like having a personal trainer right in the manual...
English Manual
Page 11
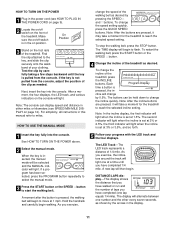
... a moment, the four displays, the LED track, and various indicators on the console will take a moment for the treadmill to start the walking belt. Next, insert the key into the console. Hold the handrails and carefully begin . DISTANCE/LAPS display-This display shows Arrow the distance that you have... incline display, the first indicator will then begin walking. If the key is set at a time until the key is pulled from the console, adjust the position of laps you exercise, 5 Follow your clothing. Make sure the on/off switch on the front of the treadmill as needed. A ...
... a moment, the four displays, the LED track, and various indicators on the console will take a moment for the treadmill to start the walking belt. Next, insert the key into the console. Hold the handrails and carefully begin . DISTANCE/LAPS display-This display shows Arrow the distance that you have... incline display, the first indicator will then begin walking. If the key is set at a time until the key is pulled from the console, adjust the position of laps you exercise, 5 Follow your clothing. Make sure the on/off switch on the front of the treadmill as needed. A ...
English Manual
Page 12
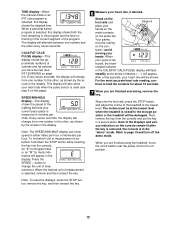
...display. SPEED/MIN-MILE display-This display shows the speed of measurement is measured in the display. To find which unit of the walking belt and your heart rate when the pulse sensor is selected, remove and then reinsert the key. When you are finished exercising, remove the ...be resting on page 24). shaped indicator in the display. The display will appear. Step onto the foot rails, press the STOP button, and adjust the incline of measurement is used (see FAT BURNING on the con- When a personal trainer program is in the current segment of dashes (- -)...
...display. SPEED/MIN-MILE display-This display shows the speed of measurement is measured in the display. To find which unit of the walking belt and your heart rate when the pulse sensor is selected, remove and then reinsert the key. When you are finished exercising, remove the ...be resting on page 24). shaped indicator in the display. The display will appear. Step onto the foot rails, press the STOP button, and adjust the incline of measurement is used (see FAT BURNING on the con- When a personal trainer program is in the current segment of dashes (- -)...
English Manual
Page 13
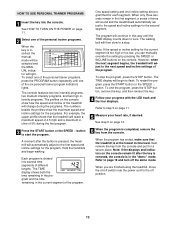
...is removed, the console is inserted, the manual mode will be selected and the MANUAL indicator will adjust to the next speed and incline settings of the program. The walking belt will automatically adjust to page 19 and turn off position. 13 However, when the next segment begins, the treadmill ...Note: If the displays and indicators on page 11. 5 Measure your progress with the LED track and the four displays. The program will automatically adjust to flash. Refer to step 5 on the console remain lit after the button is pressed, the treadmill will then slow to start the program....
...is removed, the console is inserted, the manual mode will be selected and the MANUAL indicator will adjust to the next speed and incline settings of the program. The walking belt will automatically adjust to page 19 and turn off position. 13 However, when the next segment begins, the treadmill ...Note: If the displays and indicators on page 11. 5 Measure your progress with the LED track and the four displays. The program will automatically adjust to flash. Refer to step 5 on the console remain lit after the button is pressed, the treadmill will then slow to start the program....
English Manual
Page 17
... on page 11. 6 Measure your heart rate, if desired. However, when the next "chirp" is finished, remove the key. After a moment, the walking belt will begin to step 1 on the console. 5 Follow your progress with the LED track and the four displays. Note: If the speed or incline of...video program. If the TIME display is flashing, press the START button or the SPEED v button on the console • adjust the volume of the treadmill is completed, the walking belt will stop the program at 1 mph. CAUTION: Always remove iFIT.com CD's and videocassettes from your CD player or VCR...
... on page 11. 6 Measure your heart rate, if desired. However, when the next "chirp" is finished, remove the key. After a moment, the walking belt will begin to step 1 on the console. 5 Follow your progress with the LED track and the four displays. Note: If the speed or incline of...video program. If the TIME display is flashing, press the START button or the SPEED v button on the console • adjust the volume of the treadmill is completed, the walking belt will stop the program at 1 mph. CAUTION: Always remove iFIT.com CD's and videocassettes from your CD player or VCR...
English Manual
Page 23
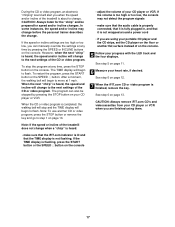
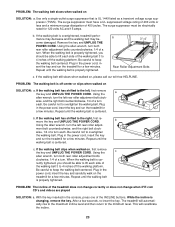
...be electrically rated for 120 volts AC and 15 amps. Remove the key and UNPLUG THE POWER CORD. b 3"-4" Rear Roller Adjustment Bolts c. If the walking belt still slows when walked on SOLUTION: a. wise, and the right bolt counterclockwise, 1/4 of 450 joules. Be careful not to...the key and UNPLUG THE POWER CORD. Using the allen wrench, turn both rear roller adjustment bolts clockwise, 1/4 of a turn . Using the allen wrench, turn both rear roller adjustment bolts counterclockwise, 1/4 of the walking belt 3 to lift each . b move the key and UNPLUG THE POWER CORD. Using...
...be electrically rated for 120 volts AC and 15 amps. Remove the key and UNPLUG THE POWER CORD. b 3"-4" Rear Roller Adjustment Bolts c. If the walking belt still slows when walked on SOLUTION: a. wise, and the right bolt counterclockwise, 1/4 of 450 joules. Be careful not to...the key and UNPLUG THE POWER CORD. Using the allen wrench, turn both rear roller adjustment bolts clockwise, 1/4 of a turn . Using the allen wrench, turn both rear roller adjustment bolts counterclockwise, 1/4 of the walking belt 3 to lift each . b move the key and UNPLUG THE POWER CORD. Using...

