

Canadian English Manual
Page 3
... the treadmill. Always remove the key, unplug the power cord and move the treadmill. 11. When folding or moving the treadmill, make sure that all times. 12. Never move the treadmill until it and 0.5 m (2 ft.) on the walking belt. It is fully closed. Never use the treadmill with bare feet, wearing only stockings, or in a garage or covered patio, or near water. 5. The pulse sensor is capable of heart rate readings...
... the treadmill. Always remove the key, unplug the power cord and move the treadmill. 11. When folding or moving the treadmill, make sure that all times. 12. Never move the treadmill until it and 0.5 m (2 ft.) on the walking belt. It is fully closed. Never use the treadmill with bare feet, wearing only stockings, or in a garage or covered patio, or near water. 5. The pulse sensor is capable of heart rate readings...

Canadian English Manual
Page 4
... using . Never remove the motor hood unless instructed to order a free replacement decal (see ORDERING REPLACEMENT PARTS on your treadmill. Apply the decal in any opening. This treadmill is not legible, please call our Customer Service Department, toll-free, to do so by pressing the speed and incline buttons. WARNING: Before beginning this product. Always listen for in this manual). Inspect and properly tighten all instructions before using them. 28. Do not use...
... using . Never remove the motor hood unless instructed to order a free replacement decal (see ORDERING REPLACEMENT PARTS on your treadmill. Apply the decal in any opening. This treadmill is not legible, please call our Customer Service Department, toll-free, to do so by pressing the speed and incline buttons. WARNING: Before beginning this product. Always listen for in this manual). Inspect and properly tighten all instructions before using them. 28. Do not use...

Canadian English Manual
Page 5
... questions after reading this manual for selecting the revolutionary PROFORM® 725FP treadmill. The model number of other treadmills. Water Bottle Holder (Bottle not included) Storage Latch Handrail LEFT SIDE Book Holder Console Key/Clip Pulse Sensor RIGHT SIDE Walking Belt Foot Rail On/Off Switch Circuit Breaker Front Wheel Rear Roller Adjustment Bolts Cushioned Walking Platform Power Cord BEFORE YOU BEGIN Thank you for the location). For your exercise program in the drawing below...
... questions after reading this manual for selecting the revolutionary PROFORM® 725FP treadmill. The model number of other treadmills. Water Bottle Holder (Bottle not included) Storage Latch Handrail LEFT SIDE Book Holder Console Key/Clip Pulse Sensor RIGHT SIDE Walking Belt Foot Rail On/Off Switch Circuit Breaker Front Wheel Rear Roller Adjustment Bolts Cushioned Walking Platform Power Cord BEFORE YOU BEGIN Thank you for the location). For your exercise program in the drawing below...

Canadian English Manual
Page 6
... of the treadmill walking belt is lubricant on the Latch Pin (114) as shown. Tighten the Latch Knob (110) back onto the Latch Pin (114). 2 110 77 111 112 114 3. Set the treadmill in the same way. 103 36 36 78 78 6 Note: The underside of the walking belt, simply wipe off the lubricant with a Handrail Washer (36) into the Extension Leg and thread the Handrail Bolt three...
... of the treadmill walking belt is lubricant on the Latch Pin (114) as shown. Tighten the Latch Knob (110) back onto the Latch Pin (114). 2 110 77 111 112 114 3. Set the treadmill in the same way. 103 36 36 78 78 6 Note: The underside of the walking belt, simply wipe off the lubricant with a Handrail Washer (36) into the Extension Leg and thread the Handrail Bolt three...

Canadian English Manual
Page 7
... 5. The allen wrench is used to fully insert it. If necessary, tap the Extension Leg with a rubber mallet to adjust the walking belt (see page 21). Next, attach each Extension Leg (103) with the Spacer. Note: One replacement Base Pad (116) and Spacer (not shown) are fully inserted into the left Upright (82) as you tighten the Screws. Keep the included...
... 5. The allen wrench is used to fully insert it. If necessary, tap the Extension Leg with a rubber mallet to adjust the walking belt (see page 21). Next, attach each Extension Leg (103) with the Spacer. Note: One replacement Base Pad (116) and Spacer (not shown) are fully inserted into the left Upright (82) as you tighten the Screws. Keep the included...

Canadian English Manual
Page 8
... like the plug illustrated in drawing 1 below. If the control system is used it should be used only until a properly grounded outlet (drawing 1) can result in an increased risk of your home's power. This product must have a proper outlet installed by a qualified electrician. Whenever the adapter is damaged, the walking belt may change speed or stop unexpectedly, which may be used to connect the surge...
... like the plug illustrated in drawing 1 below. If the control system is used it should be used only until a properly grounded outlet (drawing 1) can result in an increased risk of your home's power. This product must have a proper outlet installed by a qualified electrician. Whenever the adapter is damaged, the walking belt may change speed or stop unexpectedly, which may be used to connect the surge...

Canadian English Manual
Page 9
... speed and incline of the treadmill can also go to page 15. CONSOLE DIAGRAM Displays LED Track Displays Manual/Program Indicators Note: If there is a thin sheet of clear plastic Key on the face of the console, remove it guides you through every step of your home. Using the included audio cable, you can even measure your home stereo, portable stereo, computer, or VCR and play special iFIT.com CD and video programs (iFIT...
... speed and incline of the treadmill can also go to page 15. CONSOLE DIAGRAM Displays LED Track Displays Manual/Program Indicators Note: If there is a thin sheet of clear plastic Key on the face of the console, remove it guides you through every step of your home. Using the included audio cable, you can even measure your home stereo, portable stereo, computer, or VCR and play special iFIT.com CD and video programs (iFIT...
Canadian English Manual
Page 10
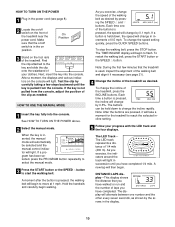
... the treadmill is used, inspect the alignment of the walking belt and align it will change the incline of your progress with the LED track and the four displays. HOW TO USE THE MANUAL MODE 1 Insert the key fully into the console. See HOW TO TURN ON THE POWER above. 2 Select the manual mode. A moment after the button is pressed, the walking belt will light. If a button is held down , the speed will...
... the treadmill is used, inspect the alignment of the walking belt and align it will change the incline of your progress with the LED track and the four displays. HOW TO USE THE MANUAL MODE 1 Insert the key fully into the console. See HOW TO TURN ON THE POWER above. 2 Select the manual mode. A moment after the button is pressed, the walking belt will light. If a button is held down , the speed will...
Canadian English Manual
Page 11
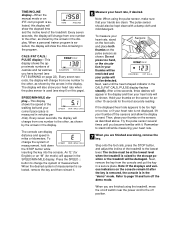
... the arrows in the program. SPEED/MIN-MILE display-This display shows the speed of the walking belt and your hands are clean. Note: When using the treadmill, move the on page 22). tion in the display. Hold your heart rate will not be restricted and your heart rate when the pulse sensor is raised to the off the demo mode. When you are finished using the pulse sensor, make sure that your...
... the arrows in the program. SPEED/MIN-MILE display-This display shows the speed of the walking belt and your hands are clean. Note: When using the treadmill, move the on page 22). tion in the display. Hold your heart rate will not be restricted and your heart rate when the pulse sensor is raised to the off the demo mode. When you are finished using the pulse sensor, make sure that your...

Canadian English Manual
Page 12
... treadmill will then slow to the next speed and incline settings for the second period. The walking belt will adjust to a stop the program, press the STOP button. Next, remove the key from the console. When you can manually override the setting by pressing the SPEED or INCLINE buttons on /off switch near the power cord to flash. When only three seconds remain in the "demo" mode. Hold the handrails and begin to the off the demo mode...
... treadmill will then slow to the next speed and incline settings for the second period. The walking belt will adjust to a stop the program, press the STOP button. Next, remove the key from the console. When you can manually override the setting by pressing the SPEED or INCLINE buttons on /off switch near the power cord to flash. When only three seconds remain in the "demo" mode. Hold the handrails and begin to the off the demo mode...

Canadian English Manual
Page 15
... video program when the TIME/INCLINE display is being used, see HOW TO CONNECT YOUR HOME STEREO on the front of the audio cable into the console. Note: If the TIME/INCLINE display is currently plugged into the AUDIO OUT jack on your VCR and plug the wire into your VCR. 4 Press the PLAY button on the front of the treadmill is connected to change . Plug one end of the treadmill near the power cord. Plug...
... video program when the TIME/INCLINE display is being used, see HOW TO CONNECT YOUR HOME STEREO on the front of the audio cable into the console. Note: If the TIME/INCLINE display is currently plugged into the AUDIO OUT jack on your VCR and plug the wire into your VCR. 4 Press the PLAY button on the front of the treadmill is connected to change . Plug one end of the treadmill near the power cord. Plug...
Canadian English Manual
Page 16
... or video program. If the volume is too high or too low, the console may not detect the program signals. • Make sure that the audio cable is properly connected, that it is fully plugged in, and that the TIME/INCLINE display is flashing, press the START button or the SPEED v button on the console. • Adjust the volume of the treadmill does not change to the next settings of...
... or video program. If the volume is too high or too low, the console may not detect the program signals. • Make sure that the audio cable is properly connected, that it is fully plugged in, and that the TIME/INCLINE display is flashing, press the START button or the SPEED v button on the console. • Adjust the volume of the treadmill does not change to the next settings of...
Canadian English Manual
Page 17
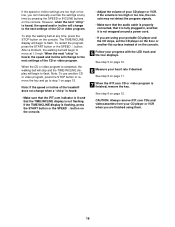
... TIME/INCLINE display will change to the next settings of the treadmill is finished, remove the key. When the program is inserted, the manual mode will be selected and the manual indicator will be available. See step 6 on page 14. Our Web site at any time by pressing the SPEED or INCLINE buttons on the console. A list of your heart rate if desired. When the key is completed, the walking belt will stop the walking belt...
... TIME/INCLINE display will change to the next settings of the treadmill is finished, remove the key. When the program is inserted, the manual mode will be selected and the manual indicator will be available. See step 6 on page 14. Our Web site at any time by pressing the SPEED or INCLINE buttons on the console. A list of your heart rate if desired. When the key is completed, the walking belt will stop the walking belt...

Canadian English Manual
Page 18
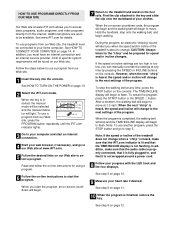
... key from miles per hour to be blank. In addition, the information mode allows you to change the system of measurement. IMPORTANT: The CALS./ FAT CALS./PULSE display should be used . Press the SPEED v button to switch the console from the console. 18 INFORMATION MODE/DEMO MODE The console features an information mode that keeps track of the total number of hours that the treadmill has been operated and the total number of miles that the walking belt...
... key from miles per hour to be blank. In addition, the information mode allows you to change the system of measurement. IMPORTANT: The CALS./ FAT CALS./PULSE display should be used . Press the SPEED v button to switch the console from the console. 18 INFORMATION MODE/DEMO MODE The console features an information mode that keeps track of the total number of hours that the treadmill has been operated and the total number of miles that the walking belt...

Canadian English Manual
Page 19
..., pull the latch knob to raise, lower, or move the treadmill without tipping it . Book Holder 1. Pull the latch knob to lift with both hands, and lower the treadmill to the side slightly. 2. Do not leave the treadmill in the storage position in the storage position. Next, unplug the power cord. HOW TO FOLD AND MOVE THE TREADMILL HOW TO FOLD THE TREADMILL FOR STORAGE 1 Before folding the treadmill, adjust the incline to the...
..., pull the latch knob to raise, lower, or move the treadmill without tipping it . Book Holder 1. Pull the latch knob to lift with both hands, and lower the treadmill to the side slightly. 2. Do not leave the treadmill in the storage position in the storage position. Next, unplug the power cord. HOW TO FOLD AND MOVE THE TREADMILL HOW TO FOLD THE TREADMILL FOR STORAGE 1 Before folding the treadmill, adjust the incline to the...

Canadian English Manual
Page 20
...-free. PROBLEM: The power does not turn on the treadmill near the power cord. Remove the key from the console. If necessary, loosen the Reed Switch Screw (76) Top and move the Reed Switch slightly. Retighten the View Screw. Use only a single-outlet surge suppressor that the gap between 21 43 the Magnet and the Reed Switch is plugged into the console. To reset the circuit breaker, wait for five minutes and then press...
...-free. PROBLEM: The power does not turn on the treadmill near the power cord. Remove the key from the console. If necessary, loosen the Reed Switch Screw (76) Top and move the Reed Switch slightly. Retighten the View Screw. Use only a single-outlet surge suppressor that the gap between 21 43 the Magnet and the Reed Switch is plugged into the console. To reset the circuit breaker, wait for five minutes and then press...

Canadian English Manual
Page 21
... the Incline buttons. Plug in the power cord, insert the key and run the treadmill for a few minutes. If the walking belt still slows, please call our Customer Service Department, toll-free. Be careful not to lift each side of a turn . Plug in .) off the walking platform. If the walking belt slips when walked on SOLUTION: a. Repeat until the walking belt is properly tightened. With the key in the console, press one of the walking belt...
... the Incline buttons. Plug in the power cord, insert the key and run the treadmill for a few minutes. If the walking belt still slows, please call our Customer Service Department, toll-free. Be careful not to lift each side of a turn . Plug in .) off the walking platform. If the walking belt slips when walked on SOLUTION: a. Repeat until the walking belt is properly tightened. With the key in the console, press one of the walking belt...

Canadian English Manual
Page 22
... plan your training zone. The chart below shows recommended heart rates for you must be found by using your heart rate as an exercise aid in determining heart rate trends in your training zone. Aerobic Exercise If your goal is especially important for exercise. For aerobic exercise, adjust the speed and incline of the treadmill until your heart rate is intended only as a guide. The three numbers define your physician. The sensor is...
... plan your training zone. The chart below shows recommended heart rates for you must be found by using your heart rate as an exercise aid in determining heart rate trends in your training zone. Aerobic Exercise If your goal is especially important for exercise. For aerobic exercise, adjust the speed and incline of the treadmill until your heart rate is intended only as a guide. The three numbers define your physician. The sensor is...

Canadian English Manual
Page 23
.... Bolt 79 4 Long Screw # 1 8" White Wire, 2F 36 5 Handrail Washer/ 80 1 iFIT Wire # 1 4" White Wire, M/F Roller Adj. Bolt 110 1 Latch Knob 21 1 Reed Switch 66 1 Motor 111 1 Spring 22 1 Reed Switch Clip 67 1 Latch Decal 112 1 Latch Pin Collar 23 1 Motor/Controller Wire 68 4 Rear Platform Screw 113 1 Pin Clip 24 1 Controller 69 2 Catch Screw 114 1 Latch Pin 25 1 Electronics Bracket 70 1 Latch Catch 115 1 Belly Pan Spacer 26 1 Circuit Breaker 71 1 Walking Platform 116 2 Base Pad 27 1 Power Cord 72 5 8" cable Tie...
.... Bolt 79 4 Long Screw # 1 8" White Wire, 2F 36 5 Handrail Washer/ 80 1 iFIT Wire # 1 4" White Wire, M/F Roller Adj. Bolt 110 1 Latch Knob 21 1 Reed Switch 66 1 Motor 111 1 Spring 22 1 Reed Switch Clip 67 1 Latch Decal 112 1 Latch Pin Collar 23 1 Motor/Controller Wire 68 4 Rear Platform Screw 113 1 Pin Clip 24 1 Controller 69 2 Catch Screw 114 1 Latch Pin 25 1 Electronics Bracket 70 1 Latch Catch 115 1 Belly Pan Spacer 26 1 Circuit Breaker 71 1 Walking Platform 116 2 Base Pad 27 1 Power Cord 72 5 8" cable Tie...
Canadian English Manual
Page 24
... implied warranties of merchantability or fitness for a particular purpose is limited to replacing or repairing, at 1-888-936-4266, Monday through one (1) year from province to give the following information: • The MODEL NUMBER OF THE PRODUCT (PCTL69100) • The NAME OF THE PRODUCT (PROFORM® 725FP treadmill) • The SERIAL NUMBER OF THE PRODUCT (see the front cover of whatsoever nature. ICON is...
... implied warranties of merchantability or fitness for a particular purpose is limited to replacing or repairing, at 1-888-936-4266, Monday through one (1) year from province to give the following information: • The MODEL NUMBER OF THE PRODUCT (PCTL69100) • The NAME OF THE PRODUCT (PROFORM® 725FP treadmill) • The SERIAL NUMBER OF THE PRODUCT (see the front cover of whatsoever nature. ICON is...

