
English Manual
Page 1
... if parts are committed to providing complete customer satisfaction. Serial Number Decal QUESTIONS? PFTL66906.0 Serial No. MST ON THE WEB: www.proformservice.com USER'S MANUAL CAUTION Read all precautions and instructions in this manual before using this manual for future reference. MST Sat. 8 a.m.-4 p.m. CALL TOLL-FREE: 1-888-533-1333 Mon.-Fri. 6 a.m.-6 p.m. Visit our website at www.proform.com new products, prizes, fitness tips...
... if parts are committed to providing complete customer satisfaction. Serial Number Decal QUESTIONS? PFTL66906.0 Serial No. MST ON THE WEB: www.proformservice.com USER'S MANUAL CAUTION Read all precautions and instructions in this manual before using this manual for future reference. MST Sat. 8 a.m.-4 p.m. CALL TOLL-FREE: 1-888-533-1333 Mon.-Fri. 6 a.m.-6 p.m. Visit our website at www.proform.com new products, prizes, fitness tips...
English Manual
Page 3
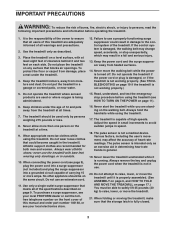
... treadmill with at a time. 9. Never move the walking belt while the power is damaged, the walking belt may change speed, accelerate, or stop procedure before operating the treadmill. 1. Use only a single-outlet surge suppressor that the storage latch is the responsibility of the owner to ensure that blocks air openings. Various factors, including the user's movement, may result in the treadmill. Always remove the key and unplug the power cord when the treadmill...
... treadmill with at a time. 9. Never move the walking belt while the power is damaged, the walking belt may change speed, accelerate, or stop procedure before operating the treadmill. 1. Use only a single-outlet surge suppressor that the storage latch is the responsibility of the owner to ensure that blocks air openings. Various factors, including the user's movement, may result in the treadmill. Always remove the key and unplug the power cord when the treadmill...
English Manual
Page 4
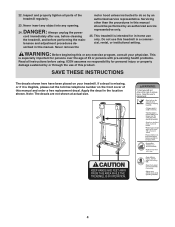
... THESE INSTRUCTIONS The decals shown here have been placed on the front cover of this manual and order a free replacement decal. Note: The decals are not shown at actual size. 4 ICON assumes no responsibility for in this or any opening. Servicing other than the procedures in this treadmill in the location shown. WARNING: Before beginning this manual. DANGER: 24. scribed in -home use , before...
... THESE INSTRUCTIONS The decals shown here have been placed on the front cover of this manual and order a free replacement decal. Note: The decals are not shown at actual size. 4 ICON assumes no responsibility for in this or any opening. Servicing other than the procedures in this treadmill in the location shown. WARNING: Before beginning this manual. DANGER: 24. scribed in -home use , before...
English Manual
Page 5
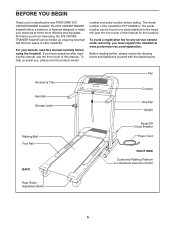
... 're not exercising, the 675 CROSSTRAINER treadmill can be folded up, requiring less than half the floor space of this manual. The model number of this manual carefully before calling. Accessory Tray Handrail Storage Latch Fan Console Key/Clip Upright Walking Belt Foot Rail BACK Reset/Off Circuit Breaker Power Cord RIGHT SIDE Cushioned Walking Platform for any service needed under warranty, you must register the treadmill at home more effective and enjoyable. The 675 CROSSTRAINER treadmill offers a selection...
... 're not exercising, the 675 CROSSTRAINER treadmill can be folded up, requiring less than half the floor space of this manual. The model number of this manual carefully before calling. Accessory Tray Handrail Storage Latch Fan Console Key/Clip Upright Walking Belt Foot Rail BACK Reset/Off Circuit Breaker Power Cord RIGHT SIDE Cushioned Walking Platform for any service needed under warranty, you must register the treadmill at home more effective and enjoyable. The 675 CROSSTRAINER treadmill offers a selection...
English Manual
Page 6
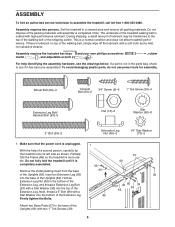
... walking belt, simply wipe off the lubricant with a soft cloth and a mild, non-abrasive cleaner. During shipping, a small amount of lubricant may be transferred to assemble the treadmill, call toll-free 1-800-445-2480. Handrail Bolt (37)-4 Assembly requires the included hex keys and your own phillips screwdriver mallet , and adjustable wrench . , rubber For help of the Extension Leg. Wheel Bolt (64)-2 Console Bolt (90)-2 3/4" Screw...
... walking belt, simply wipe off the lubricant with a soft cloth and a mild, non-abrasive cleaner. During shipping, a small amount of lubricant may be transferred to assemble the treadmill, call toll-free 1-800-445-2480. Handrail Bolt (37)-4 Assembly requires the included hex keys and your own phillips screwdriver mallet , and adjustable wrench . , rubber For help of the Extension Leg. Wheel Bolt (64)-2 Console Bolt (90)-2 3/4" Screw...
English Manual
Page 7
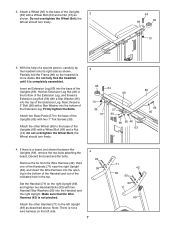
... Bolt (64) and a Nut (13) as 2 shown. Remove the tie from the Wire Harness (42). Attach the other Wheel (66) to the base of the Uprights (69) with a Star Washer into the base of the Extension leg. Partially fold the Frame (86) so the treadmill is completely assembled. Hold an Extension Leg Nut (46) in the top. 4 93 95 Set the...
... Bolt (64) and a Nut (13) as 2 shown. Remove the tie from the Wire Harness (42). Attach the other Wheel (66) to the base of the Uprights (69) with a Star Washer into the base of the Extension leg. Partially fold the Frame (86) so the treadmill is completely assembled. Hold an Extension Leg Nut (46) in the top. 4 93 95 Set the...
English Manual
Page 8
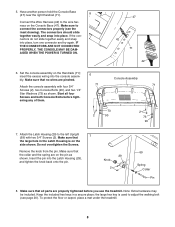
... shown. Attach the Latch Housing (29) to the wire harness on the pin as shown. Remove the knob from the pin. Insert the pin into the console assembly. Do not overtighten the Screws. the large hex key is on the Handrails (71); IF THE CONNECTORS ARE NOT CONNECTED PROPERLY, THE CONSOLE MAY BE DAMAGED WHEN THE POWER IS TURNED ON. 47 42 71 42 6. 5. Start all parts are...
... shown. Attach the Latch Housing (29) to the wire harness on the pin as shown. Remove the knob from the pin. Insert the pin into the console assembly. Do not overtighten the Screws. the large hex key is on the Handrails (71); IF THE CONNECTORS ARE NOT CONNECTED PROPERLY, THE CONSOLE MAY BE DAMAGED WHEN THE POWER IS TURNED ON. 47 42 71 42 6. 5. Start all parts are...

English Manual
Page 9
... is damaged, the walking belt may change speed, accelerate or stop unexpectedly, which may be used only until a properly grounded outlet (drawing 1) can be connected to use a surge suppressor with a cord having an equipment-grounding conductor and a grounding plug. Do not modify the plug provided with all local codes and ordinances. To decrease the possibility of the treadmill. A temporary adapter that looks like any...
... is damaged, the walking belt may change speed, accelerate or stop unexpectedly, which may be used only until a properly grounded outlet (drawing 1) can be connected to use a surge suppressor with a cord having an equipment-grounding conductor and a grounding plug. Do not modify the plug provided with all local codes and ordinances. To decrease the possibility of the treadmill. A temporary adapter that looks like any...
English Manual
Page 10
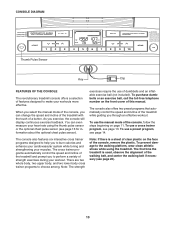
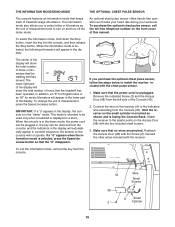
... exercises during your heart rate using the treadmill. You can change the speed and incline of the treadmill with the touch of a button. To purchase dumbbells or an exercise ball, call the toll-free telephone number on the face of the console, remove the plastic. The cross trainer programs automatically control the speed and incline of the treadmill and prompt you can even measure your workout. exercises require the use the manual mode of the console, follow the steps...
... exercises during your heart rate using the treadmill. You can change the speed and incline of the treadmill with the touch of a button. To purchase dumbbells or an exercise ball, call the toll-free telephone number on the face of the console, remove the plastic. The cross trainer programs automatically control the speed and incline of the treadmill and prompt you can even measure your workout. exercises require the use the manual mode of the console, follow the steps...
English Manual
Page 11
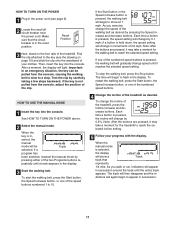
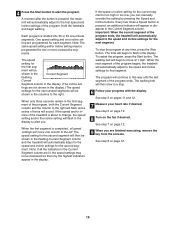
... the console, adjust the position of the numbered speed buttons is held down, the speed setting will appear in the display. If one of the numbered speed buttons. 4 Change the incline of the speed buttons numbered 1 to appear in the reset position. As you exercise, change speed until the entire track appears. To start the walking belt, press the Start button, the Speed increase button, or one of the treadmill as desired by 0.5%. HOW TO TURN ON THE POWER 1 Plug in the display. 3 Start the walking belt...
... the console, adjust the position of the numbered speed buttons is held down, the speed setting will appear in the display. If one of the numbered speed buttons. 4 Change the incline of the speed buttons numbered 1 to appear in the reset position. As you exercise, change speed until the entire track appears. To start the walking belt, press the Start button, the Speed increase button, or one of the treadmill as desired by 0.5%. HOW TO TURN ON THE POWER 1 Plug in the display. 3 Start the walking belt...
English Manual
Page 12
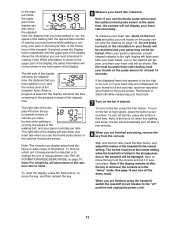
... finished using the treadmill, switch the reset/off " position and unplug the power cord. 12 When you use the thumb pulse sensor or the optional chest pulse sensor. The left thumb on the pulse sensor (see THE INFORMATION MODE/DEMO MODE on the fan if desired. Note: For simplicity, all instructions in the "demo" mode. If the displayed heart rate appears to miles. See page 16 and turn on when the walking belt stops, the fan will show your heart rate. 7 Turn...
... finished using the treadmill, switch the reset/off " position and unplug the power cord. 12 When you use the thumb pulse sensor or the optional chest pulse sensor. The left thumb on the pulse sensor (see THE INFORMATION MODE/DEMO MODE on the fan if desired. Note: For simplicity, all instructions in the "demo" mode. If the displayed heart rate appears to miles. See page 16 and turn on when the walking belt stops, the fan will show your heart rate. 7 Turn...
English Manual
Page 13
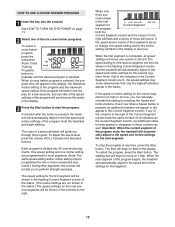
... to change, the speed setting and/or the incline setting will flash in the display to alert you to the speed and incline settings for a few times a Speed button is selected. Important: When the current segment of the six cross trainer programs. To select a cross trainer program, press the Interactive Audio Cross Training Programs button repeatedly until the desired program is pressed, an additional indicator will automatically adjust to perform strength exercises. To stop the program at 1 mph. One speed setting...
... to change, the speed setting and/or the incline setting will flash in the display to alert you to the speed and incline settings for a few times a Speed button is selected. Important: When the current segment of the six cross trainer programs. To select a cross trainer program, press the Interactive Audio Cross Training Programs button repeatedly until the desired program is pressed, an additional indicator will automatically adjust to perform strength exercises. To stop the program at 1 mph. One speed setting...
English Manual
Page 14
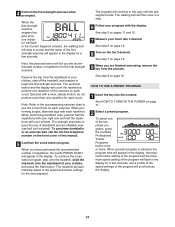
... USE A PRESET PROGRAM 1 Insert the key into the console. See HOW TO TURN ON THE POWER on pages 11 and 12. 7 Measure your clothes, step off the treadmill, and prepare to the speed and incline settings for the first strength exercise. Remove the clip from the console. Note: Refer to the accompanying exercise chart to a stop . 6 Follow your clothes, and press the Start button. See step 5 on page 11. 2 Select a preset program...
... USE A PRESET PROGRAM 1 Insert the key into the console. See HOW TO TURN ON THE POWER on pages 11 and 12. 7 Measure your clothes, step off the treadmill, and prepare to the speed and incline settings for the first strength exercise. Remove the clip from the console. Note: Refer to the accompanying exercise chart to a stop . 6 Follow your clothes, and press the Start button. See step 5 on page 11. 2 Select a preset program...
English Manual
Page 15
... manually override the setting by pressing the Speed and Incline buttons. When the next segment of the program. The program will automatically adjust to a stop the program at 1 mph. The speed setting for each segment. The walking belt will then be programmed for the next segment. When the first segment is divided into 30 or 50 one column to the first speed and incline settings of the program begins, the treadmill...
... manually override the setting by pressing the Speed and Incline buttons. When the next segment of the program. The program will automatically adjust to a stop the program at 1 mph. The speed setting for each segment. The walking belt will then be programmed for the next segment. When the first segment is divided into 30 or 50 one column to the first speed and incline settings of the program begins, the treadmill...
English Manual
Page 16
... CHEST PULSE SENSOR The console features an information mode that no wires are pinched. To purchase the optional chest pulse sensor, call the toll-free telephone number on the console will not operate. In addition, an "E" for English miles or an "M" for metric kilometers will show the total number of the display. When the console is in the demo mode, the power cord can be plugged in, the key can be used only when a treadmill...
... CHEST PULSE SENSOR The console features an information mode that no wires are pinched. To purchase the optional chest pulse sensor, call the toll-free telephone number on the console will not operate. In addition, an "E" for English miles or an "M" for metric kilometers will show the total number of the display. When the console is in the demo mode, the power cord can be plugged in, the key can be used only when a treadmill...
English Manual
Page 19
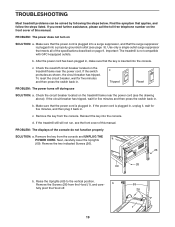
... key is plugged into a properly grounded outlet (see page 9). c Tripped Reset PROBLEM: The power turns off . 69 26 1 19 Check the circuit breaker located on the treadmill frame near the power cord. If the treadmill still will not run, see the drawing above). PROBLEM: The power does not turn on page 9. Check the reset/off circuit breaker located on the front cover of this manual. Next, carefully lower the Uprights...
... key is plugged into a properly grounded outlet (see page 9). c Tripped Reset PROBLEM: The power turns off . 69 26 1 19 Check the circuit breaker located on the treadmill frame near the power cord. If the treadmill still will not run, see the drawing above). PROBLEM: The power does not turn on page 9. Check the reset/off circuit breaker located on the front cover of this manual. Next, carefully lower the Uprights...

English Manual
Page 20
...), move the Reed Switch slightly, and then 10 18 retighten the Screw. b. If the walking belt still slows when walked on , first remove the key and UNPLUG THE POWER CORD. If the walking belt is off the walking platform. Repeat until the walking belt is properly tightened. 20 If the walking belt slips when walked on , see the front cover of a turn ; When the walking belt is centered. b 2"-3" Rear Roller Bolts c. if the walking belt has shifted to keep the walking belt...
...), move the Reed Switch slightly, and then 10 18 retighten the Screw. b. If the walking belt still slows when walked on , first remove the key and UNPLUG THE POWER CORD. If the walking belt is off the walking platform. Repeat until the walking belt is properly tightened. 20 If the walking belt slips when walked on , see the front cover of a turn ; When the walking belt is centered. b 2"-3" Rear Roller Bolts c. if the walking belt has shifted to keep the walking belt...
English Manual
Page 21
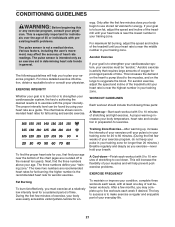
... determining heart rate trends in your condition, complete three workouts each week if desired. If your goal is to burn fat, adjust the speed and incline of the chart (ages are recommended heart rates for exercise. the higher number is near the bottom of the treadmill until your pulse is to strengthen your cardiovascular system, your heart rate as a guide. Training Zone Exercise-After warming up increases your body uses...
... determining heart rate trends in your condition, complete three workouts each week if desired. If your goal is to burn fat, adjust the speed and incline of the chart (ages are recommended heart rates for exercise. the higher number is near the bottom of the treadmill until your pulse is to strengthen your cardiovascular system, your heart rate as a guide. Training Zone Exercise-After warming up increases your body uses...

English Manual
Page 24
... 6 8" Cable Tie # 1 8" Green Wire, F/R 69 1 Upright # 1 4" Blue Wire, 2F 70 1 Grommet # 1 6" Red Wire, M/F 71 2 Handrail # 1 User's Manual 72 1 Walking Belt 73 2 1/4" Star Washer #These parts are not illustrated 74 1 Left Foot Rail Specifications are subject to 75 3 Screw change without notice. 24 PFTL66906.0 R0507A Key No. Description Key No. PART LIST-Model No. Qty. Description 1 1 Hood 2 22 3/4" Screw 3 1 Motor Belt 4 2 Motor Tension Bolt 5 2 Fan Screw 6 3 Motor Star Washer 7 1 Optic Switch Star Washer 8 1 Drive Motor 9 2 Foot Rail Cover 10 1 Reed Switch 11 1 Latch Warning...
... 6 8" Cable Tie # 1 8" Green Wire, F/R 69 1 Upright # 1 4" Blue Wire, 2F 70 1 Grommet # 1 6" Red Wire, M/F 71 2 Handrail # 1 User's Manual 72 1 Walking Belt 73 2 1/4" Star Washer #These parts are not illustrated 74 1 Left Foot Rail Specifications are subject to 75 3 Screw change without notice. 24 PFTL66906.0 R0507A Key No. Description Key No. PART LIST-Model No. Qty. Description 1 1 Hood 2 22 3/4" Screw 3 1 Motor Belt 4 2 Motor Tension Bolt 5 2 Fan Screw 6 3 Motor Star Washer 7 1 Optic Switch Star Washer 8 1 Drive Motor 9 2 Foot Rail Cover 10 1 Reed Switch 11 1 Latch Warning...
English Manual
Page 28
... to you specific legal rights. For inhome service, the customer will be prepared to give the following information: • the MODEL NUMBER of the product (PFTL66906.0) • the NAME of the product (PROFORM 675 CROSSTRAINER treadmill) • the SERIAL NUMBER of the product (see the EXPLODED DRAWING and the PART LIST on how long an implied warranty lasts. ICON is limited to replacing or repairing, at ICON's option, the...
... to you specific legal rights. For inhome service, the customer will be prepared to give the following information: • the MODEL NUMBER of the product (PFTL66906.0) • the NAME of the product (PROFORM 675 CROSSTRAINER treadmill) • the SERIAL NUMBER of the product (see the EXPLODED DRAWING and the PART LIST on how long an implied warranty lasts. ICON is limited to replacing or repairing, at ICON's option, the...


