
Uk Manual
Page 1
... number in this manual before using this manual for future reference. Save this equipment. Model No. If you have questions, or if there are missing parts, please contact us: UK Call: 08457 089 009 From Ireland: 053 92 36102 Website: www.iconsupport.eu E-mail: [email protected] Write: ICON Health & Fitness...
... number in this manual before using this manual for future reference. Save this equipment. Model No. If you have questions, or if there are missing parts, please contact us: UK Call: 08457 089 009 From Ireland: 053 92 36102 Website: www.iconsupport.eu E-mail: [email protected] Write: ICON Health & Fitness...
Uk Manual
Page 2
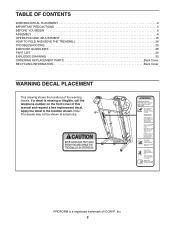
... BEFORE YOU BEGIN 5 ASSEMBLY 6 OPERATION AND ADJUSTMENT 15 HOW TO FOLD AND MOVE THE TREADMILL 24 TROUBLESHOOTING 25 EXERCISE GUIDELINES 28 PART LIST 30 EXPLODED DRAWING 32 ORDERING REPLACEMENT PARTS Back Cover RECYCLING INFORMATION Back Cover WARNING DECAL PLACEMENT This drawing shows the locations of ICON... IP, Inc. 2 Apply the decal in the location shown. PROFORM is missing or illegible...
... BEFORE YOU BEGIN 5 ASSEMBLY 6 OPERATION AND ADJUSTMENT 15 HOW TO FOLD AND MOVE THE TREADMILL 24 TROUBLESHOOTING 25 EXERCISE GUIDELINES 28 PART LIST 30 EXPLODED DRAWING 32 ORDERING REPLACEMENT PARTS Back Cover RECYCLING INFORMATION Back Cover WARNING DECAL PLACEMENT This drawing shows the locations of ICON... IP, Inc. 2 Apply the decal in the location shown. PROFORM is missing or illegible...

Uk Manual
Page 4
... cord immediately after use this manual should be able to safely lift 45 lbs. (20 kg) to raise, lower, or move the treadmill. 20. nance and adjustment procedures described in serious injury or death. less instructed to do so by an authorized service representative only. 24...SAVE THESE INSTRUCTIONS 4 Never remove the motor hood un- vice representative. Do not use , before cleaning the treadmill, and before performing the mainte- Inspect and properly tighten all parts of the power switch.) 19. If you feel faint or if you experience pain while exercising, stop immediately and...
... cord immediately after use this manual should be able to safely lift 45 lbs. (20 kg) to raise, lower, or move the treadmill. 20. nance and adjustment procedures described in serious injury or death. less instructed to do so by an authorized service representative only. 24...SAVE THESE INSTRUCTIONS 4 Never remove the motor hood un- vice representative. Do not use , before cleaning the treadmill, and before performing the mainte- Inspect and properly tighten all parts of the power switch.) 19. If you feel faint or if you experience pain while exercising, stop immediately and...
Uk Manual
Page 5
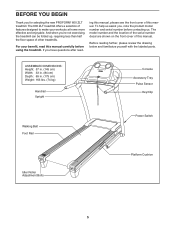
... half the floor space of other treadmills. And when you for selecting the new PROFORM® 600 ZLT treadmill. For your workouts at home more effective and enjoyable. Before reading further, please review the drawing below and familiarize yourself with the labeled parts. To help us assist you have... Adjustment Bolts Platform Cushion 5 If you , note the product model number and serial number before using the treadmill. ing this manual, please see the front cover of features designed to make your benefit, read - The 600 ZLT treadmill offers a selection of this manual.
... half the floor space of other treadmills. And when you for selecting the new PROFORM® 600 ZLT treadmill. For your workouts at home more effective and enjoyable. Before reading further, please review the drawing below and familiarize yourself with the labeled parts. To help us assist you have... Adjustment Bolts Platform Cushion 5 If you , note the product model number and serial number before using the treadmill. ing this manual, please see the front cover of features designed to make your benefit, read - The 600 ZLT treadmill offers a selection of this manual.
Uk Manual
Page 6
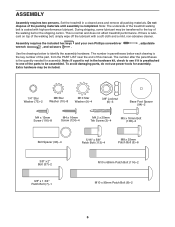
... for assembly. The number in parentheses below to see if it is normal and does not affect treadmill performance. The number after the parentheses is the key number of the part, from the PART LIST near the end of this manual. During shipping, some lubricant may be included. 1/4" Star...M10 x 95mm Patch Bolt (8)-2 6 ASSEMBLY Assembly requires two persons. Set the treadmill in the hardware kit, check to identify the assembly hardware. This is preattached to be transferred to the top of the parts to one of the walking belt or the shipping carton. Extra hardware may be...
... for assembly. The number in parentheses below to see if it is normal and does not affect treadmill performance. The number after the parentheses is the key number of the part, from the PART LIST near the end of this manual. During shipping, some lubricant may be included. 1/4" Star...M10 x 95mm Patch Bolt (8)-2 6 ASSEMBLY Assembly requires two persons. Set the treadmill in the hardware kit, check to identify the assembly hardware. This is preattached to be transferred to the top of the parts to one of the walking belt or the shipping carton. Extra hardware may be...
Uk Manual
Page 13
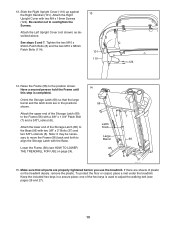
...and the latch knob are in a secure place; If there are properly tightened before you use the treadmill. 13. To protect the floor or carpet, place a mat under the treadmill. Attach the lower end of the hex keys is completed. Be careful not to align the Storage Latch... Right Handrail (101). Raise the Frame (56) to adjust the walking belt (see HOW TO LOWER THE TREADMILL FOR USE on the treadmill decals, remove the plastic. Orient the Storage Latch (60) so that all parts are sheets of the Storage Latch (60) to the Base (95) with a 3/8" x 1 3/4" Patch Bolt (7) and ...
...and the latch knob are in a secure place; If there are properly tightened before you use the treadmill. 13. To protect the floor or carpet, place a mat under the treadmill. Attach the lower end of the hex keys is completed. Be careful not to align the Storage Latch... Right Handrail (101). Raise the Frame (56) to adjust the walking belt (see HOW TO LOWER THE TREADMILL FOR USE on the treadmill decals, remove the plastic. Orient the Storage Latch (60) so that all parts are sheets of the Storage Latch (60) to the Base (95) with a 3/8" x 1 3/4" Patch Bolt (7) and ...

Uk Manual
Page 28
... is near the highest number in your everyday life. 28 Remember, proper nutrition and adequate rest are rounded off to make exercise a regular and enjoyable part of your training zone. Training Zone Exercise-Exercise for a sustained period of time. Remember, the key to success is the heart rate for persons over...
... is near the highest number in your everyday life. 28 Remember, proper nutrition and adequate rest are rounded off to make exercise a regular and enjoyable part of your training zone. Training Zone Exercise-Exercise for a sustained period of time. Remember, the key to success is the heart rate for persons over...
Uk Manual
Page 30
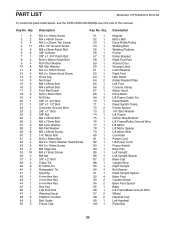
PETL69910.0 R1210A To locate the parts listed below, see the EXPLODED DRAWING near the end of this manual. Key No. Qty. 51 1 52 1 53 1 54 1 55 1 56 1 57 2 58 1 59 1 60 1 .../Clip 6 mm Hex Key 4 mm Hex Key 5 mm Hex Key Hex Key Left Foot Rail Warning Decal Platform Cushion Belt Guide Frame Cap Key No. PART LIST Model No.
PETL69910.0 R1210A To locate the parts listed below, see the EXPLODED DRAWING near the end of this manual. Key No. Qty. 51 1 52 1 53 1 54 1 55 1 56 1 57 2 58 1 59 1 60 1 .../Clip 6 mm Hex Key 4 mm Hex Key 5 mm Hex Key Hex Key Left Foot Rail Warning Decal Platform Cushion Belt Guide Frame Cap Key No. PART LIST Model No.
Uk Manual
Page 31
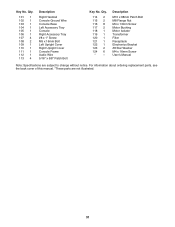
... Frame Audio Wire 5/16" x 5/8" Patch Bolt Key No. Qty. 114 2 115 2 116 8 117 2 118 1 119 1 120 1 121 1 122 1 123 2 124 6 * - For information about ordering replacement parts, see the back cover of this manual. *These parts are subject to change without notice. Key No.
... Frame Audio Wire 5/16" x 5/8" Patch Bolt Key No. Qty. 114 2 115 2 116 8 117 2 118 1 119 1 120 1 121 1 122 1 123 2 124 6 * - For information about ordering replacement parts, see the back cover of this manual. *These parts are subject to change without notice. Key No.
Uk Manual
Page 36
... • the name of the product (see the front cover of this manual) • the key number and description of the replacement part(s) (see the front cover of waste in your local city office or the establishment where you purchased this product must not be recycled after ...are authorized to conserve natural resources and improve European standards of in municipal waste. Part No. 306836 R1210A Printed in China © 2010 ICON IP, Inc. ORDERING REPLACEMENT PARTS To order replacement parts, see the PART LIST and the EXPLODED DRAWING near the end of this manual. To preserve the ...
... • the name of the product (see the front cover of this manual) • the key number and description of the replacement part(s) (see the front cover of waste in your local city office or the establishment where you purchased this product must not be recycled after ...are authorized to conserve natural resources and improve European standards of in municipal waste. Part No. 306836 R1210A Printed in China © 2010 ICON IP, Inc. ORDERING REPLACEMENT PARTS To order replacement parts, see the PART LIST and the EXPLODED DRAWING near the end of this manual. To preserve the ...


